

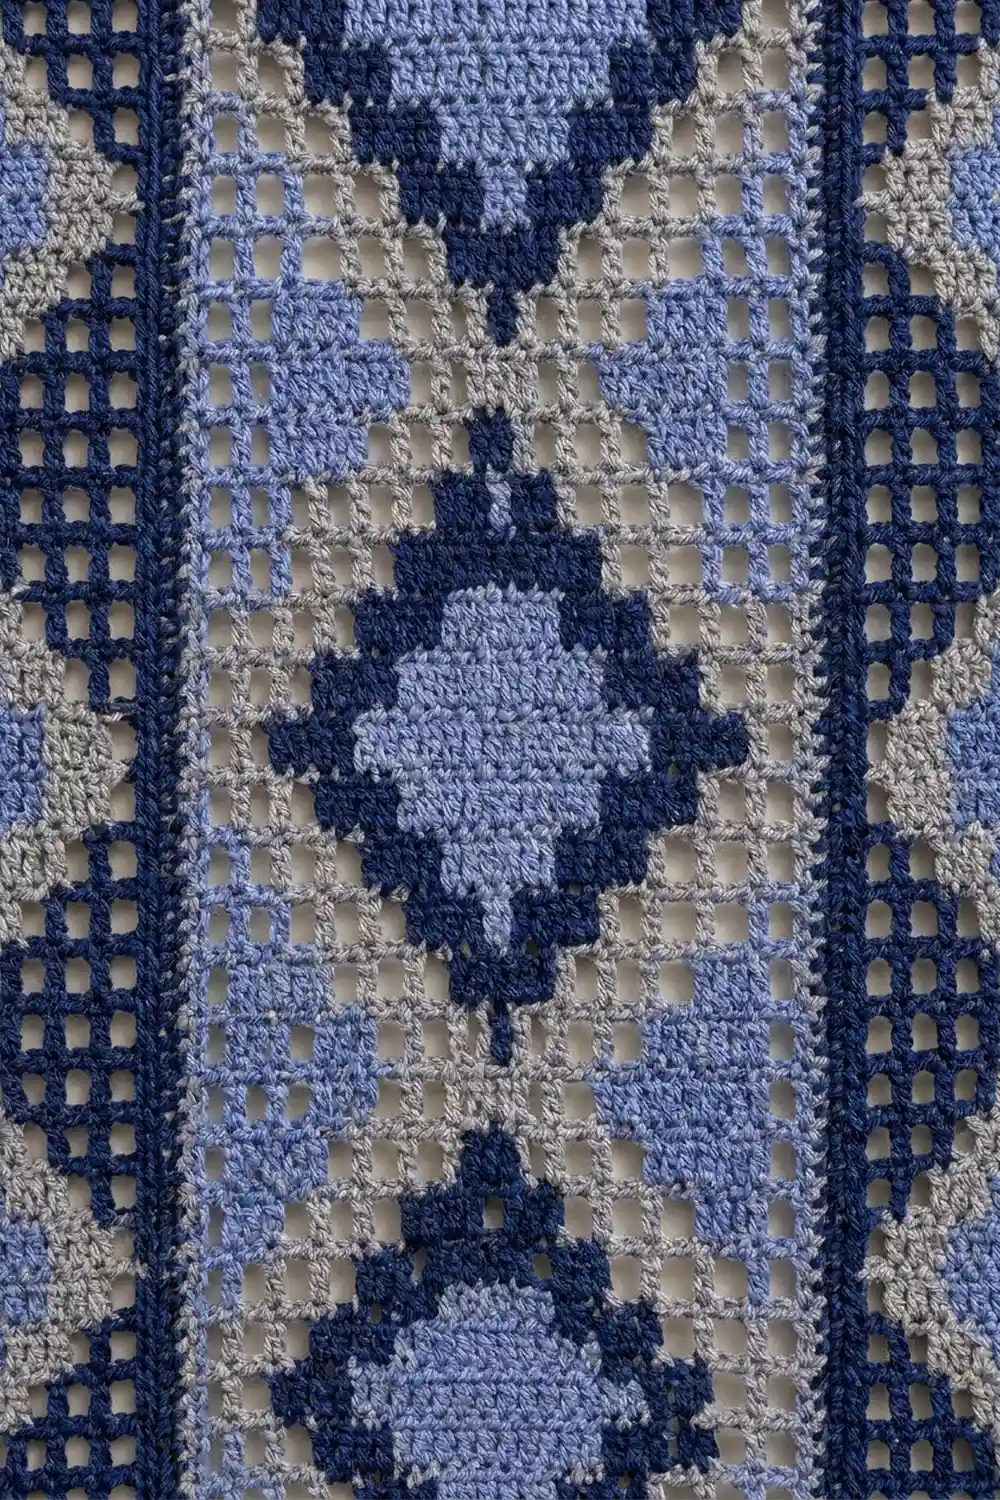
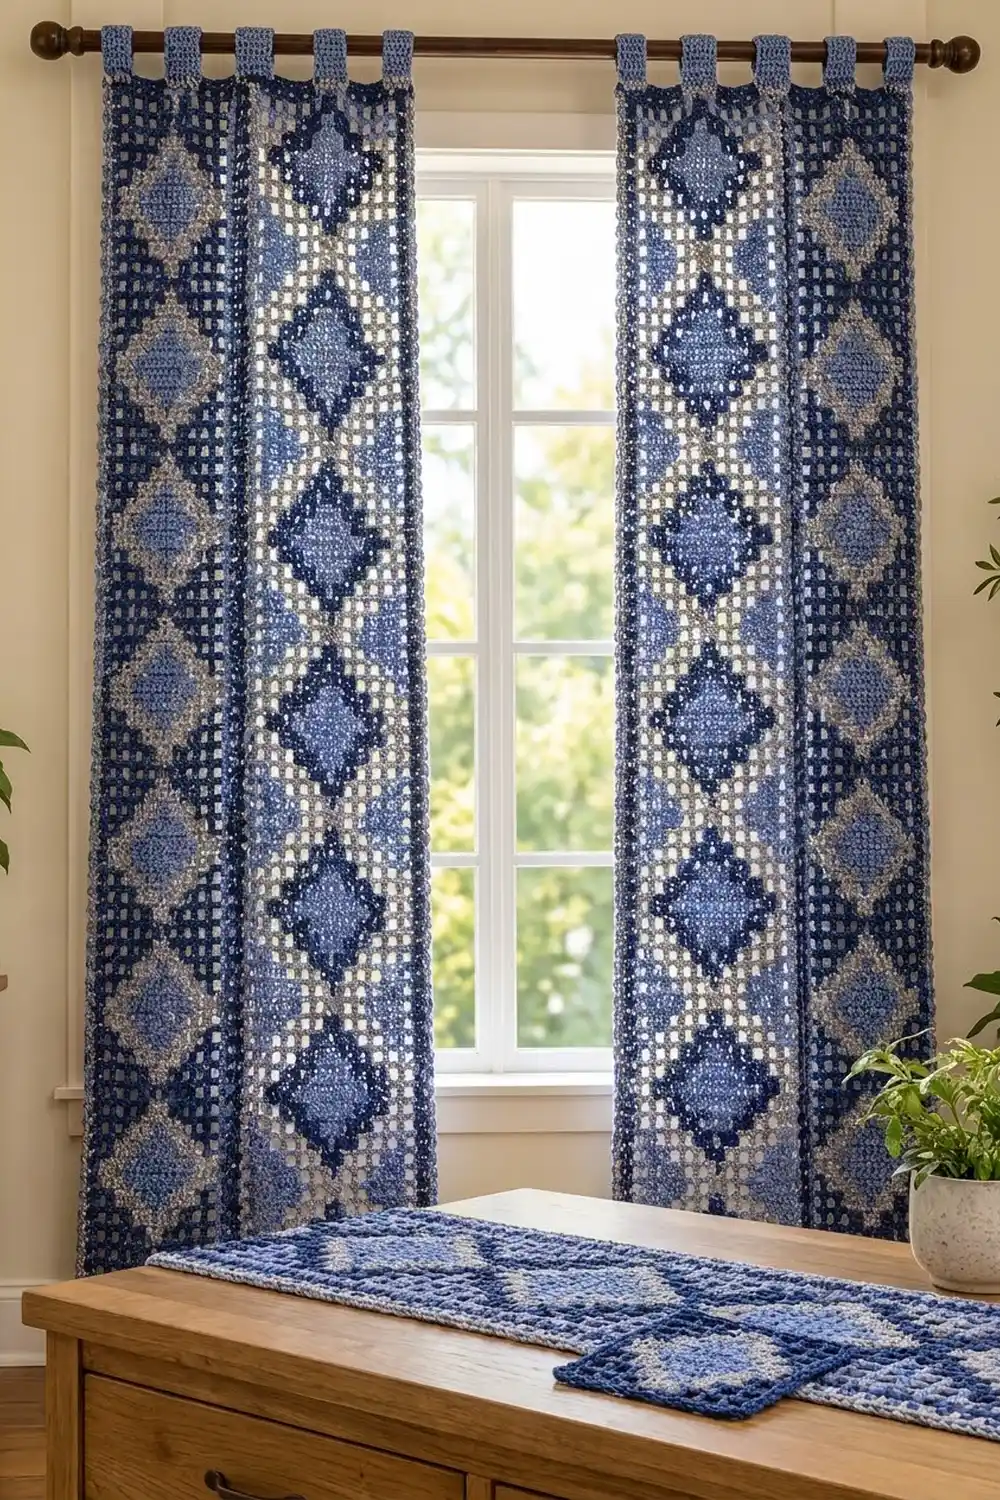
The Indigo Diamond Curtain Panel is a light-filtering filet curtain with a strong geometric look. A column of large navy-outlined diamonds runs down the center. Smaller gray-and-blue diamonds sit in the side strips, and solid navy bars separate the three columns. Light shows through the open grid squares, and the solid diamonds catch the eye.
The palette uses three shades of blue-gray: deep navy, medium gray and light periwinkle blue. The style is calm and works well in a living room, bedroom or sunny kitchen. This pattern uses US crochet terms.
Each finished panel measures 20 in (50.8 cm) wide by 75.5 in (191.8 cm) long, not counting the tabs. With the tabs looped over a rod, the panel hangs about 78.5 in (199.4 cm) from the top of the rod.
The panel is worked flat as one piece, in rows of filet squares, using intarsia color changes. Three rounds of single crochet border frame it, and five tabs are worked directly off the top edge. The photo shows a matching pair, so make two identical panels.
Finished Size and Construction
- Finished size (one panel): 20 x 75.5 in (50.8 x 191.8 cm), without tabs
- Skill level: Intermediate (filet crochet plus intarsia)
- Terminology: US crochet terms
- Yarn weight: Worsted (#4)
- Hook: 5.0 mm (H-8)
- Number of pieces: 1 per panel, with tabs attached; make 2 panels for a pair
- Layout: 37 filet squares wide x 148 rows long
- Size before border: 18.5 x 74 in (47.0 x 188.0 cm)
- Border depth: 0.75 in (1.9 cm) on each side
- Tabs: 5 per panel, each 1.75 in (4.4 cm) wide
Materials
Choose a smooth worsted-weight cotton or cotton blend. Cotton keeps the filet grid crisp and hangs well without stretching much. Acrylic also works, but it may lengthen slightly over time when hanging.
Per panel:
– Navy: 250 g (about 500 m)
– Light blue: 130 g (about 260 m)
– Gray: 120 g (about 240 m)
For a pair: double each amount (navy 500 g / 1,000 m; light blue 260 g / 520 m; gray 240 g / 480 m).
The meter figures assume about 200 m per 100 g. Quantities already include a margin of about 10% for swatching and color changes.
Tools:
– 5.0 mm (H-8) crochet hook
– 12–14 yarn bobbins (or small butterflies of yarn)
– Tapestry needle
– Stitch markers
– Measuring tape
– Blocking mats, rustproof pins and a spray bottle
Abbreviations (US Terms)
- ch – chain
- sc – single crochet
- dc – double crochet
- sk – skip
- sp – space
- st(s) – stitch(es)
- RS / WS – right side / wrong side
- M – mesh square
- B – block square
Special stitches:
– Mesh square (M): ch 1, sk next st, dc in next st. Uses 2 sts.
– Block square (B): dc in each of next 2 sts (or dc in the ch-1 sp, then dc in the next dc). Uses 2 sts.
– Row structure: Every row starts with ch 3, which counts as the first dc. That is followed by 37 squares of 2 sts each, so every row has 1 + (37 x 2) = 75 sts.
– Intarsia color change: Work the last yarn over of the dc before a new color section with the new color. Drop the old color on the WS and pick it up again on the next row. Mesh squares use their section’s background color for both the ch-1 and the dc.
Gauge and Checkpoints
Gauge: 8 squares (17 sts) and 8 rows = 4 in (10.2 cm) in filet mesh. One square is 0.5 in (1.3 cm) wide and 0.5 in (1.3 cm) tall.
Before starting the panel, test your gauge on a small swatch. Ch 21, dc in the 4th ch from the hook and in each ch across (19 sts, 9 squares). Then work 9 rows of mesh squares. Measure the center 8 squares and 8 rows.
Checkpoints:
– After Row 20 (base rows plus one repeat): 18.5 in (47.0 cm) wide, 10 in (25.4 cm) long
– After Row 74 (four repeats): 37 in (94.0 cm) long
– After Row 146 (all repeats): 73 in (185.4 cm) long
– After Row 148: 74 in (188.0 cm) long
– After the border: 20 x 75.5 in (50.8 x 191.8 cm)
If your fabric is too big: go down to a 4.5 mm hook. If it is too small: go up to a 5.5 mm hook. Row height matters as much as width. If your dc stitches are short, pull up a slightly taller loop rather than adding rows, because the diamond chart depends on the row count.
Panel Layout
Read each row across these five sections (37 squares in total):
| Section | Squares | Width |
|---|---|---|
| Side strip | 9 | 4.5 in (11.4 cm) |
| Navy bar | 1 B | 0.5 in (1.3 cm) |
| Center column | 17 | 8.5 in (21.6 cm) |
| Navy bar | 1 B | 0.5 in (1.3 cm) |
| Side strip | 9 | 4.5 in (11.4 cm) |
The design is symmetrical from left to right, so every row reads the same on RS and WS rows.
Background colors: Side strips are navy mesh, and the center column is gray mesh.
Panel Instructions
Foundation: With navy, ch 77.
Row 1 (RS): Dc in the 4th ch from the hook (the skipped ch count as the first dc) and in each ch across. Turn. (75 sts = 37 B)
Row 2: Ch 3 (counts as dc), dc in each st across. Turn. (75 sts = 37 B, all navy)
Rows 3–146: Work the 18-row repeat below 8 times in total. Repeat row 1 = panel Row 3, repeat row 18 = panel Row 20, and so on. Begin every row with ch 3 in navy, which forms the navy edge of the first side strip. Then work the side strip, the navy bar B, the center column, the navy bar B and the second side strip, ending with a dc in the top of the turning ch.
Side Strip Chart (each strip, 9 squares)
Work this 9-row chart twice per 18-row repeat (repeat rows 1–9 and 10–18). M = navy mesh, g = gray B, lb = light blue B.
- S1: 4 M, 1 g, 4 M
- S2: 3 M, 1 g, 1 lb, 1 g, 3 M
- S3: 2 M, 1 g, 3 lb, 1 g, 2 M
- S4: 1 M, 1 g, 5 lb, 1 g, 1 M
- S5: as S3
- S6: as S2
- S7: as S1
- S8–S9: 9 M
Each line totals 9 squares, and the gray outline is one square wide on each side of the diamond.
Center Column Chart (17 squares)
M = gray mesh, N = navy B, lb = light blue B.
- Row 1: 8 M, 1 N, 8 M
- Row 2: 7 M, 3 N, 7 M
- Row 3: 6 M, 2 N, 1 lb, 2 N, 6 M
- Row 4: 5 M, 2 N, 3 lb, 2 N, 5 M
- Row 5: 4 M, 2 N, 5 lb, 2 N, 4 M
- Row 6: 3 M, 2 N, 7 lb, 2 N, 3 M
- Row 7: 2 M, 2 N, 9 lb, 2 N, 2 M
- Row 8: 1 M, 2 N, 11 lb, 2 N, 1 M (widest row: 15 diamond squares)
- Rows 9–15: work Rows 7 back to 1 in reverse order
- Rows 16–18: 17 M
Each row totals 17 squares. The navy outline is two squares thick on each side, and the light blue center grows by 2 squares per row up to Row 8.
Row stitch count: every row in Rows 3–146 has 75 sts (1 turning ch + 9 x 2 + 2 + 17 x 2 + 2 + 9 x 2 = 75).
Rows 147–148: With navy only, ch 3, dc in each st and ch-1 sp across. Turn. (75 sts each row) Do not fasten off; go straight into the border.
The panel now measures 18.5 x 74 in (47.0 x 188.0 cm). Weave in all intarsia tails along same-color blocks before you start the border.
Border
Border gauge: 4 sc = 1 in (2.5 cm), and 4 sc rounds = 1 in (2.5 cm).
In this border, the side counts include the sc worked in the corner groups. The corner ch-2 spaces are not counted.
Round 1 (navy, RS): Ch 1. Along the top edge, sc in each of the 75 sts (75 sc). Ch 2 for the corner. Along the long side, work 2 sc in each of the 148 row-ends (296 sc). Ch 2. Along the bottom, sc in each of the 75 foundation ch (75 sc). Ch 2. Work 2 sc in each row-end of the second long side (296 sc), ch 2, and join with a sl st to the first sc. Fasten off.
Count: 75 + 296 + 75 + 296 = 742 sc, plus 4 corner ch-2 sps.
Round 2 (light blue): Join in any corner sp. Work (sc, ch 2, sc) in each corner sp and sc in each sc around. Join and fasten off.
Count: 77 + 298 + 77 + 298 = 750 sc.
Round 3 (gray): Work as Round 2.
Count: 79 + 300 + 79 + 300 = 758 sc.
Why the math works: The filet fabric measures 4 sts per inch across and 2 dc rows per inch down. One sc per stitch across the top and bottom, and 2 sc per dc row-end down the sides, both give exactly 4 sc per inch. That matches the border gauge, so the edges lie flat without ruffling or cupping. Each round adds about 0.25 in (0.6 cm), so three rounds add 0.75 in (1.9 cm) per side. Width: 18.5 + 1.5 = 20 in (50.8 cm). Length: 74 + 1.5 = 75.5 in (191.8 cm).
Tabs
There are 79 sc along the top edge of Round 3. They are divided as: tab 7, gap 11, tab 7, gap 11, tab 7, gap 11, tab 7, gap 11, tab 7 (7 x 5 + 11 x 4 = 79). Place markers to show where each tab starts.
Row 1: With navy and the RS facing, join in the first sc of the top edge. Ch 1, sc in the same st and the next 6 sts. Turn. (7 sc)
Rows 2–24: Ch 1, sc in each sc across. Turn. (7 sc)
Fasten off, leaving a 12 in (30.5 cm) tail. Fold the tab to the WS and whipstitch the last row along Round 1 of the border, behind the tab’s base. Each tab is 6 in (15.2 cm) long and forms a loop about 3 in (7.6 cm) deep.
Skip 11 sts and repeat for the remaining four tabs. The last tab ends in the last sc before the corner.
Final Blocking
- Weave in all remaining ends along same-color stitches.
- Lay the panel flat on blocking mats. You may need to block it in two halves because of its length.
- Spray it evenly until it is damp but not dripping.
- Pin it to 20 in (50.8 cm) wide, checking the width every 12 in (30.5 cm) along the length.
- Pin it to 75.5 in (191.8 cm) long, keeping the long edges straight.
- Gently square up the filet grid with your fingers so the mesh openings are even.
- Leave it pinned until completely dry. Unpin, then block the second panel to the same measurements.
Final Quality-Control Checklist
- Every row has 75 sts (37 squares)
- The center diamonds line up vertically, with 3 gray mesh rows between them
- The side diamonds sit in pairs beside each large diamond
- The navy bars are unbroken from Row 1 to Row 148
- The border counts are 79 / 300 sc per side on Round 3
- All five tabs are evenly spaced and the same length
- Both panels match in width and length to within 0.25 in (0.6 cm)
Troubleshooting
Diamonds look jagged or off-center: Count the M squares on each side of the diamond. They must be equal in every row.
Holes at color changes: Twist the old and new yarns once on the WS before you continue.
The panel narrows over its length: Check the turning chains. The ch 3 must count as a stitch, and the last dc must go into the top of it.
The border ripples: Reduce to 3 sc for every 2 row-ends on the long sides, then add back the same number of sc so the side counts still come out to 296.
Tabs pull downward: Make sure each tab is sewn through Round 1, not only the outer gray round.
Panels differ in length: Measure row height on the second panel at the Row 20 checkpoint and adjust your hook size before continuing.
Care
Hand wash or machine wash on a cold, gentle cycle inside a mesh laundry bag. Lay flat to dry and reshape to 20 x 75.5 in (50.8 x 191.8 cm).
Final Notes
The measurement chain for each panel works like this:
– The 0.5 in (1.3 cm) square sets the 37-square width of 18.5 in (47.0 cm).
– 148 rows give 74 in (188.0 cm) of length.
– The three-round border adds 0.75 in (1.9 cm) per side, for a finished 20 x 75.5 in (50.8 x 191.8 cm).
– The tabs add a 3 in (7.6 cm) loop for the rod.
If you hit the checkpoints at Row 20 and Row 74, the diamonds, border and tabs will all line up. Make two identical panels for a matched pair.
Happy crocheting!