

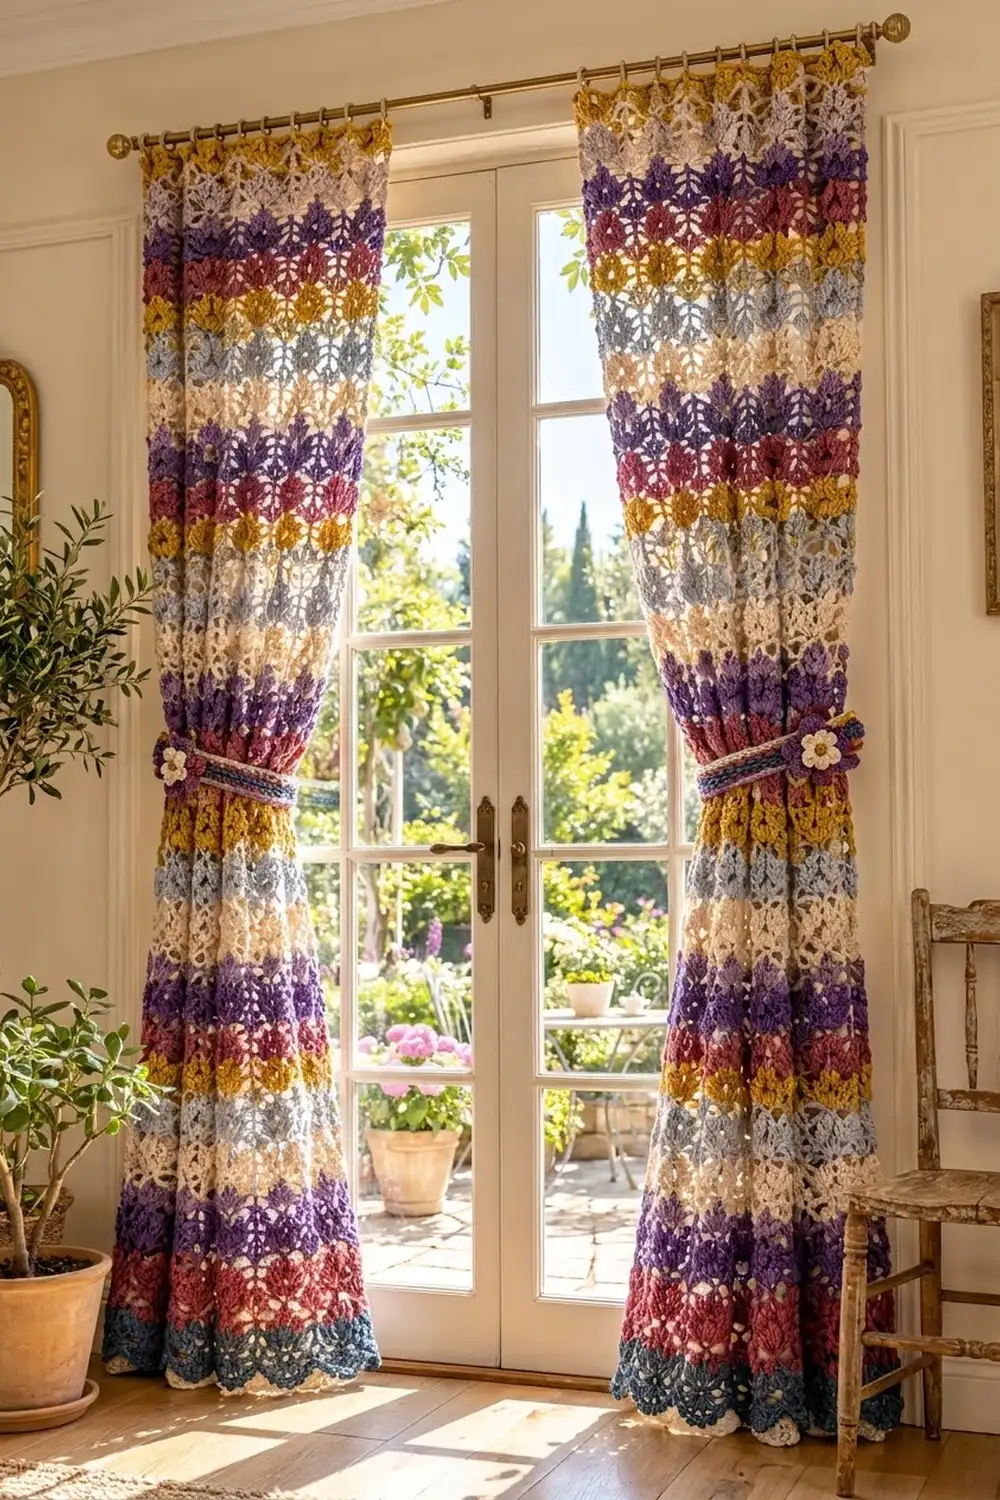
These curtains make a doorway look like a flower bed. Each panel is covered in rows of upright tulip clusters, and every stripe is a different garden color. Light comes through the open lattice, and each panel ends in a denim-blue scalloped hem with small picot points.
The palette has six colors: mustard, silver gray, cream, purple, raspberry, and denim blue. They repeat in a fixed sequence from hem to top, so the stripes line up across both panels when the curtains hang side by side. A matching striped tieback with a layered flower gathers each panel at the middle.
The pattern uses US crochet terms. Each finished panel measures 39.5 in (100.3 cm) wide by 83.5 in (212.1 cm) long after blocking, which suits a standard French door or a wide window.
Each panel is worked flat in one piece from the bottom up. You make a foundation row, then work 54 three-row tulip bands. A solid band at the top holds the curtain clips. Last, you add the scalloped hem to the underside of the foundation chain and a narrow edging along both long sides. The tiebacks and flowers are made separately and sewn together.
Finished Size and Construction
- Finished panel size: 39.5 in x 83.5 in (100.3 cm x 212.1 cm)
- Skill level: Intermediate
- Terminology: US crochet terms
- Yarn weight: DK (light worsted, #3)
- Hook: 4.0 mm (US G-6)
- Number of pieces: 2 curtain panels, 2 tiebacks, 2 back flowers, 2 front flowers
- Layout: two separate panels, one on each side of the door, not joined
- Panel body size (before hem and side edging): 39 in x 82 in (99.1 cm x 208.3 cm), including the top band
- Hem border depth: 1.5 in (3.8 cm)
- Side edging depth: 0.25 in (0.6 cm) per side
- Tieback size: 20 in x 2 in (50.8 cm x 5.1 cm), not counting the hanging loops
Materials
Use a smooth DK cotton or cotton blend, about 230 m per 100 g. Cotton keeps its shape when it hangs and doesn’t fade as fast in sunlight as many acrylics do. Avoid fuzzy yarns, which hide the tulip shapes.
Quantities below are for the full pair: 2 panels, 2 tiebacks, and 2 flowers.
- Color A – Mustard: 150 g / 345 m (tulip bands, top band, flower centers)
- Color B – Silver Gray: 140 g / 322 m (tulip bands)
- Color C – Cream: 150 g / 345 m (tulip bands, side edging, front flowers)
- Color D – Purple: 150 g / 345 m (tulip bands, tiebacks, back flowers)
- Color E – Raspberry: 150 g / 345 m (foundation, tulip bands, tiebacks)
- Color F – Denim Blue: 170 g / 391 m (tulip bands, hem border, tiebacks)
Tools:
– 4.0 mm (US G-6) crochet hook
– Tapestry needle
– Stitch markers
– Measuring tape
– Rust-proof pins, blocking mats or a large clean towel-covered floor area, and a spray bottle
– 28 curtain clip rings (14 per panel)
– 2 small wall hooks for the tiebacks
All quantities include a margin of about 15% for swatching, color changes, and weaving in ends.
Abbreviations (US Terms)
- ch – chain
- sl st – slip stitch
- sc – single crochet
- hdc – half double crochet
- dc – double crochet
- sk – skip
- sp – space
- st(s) – stitch(es)
- RS / WS – right side / wrong side
- rep – repeat
Special stitches:
– V-st (V-stitch): (dc, ch 3, dc) in the same st or sp.
– 3-dc cl (3-double-crochet cluster): Yarn over, insert hook in the sp, yarn over and pull up a loop, yarn over and pull through 2 loops; rep from * 2 more times in the same sp, then yarn over and pull through all 4 loops on the hook.
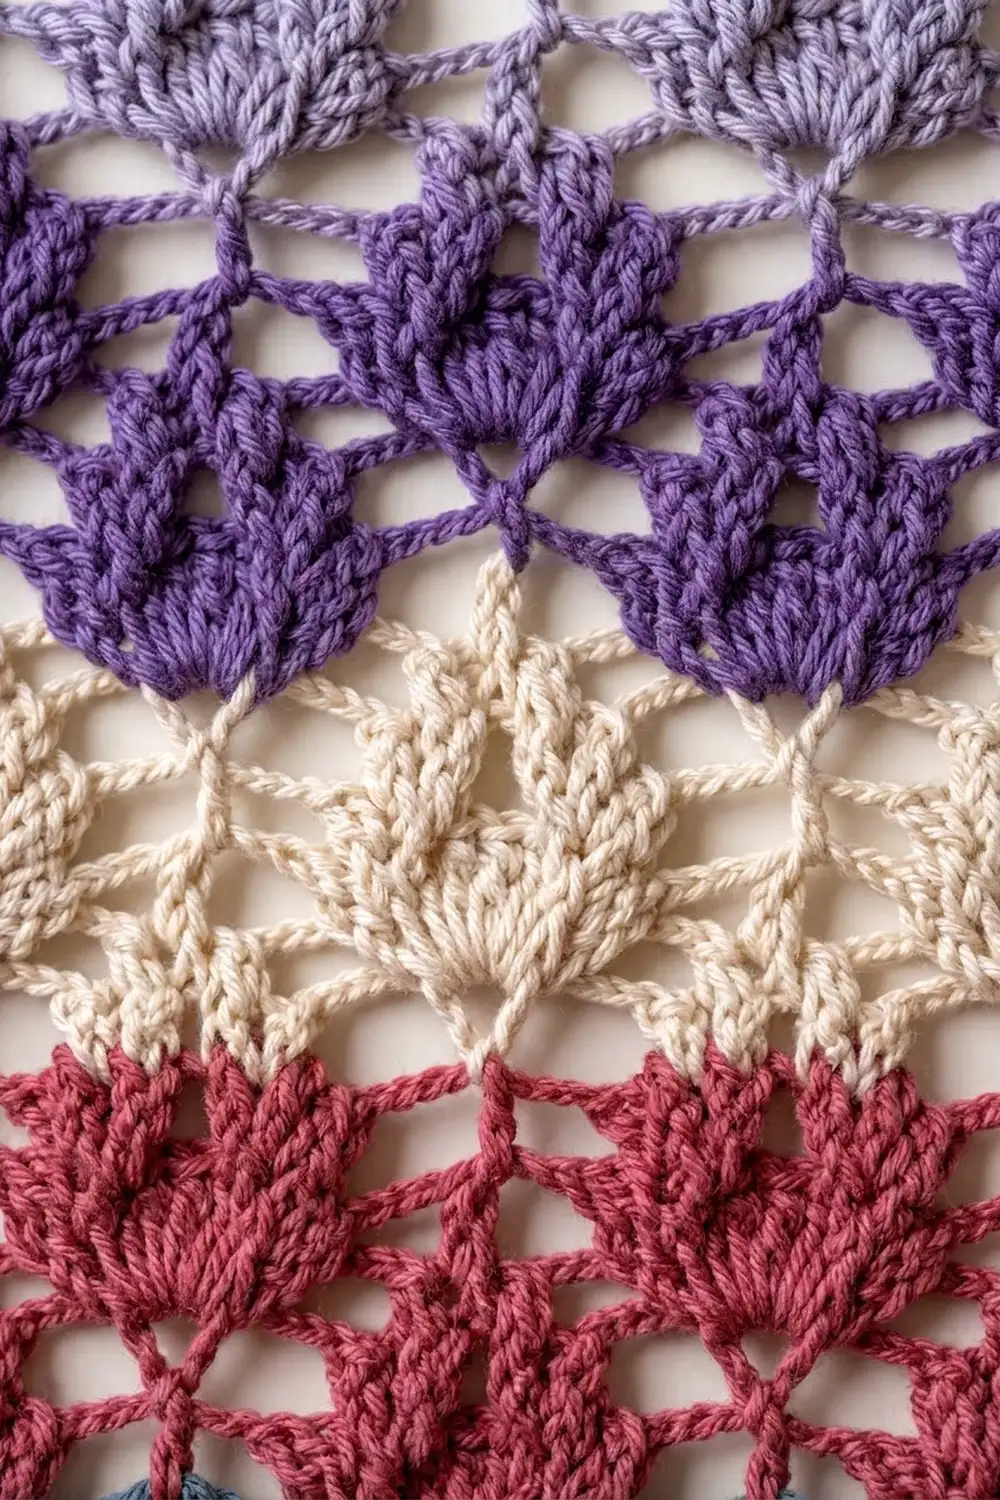
– Tulip: (3-dc cl, ch 2, 3-dc cl, ch 2, 3-dc cl) in the same ch-3 sp.
– Picot: ch 3, sl st in 3rd ch from hook.
– Picot Shell:* (3 dc, picot, 3 dc) in the same ch-3 sp.
Gauge and Checkpoints
Blocked gauge: 4 pattern repeats (24 sts) = 6 in (15.2 cm) wide, and 4 tulip bands (12 rows) = 6 in (15.2 cm) tall.
Tieback gauge: 18 sc and 20 rows = 4 in (10.2 cm).
Make a swatch before you start the panel. Ch 26 and work Row 1 (25 sc). Then work 4 bands following the panel instructions. Use 1 repeat instead of 26: each band row repeats 4 times across. Block the swatch, let it dry, and measure. It should be 6 in (15.2 cm) wide and about 6.25 in (15.9 cm) tall, counting Row 1.
Checkpoints for each panel:
– After Row 1: 39 in (99.1 cm) wide, unstretched.
– After 10 bands: about 15.25 in (38.7 cm) tall.
– After 27 bands (halfway): about 40.75 in (103.5 cm) tall.
– After 54 bands: about 81.25 in (206.4 cm) tall.
– After the top band: about 82 in (208.3 cm) tall.
Lace grows as it hangs, so measure flat with the piece lying relaxed, not pulled.
If your swatch is too big: go down one hook size, to 3.75 mm (US F-5). If it is too small: go up one size, to 4.5 mm (US 7). Fix width first. If the width is right but the bands are too tall or short, adjust the number of bands. Each band changes the length by 1.5 in (3.8 cm).
Panel (Make 2)
Stitch count logic: the pattern is a multiple of 6 sts + 1. Each panel has 26 repeats, so 6 x 26 + 1 = 157 sts.
Foundation
With Color E, ch 158.
Row 1 (RS): Sc in 2nd ch from hook and in each ch across. Turn. (157 sc)
Tulip Band (3 rows)
Work each band in a single color. Fasten off at the end of every third row and join the next color for the next band.
Band Row 1 (V-row): Ch 1, sc in first st, ch 2, sk 2 sts, V-st in next st, ch 2, sk 2 sts, sc in next st; rep from * across. Turn. (26 V-sts, 27 sc, 52 ch-2 sps)*
On the first band, the V-sts go in sc 4, 10, 16, and so on. In later bands, each V-st goes in the center ch-1 sp, the one directly above the center cluster of the tulip below.
Band Row 2 (Tulip row): Ch 3 (counts as dc), sk ch-2 sp, Tulip in ch-3 sp of next V-st, sk ch-2 sp, dc in next sc; rep from * across. Turn. (26 Tulips, 27 dc counting the turning ch)*
Each Tulip fans upward from one point, which makes the cup-shaped flower.
Band Row 3 (Lattice row): Ch 1, sc in first dc, ch 1, sc in next ch-2 sp, ch 1, sc in next ch-2 sp, ch 1, sc in next dc; rep from * across, working the last sc in the top of the turning ch. Turn. (79 sc + 78 ch-1 sps = 157 sts)*
This row converts the Tulips back to the 157-st base. Each repeat is 6 positions (ch, sc, ch, sc, ch, sc), so 6 x 26 + 1 = 157 again. The middle ch-1 of each repeat sits above the center cluster, which keeps the tulip columns stacked straight up the panel.
Fasten off.
Color Sequence
Work 54 bands in this 6-band cycle, 9 times in total:
- Color E – Raspberry
- Color D – Purple
- Color C – Cream
- Color B – Silver Gray
- Color A – Mustard
- Color F – Denim Blue
Band 1 uses the same Color E as Row 1, so don’t fasten off between them. Since every band has 3 rows, color changes switch sides each time. Leave 6 in (15.2 cm) tails and weave them into the side edge, because the side edging will cover them.
Top Band
Join Color A.
Rows T1–T3: Ch 1, sc in each sc and each ch-1 sp across. Turn. (157 sc each row)
Fasten off. The top band adds 0.75 in (1.9 cm). The panel body should now be 39 in x 82 in (99.1 cm x 208.3 cm).
Make All Pieces
For one pair, make:
– 2 panels: 54 bands each, so 9 bands of each color per panel
– 2 tiebacks: in Colors F, E, and D
– 2 back flowers: Color D
– 2 front flowers: Color C, with Color A centers
Layout on the rod, seen from inside the room:
[ Panel 1 ] [ glass door | glass door ] [ Panel 2 ]
 tieback at                                tieback at
 mid-height                                mid-height
Hang both panels with the hem border at the bottom so the stripes line up across the doorway. The panels aren’t joined, so there is no joining step.
Tieback (Make 2)
With Color F, ch 91.
Row 1: Sc in 2nd ch from hook and in each ch across. Turn. (90 sc)
Rows 2–10: Ch 1, sc in each st across. Turn. (90 sc)
Stripe sequence: Rows 1–2 Color F, Rows 3–4 Color E, Rows 5–6 Color D, Rows 7–8 Color E, Rows 9–10 Color F.
Hanging loops: Join Color F at the middle of one short end, between Rows 5 and 6. Ch 12 and sl st in the same place. Fasten off. Repeat on the other short end.
The tieback measures 20 in x 2 in (50.8 cm x 5.1 cm).
Back Flower (Color D)
Rnd 1: In a magic ring, ch 1, 10 sc. Join with sl st to first sc. (10 sc)
Rnd 2: Ch 1, sc in first st, ch 3, sk 1, sc in next st, ch 3, sk 1; rep from * 3 more times. Join. (5 sc, 5 ch-3 sps)*
Rnd 3: In next ch-3 sp work (sc, hdc, 3 dc, hdc, sc), sl st in next sc; rep from * 4 more times. (5 petals of 7 sts each)*
Fasten off. The back flower measures about 2.5 in (6.4 cm) across.
Front Flower (Color C)
Rnd 1: In a magic ring, ch 1, 10 sc. Join. (10 sc)
Rnd 2: Sl st in next st, (hdc, dc, hdc) in next st; rep from * 4 more times. Join. (5 petals)*
Fasten off. The front flower measures about 1.5 in (3.8 cm) across.
Assembly: Set the front flower on the back flower so each cream petal sits between two purple petals. With Color A, make a French knot in the center through both layers. Sew the flower to the tieback 2 in (5.1 cm) from one end, centered on the purple stripe.
Border
The border has two parts: a scalloped hem worked into the foundation chain, and a sc edging along each long side.
Border gauge: one hem scallop = 1.5 in (3.8 cm) wide, the same width as one tulip repeat.
Scalloped Hem (Color F)
Hold the panel RS facing with the foundation chain at the top. Join Color F in the first remaining loop of the foundation chain.
Row B1: Ch 1, sc in first ch, ch 2, sk 2 ch, V-st in next ch, ch 2, sk 2 ch, sc in next ch; rep from * across. Turn. (26 V-sts, 27 sc)*
Row B2: Ch 1, sc in first sc, sk ch-2 sp, Picot Shell in ch-3 sp of next V-st, sk ch-2 sp, sc in next sc; rep from * across. (26 Picot Shells, 27 sc)*
Fasten off. The hem adds 1.5 in (3.8 cm).
Why the math works: the foundation chain has 157 loops, the same 6 x 26 + 1 count as the body. Each hem V-st goes in loops 4, 10, 16, and so on. Those are the same positions as the first-band V-sts on the other side of the chain, so each scallop sits right under a tulip column. The hem is 26 scallops x 1.5 in = 39 in (99.1 cm), exactly the body width, so it hangs flat without ruffling or pulling in.
Side Edging (Color C)
Work each long side separately, with RS facing. Start at the top of Row 1 and work up to the top band.
Edging Row 1: Ch 1, sc evenly as follows:
– 1 sc in the end of Row 1
– 5 sc per band: 1 sc in the end of the V-row, 3 sc around the end dc or turning ch of the Tulip row, and 1 sc in the end of the Lattice row
– 1 sc in the end of each top-band row
Total: 1 + (54 x 5) + 3 = 274 sc per side. Turn.
Edging Row 2: Ch 1, sc in each st across. (274 sc)
Fasten off. Each side gains 0.25 in (0.6 cm), so the panel width becomes 39.5 in (100.3 cm).
Five sc per 1.5 in (3.8 cm) band works out to about 3.3 sc per inch. That matches the stretch of the open lace, so the edges stay straight and don’t wave or pucker. The sides are worked as separate rows, so there are no corner stitches to count.
Final Blocking
- Weave in all remaining ends along the side edging and inside the solid sc rows.
- Soak the panel in cool water with a little wool wash for 15 minutes. Press out the water. Don’t wring.
- Roll the panel in towels to remove more water.
- Lay it flat on a towel-covered floor or blocking mats. Shape it to 39.5 in x 83.5 in (100.3 cm x 212.1 cm).
- Pin both side edges straight, every 4 in (10.2 cm).
- Pin the point of each picot so all 26 scallops are even.
- Open each Tulip gently with your fingers so the three clusters fan out.
- Let it dry completely, which usually takes 24–48 hours.
- Block the tiebacks and flowers flat at the same time.
Final Quality-Control Checklist
- Each panel measures 39.5 in x 83.5 in (100.3 cm x 212.1 cm) after blocking.
- Both panels have 54 bands in the same color order.
- Every Tulip column runs straight up from hem to top.
- The hem has 26 Picot Shells, each centered under a tulip column.
- Each side edging has 274 sc, and both sides are the same length.
- The top band has 157 sc per row.
- The tiebacks measure 20 in x 2 in (50.8 cm x 5.1 cm), with secure loops.
- Each flower’s petals alternate between layers, and the center knot is tight.
- All ends are woven in and nothing shows on the RS.
Troubleshooting
Tulip columns lean or drift: check that each V-st sits in the center ch-1 sp of the Lattice row, not in a sc.
The stitch count is off in a Lattice row: count the ch-2 sps in the Tulip row below. There should be 52, two per Tulip.
The sides wave: you have more than 5 sc per band. Pull out the edging and redo it at the correct rate.
The sides pull in: you have fewer than 5 sc per band, or your tension is too tight. Use a hook one size larger for the edging.
The hem ruffles: a V-st was skipped or doubled. Count the scallops. There should be 26.
The panel grows too long when hung: cotton lace relaxes over time. Take out one or more bands from the next panel to match, or re-block the panel shorter.
Care
Hand wash in cool water, or machine wash on a delicate cycle inside a mesh laundry bag. Always dry flat, and re-pin the scallops while the panel is damp.
Final Notes
The measurements in this pattern build on each other. A 6-st repeat that measures 1.5 in (3.8 cm), times 26 repeats, gives a 39 in (99.1 cm) body. Each band adds 1.5 in (3.8 cm), so 54 bands give 81 in (205.7 cm). Row 1 adds 0.25 in (0.6 cm), the top band 0.75 in (1.9 cm), and the hem 1.5 in (3.8 cm), for 83.5 in (212.1 cm) in total. The side edging adds 0.25 in (0.6 cm) per side, for a finished width of 39.5 in (100.3 cm). If your gauge matches at the swatch stage, every later checkpoint should match too.
Happy crocheting!