

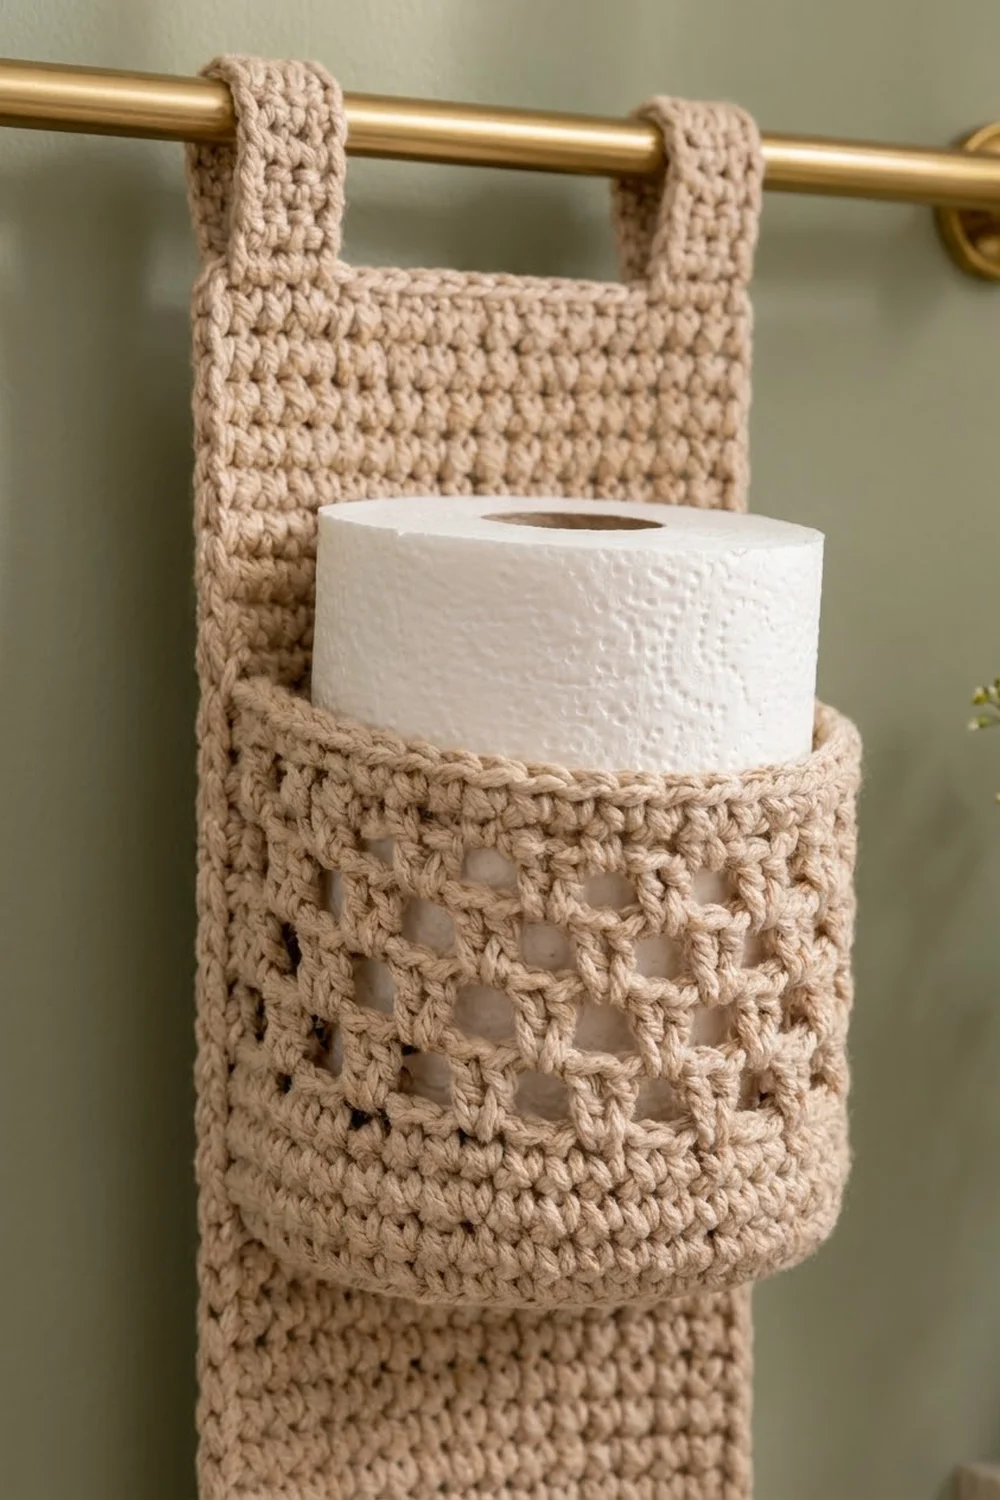
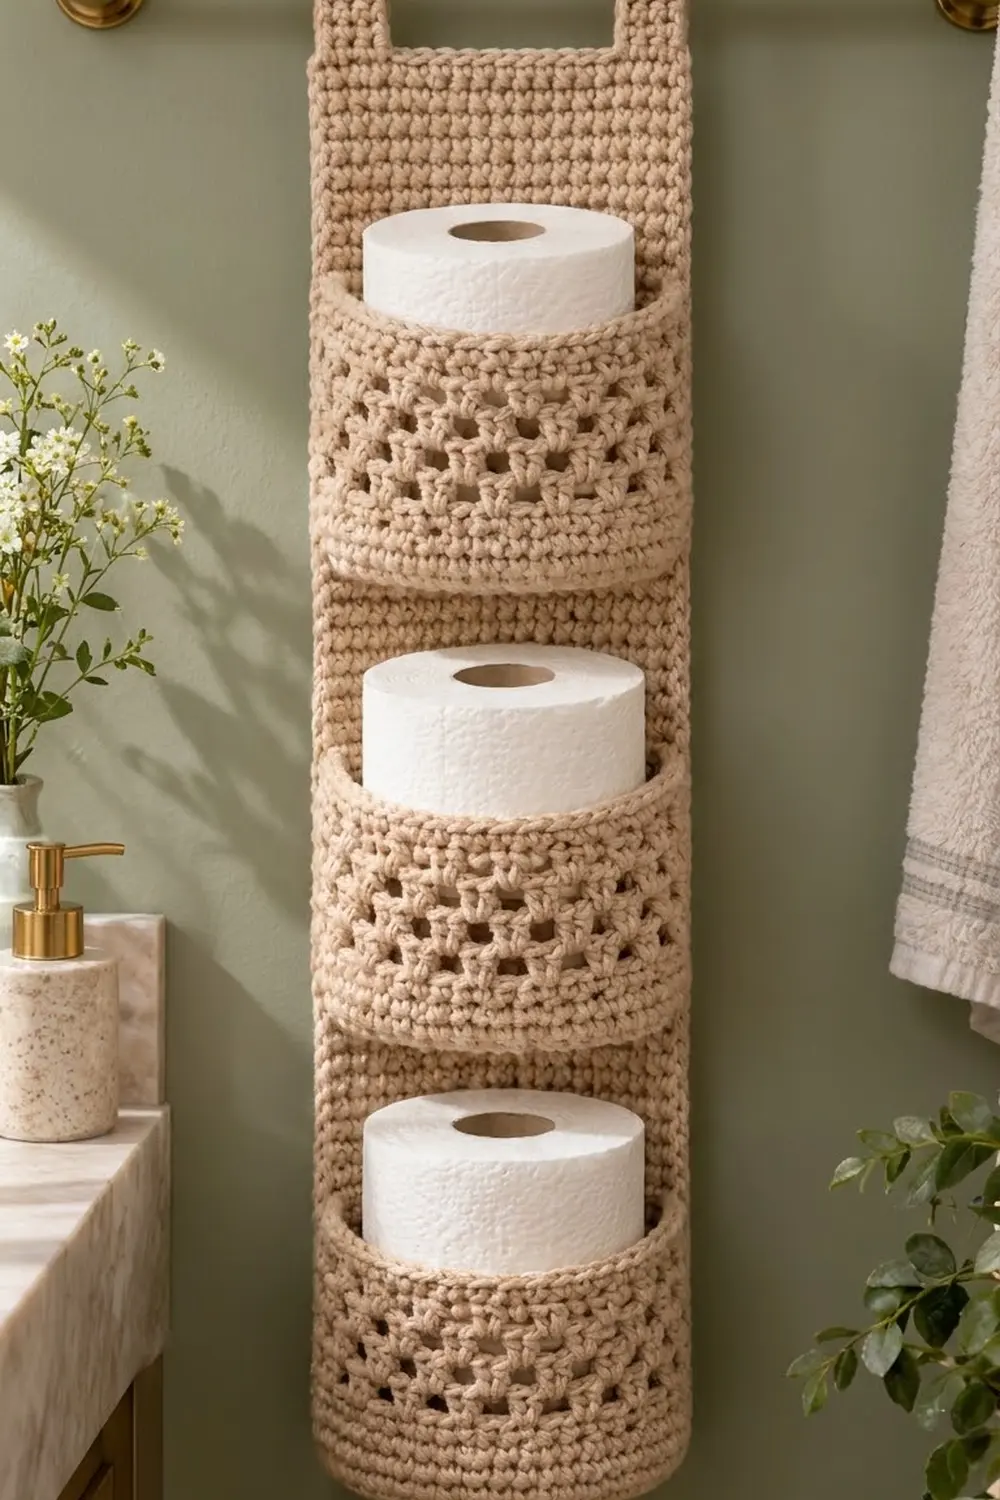
The Linen Lattice Toilet Paper Holder is a tall, slim organizer that hangs from a towel bar and holds three spare rolls. It has a sturdy single crochet back panel and three round cup pockets. Each cup has an open lattice band between two solid bands.
The sample uses one color only, a warm oatmeal beige. That keeps the look calm and natural, and it suits neutral, sage, or wood-toned bathrooms. The texture does the decorative work: tight single crochet for structure and airy V-stitches for lightness.
This pattern uses US crochet terms. The finished holder measures 5 in (12.7 cm) wide x 16.5 in (41.9 cm) tall, and the loops above it add about 2 in (5.1 cm). Each cup measures about 4.75 in (12.1 cm) across and 3.5 in (8.9 cm) tall.
Construction is simple. First you work the back panel in rows and add a two-round border. Next you make three cups in joined rounds, starting from a flat base. Then you make two strap tabs. Last, you sew the cups and tabs to the panel and block.
Finished Size and Construction
- Finished size: 5 in x 16.5 in (12.7 cm x 41.9 cm), plus 2 in (5.1 cm) loops
- Skill level: Easy–Intermediate
- Terminology: US
- Yarn weight: #4 worsted, cotton or cotton blend
- Hook: 5.0 mm (H-8)
- Number of pieces: 6 (1 back panel, 3 cups, 2 tabs)
- Layout: 3 cups stacked vertically on a single panel
- Panel size before border: 4.5 in x 16 in (11.4 cm x 40.6 cm)
- Border depth: 0.25 in (0.6 cm) per side
- Cup size: 4.75 in (12.1 cm) diameter x 3.5 in (8.9 cm) tall
- Tab size: 1.25 in x 6 in (3.2 cm x 15.2 cm)
Materials
Yarn: Use a smooth worsted-weight cotton or cotton blend. Cotton holds its shape in a humid bathroom and won’t stretch out under the weight of the rolls. Avoid acrylic that feels very soft, because the cups may sag.
- Oatmeal / natural beige: about 250 g (425 m / 465 yd)
The quantity includes a margin of about 15% for your gauge swatch and for differences between brands.
Tools:
– 5.0 mm (H-8) crochet hook
– Tapestry needle
– 8 locking stitch markers
– Scissors
– Measuring tape or ruler
– Rust-proof pins and a blocking mat
– Spray bottle
Abbreviations (US Terms)
- ch – chain
- sl st – slip stitch
- sc – single crochet
- dc – double crochet
- BLO – back loop only
- st(s) – stitch(es)
- sp – space
- sk – skip
- rev sc – reverse single crochet (crab stitch)
- inc – 2 sc in the same stitch
Special stitch:
– V-stitch (V): (dc, ch 1, dc) in the stitch or space given.
– Reverse sc: Work from left to right (right to left if you crochet left-handed). Insert the hook into the next stitch to the right, yarn over, pull up a loop, then yarn over and pull through 2 loops.
Gauge and Checkpoints
Gauge: 16 sc x 18 rows = 4 in (10.2 cm) in sc worked in rows.
Make one cup first. It uses every stitch in the pattern and shows right away whether your rolls will fit.
Checkpoints:
– Cup base after Rnd 5: about 2.25 in (5.7 cm) across.
– Cup base after Rnd 10: 4.75 in (12.1 cm) across.
– Cup wall after Rnd 15: 1.1 in (2.8 cm) tall.
– Finished cup: 3.5 in (8.9 cm) tall.
– Panel after Row 36: 8 in (20.3 cm) long.
– Panel after Row 72: 4.5 in x 16 in (11.4 cm x 40.6 cm).
Too big? Go down 0.5 mm. A loose cup will still hold a roll, but the cup will flop forward.
Too small? Go up 0.5 mm. If the cup is smaller than 4.5 in (11.4 cm) across, a standard roll won’t drop in easily.
Back Panel
Ch 19.
Row 1: Sc in the 2nd ch from the hook and in each ch across. Turn. (18 sc)
Rows 2–72: Ch 1 (does not count as a stitch), sc in each st across. Turn. (18 sc)
Check at Row 36: the panel should be 8 in (20.3 cm) long. At Row 72 it should be 4.5 in x 16 in (11.4 cm x 40.6 cm). Don’t fasten off. Go straight on to the border.
Panel Border
Border gauge: The same as the main gauge, 4 sc per inch (2.5 cm).
Rnd 1 (sc): Ch 1. Don’t turn. Work around the panel as follows:
– Top edge: sc in each of the 18 sts of Row 72. (18 sc)
– Corner: ch 1.
– Long side: work 64 sc evenly across the 72 row ends. To space them, work 8 sc across every 9 row ends (sc in 8 row ends, skip 1). (64 sc)
– Corner: ch 1.
– Bottom edge: sc in each of the 18 unused loops of the foundation chain. (18 sc)
– Corner: ch 1.
– Long side: 64 sc across the row ends, using the same spacing. (64 sc)
– Corner: ch 1. Join with a sl st to the first sc.
Total: 164 sc + 4 corner ch-1 sps.
Rnd 2 (rev sc): Ch 1. Rev sc in each sc around, and work 1 rev sc in each corner ch-1 sp. That gives 18 rev sc along each short side, 64 along each long side, and 1 at each of the 4 corners. Join and fasten off. (168 rev sc)
Why the math works: Each long side is 16 in (40.6 cm), and 16 in x 4 sts per inch = 64 sts. Your rows are shorter than your stitches are wide (18 rows vs. 16 sts per 4 in), so 9 rows are the same length as 8 sts. That makes 72 rows ÷ 9 x 8 = 64. Each short side is 4.5 in (11.4 cm), and 4.5 x 4 = 18 sts, the same as the panel’s own stitch count. The corner chains let the border turn the corners without cupping.
Rnd 1 adds 0.25 in (0.6 cm) on every side. Rnd 2 rolls over the edge as a cord and adds no width you can measure. The bordered panel measures 5 in x 16.5 in (12.7 cm x 41.9 cm).
Cups (Make 3)
Base
Rnd 1: Make a magic ring and work 6 sc into it. Join with a sl st to the first sc. (6 sc)
Begin every round with ch 1 (does not count as a stitch), and end every round with a sl st to the first sc.
Rnd 2: Inc in each st around. (12 sc)
Rnd 3: Sc 1, inc 6 times. (18 sc)
Rnd 4: Sc 1, inc, sc 1 6 times. (24 sc)
Rnd 5: Sc 3, inc 6 times. (30 sc)
Checkpoint: about 2.25 in (5.7 cm) across.
Rnd 6: Sc 2, inc, sc 2 6 times. (36 sc)
Rnd 7: Sc 5, inc 6 times. (42 sc)
Rnd 8: Sc 3, inc, sc 3 6 times. (48 sc)
Rnd 9: Sc 7, inc 6 times. (54 sc)
Rnd 10: Sc 4, inc, sc 4 6 times. (60 sc)
Checkpoint: 4.75 in (12.1 cm) across, lying flat. Moving the increases around in alternate rounds keeps the base round rather than hexagonal.
Lower Solid Band
Rnd 11: Ch 1, sc BLO in each st around. Join. (60 sc)
This turning ridge makes the base fold up crisply into the wall.
Rnds 12–15: Ch 1, sc in each st around. Join. (60 sc)
Checkpoint: the wall is 1.1 in (2.8 cm) tall.
Lattice Band
Rnd 16: Ch 4 (counts as dc + ch 1), dc in the same st as the join. This is your first V. Sk 2 sts, V in the next st 19 times. Sk the last 2 sts and join with a sl st to the 3rd ch of the starting ch-4. (20 V)
60 sts ÷ 3 sts per repeat = 20 V-stitches, with no stitches left over.
Rnd 17: Sl st into the first ch-1 sp. Ch 4 (counts as dc + ch 1), dc in the same sp. V in the ch-1 sp of each V around. Join to the 3rd ch of the ch-4. (20 V)
Rnd 18: Repeat Rnd 17. (20 V)
Stacking each V on top of the V below makes the open columns and diamond windows of the lattice. This band adds about 1.5 in (3.8 cm).
Upper Solid Band
Rnd 19 (conversion round): Ch 1. In each V, work sc in the first dc, sc in the ch-1 sp, and sc in the second dc. Join.
Count: 20 V x 3 sts worked 1-per-existing-stitch = 60, + 0 extra stitches = 60 sc.
Rnds 20–22: Ch 1, sc in each st around. Join. (60 sc)
Rnd 23: Sl st loosely in each st around. Fasten off and leave a 24 in (61.0 cm) tail for sewing. (60 sl st)
The sl st round firms up the rim so it doesn’t flare. Checkpoint: the finished cup is 3.5 in (8.9 cm) tall and 4.75 in (12.1 cm) across.
Tabs (Make 2)
Ch 6.
Row 1: Sc in the 2nd ch from the hook and in each ch across. Turn. (5 sc)
Rows 2–27: Ch 1, sc in each st across. Turn. (5 sc)
Fasten off and leave a 12 in (30.5 cm) tail. Each tab measures 1.25 in x 6 in (3.2 cm x 15.2 cm): 5 sts ÷ 4 = 1.25 in, and 27 rows ÷ 4.5 rows per inch = 6 in.
Make All Pieces
Quantities (all in oatmeal beige):
– Back panel with border: 1
– Cups: 3
– Tabs: 2
Layout, measured from the bottom edge of the bordered panel:
 [TAB]          [TAB]     <- loops about 2 in (5.1 cm) above the top
+---------------------+   16.5 in (41.9 cm)
|                     |
|   clear panel       |   2.75 in (7.0 cm)
|                     |
|   ( CUP 3 )         |   10.25–13.75 in (26.0–34.9 cm)
|                     |
|   ( CUP 2 )         |   5.25–8.75 in (13.3–22.2 cm)
|                     |
|   ( CUP 1 )         |   0.25–3.75 in (0.6–9.5 cm)
+---------------------+   0 in
The cups are 1.5 in (3.8 cm) apart. A 4.25 in (10.8 cm) roll stands about 0.75 in (1.9 cm) above its rim and still clears the base of the cup above it.
Joining
Method: Whipstitch with the yarn tail, working through both layers.
Placing the cups: Lay the panel flat with the right side up. Sit Cup 1 with the base 0.25 in (0.6 cm) above the bottom edge, which is just inside the border. Flatten the back of the cup against the panel. On the back of the cup, mark 2 vertical lines of stitches 3 in (7.6 cm) apart. At 4 sts per inch, that’s 12 sts apart along Rnd 22. Center the lines across the panel so each sits 1 in (2.5 cm) in from the panel’s outer edge.
Stitch-to-stitch logic: Sew each line from the bottom of the wall to the rim. In the solid bands, cup rounds and panel rows are both 0.22 in (0.6 cm) tall, so work 1 whipstitch per round into 1 panel row. In the lattice band, each V round covers about 2 panel rows, so take 2 whipstitches per V round. Then tack the back curve of the base to the panel with 6 evenly spaced stitches between the 2 lines.
Tension: Pull each stitch snug but not tight. If you pull too hard, the panel puckers and the cup tilts. Leave the front of the cup unsewn so it keeps its round shape.
Repeat for Cup 2 at 5.25 in (13.3 cm) and Cup 3 at 10.25 in (26.0 cm).
Tabs: Sew one end of each tab to the back of the panel, with 1 in (2.5 cm) overlapping and the outer edge of the tab lined up with the outer edge of the panel. Fold the tab into a loop and sew its other end on top of the first end. Each loop rises about 2 in (5.1 cm) above the panel and fits a bar up to about 1.25 in (3.2 cm) thick. There is a 2.5 in (6.4 cm) gap between the tabs.
Size checkpoint: The panel still measures 5 in x 16.5 in (12.7 cm x 41.9 cm), and the cups stand 4.75 in (12.1 cm) out from it.
Final Blocking
- Spray the whole holder with water until it is damp but not soaked.
- Lay it face up on a blocking mat.
- Pin the panel to 5 in x 16.5 in (12.7 cm x 41.9 cm), with straight edges and square corners.
- Put a roll, or a rolled-up towel 4.75 in (12.1 cm) across, inside each cup to set the round shape.
- Open each lattice window gently with your fingertips.
- Leave it to dry completely, about 24 hours.
- Take out the pins and fillers.
Final Quality-Control Checklist
- Panel measures 5 in x 16.5 in (12.7 cm x 41.9 cm).
- Border has 168 rev sc, with flat corners that don’t flare.
- Each cup has 60 sts in each solid round and 20 V in each lattice round.
- The cups are 4.75 in (12.1 cm) across and 3.5 in (8.9 cm) tall.
- The cups are evenly spaced and centered across the panel.
- Both tabs are the same length, and the holder hangs straight.
- All ends are woven in at least 2 in (5.1 cm).
Troubleshooting
The cup base ripples. You have too many stitches for your tension. Go down a hook size for the base only.
The cup base cups upward. Your increases are too tight. Go up a hook size or loosen your grip.
The V-stitches lean in a spiral. Make sure you join to the 3rd ch of the ch-4 and start each new round in the first ch-1 sp.
The panel edges ruffle. You probably worked 1 sc per row end. Undo the side and keep to 8 sc per 9 rows.
The holder tilts. One tab is sewn lower than the other. Re-sew it so both overlap exactly 1 in (2.5 cm).
A cup sags forward. Add 2 extra whipstitches at the top of each sewing line.
Care
Hand wash cool and lay flat to dry, reshaping the cups while they are damp. Don’t tumble dry, because cotton can shrink and the cups would lose their fit.
Final Notes
The measurement chain is simple. At a gauge of 16 sc x 18 rows = 4 in (10.2 cm), the 18-stitch, 72-row panel measures 4.5 in x 16 in (11.4 cm x 40.6 cm). The 0.25 in (0.6 cm) border takes it to 5 in x 16.5 in (12.7 cm x 41.9 cm). Each 60-stitch cup is 4.75 in (12.1 cm) across and 3.5 in (8.9 cm) tall, which fits a standard roll. If your gauge matches, every piece will fit. Check one cup first and the rest will follow.
Happy crocheting!