

This curtain panel brings the look of old Bruges tape lace to a sunny window. Columns of ivory braids run from top to bottom. Each braid is a chain of almond-shaped openings framed by two ladder-like tapes.
Soft lattice fills the spaces between the columns, small picot scallops trim the sides and bottom, and simple tabs slide onto the rod. The panel uses one color, a warm ivory cotton, so all the texture comes from the stitches. The pattern uses US crochet terms throughout.
One finished panel measures about 30 in (76.2 cm) wide and 85.75 in (217.8 cm) long, plus 3 in (7.6 cm) tab loops. The photo shows a matching pair on one rod, so make two panels for that look.
Construction is modular. You crochet 105 identical rectangular Oval Braid motifs in the round and join them into 7 vertical columns of 15 motifs. Then you join the columns side by side, add a scalloped picot border, and finish with 7 tabs across the top.
Finished Size and Construction
- Finished size (one panel): 30 in x 85.75 in (76.2 cm x 217.8 cm), plus 3 in (7.6 cm) tab loops
- Skill level: Intermediate
- Terminology: US crochet terms
- Yarn weight: Super fine (#1) / size 3 mercerized cotton crochet thread
- Hook: 2.75 mm (C-2)
- Number of pieces: 105 motifs + 7 tabs per panel
- Layout: 7 motifs wide x 15 motifs tall
- Motif size: 4 in x 5.6 in (10.2 cm x 14.2 cm), width x height
- Size before border: 28 in x 84 in (71.1 cm x 213.4 cm)
- Border depth: 1 in (2.5 cm) on the sides and bottom; 0.75 in (1.9 cm) on the top
Materials
Use a smooth, mercerized size 3 thread or a fingering-weight cotton. It gives crisp stitches and holds its shape when hung. Avoid fuzzy or very stretchy fibers, because a long panel can stretch under its own weight.
Yarn (one panel):
– Ivory: 800 g, about 2,720 m (approximately 340 m per 100 g)
For a pair of panels, buy 1,600 g, about 5,440 m, all from the same dye lot.
Tools:
– 2.75 mm (C-2) crochet hook
– Tapestry needle and scissors
– Stitch markers (at least 4)
– Tape measure
– Blocking mats, rustproof pins, and a spray bottle
The yarn amounts include a margin of about 15% for swatching, joining, and differences in tension.
Abbreviations (US Terms)
- ch: chain
- sl st: slip stitch
- sc: single crochet
- dc: double crochet
- dtr: double treble crochet (yarn over 3 times, insert hook, pull up a loop, [yarn over, pull through 2 loops] 4 times)
- sp: space
- st(s): stitch(es)
- RS / WS: right side / wrong side
- rep: repeat
Special stitches:
– Picot: ch 3, sl st in the 3rd ch from the hook.
– Picot shell: (3 dc, picot, 2 dc) in the same st or sp.
Gauge and Checkpoints
Make one complete motif before you commit to all 105. Block it lightly (pin, spray, let dry), then measure.
Motif gauge: One motif measures 4 in x 5.6 in (10.2 cm x 14.2 cm). On the final round, 25 sc = 4 in (10.2 cm), which is 6.25 sc per inch.
Checkpoints:
– After Rnd 2: about 1.5 in x 3.25 in (3.8 cm x 8.3 cm)
– After Rnd 4: about 2.5 in x 4.25 in (6.4 cm x 10.8 cm)
– After Rnd 7: 4 in x 5.6 in (10.2 cm x 14.2 cm)
If your motif is too big: use a 2.5 mm hook, or tighten the long stitches in Rnd 6.
If your motif is too small: use a 3 mm hook.
An error of 1/8 in (0.3 cm) per motif adds up to 1.9 in (4.8 cm) over 15 motifs, so check your size now.
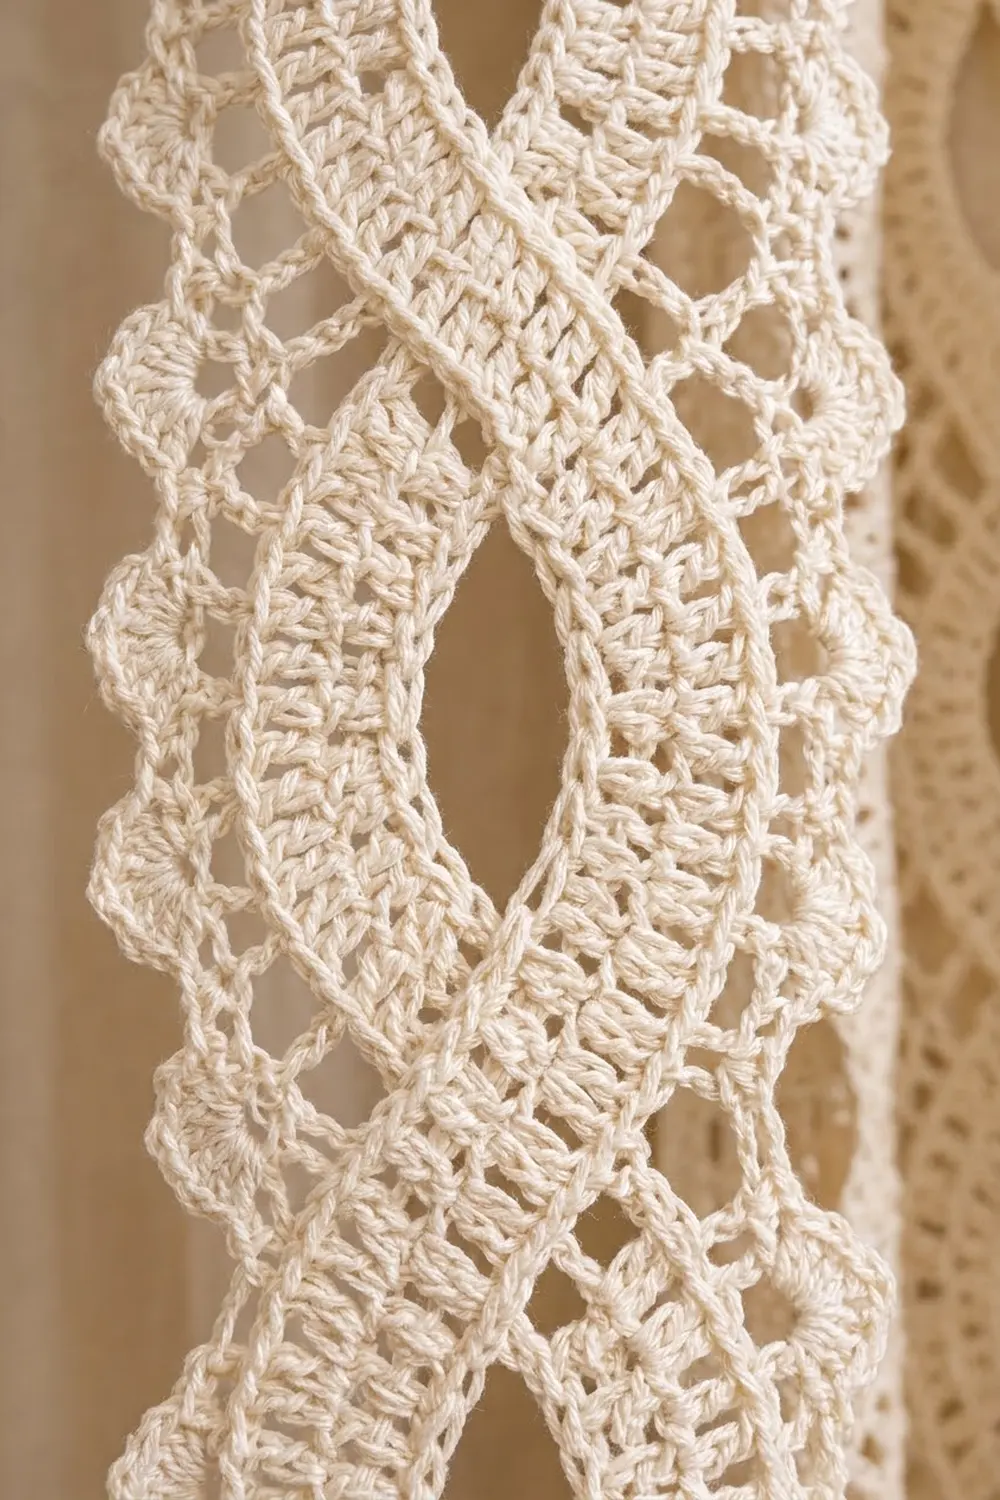
Oval Braid Motif (make 105)
An open chain ring forms the almond-shaped opening (the “eye”). Two rounds of dc make the double tape around it, and the outer rounds square the oval into a rectangle.
Foundation: Ch 36, sl st in the first ch to form a ring. Flatten the ring into a long oval with 17 ch on each long side and 1 ch at each tip. Mark both tip ch.
Rnd 1 (eye edge): Ch 1, sc in each ch around, join with sl st to the first sc. (36 sc)
Rnd 2 (inner tape): Ch 3 (counts as dc throughout), dc in each sc around. Work 2 dc in each marked tip sc and 2 dc in the sc right after each tip sc. Join to the top of the ch-3. (40 dc)
Rnd 3 (gap round): Ch 1, sc in the same st, ch 3, skip 1 dc, sc in next dc, ch 3, skip 1 dc; rep from * around, join. (20 sc, 20 ch-3 sps)* These small openings separate the two tapes.
Rnd 4 (outer tape): Sl st into the first ch-3 sp, ch 3, 3 dc in the same sp, then 4 dc in each remaining ch-3 sp around, join. (80 dc) The dc groups sit edge to edge, so they form one continuous ladder tape.
Rnd 5 (lattice loops): Ch 1, sc in the same st, ch 5, skip 3 dc, sc in next dc, ch 5, skip 3 dc; rep from * around, join. (20 sc, 20 ch-5 loops)*
Lay the motif flat with its long axis vertical. Mark the 4 loops at the diagonal corners. Between the corner loops, there should be 3 loops across each short side (top and bottom) and 5 loops along each long side: 4 + 3 + 3 + 5 + 5 = 20 loops.
Rnd 6 (squaring round): Sl st into the first corner loop. In each corner loop, work (3 dtr, ch 2, 3 dtr). In each side loop, work (dc, ch 1, dc, ch 1, dc). Join.
Count: 24 dtr, 48 dc, 32 ch-1 sps, and 4 ch-2 corner sps.
Rnd 7 (edge, conversion round): Sl st into the corner ch-2 sp, ch 1. Work 3 sc in each corner ch-2 sp. Along the sides, work 1 sc in each dtr, each dc, and each ch-1 sp. Join.
- Short side: 3 dtr + (3 groups x 5) + 3 dtr = 21 sts, worked 1 sc per st. Add the 2 outer sc from the corner groups and the 2 middle corner sc: 21 + 2 + 2 = 25 sc, corners included.
- Long side: 3 dtr + (5 groups x 5) + 3 dtr = 31 sts, + 2 + 2 = 35 sc, corners included.
- Total: 4 corner sc + (2 x 23) + (2 x 33) = 116 sc.
The middle sc of each corner group is the corner st. Fasten off and weave in the ends.
Make All Pieces
Make 105 Oval Braid motifs in Ivory (210 for a pair of panels). Block each one to 4 in x 5.6 in (10.2 cm x 14.2 cm) before joining, and stack them in groups of 15 to keep count.
Layout grid (one panel, 7 columns x 15 rows, all motifs upright):
Rows  1-5:   O O O O O O O
Rows  6-10:  O O O O O O O
Rows 11-15:  O O O O O O O
Each O stands for one motif, 4 in x 5.6 in (10.2 cm x 14.2 cm). Every row in the grid holds 7 motifs, and every column holds 15.
Joining
Method: Flat slip stitch join through the back loops, worked on the WS. It makes a thin, neat ridge and keeps the openwork flat.
Step 1: Columns. Hold two motifs WS up with their short sides together. Sl st through the back loop of each matching pair of sts, from corner st to corner st (25 sts to 25 sts). Continue until you have 7 columns of 15 motifs, each 4 in x 84 in (10.2 cm x 213.4 cm). Stacked tip to tip, the eyes line up into one continuous braid.
Step 2: Panel. Join the columns along their long edges. Each column edge has 15 x 35 = 525 sts, including every motif’s own corner sts. Join 525 sts to 525 sts, one to one, with no skipped or added sts at the motif seams.
Tension: Keep the join as loose as the motif edge. Tight sl sts pull the columns in and pucker the panel. If needed, use a hook one size larger for joining.
Checkpoint: The joined panel measures 28 in x 84 in (71.1 cm x 213.4 cm). The top and bottom edges have 7 x 25 = 175 sts each, and the long edges have 15 x 35 = 525 sts each.
Border
Border gauge: 6.25 sts per inch, the same as the motif edge. Work with the RS facing.
Rnd 1: Join the yarn in any panel corner st, ch 1. Work (sc, ch 2, sc) in each of the 4 panel corner sts and 1 sc in every other st. Join. The 2 sc from each corner belong to the side counts: top and bottom 175 sc each; long sides 525 sc each.
Rnd 2 (conversion round): Sl st into a corner ch-2 sp, then ch 3. Work (dc, ch 3, dc) in each corner ch-2 sp, and 1 dc in each sc along the sides, plus these extras:
– Top and bottom edges: 175 dc + 2 corner dc + 4 extra dc (2 dc in the 35th, 70th, 105th, and 140th sc) = 181 dc each
– Each long side: 525 dc + 2 corner dc + 2 extra dc (2 dc in the 175th and 350th sc) = 529 dc
Rnd 3 (scallops and top edge):
– Each top corner sp: 3 sc.
– Top edge: sc in each dc. (181 sc)
– Each long side: sc in the first dc, skip 2 dc, picot shell in next dc, skip 2 dc, sc in next dc; rep from * to the corner. (88 scallops)
– Each bottom corner sp: picot shell.
– Bottom edge: same repeat as the long sides. (30 scallops)*
Join and fasten off.
Why the math works: Each scallop uses 6 sts, and each scalloped side must start and end on a sc, so it needs 1 + a multiple of 6 sts. Bottom: 181 = 1 + (6 x 30). Long sides: 529 = 1 + (6 x 88). The extra dc in Rnd 2 make these numbers exact.
Tabs (make 7)
Mark the 181 top-edge sc. Each tab is 13 sts wide, about 2 in (5.1 cm). The gaps between tabs are 15 sts, about 2.4 in (6.1 cm). Check: (7 x 13) + (6 x 15) = 91 + 90 = 181. The first and last tabs sit flush with the panel corners.
Row 1: With the RS facing, join the yarn in the first st of the tab, ch 1, sc in the same st and the next 12 sts, turn. (13 sc)
Rows 2–36: Ch 1, sc in each sc across, turn. (13 sc) The tab measures about 6 in (15.2 cm).
Fasten off, leaving a 12 in (30.5 cm) tail. Fold the tab to the WS and whipstitch the last row to the back of border Rnd 1. This makes a 3 in (7.6 cm) loop that fits a rod up to 1.25 in (3.2 cm) in diameter.
Final Blocking
- Weave in the remaining ends along the joins and inside the dc tapes.
- Soak the panel in cool water for 15 minutes, then press out the water gently. Do not wring.
- Roll the panel in towels to remove more moisture.
- Lay it flat on blocking mats or on a clean sheet on the floor.
- Pin it to 30 in x 85.75 in (76.2 cm x 217.8 cm), not counting the tabs.
- Use a long ruler to keep each column and join straight and parallel.
- Pin out every picot along the sides and bottom.
- Let the panel dry completely before you unpin it.
Final Quality-Control Checklist
- All 105 motifs measure 4 in x 5.6 in (10.2 cm x 14.2 cm).
- Each motif has 25 sc per short side and 35 sc per long side, corners included.
- The eyes line up in straight vertical braids.
- The joins lie flat, with no puckering where four corners meet.
- Before the border, the panel measures 28 in x 84 in (71.1 cm x 213.4 cm).
- Border Rnd 2 has 181 dc on the top and bottom and 529 dc on each long side.
- There are 88 scallops on each long side and 30 on the bottom.
- The 7 tabs are evenly spaced and securely sewn.
- The blocked panel measures 30 in x 85.75 in (76.2 cm x 217.8 cm).
Troubleshooting
The eye puckers: The foundation chain is too tight. Make the chain with a larger hook.
The motif cups: Loosen the dc in Rnd 4 and the dtr in Rnd 6.
The motif ruffles: Recount. Rnd 2 must have exactly 40 dc, and Rnd 4 must have 80 dc.
The corners are rounded: Work the dtr to full height and pin the corners sharply.
The columns lean: Rejoin them, matching st for st from corner to corner.
The scallops don’t fit: Check Rnd 2 against 181 and 529 before you start Rnd 3.
The panel grows when hung: Let it hang for a few days, then re-block.
Care
Hand wash in cool water with a mild detergent, then dry flat and pinned to size. Do not tumble dry, and do not hang the panel while it is wet.

Final Notes
Each motif measures 4 in x 5.6 in (10.2 cm x 14.2 cm), with 25 and 35 sts per side. Seven motifs across and fifteen down make 28 in x 84 in (71.1 cm x 213.4 cm), with 175 and 525 edge sts. The border brings the panel to 30 in x 85.75 in (76.2 cm x 217.8 cm), and seven tabs hang it from the rod. If every step of that measurement chain checks out, the panel will hang straight.
Happy crocheting!