

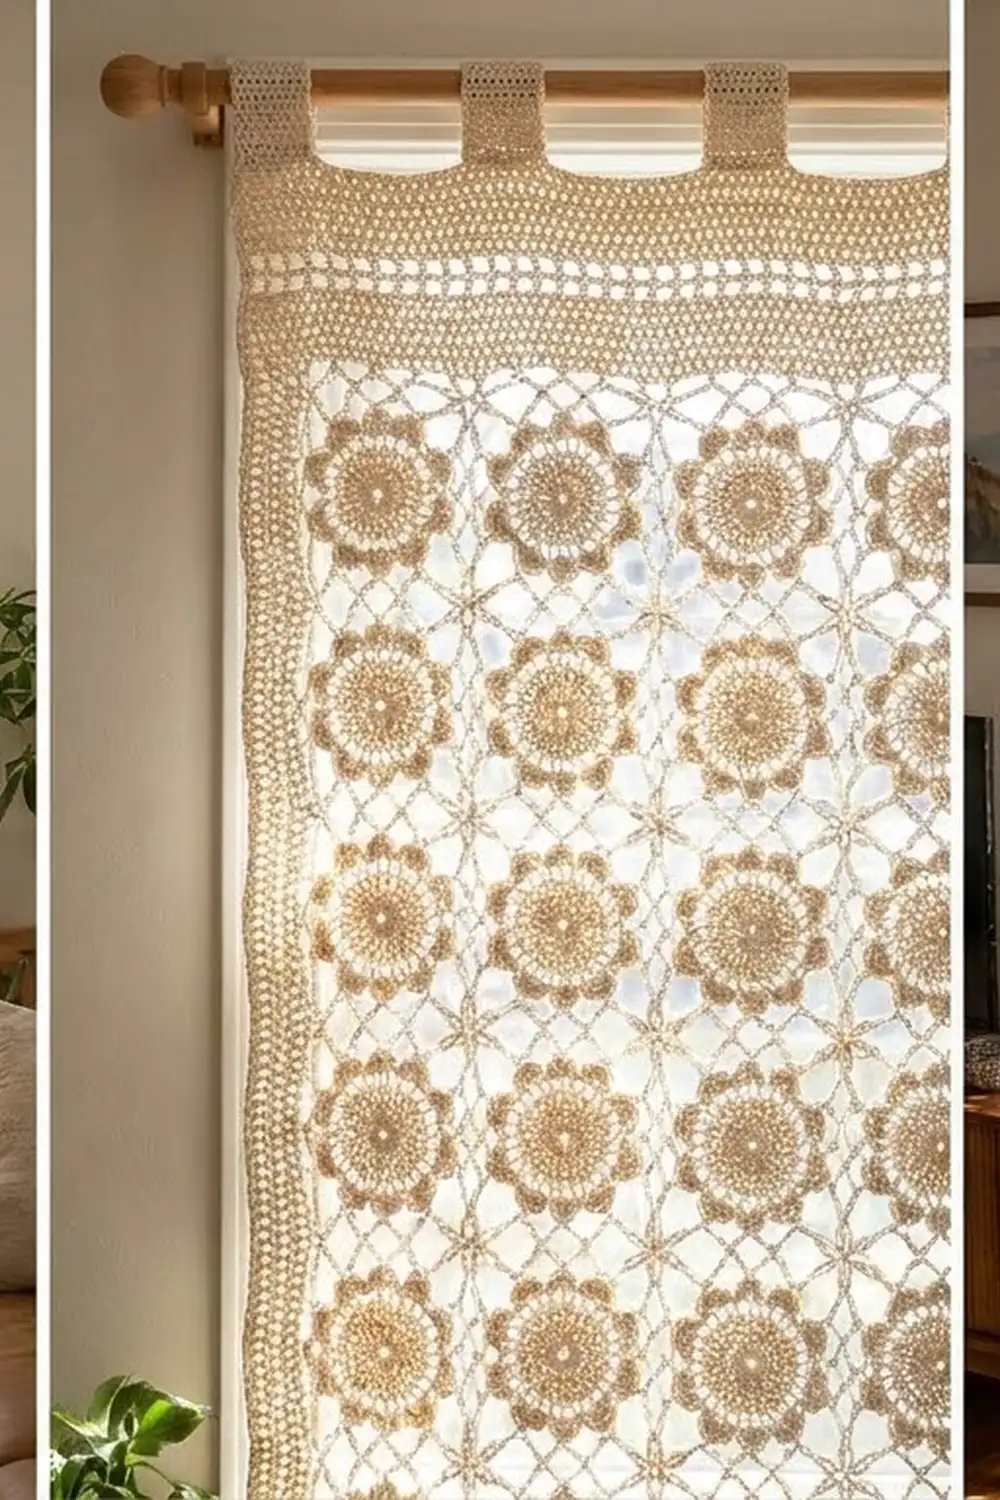
This curtain panel is made from small eight-petal flower motifs joined into an airy chain-loop lattice. In a sunny window the flowers read as soft, solid circles and the mesh between them almost disappears, so the light comes through a pattern of blossoms.
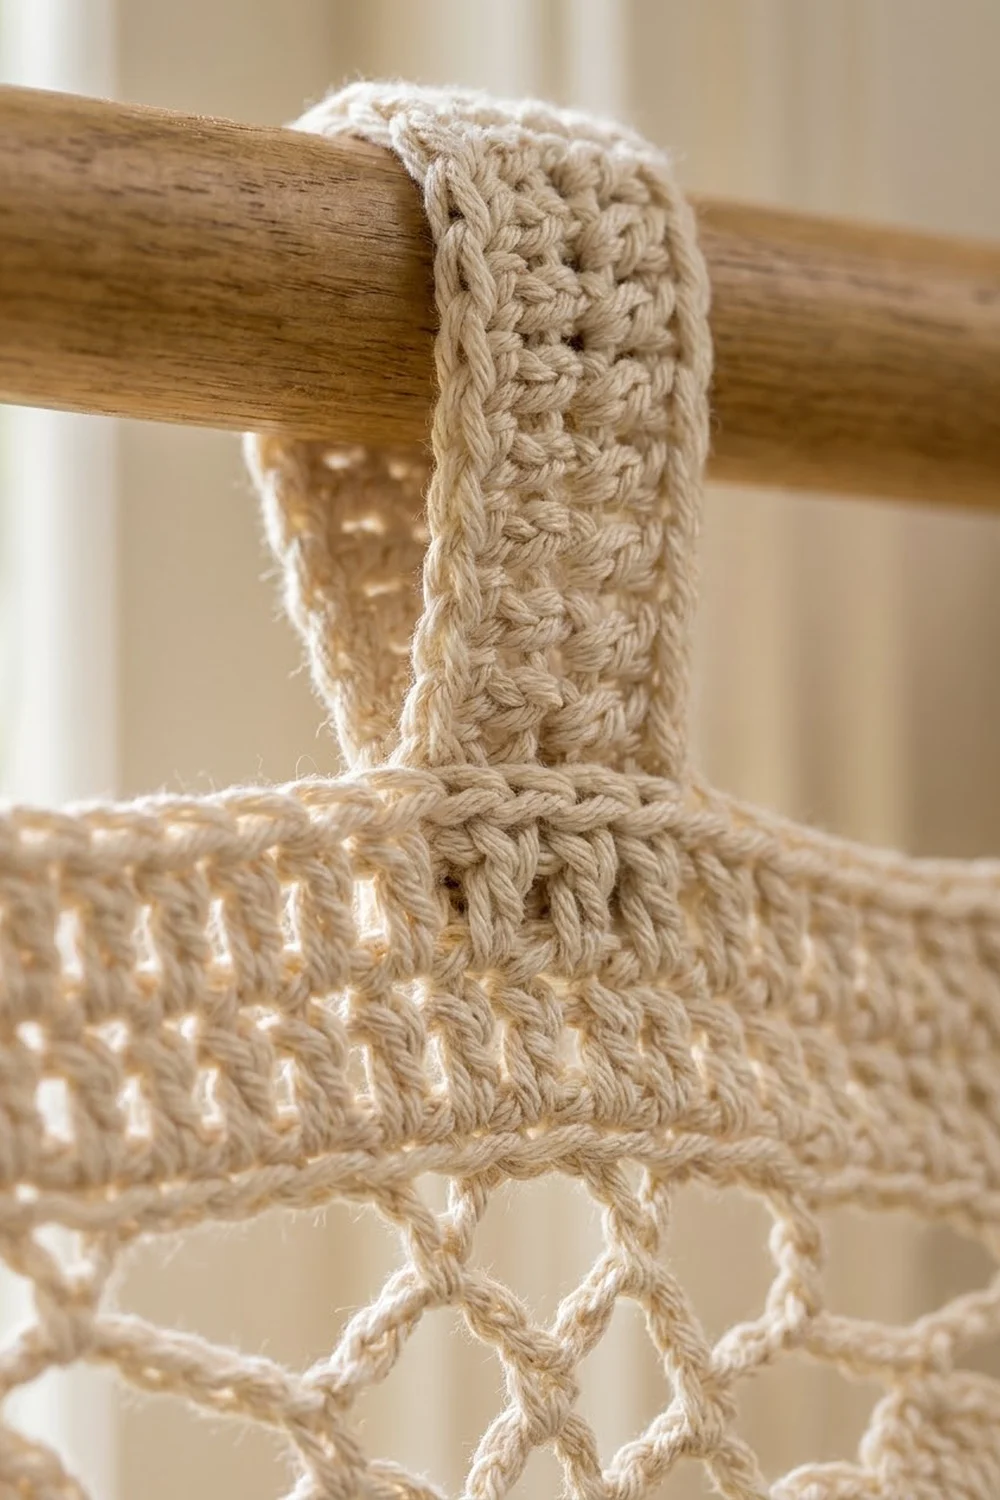
The sample is worked in one color, a warm ivory or natural cotton, for a classic cottage look. A plain top band holds one openwork row, and narrow tabs fold over to slide onto a wooden curtain rod. The pattern uses US crochet terms throughout.
The finished panel measures 35.8 in (90.9 cm) wide and 62.2 in (158.0 cm) long from the bottom edge to the top of the band. The tab loops add about 2 in (5.1 cm) above the band.
You make 84 motifs (7 across by 12 down) and join them as you go on the last round. Then two single crochet border rounds frame the panel, a four-row band goes across the top, and eight tabs finish it off.
Finished Size and Construction
- Finished size: 35.8 in x 62.2 in (90.9 cm x 158.0 cm), not counting the tabs
- Skill level: Intermediate
- Terminology: US crochet terms
- Yarn weight: Sport weight (#2) mercerized or matte cotton
- Hook: 3.0 mm (US C/2 or D/3, depending on the brand)
- Number of pieces: 84 identical flower motifs
- Layout: 7 motifs across x 12 motifs down
- Motif size: 5 in (12.7 cm) square, measured side to side after blocking
- Size before border: 35 in x 60 in (88.9 cm x 152.4 cm)
- Border depth: 0.4 in (1.0 cm) on each edge, plus a 1.4 in (3.6 cm) top band
Materials
Pick a smooth cotton with good stitch definition. Mercerized cotton gives crisp petals and a slight sheen. Matte cotton looks softer and more rustic. Avoid fuzzy yarns, because the open loops lose their shape.
- Ivory / natural cotton, sport weight: 550 g (about 1,100 m), based on 50 g = 100 m skeins (11 skeins)
Each motif uses about 5 g (10 m). The border, band and tabs use about 60 g (120 m). The amount listed includes a margin of about 15% for your gauge test and any differences in tension.
Tools:
- 3.0 mm crochet hook
- Tapestry needle
- Stitch markers (at least 4)
- Scissors
- Measuring tape
- Blocking mats or a large towel, and rust-proof pins
- Spray bottle
Abbreviations (US Terms)
- ch – chain
- sl st – slip stitch
- sc – single crochet
- hdc – half double crochet
- dc – double crochet
- sp(s) – space(s)
- st(s) – stitch(es)
- rnd(s) – round(s)
- RS – right side
Special stitch – Petal: (sc, hdc, 5 dc, hdc, sc) all in the same ch-sp. One petal is 9 sts, and the 3rd dc of the 5 is the center dc.
Joining loop (JL): ch 2, sl st into the matching ch-5 loop on the neighboring motif, ch 2. This takes the place of one ch-5 loop.
Joining corner (JC): ch 3, sl st into the matching corner loop (or corner join) on the neighboring motif, ch 3. This takes the place of one ch-7 corner loop.
Gauge and Checkpoints
Make one complete motif before anything else, then wet-block it and let it dry. All the later math depends on this piece.
- After Rnd 1: 1.25 in (3.2 cm) across
- After Rnd 3: 3.25 in (8.3 cm) across, from petal tip to petal tip
- After Rnd 4: 4.25 in (10.8 cm) across
- After Rnd 5, blocked: 5 in (12.7 cm) square, side to side
- Border gauge: 26 sc = 5 in (12.7 cm) along one motif side
If your motif is larger than 5 in (12.7 cm), go down a hook size. If it comes out smaller, go up a hook size. A difference of just 0.25 in (0.6 cm) per motif turns into 1.75 in (4.4 cm) across the width and 3 in (7.6 cm) over the length, so check this before you go on.
Flower Motif (make 84)
Rnd 1: Make a magic ring. Ch 3 (this counts as a dc), then work 15 dc into the ring. Join with a sl st to the top of the ch-3. (16 dc)
Rnd 2: Ch 1, sc in the same st, ch 4, skip the next st. Sc in the next st, ch 4, skip the next st; repeat from * 6 more times. Join with a sl st to the first sc. (8 sc, 8 ch-4 sps)*
Rnd 3: Sl st into the first ch-4 sp. Work a Petal in each ch-4 sp around. Join with a sl st to the first sc. (8 petals, 72 sts)
The petals sit side by side, sc to sc, which makes the scalloped flower edge.
Rnd 4: Sl st in the next hdc, the next 2 dc and the center dc of the first petal. Ch 1, sc in the same center dc. Ch 6, sc in the center dc of the next petal; repeat from * 6 more times, then ch 6. Join with a sl st to the first sc. (8 sc, 8 ch-6 loops)*
Mark the 1st, 3rd, 5th and 7th sc of this round. These are the corner sc. The unmarked sc are the side sc.
Rnd 5 (first motif only, no joining): Sl st into the first corner sc. Ch 1.
*Work (sc, ch 7, sc) in the corner sc. Ch 5, sc in the next ch-6 loop, ch 5, sc in the side sc, ch 5, sc in the next ch-6 loop, ch 5. Repeat from * 3 more times, ending at the first sc. Join with a sl st to the first sc.
(20 sc, 4 ch-7 corner loops, 16 ch-5 loops; 4 ch-5 loops on each side)
Fasten off and weave in the ends. This round turns the round flower into a square mesh frame. The corner loops sit on the tips of four petals, and the side sc sit on the other four.
Make All Pieces
Make all 84 motifs in ivory. Work Rnds 1–4 the same way for every motif. The first motif is made in full. The other 83 get their Rnd 5 joined to the motifs before them.
Layout (each M = one motif; row 1 is the top of the curtain):
Row  1: M M M M M M M
Row  2: M M M M M M M
Row  3: M M M M M M M
 ...    (repeat)
Row 12: M M M M M M M
That is 7 motifs per row x 12 rows = 84 motifs.
Joining (Join-As-You-Go on Rnd 5)
Work Rnd 5 as written until you reach a side that touches a finished motif. On that side, replace each loop as follows:
- The corner ch-7 becomes a JC: ch 3, sl st into the neighbor’s corner loop, ch 3.
- Each of the 4 ch-5 loops becomes a JL: ch 2, sl st into the neighbor’s matching ch-5 loop, ch 2.
- The next corner ch-7 also becomes a JC.
All the sc stay exactly where they are, so the stitch logic is loop to loop. Loop 1 joins to loop 4 of the neighbor’s facing side, loop 2 to loop 3, and so on, because the two motifs face each other in mirror order.
Row 1: Join each motif to the one on its left along one side.
Rows 2–12: Join the first motif of each row to the motif above it. Join every other motif along two sides, to the motif above and to the motif on its left.
Four-way corners: Where four motifs meet, sl st into the existing corner join (the sl st that joins the first two corners) and not into a loose loop. This keeps all four corners on one point with no gap.
Tension: Keep the joining sl st as loose as your chains. If you pull it tight, the seam puckers and the mesh pulls into a V.
Size checkpoint: After Row 1, lay the strip flat. It should measure 35 in (88.9 cm) long. After all 12 rows, the panel should be 35 in x 60 in (88.9 cm x 152.4 cm).
Border
Border gauge: 26 sc = 5 in (12.7 cm). Each motif side gets exactly 26 sc:
- 3 sc in the half of the corner loop where that side starts
- 5 sc in each of the 4 ch-5 loops (20 sc)
- 3 sc in the half of the corner loop where that side ends
In this pattern, the motif side count of 26 includes these corner-loop sc. The panel’s four outer corners also get a ch-2 corner sp, which is not counted in any side.
Border Rnd 1: With RS facing, join the yarn in the top right corner loop of the panel. Ch 1.
- At each outer panel corner loop, work (3 sc, ch 2, 3 sc).
- In each ch-5 loop, work 5 sc.
- Where two motifs meet along the edge, work 3 sc in the outer half of each corner loop, one on each side of the join.
Join with a sl st to the first sc.
- Top and bottom: 7 motifs x 26 sc = 182 sc each
- Left and right sides: 12 motifs x 26 sc = 312 sc each
- Total: 182 + 312 + 182 + 312 = 988 sc, plus 4 ch-2 corner sps
No extra stitches go in at the seams. The two half-corner groups of 3 sc already sit at each join, so the count stays exactly 26 per motif.
Border Rnd 2: Ch 1. Work 1 sc in each sc around and (sc, ch 2, sc) in each ch-2 corner sp. Join with a sl st.
Each side count is the sts worked 1-per-existing-st plus 2 added corner sc:
- Top and bottom: 182 + 2 = 184 sc each
- Left and right sides: 312 + 2 = 314 sc each
- Total: 988 + 8 = 996 sc, plus 4 ch-2 corner sps
Fasten off. The border depth is now 0.4 in (1.0 cm).
Top Band
Work in rows across the 184 top sts only, from the first corner sc to the last corner sc. Do not work into the ch-2 sps.
Row 1: With RS facing, join the yarn in the top right corner sc. Ch 3 (this counts as a dc), then dc in each st across. Turn. (184 dc)
Row 2 (openwork): Ch 3 (this counts as a dc), dc in the next 2 sts. *Ch 1, skip the next st, dc in the next 2 sts; repeat from * 59 times in total. Then ch 1, skip the next st, dc in the last 3 sts. Turn.
(124 dc + 60 ch-1 sps = 184 sts)
Check: 3 + (59 x 3) + 1 + 3 = 184. The row starts and ends with 3 dc, so it is symmetrical.
Row 3: Ch 3 (this counts as a dc), dc in each dc and each ch-1 sp across. Turn. (184 dc)
Row 4: Ch 1, sc in each st across. (184 sc) Fasten off.
The band is 1.4 in (3.6 cm) deep. Work 2 sc into the end of each dc row and 1 sc into the end of the sc row along both short ends of the band to neaten them.
Tabs (make 8)
The 184 sts of Row 4 divide into 8 tabs of 9 sts and 7 gaps of 16 sts: (8 x 9) + (7 x 16) = 72 + 112 = 184.
Row 1: With RS facing, join the yarn in the first st of the tab. Ch 1, sc in the same st and in the next 8 sts. Turn. (9 sc)
Rows 2–24: Ch 1, sc in each st across. Turn. (9 sc)
Fasten off and leave a 12 in (30.5 cm) tail. Skip 16 sts, then make the next tab. The first tab starts in st 1 and the last tab ends in st 184.
Each tab is 1.75 in (4.4 cm) wide and 4 in (10.2 cm) long. Fold each tab to the back and whipstitch its last row to the back of Band Row 3. This makes a loop that stands about 2 in (5.1 cm) tall and fits a rod up to 1.25 in (3.2 cm) across.
Final Blocking
- Weave in all the remaining ends, splitting the plies on the back of the sc and dc.
- Wet the panel completely in cool water and gently squeeze it out. Do not wring it.
- Roll it in towels to take out the extra water.
- Lay it flat on blocking mats and pin the four corners to 35.8 in x 62.2 in (90.9 cm x 158.0 cm).
- Pin along each edge every 5 in (12.7 cm), matching each pin to a motif seam.
- Open up the petals and center each flower in its square with your fingers.
- Let it dry fully. Leave the tabs unpinned so they stay soft.
Final Quality-Control Checklist
- 84 motifs, with 8 petals each
- Every motif Rnd 5 has 20 sc and 4 loops per side
- All four-way corners meet on one point
- Border Rnd 1: 182 / 312 / 182 / 312 sc
- Border Rnd 2: 184 / 314 / 184 / 314 sc
- Band rows: 184 sts each
- 8 tabs, 9 sts wide, spaced 16 sts apart
- Blocked size: 35.8 in x 62.2 in (90.9 cm x 158.0 cm)
Troubleshooting
- Petals cup or ruffle: Your Rnd 2 ch-4 loops are too tight or too loose. Adjust your chain tension, or try ch 3 or ch 5.
- The mesh sags between flowers: Your chains are too loose. Go down a hook size for Rnds 4–5 only.
- Seams pucker: Your joining sl sts are too tight. Make them looser, or pull up a slightly taller loop before the sl st.
- Border ruffles: Work 4 sc in the ch-5 loops instead of 5, but only if every motif side is affected the same way.
- Border pulls in: Check that you worked 3 sc in each half of every corner loop.
- Panel too long or too short: Add or take away a full row of 7 motifs. Each row changes the length by 5 in (12.7 cm) and adds or removes 26 sc on each long side of the border.
Care
Hand wash in cool water with a mild detergent, then dry flat and re-block. If you hang the curtain in strong sun, take it down now and then and wash it to keep the ivory fresh.
Final Notes
The measurement chain is simple: one motif is 5 in (12.7 cm). Seven motifs make 35 in (88.9 cm) and twelve make 60 in (152.4 cm). The border adds 0.4 in (1.0 cm) on each edge, and the band adds 1.4 in (3.6 cm), for a panel of 35.8 in x 62.2 in (90.9 cm x 158.0 cm). Every border count comes from 26 sc per motif side, so if your first motif is right, everything after it will be too.
Happy crocheting!