

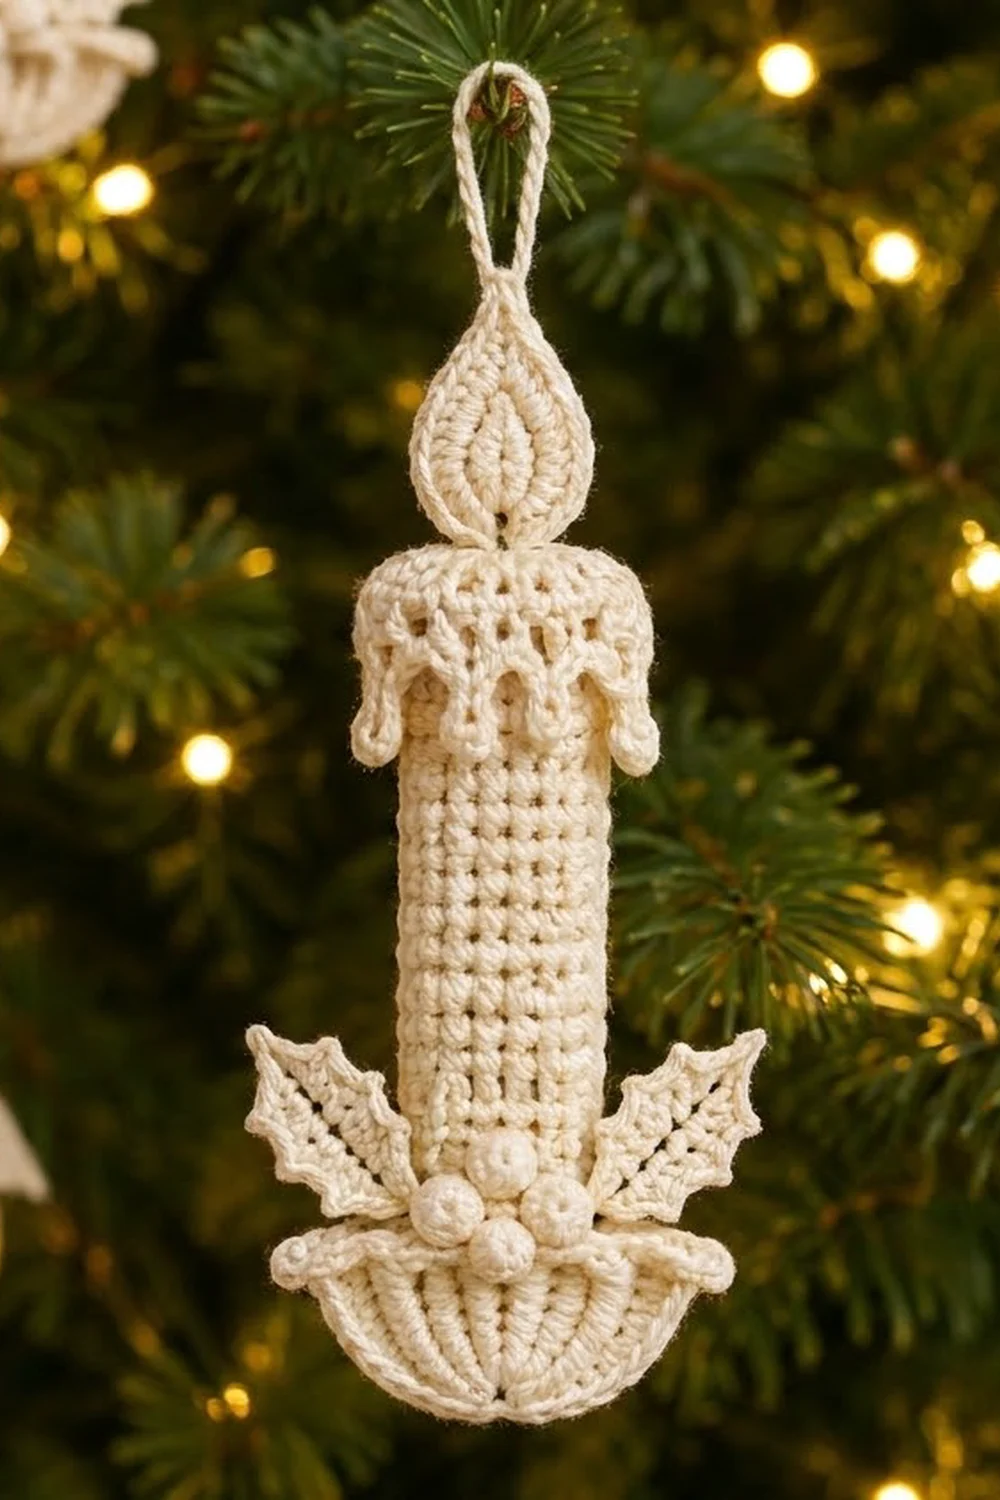
The Ivory Glow Candle is a flat, layered Christmas ornament worked in one soft ivory cotton. It has a teardrop flame, a candle body with a dripping wax cap, two holly leaves, three tiny berries, and a ribbed holder bowl. Together they make a small vintage-style candle that hangs flat against a tree.
Because the whole ornament is one color, the texture does the work. The candle body has a tight single-crochet grid, the edges are corded with reverse single crochet, and each little part sits slightly raised over the next. The look is calm, classic, and heirloom.
This pattern uses US crochet terms. The finished ornament measures about 4.5 in (11.4 cm) tall, not counting the hanging loop, and 3 in (7.6 cm) wide across the holly leaves.
You’ll make seven small components: one flame with a built-in loop, one drip cap, one candle body, two holly leaves, three berries, and one holder bowl. The body gets a two-round border, then everything is layered and sewn into one finished ornament.
Finished Size and Construction
- Finished size: 4.5 in (11.4 cm) tall x 3 in (7.6 cm) wide, without the loop
- Hanging loop: about 1.25 in (3.2 cm) above the flame tip
- Skill level: Intermediate (small-scale work, reverse sc, sewing appliqués)
- Terminology: US
- Yarn weight: Super Fine (#1) / fingering-weight mercerized cotton
- Hook: 2.25 mm (US B-1)
- Number of pieces: 1 finished ornament, built from 7 sewn components
- Layout: flame on top, drip cap over the body top, bowl over the body bottom, leaves behind the bowl, berries centered on the bowl rim
- Candle body before border: 1 in (2.5 cm) x 2.5 in (6.4 cm)
- Border depth: 0.25 in (0.6 cm) per side
- Candle body after border: 1.5 in (3.8 cm) x 3 in (7.6 cm)
Materials
Use a smooth, mercerized cotton in fingering weight (about 170 m per 50 g). Cotton holds the picots and drips crisply and blocks flat. Avoid fuzzy or very stretchy yarns, because the small details will blur.
- Ivory / cream: 8 g, about 27 m (30 yd)
That amount includes a margin for gauge swatching and sewing tails. If you plan a set of ornaments, multiply per ornament and add a little extra.
Tools:
– 2.25 mm (US B-1) crochet hook
– Tapestry needle with a small eye
– Rust-proof pins and a foam blocking mat
– Scissors
– Optional: fabric stiffener or a light starch spray
Abbreviations (US Terms)
- ch – chain
- sl st – slip stitch
- sc – single crochet
- hdc – half double crochet
- dc – double crochet
- tr – treble crochet
- sc2tog – single crochet 2 together
- rev sc – reverse single crochet (crab stitch)
- BLO – back loop only
- MR – magic ring
- sp – space
- st(s) – stitch(es)
- RS – right side
Special stitches:
– Picot: ch 3, sl st in 3rd ch from hook.
– Long drip (LD): ch 5, sc in 2nd ch from hook, hdc in next 3 ch.
– Short drip (SD): ch 4, sc in 2nd ch from hook, hdc in next 2 ch.
– Rev sc: working left to right, insert hook in the next st to the right, yo, pull up a loop, yo, pull through both loops.
Gauge and Checkpoints
Gauge: 14 sc and 16 rows = 2 in (5.1 cm) in sc worked in rows.
Make the candle body first and treat it as your gauge swatch. It’s the largest piece, and every other part is sized to fit it.
Checkpoints:
– Flame after Rnd 2: 1 in (2.5 cm) wide x 1.5 in (3.8 cm) tall
– Candle body after Row 20: 1 in (2.5 cm) x 2.5 in (6.4 cm)
– Candle body after border: 1.5 in (3.8 cm) x 3 in (7.6 cm)
– Drip cap: 1.75 in (4.4 cm) wide x 0.75 in (1.9 cm) deep, including drips
– Holly leaf: 1.25 in (3.2 cm) long x 0.75 in (1.9 cm) wide
– Berry: about 0.375 in (1.0 cm) across
– Holder bowl: 2 in (5.1 cm) wide x 0.75 in (1.9 cm) tall
If your body is too big, go down to a 2.0 mm hook. If it’s too small, go up to a 2.5 mm hook. Change the hook for every component so the parts stay in proportion.
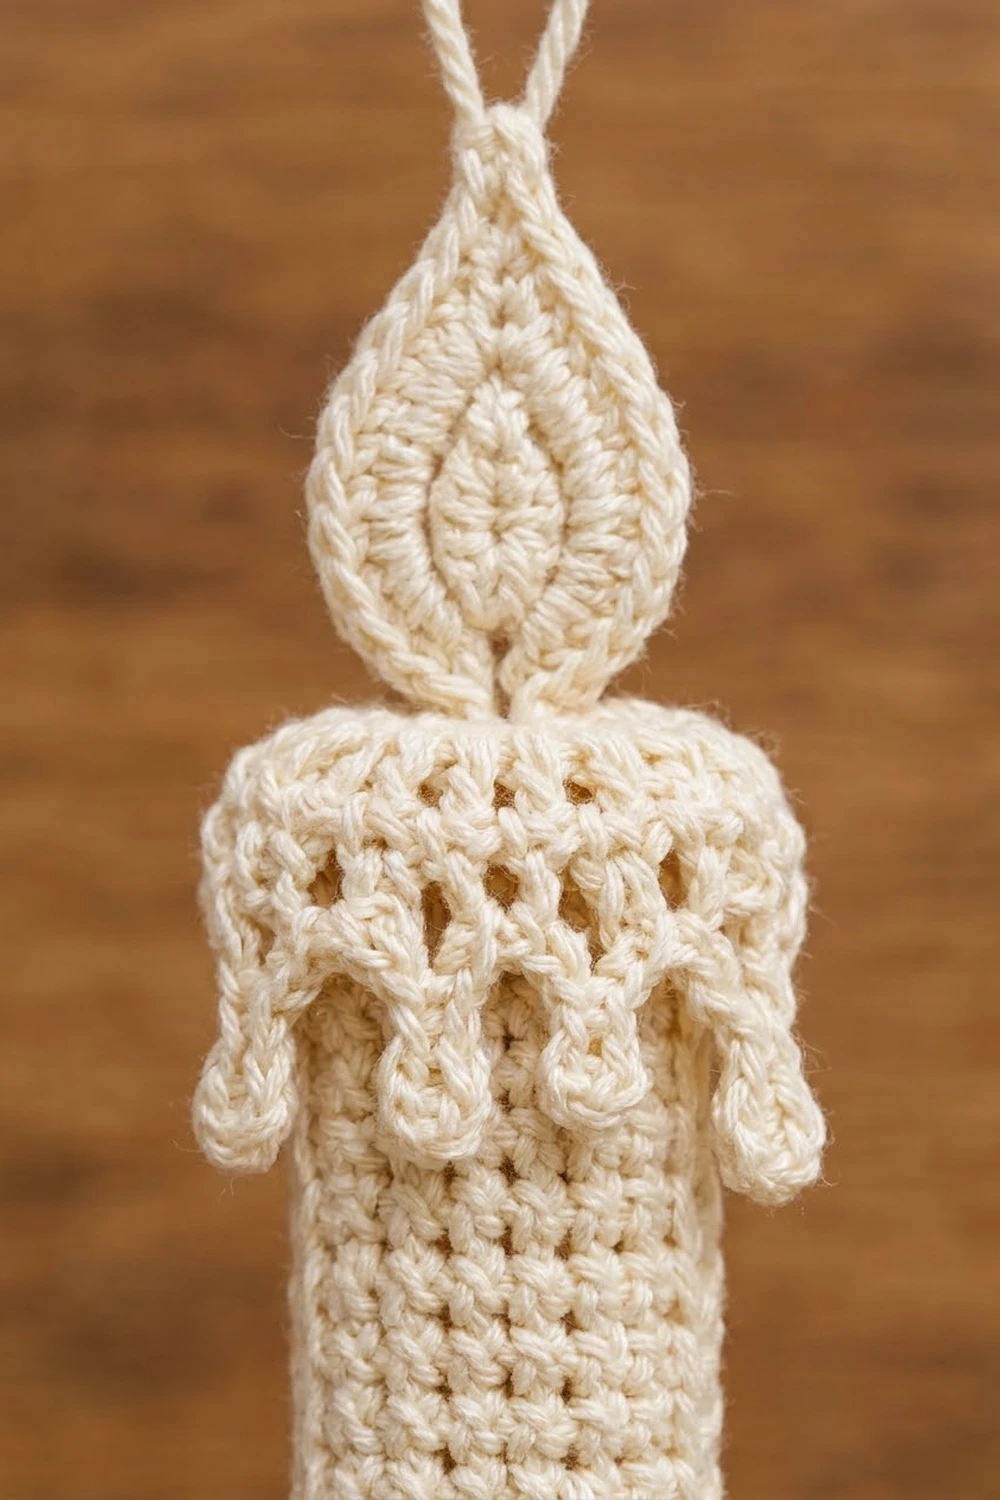
Flame (make 1)
The flame is worked in two rounds around a foundation chain. Rnd 2 goes in the back loops, so the unused front loops form a raised inner teardrop outline.
Foundation: Ch 7.
Rnd 1: Sc in 2nd ch from hook, hdc in next ch, dc in next 3 ch, 7 dc in last ch. Working along the opposite side of the foundation: dc in next 3 ch, hdc in next ch, sc in next ch. Ch 3 for the tip and sl st to the first sc to join. (17 sts + ch-3 tip sp)
Rnd 2 (BLO): Ch 1. Sc in BLO of the first 5 sts, 2 sc in BLO of each of the next 7 dc, sc in BLO of the next 5 sts, then (sc, ch 2, sc) in the ch-3 tip sp. Join with sl st to the first sc. (26 sc + ch-2 tip: 5 + 14 + 5 + 2 = 26)
Hanging loop: Sl st into the ch-2 tip sp, ch 20, sl st in the same sp. Fasten off and leave a 6 in (15.2 cm) tail for sewing.
The 7 dc at the base double to 14 sc, which rounds the bottom of the flame. The ch-2 at the top keeps the tip sharp.
Candle Body (make 1)
Foundation: Ch 8.
Row 1 (RS): Sc in 2nd ch from hook and in each ch across. (7 sc)
Rows 2–20: Ch 1, turn, sc in each st across. (7 sc)
Don’t fasten off. Check the size: 1 in (2.5 cm) wide x 2.5 in (6.4 cm) tall. Go straight to the Border section and work it now, before assembly.
Drip Cap (make 1)
Foundation: Ch 13.
Row 1: Sc in 2nd ch from hook and in each ch across. (12 sc)
Row 2: Ch 1, turn, sc in each st across. (12 sc)
Row 3 (drip row): Ch 1, turn. Sc in first st, LD, sc in next 2 sts, SD, sc in next 2 sts; rep from * once more, LD, sc in next 2 sts, sc in last st. (12 sc + 5 drips: 3 LD and 2 SD)*
Fasten off and leave an 8 in (20.3 cm) tail. Pull each drip straight down so it hangs below Row 3. The long and short drips alternate, giving the melted-wax edge.
Holly Leaves (make 2)
Each leaf is worked in one round around a chain. The picots make the points.
Foundation: Ch 10.
Rnd 1: Sl st in 2nd ch from hook, sc in next ch, hdc in next ch, picot, dc in next 2 ch, picot, dc in next 2 ch, picot, hdc in next ch, (sc, picot, sc) in last ch for the tip. Working along the opposite side: hdc in next ch, picot, dc in next 2 ch, picot, dc in next 2 ch, picot, hdc in next ch, sc in next ch, sl st in next ch. Join with sl st to the first sl st. (18 sts + 7 picots: 8 per side + 2 at tip)
Fasten off and leave a 6 in (15.2 cm) tail. The foundation chain down the middle reads as the leaf’s center vein.
Berries (make 3)
Rnd 1: 6 sc in MR. (6 sc)
Rnd 2: Sc in each st around. (6 sc)
Rnd 3: Sc2tog 3 times. (3 sts)
Push the starting tail inside with the hook to fill the berry. Fasten off, leaving a 6 in (15.2 cm) tail, and weave it through the last 3 sts to close.
Holder Bowl (make 1)
The bowl starts along its straight rim. Graduated stitches make the curved bottom, and the treble columns form the vertical ribs.
Foundation: Ch 14.
Row 1 (RS): Sc in 2nd ch from hook, hdc in next ch, dc in next 2 ch, tr in next 5 ch, dc in next 2 ch, hdc in next ch, sc in last ch. (13 sts: 1 + 1 + 2 + 5 + 2 + 1 + 1)
Row 2 (curve): Ch 1, turn. Sc in first sc, 2 sc in hdc, 2 sc in each of the next 2 dc, 2 sc in each of the next 5 tr, 2 sc in each of the next 2 dc, 2 sc in hdc, sc in last sc. (24 sc: 1 + 2 + 4 + 10 + 4 + 2 + 1)
Row 3 (rim): Ch 1. Rotate and work along the unused loops of the foundation chain: sc in each of the 13 ch. (13 sc)
Row 4 (corded lip): Ch 1, do not turn. Rev sc in each st across. (13 rev sc)
Fasten off and leave a 10 in (25.4 cm) tail.
Assembly
Work the Border (below) on the candle body before you start here. Then lay the bordered body RS up and build the layers from back to front.
- Flame: Place the flame behind the body top so its base overlaps by 0.25 in (0.6 cm). Whipstitch through the back layer only.
- Drip cap: Line the cap’s Row 1 edge up with the top border of the body. The cap is 1.75 in (4.4 cm) wide on a 1.5 in (3.8 cm) body, so let it overhang 0.125 in (0.3 cm) on each side. Sew along Row 1 and tack each drip tip down lightly.
- Leaves: Tuck one leaf behind each side of the body bottom, angled up and out at about 45 degrees. Leave about 0.75 in (1.9 cm) of each leaf showing past the body edge.
- Bowl: Lay the bowl over the bottom 0.5 in (1.3 cm) of the body with the corded rim on top. Sew around the curve and along the rim, catching the leaf bases.
- Berries: Sew the three berries in a tight triangle at the center of the bowl rim.
Weave in every end on the back.
Border
The border goes on the candle body only. It frames the grid texture with a corded edge.
Border gauge: Along the side edges, 18 sc fit 2.5 in (6.4 cm), which matches the 7 sc per 1 in (2.5 cm) of the main gauge.
Rnd 1: With the last loop of Row 20 still on the hook, ch 1, do not turn. Work 7 sc across the top of Row 20, ch 2 for the corner. Work 18 sc down the side row-ends, skipping every 10th row-end, ch 2. Work 7 sc across the foundation chain, ch 2. Work 18 sc up the other side, again skipping every 10th row-end, ch 2. Join to the first sc. (50 sc: 7 + 18 + 7 + 18, + 4 ch-2 corner sps)
The corner ch-2 spaces are not stitches and aren’t part of the side counts.
Rnd 2: Ch 1. Rev sc in each sc around, with 2 rev sc in each ch-2 corner sp. Join and fasten off. (58 rev sc: 50 + 8)
Why the math works: The top and bottom carry the body’s own 7 sts with no change. The sides have 20 rows, but 20 sc would be wider than the 2.5 in (6.4 cm) edge at 7 sc per inch. Skipping 2 row-ends brings each side to 18, which keeps the side flat. The ch-2 corners and the 2 extra rev sc in each corner turn the corners without cupping. Each of the two rounds adds about 0.125 in (0.3 cm), for 0.25 in (0.6 cm) per side. The body grows from 1 in x 2.5 in (2.5 cm x 6.4 cm) to 1.5 in x 3 in (3.8 cm x 7.6 cm).
Final Blocking
- Soak the assembled ornament in cool water for 5 minutes, then press out the water in a towel.
- Pin it flat, RS up, to 4.5 in (11.4 cm) tall x 3 in (7.6 cm) wide.
- Pin the flame tip upward, and pin each holly picot outward to a point.
- Pull each drip straight down and pin its tip.
- Pin the hanging loop into a neat oval.
- If you want it stiffer, spray lightly with fabric stiffener or starch.
- Let it dry fully, at least 12 hours, before unpinning.
Final Quality-Control Checklist
- Flame Rnd 2 has 26 sc plus the ch-2 tip, and the inner front-loop outline shows.
- The body measures 1.5 in x 3 in (3.8 cm x 7.6 cm) after the border.
- Border Rnd 1 has 50 sc and Rnd 2 has 58 rev sc.
- The drip cap has 5 drips that alternate long and short.
- Each leaf has 7 picots and a sharp tip.
- All 3 berries are firm and the same size.
- The bowl rim is straight and corded, and the curve is smooth.
- The ornament lies flat, with no ends showing on the front.
- The hanging loop is centered over the flame.
Troubleshooting
- Body edges wave: You probably worked 20 sc per side. Redo Border Rnd 1 with 18 sc per side.
- Body edges pull in: Your tension is too tight on the border. Use a hook 0.25 mm larger for Rnd 1 only.
- Flame looks round, not pointed: Make sure the ch-2 tip goes into the ch-3 space, then pin the tip firmly when blocking.
- Drips curl: Steam-block them and pin them straight down until dry.
- Leaves cup: Tighten the picot chains, or block them flatter with stiffener.
- Berries are soft: Add a tiny wisp of thread or fiberfill before closing.
- Bowl rim flares: Work Row 3 with tighter tension, or use a smaller hook.
Care
Hand-wash cool, press out the water, and re-block flat. Store flat or hanging, away from heavy items.
Final Notes
Everything comes back to the measurement chain. Gauge of 14 sc x 16 rows = 2 in (5.1 cm) gives a 1 in x 2.5 in (2.5 cm x 6.4 cm) body. The border adds 0.25 in (0.6 cm) per side, for 1.5 in x 3 in (3.8 cm x 7.6 cm). The flame, cap, leaves, and bowl are sized to that bordered body, which gives a finished ornament of 4.5 in x 3 in (11.4 cm x 7.6 cm). Check the body first, and everything else will fall into place.
Happy crocheting!