

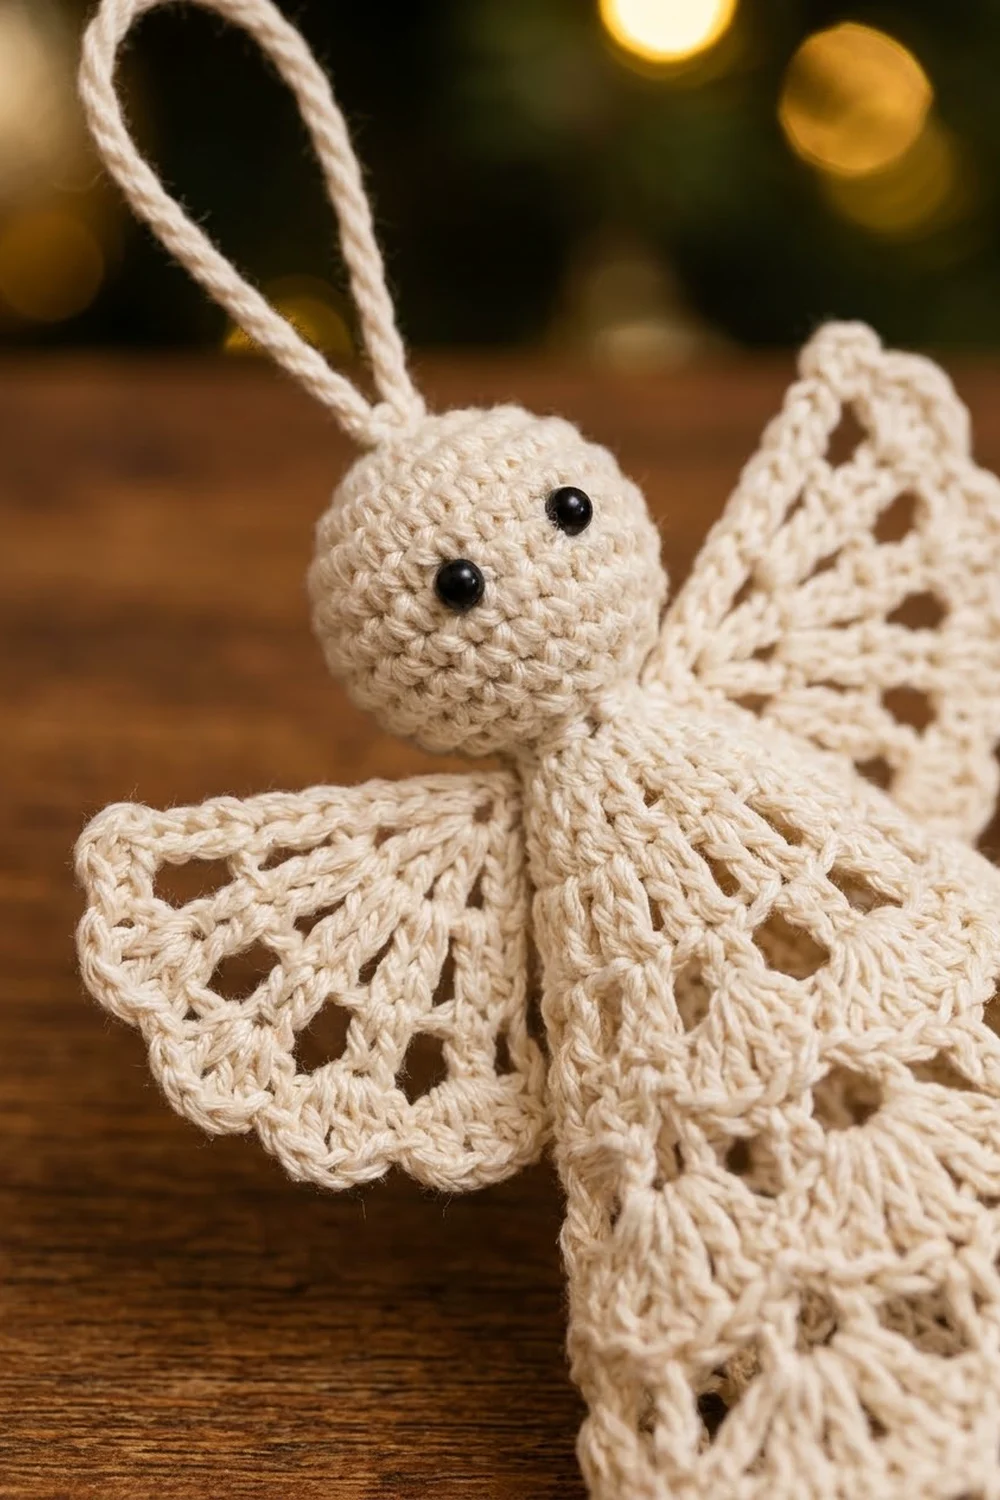
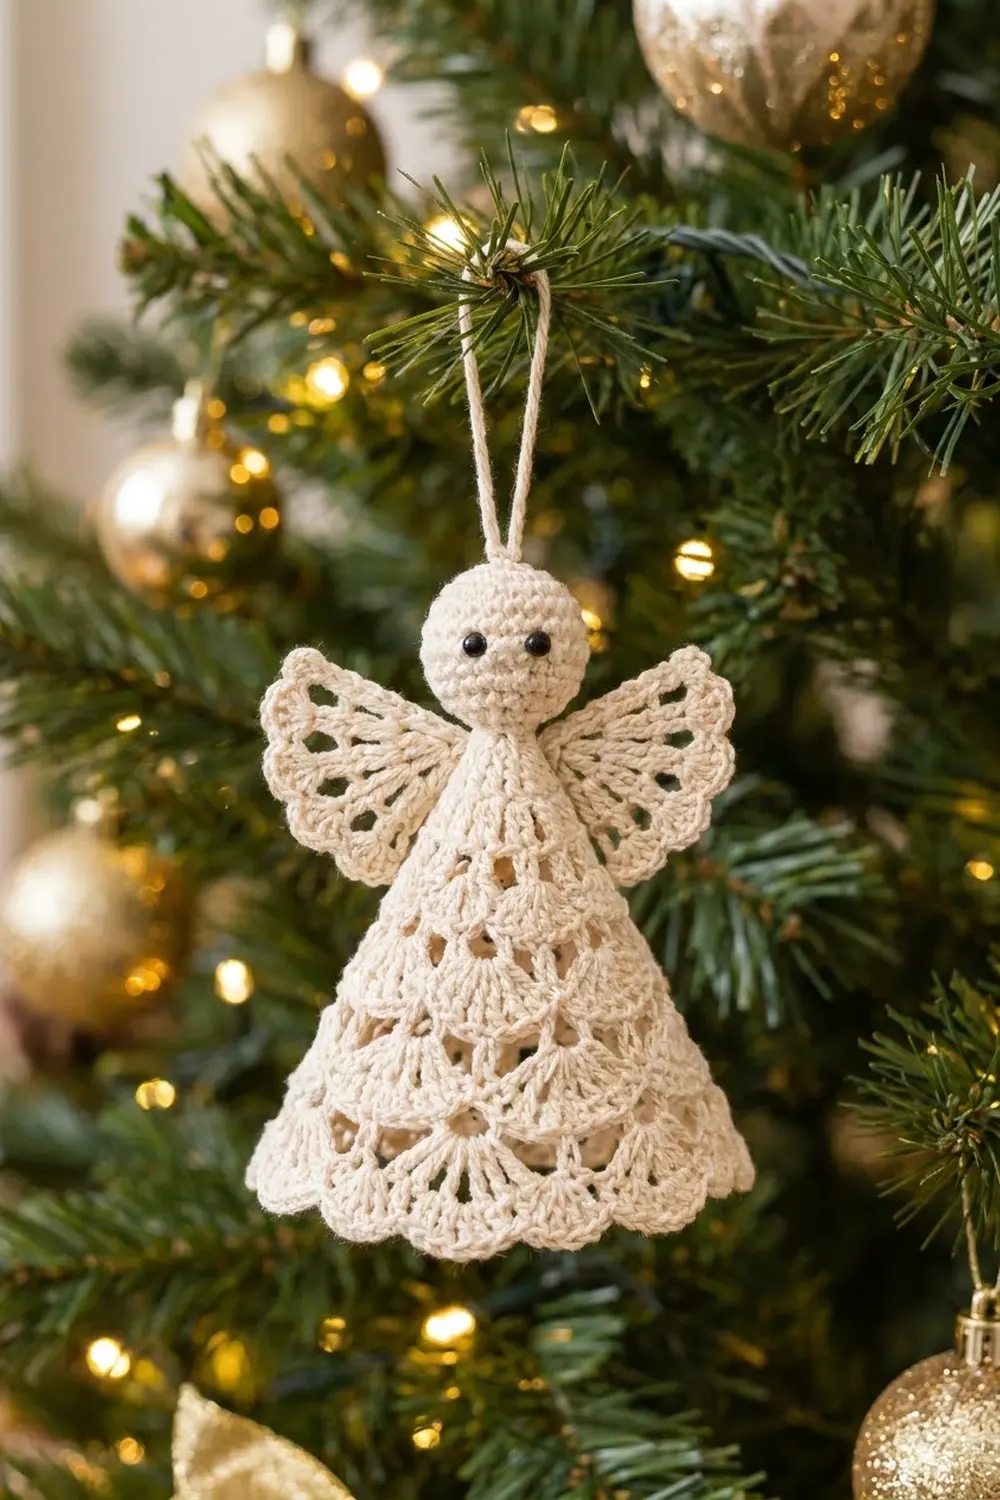
The Ivory Grace Angel is a small lace tree ornament worked in one cream thread. She has a round, smooth head with two tiny black eyes and two fan-shaped wings with open spokes and scalloped edges. Her cone skirt has four tiers of shell fans that get bigger toward a scalloped hem. A thin hanging loop sits on top of her head.
The look is classic heirloom Christmas: one soft ivory color, airy lace, and a stiffened shape that holds its form on a branch. With only one main color, the stitch texture does all the work. The only contrast is the black of the eyes.
This pattern uses US crochet terms. The finished angel is 4 in (10.2 cm) tall from the top of the head to the hem, plus a 1.25 in (3.2 cm) hanging loop. The hem measures 4.75 in (12.1 cm) across when the angel is flattened, and the wingspan is 4 in (10.2 cm).
Construction is simple. You work the skirt as a lace cone in joined rounds from the neck down. Then you make a small stuffed ball for the head, two flat fan wings and a chain cord for hanging. Finally you sew the parts together and stiffen the ornament over a cone form.
Finished Size and Construction
- Finished size: 4 in (10.2 cm) tall without the loop; 5.25 in (13.3 cm) tall with the loop
- Skill level: Intermediate (lace fans and small amigurumi shaping)
- Terminology: US crochet terms
- Yarn weight: Size 3 crochet thread (CYC #1 super fine)
- Hook: 2.25 mm (US B-1)
- Number of pieces: One single ornament, made from 5 parts (skirt, head, 2 wings, hanging loop)
- Layout: Head on top of the cone skirt, one wing on each side of the upper back, loop on top of the head
- Skirt size: 3.25 in (8.3 cm) tall, 4.75 in (12.1 cm) across the hem when flattened
- Skirt size before the hem border: 3 in (7.6 cm) tall, 4.7 in (11.9 cm) across
- Hem border depth: 1 round of single crochet, about 0.15 in (0.4 cm)
- Head: 0.8 in (2.0 cm) across
- Each wing: 1.75 in (4.4 cm) across the scalloped edge, 1.25 in (3.2 cm) from point to edge
Materials
Choose a smooth, mercerized cotton crochet thread in size 3. Mercerized cotton shows each stitch clearly and takes stiffener well. Avoid fuzzy or acrylic blends, because they blur the lace and don’t hold a starched shape.
- Cream / ivory thread: 13 g, about 40 m (44 yd)
- Black embroidery floss: under 1 g, about 1 m (1.1 yd), for the eyes
These amounts include about 25% extra for your gauge swatch and tails.
Tools:
- 2.25 mm (US B-1) crochet hook
- Tapestry needle and a fine embroidery needle
- A small pinch of polyester fiberfill for the head
- Stitch marker
- Fabric stiffener, or a thick starch solution
- A cone form about 3.25 in (8.3 cm) tall and 3 in (7.6 cm) across the base (a rolled card cone covered in plastic wrap works well)
- Rustproof pins and a ruler
Abbreviations (US Terms)
- ch – chain
- sl st – slip stitch
- sc – single crochet
- dc – double crochet
- inc – 2 sc in the same stitch
- dec – sc2tog (single crochet 2 together)
- sk – skip
- sp(s) – space(s)
- st(s) – stitch(es)
- MR – magic ring
Special stitch – Fan: the stated number of dc all worked into the same chain space. The “center” of a fan is the gap between its two middle dc.
Gauge and Checkpoints
Gauge: 14 dc and 6 rows of dc = 2 in (5.1 cm) square, before stiffening.
That equals 7 dc per 1 in (2.5 cm). Make a small swatch first. Then make the skirt as your test piece, because it sets the overall size.
Skirt checkpoints (cone pressed flat, measured across):
- After Round 2: 1.3 in (3.3 cm) wide, 0.65 in (1.7 cm) tall
- After Round 4: 2.1 in (5.3 cm) wide, 1.25 in (3.2 cm) tall
- After Round 6: 3 in (7.6 cm) wide, 1.85 in (4.7 cm) tall
- After Round 8: 3.9 in (9.9 cm) wide, 2.45 in (6.2 cm) tall
- After Round 10: 4.7 in (11.9 cm) wide, 3 in (7.6 cm) tall
If your skirt is too big, go down to a 2 mm hook. If it’s too small, go up to a 2.5 mm hook. Use the same hook for the head and wings so all parts stay in proportion.
Skirt
Work the skirt from the neck down in joined rounds. Don’t turn. The beginning ch-3 counts as a dc throughout.
Round 1: Ch 12, sl st in first ch to form a ring. Ch 3, dc in each of the next 11 ch, sl st in top of beg ch-3 to join. (12 dc)
Round 2: Ch 3, 2 dc in next st, dc in next st, 2 dc in next st; repeat from * 4 more times, join. (18 dc)
Round 3: Ch 1, sc in same st as join, ch 3, sk 2 sts, sc in next st, ch 3, sk 2 sts; repeat from * 4 more times, join to first sc. (6 sc, 6 ch-3 sps)
Round 4 (Tier 1 fans): Sl st into first ch-3 sp, ch 3, 3 dc in same sp, ch 1, 4 dc in next ch-3 sp, ch 1; repeat from * 4 more times, join. (24 dc in 6 fans of 4 dc, 6 ch-1 sps)
Round 5: Sl st in next dc, sl st in center of fan, ch 1, sc in same sp, ch 4, sc in center of next fan, ch 4; repeat from * 4 more times, join to first sc. (6 sc, 6 ch-4 sps)
Each ch-4 plus its sc covers 5 stitch widths: half a fan (2 dc), the ch-1 sp, and half the next fan (2 dc). This keeps the cone even.
Round 6 (Tier 2 fans): Sl st into first ch-4 sp, ch 3, 5 dc in same sp, ch 1, 6 dc in next ch-4 sp, ch 1; repeat from * 4 more times, join. (36 dc in 6 fans of 6 dc, 6 ch-1 sps)
Round 7: Sl st in next 2 dc, sl st in center of fan, ch 1, sc in same sp, ch 6, sc in center of next fan, ch 6; repeat from * 4 more times, join. (6 sc, 6 ch-6 sps)
Round 8 (Tier 3 fans): Sl st into first ch-6 sp, ch 3, 7 dc in same sp, ch 1, 8 dc in next ch-6 sp, ch 1; repeat from * 4 more times, join. (48 dc in 6 fans of 8 dc, 6 ch-1 sps)
Round 9: Sl st in next 3 dc, sl st in center of fan, ch 1, sc in same sp, ch 8, sc in center of next fan, ch 8; repeat from * 4 more times, join. (6 sc, 6 ch-8 sps)
Round 10 (Tier 4 fans): Sl st into first ch-8 sp, ch 3, 9 dc in same sp, ch 1, 10 dc in next ch-8 sp, ch 1; repeat from * 4 more times, join. (60 dc in 6 fans of 10 dc, 6 ch-1 sps)
Don’t fasten off. Go on to the Hem Border below.
Each new tier sits in the gaps of the tier above, so the fans are staggered like roof tiles. The open ch-1 sps between fans form the small lace windows down the skirt.
Head
Work in a continuous spiral. Place a marker in the first stitch of each round.
Round 1: 6 sc in MR. (6 sc)
Round 2: Inc in each st around. (12 sc)
Round 3: Sc in next st, inc; repeat from * 5 more times. (18 sc)
Rounds 4–6: Sc in each st around. (18 sc)
Round 7: Sc in next st, dec; repeat from * 5 more times. (12 sc)
Embroider the eyes now (see Assembly), then stuff the head firmly.
Round 8: Dec 6 times. (6 sc)
Fasten off, leaving a 10 in (25.4 cm) tail for sewing. Leave the hole open; it sits in the neck ring.
Checkpoint: The head should measure 0.8 in (2.0 cm) across.
Wings (Make 2)
Each wing is worked flat in rows, fanning out from a small ring.
Foundation: Ch 5, sl st in first ch to form a ring.
Row 1: Ch 3 (counts as dc), 6 dc in ring, turn. (7 dc)
Row 2: Ch 4 (counts as dc + ch 1), dc in next dc, ch 1; repeat from * 4 more times, dc in last dc, turn. (7 dc, 6 ch-1 sps)
Row 3: Ch 5 (counts as dc + ch 2), dc in next dc, ch 2; repeat from * 4 more times, dc in 3rd ch of turning ch, turn. (7 dc, 6 ch-2 sps)
Row 4 (scallop edge): Ch 1, sc in first dc, 5 dc in next ch-2 sp, sc in next dc; repeat from * 5 more times, working the last sc in the 3rd ch of the turning ch. (30 dc, 7 sc; 6 scallops)
Fasten off, leaving a 10 in (25.4 cm) tail. The dc posts of Rows 2–3 form the open spokes, and Row 4 makes the scalloped outer edge.
Checkpoint: 1.75 in (4.4 cm) across the scalloped edge and 1.25 in (3.2 cm) from the ring to the edge.
Hanging Loop
Ch 26, sl st in 2nd ch from hook and in each ch across. (25 sl st)
Fasten off, leaving both tails. Folded in half, the cord makes a 1.25 in (3.2 cm) loop.
Assembly
- Eyes: With black floss, make a small French knot on Round 5 of the head, then a second one 4 sts away. Pull gently so the knots sit snugly.
- Head to skirt: Push the open bottom of the head (Round 8) into the 12-dc neck ring. Sew all the way around, catching every dc of Round 1, so the head sits straight and centered.
- Wings: Lay the angel face down. Place each wing with its ring pointing toward the body, about 0.25 in (0.6 cm) below the neck and just off center. Sew the ring and the first 0.25 in (0.6 cm) of Row 1 to Round 2 of the skirt. The scalloped edges should point up and out.
- Loop: Fold the cord in half and sew both ends to the top of the head at the magic ring.
- Weave in all ends inside the head or along the wing spokes.
Hem Border
Border gauge: 1 sc per dc, so each 10-dc fan becomes a 10-sc scallop about 1.4 in (3.6 cm) long along its curve.
Round 11: Ch 1, sc in same st as join and in each of the next 9 dc, sl st in next ch-1 sp, sc in each of next 10 dc, sl st in next ch-1 sp; repeat from * 4 more times, join to first sc. Fasten off. (60 sc and 6 sl st; 10 sc per scallop)
Why the math works: The last tier has 6 fans of exactly 10 dc. One sc in each dc keeps every scallop at its natural length, so the edge doesn’t ripple or cup. The sl st in each ch-1 sp pulls the dip between fans in a little, which shapes the scallops. The count is 6 x 10 = 60 sc, and the only other stitches are the 6 sl sts in the dips.
Checkpoint: Before blocking, the skirt is 3.15 in (8.0 cm) tall. After blocking it relaxes to 3.25 in (8.3 cm), and the hem measures 4.75 in (12.1 cm) across.
Final Blocking
- Roll a card cone 3.25 in (8.3 cm) tall and about 3 in (7.6 cm) across the base. Tape it and wrap it in plastic.
- Dip the skirt and wings in fabric stiffener. Keep stiffener off the head so it stays soft and round.
- Squeeze out the extra, then blot with a towel so no film fills the lace holes.
- Slide the skirt onto the cone. Gently pull each fan down so the tiers line up and the hem flares evenly.
- Pin the 6 hem scallops so they point outward.
- Shape the wings by hand: spread the spokes evenly and pin the 6 scallops of each wing.
- Clear any blocked lace holes with a pin.
- Let the angel dry completely, at least 24 hours, then remove the cone.
Final Quality-Control Checklist
- Height is 4 in (10.2 cm) without the loop.
- Hem measures 4.75 in (12.1 cm) across when flattened.
- Wingspan is 4 in (10.2 cm), and both wings sit at the same height.
- The skirt has 4 tiers of 6 staggered fans.
- The hem has 6 even scallops of 10 sc each.
- The head is 0.8 in (2.0 cm) across, round, firm and centered.
- Both eyes are level.
- The loop is centered and secure.
- No stiffener film is left in the lace holes.
- All ends are woven in and hidden.
Troubleshooting
The skirt twists into a spiral. Your joins are drifting. Always join to the top of the beginning ch-3 and start the next round in the correct space.
The tiers ruffle. Your chain spaces are too loose, or a fan has extra dc. Count each fan and work the chains a little tighter.
The cone is too narrow and curls in. The chains in Rounds 5, 7 and 9 are too tight. Work them more loosely or go up one hook size.
The head tips forward. Sew it through every dc of Round 1 and add a little more fiberfill.
The wings droop. Use more stiffener on the wings and pin them flat while they dry.
The scallops look flat. Make sure each sl st goes into the ch-1 sp, not into a dc.
Care
Dust gently or spot clean with a damp cloth. Don’t machine wash, because water softens the stiffener; stiffen the angel again if she loses her shape.
Final Notes
Every measurement follows from your gauge. At 7 dc per 1 in (2.5 cm), the skirt should measure 1.3 in (3.3 cm), 2.1 in (5.3 cm), 3 in (7.6 cm), 3.9 in (9.9 cm) and 4.7 in (11.9 cm) across at the checkpoints. The 60-sc hem border finishes the skirt at 3.25 in (8.3 cm) tall and 4.75 in (12.1 cm) wide. Add the 0.8 in (2.0 cm) head and the 4 in (10.2 cm) wingspan, and your angel is 4 in (10.2 cm) tall and ready for the tree. Check each measurement as you go, and every angel will come out the same size.
Happy crocheting!