

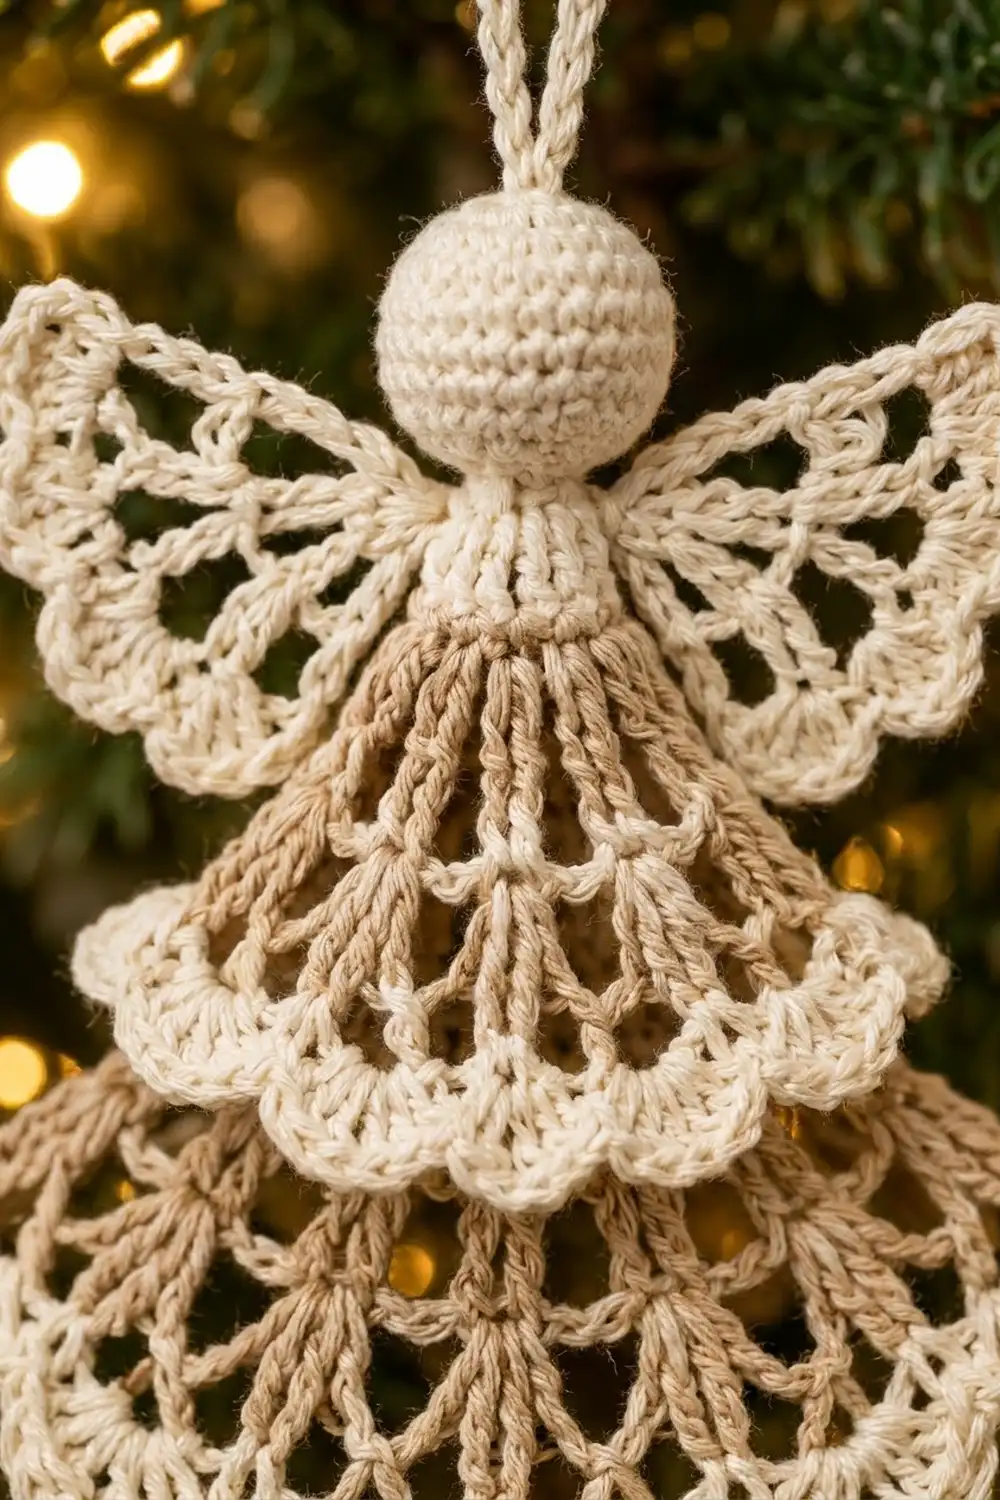
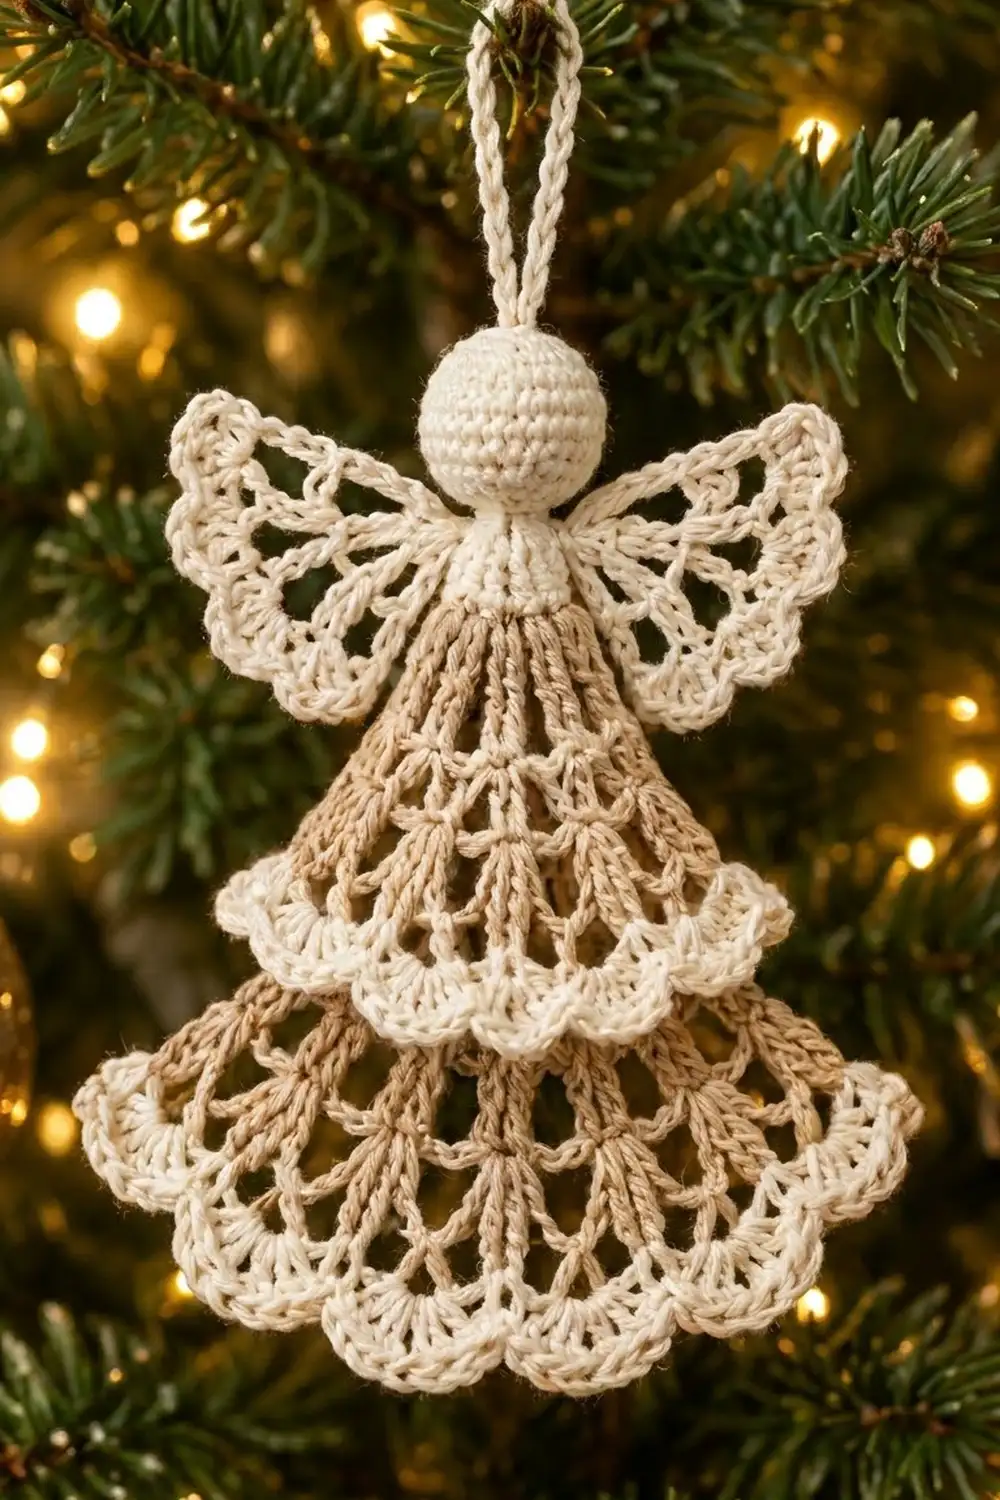
The Ivory Grace Angel is a lacy, heirloom-style Christmas ornament with a round ivory head, two open fan wings, and a three-tier scalloped skirt. Near the neck, each tier has warm tan spokes that open into cream lace. Every scallop has a thin tan outline.
The palette is just cream and light tan. That keeps the look soft and vintage, and it suits gold, white, or rustic trees. The pattern uses US crochet terms.
The finished angel is 4.5 in (11.4 cm) wide and 4.25 in (10.8 cm) tall without the loop, or 6.25 in (15.9 cm) tall with it.
Here’s the construction. You make a small stuffed head, three flat fans worked in rows from a magic ring, and two smaller wing fans. You add a tan edging to every fan, block the pieces, and sew them in layers at the neck. A crocheted cord loop finishes the ornament.
Finished Size and Construction
- Finished size: 4.5 in (11.4 cm) wide × 4.25 in (10.8 cm) tall; 6.25 in (15.9 cm) tall with loop
- Skill level: Easy-intermediate
- Terminology: US crochet terms
- Yarn weight: Sport weight (#2 fine) mercerized cotton
- Hook: 2.75 mm (US C/2)
- Number of pieces: 1 ornament, made from 7 components (head, 3 skirt fans, 2 wings, loop)
- Layout: Three fans stacked at the neck (largest at the back), wings behind the shoulders, head on top
- Piece sizes (blocked, ring to scallop tip): top fan 2 in (5.1 cm); middle fan 2.5 in (6.4 cm); bottom fan 3 in (7.6 cm); wing 1.5 in (3.8 cm)
- Size before border: each fan is about 0.125 in (0.3 cm) shorter before edging
- Border depth: 1 row of single crochet, about 0.125 in (0.3 cm)
Materials
Use a smooth mercerized cotton. Its crisp stitch definition shows off the lace and holds a blocked shape well. Avoid fuzzy or stretchy fibers, because they make the wings and scallops droop.
- Color A – Cream/Ivory: 10 g, about 30 m (head, neck, loop, lace rows, shells)
- Color B – Light Tan/Beige: 5 g, about 15 m (spoke rows and edging)
Tools:
- 2.75 mm (US C/2) crochet hook
- Tapestry needle
- Small pinch of polyester fiberfill
- 2 locking stitch markers
- Scissors
- Blocking mat, rustproof pins, and spray starch
The yarn amounts include a margin of about 25% for a test piece and for weaving in ends.
Abbreviations (US Terms)
- ch – chain
- sl st – slip stitch
- sc – single crochet
- dc – double crochet
- sc2tog – single crochet 2 together
- MR – magic ring
- sp – space
- st(s) – stitch(es)
- rep – repeat
Special stitches:
- V-st (ch-1 / ch-2 / ch-3): (dc, ch 1, dc), (dc, ch 2, dc), or (dc, ch 3, dc), all worked in the same stitch or space.
- Shell: the stated number of dc, all worked into the same space.
A beginning ch-3 counts as a dc. A beginning ch-4 counts as dc + ch 1, a ch-5 as dc + ch 2, and a ch-6 as dc + ch 3.
Gauge and Checkpoints
Gauge:
- 22 dc and 10 dc rows = 4 in (10.2 cm)
- 24 sc and 26 sc rounds = 4 in (10.2 cm)
Instead of a flat swatch, make Fan A first as your test piece and measure it.
Checkpoints:
- Fan A, after Row 1: 0.5 in (1.3 cm) from ring center to dc tops
- Fan A, after Row 3: 1.25 in (3.2 cm)
- Fan B, after Row 4: 1.75 in (4.4 cm)
- Fan C, after Row 5: 2.25 in (5.7 cm)
- Head, after Round 3: flat circle 0.75 in (1.9 cm) across
- Finished head: about 1 in (2.5 cm) diameter
If your pieces are too big, use a 2.5 mm hook. If they’re too small or the lace looks cramped, use a 3.0 mm hook. Lace grows slightly when you block it, and the final sizes are blocked measurements.
Head and Neck
Use Color A. Work in continuous spiral rounds and mark the first stitch of each round.
Rnd 1: 6 sc in MR. (6 sts)
Rnd 2: 2 sc in each st around. (12 sts)
Rnd 3: (sc in next st, 2 sc in next st) 6 times. (18 sts)
Rnds 4–7: sc in each st around. (18 sts each round)
Rnd 8: (sc in next st, sc2tog) 6 times. (12 sts)
Stuff the head firmly.
Rnd 9: sc2tog 6 times. (6 sts)
Rnds 10–11 (neck): sc in each st around. (6 sts each round)
Fasten off and leave a 12 in (30.5 cm) tail. The neck is a tube about 0.25 in (0.6 cm) long.
Skirt Fans
The fans are worked flat in rows. Turn at the end of each row.
- Rows 1–2 are Color B. Switch to Color A in the last yarn-over of Row 2.
- Leave a 6 in (15.2 cm) tail on each magic ring.
Fan A – Top Tier (7 spokes)
Row 1 (B): MR, ch 4, (dc, ch 1) 5 times in ring, dc in ring. Pull the ring snug so the row lies as a half-circle. (7 dc, 6 ch-1 sps)
Row 2 (B): ch 4, dc in same st, ch 1, V-st (ch-1) in next dc, ch 1; rep from * 4 more times, V-st (ch-1) in 3rd ch of turning ch. (7 V-sts: 14 dc, 13 ch-1 sps)
Row 3 (A): sl st into first V-st sp, ch 5, dc in same sp, ch 1, V-st (ch-2) in next V-st sp; rep from * 5 more times. (7 V-sts: 14 dc, 7 ch-2 sps, 6 ch-1 sps)
Row 4 (A, scallops): sl st into first ch-2 sp, ch 3, 6 dc in same sp, *sc in next ch-1 sp, 7 dc in next ch-2 sp; rep from * 5 more times. (7 shells of 7 dc + 6 sc = 55 sts)
Fasten off. Rows 1–2 form the tan Y-shaped spokes, Row 3 opens the lace windows, and Row 4 makes the scallops.
Fan B – Middle Tier (7 spokes)
Rows 1–3: Work as for Fan A. (7 V-sts)
Row 4 (A): sl st into first ch-2 sp, ch 6, dc in same sp, ch 2, V-st (ch-3) in next ch-2 sp; rep from * 5 more times. (7 V-sts: 14 dc, 7 ch-3 sps, 6 ch-2 sps)
Row 5 (A, scallops): sl st into first ch-3 sp, ch 3, 8 dc in same sp, sc in next ch-2 sp, 9 dc in next ch-3 sp; rep from * 5 more times. (7 shells of 9 dc + 6 sc = 69 sts)
Fasten off.
Fan C – Bottom Tier (9 spokes)
Row 1 (B): MR, ch 4, (dc, ch 1) 7 times in ring, dc in ring. (9 dc, 8 ch-1 sps)
Row 2 (B): ch 4, dc in same st, ch 1, V-st (ch-1) in next dc, ch 1; rep from * 6 more times, V-st (ch-1) in 3rd ch of turning ch. (9 V-sts: 18 dc, 17 ch-1 sps)
Row 3 (A): sl st into first V-st sp, ch 5, dc in same sp, ch 1, V-st (ch-2) in next V-st sp; rep from * 7 more times. (9 V-sts, 9 ch-2 sps, 8 ch-1 sps)
Row 4 (A): sl st into first ch-2 sp, ch 6, dc in same sp, ch 2, V-st (ch-3) in next ch-2 sp; rep from * 7 more times. (9 V-sts, 9 ch-3 sps, 8 ch-2 sps)
Row 5 (A): sl st into first ch-3 sp, ch 6, dc in same sp, ch 3, V-st (ch-3) in next V-st sp; rep from * 7 more times. (9 V-sts, 9 ch-3 sps inside, 8 ch-3 sps between)
Row 6 (A, scallops): sl st into first V-st sp, ch 3, 8 dc in same sp, *sc in next ch-3 sp between V-sts, 9 dc in next V-st sp; rep from * 7 more times. (9 shells of 9 dc + 8 sc = 89 sts)
Fasten off.
Wings (make 2)
Use Color A throughout.
Row 1: MR, ch 4, (dc, ch 1) 3 times in ring, dc in ring. Pull snug. (5 dc, 4 ch-1 sps)
Row 2: ch 5, dc in same st, ch 1, V-st (ch-2) in next dc, ch 1; rep from * 2 more times, V-st (ch-2) in 3rd ch of turning ch. (5 V-sts: 10 dc, 5 ch-2 sps, 4 ch-1 sps)
Row 3 (scallops): sl st into first ch-2 sp, ch 3, 6 dc in same sp, sc in next ch-1 sp, 7 dc in next ch-2 sp; rep from * 3 more times. (5 shells of 7 dc + 4 sc = 39 sts)
Fasten off.
Hanging Loop
With Color A, ch 30. Sl st in 2nd ch from hook and in each ch across. (29 sl sts)
This makes a firm cord about 4 in (10.2 cm) long, which folds into a 2 in (5.1 cm) loop. Leave a 6 in (15.2 cm) tail.
Border: Tan Scallop Edging
Border gauge: 6 sc = 1 in (2.5 cm) along the curved edge.
Hold the piece with the scallop row’s front side facing you. The edging goes along the scalloped edge only. Leave the two straight sides of each fan plain. Join Color B with a standing sc in the beginning ch-3 of the first shell.
Every edging row is a trim row. Work 1 stitch into every existing stitch, and add 1 extra sc at the center of each shell:
- 1 sc in each dc
- 2 sc in the center dc of each shell
- 1 sl st in each sc between shells
Fan A (Row 5): Each shell gets 3 sc, then 2 sc in the 4th dc, then 3 sc, for 8 sc. Total: 55 sts worked one per stitch + 7 extra = 62 sts (56 sc + 6 sl st).
Fan B (Row 6): Each shell gets 4 sc, then 2 sc in the 5th dc, then 4 sc, for 10 sc. Total: 69 + 7 extra = 76 sts (70 sc + 6 sl st).
Fan C (Row 7): Each shell gets 10 sc, as for Fan B. Total: 89 + 9 extra = 98 sts (90 sc + 8 sl st).
Wings (Row 4, each): Each shell gets 8 sc, as for Fan A. Total: 39 + 5 extra = 44 sts (40 sc + 4 sl st).
Fasten off and weave in the ends.
Why the math works: The outer arc of each shell is longer than its base. A plain one-to-one edging would pull the tips flat, and one extra sc per tip adds just enough length to keep each scallop round. The sl sts between shells stay tight, which keeps the dips crisp. Each sl st replaces one sc one for one, so the totals match.
Assembly
- Close each magic ring tightly and knot it on the back.
- Stack the fans with their rings aligned: Fan C at the back, Fan B in the middle, and Fan A in front.
- Sew through all three rings with the ring tails, keeping the stack flat.
- Place the wings behind the stack with their rings 0.25 in (0.6 cm) to each side of the neck point. Angle them up and out at about 45 degrees and sew them in place.
- Center the neck over the rings and sew around its base through all the layers.
- Fold the cord in half and sew both ends to the top of the head.
Checkpoint: The finished angel is 4.5 in (11.4 cm) wide and 4.25 in (10.8 cm) tall.
Final Blocking
- Block the fans and wings before you assemble them.
- Spray each piece until it’s damp.
- Pin Fan A to 2 in (5.1 cm) long × 2.5 in (6.4 cm) wide.
- Pin Fan B to 2.5 in (6.4 cm) × 3.5 in (8.9 cm).
- Pin Fan C to 3 in (7.6 cm) × 4.5 in (11.4 cm).
- Pin each wing to 1.5 in (3.8 cm) × 1.25 in (3.2 cm).
- Put a pin in each scallop tip, spray lightly with starch, and let dry for about 8 hours.
Final Quality-Control Checklist
- Head is round, firm, and about 1 in (2.5 cm) across
- Rings are fully closed, with no gaps at the neck
- Fans have 7, 7, and 9 spokes
- Every shell is complete and outlined in tan
- All three tiers show below one another
- Wings are symmetrical, and the loop is centered
- Ends are hidden
Troubleshooting
- Fan cups: The ring is too tight. Loosen it slightly and block flat.
- Fan ruffles: The chains are too loose. Use a smaller hook for the chain spaces.
- Pointed scallops: You missed the extra center sc in the edging.
- Edging puckers: Work the edging with a 3.0 mm hook.
- Wings flop: Use more starch, or tack each wing tip to the back of Fan A.
Care
Hand wash in cool water, roll in a towel to remove water, and re-block flat. Store the angel flat in tissue paper.
Final Notes
The measurements all build on each other:
- Gauge: 22 dc = 4 in (10.2 cm)
- Fan A Row 3 checkpoint: 1.25 in (3.2 cm)
- Blocked fans: 2 in (5.1 cm), 2.5 in (6.4 cm), and 3 in (7.6 cm), each including its 0.125 in (0.3 cm) edging
- Finished angel, stacked under a 1 in (2.5 cm) head: 4.5 in (11.4 cm) wide and 4.25 in (10.8 cm) tall, or 6.25 in (15.9 cm) with the loop
Happy crocheting!