

This curtain is made of lacy butterflies that catch the light. When sun comes through the window, the open wing shapes cast soft butterfly shadows across the floor. The whole curtain uses one color, a natural ecru cotton, so the texture of the lace does all the work.
Each butterfly has four wings. Each wing has a large open teardrop window, framed by a ring of double crochet, an open mesh band, and a shell edge finished with picots. A raised, ridged body and two knobbed antennae are sewn over the center.
This pattern uses US crochet terms. Each finished panel is 14 in (35.6 cm) wide and 49.4 in (125.5 cm) tall including the rod band. You make two panels.
Construction is simple to follow. You crochet each butterfly in rounds from a small center ring and join it to its neighbors at picot points as you finish its last round. You make a separate body for each butterfly and sew it on. Finally, you work a rod-pocket band across the top of each panel.
Finished Size and Construction
- Finished panel size: 14 in (35.6 cm) wide × 49.4 in (125.5 cm) tall
- Skill level: Intermediate
- Terminology: US crochet terms
- Yarn weight: DK (#3) mercerized cotton
- Hook: 3.5 mm (E-4)
- Number of pieces: 32 butterflies (16 per panel). Each butterfly is 1 wing piece plus 1 body.
- Layout per panel: 2 butterflies wide × 8 butterflies tall
- Single butterfly: 7 in (17.8 cm) wide × 6 in (15.2 cm) tall. The antennae add 1¼ in (3.2 cm) above the wings.
- Panel size before the band: 14 in (35.6 cm) × 48 in (121.9 cm)
- Band depth (folded): 1.4 in (3.6 cm)
Materials
Choose a smooth mercerized cotton. It gives crisp stitch definition, open windows that hold their shape, and the soft sheen you see in the light. Avoid fuzzy or very stretchy yarns, because the lace will lose its outline.
- Yarn: DK cotton in Natural/Ecru, 300 g (690 m / 755 yd), based on 50 g = 115 m
- Each butterfly (wings and body) uses about 7 g (16 m / 17.5 yd).
- Each rod band uses about 7 g (16 m / 17.5 yd).
- 3.5 mm (E-4) crochet hook
- Tapestry needle
- Stitch markers
- Scissors
- Blocking mats, rustproof pins, and a spray bottle
- Tape measure
The yarn amount includes a margin of about 25% for your gauge swatch and for differences in tension.
Abbreviations (US Terms)
- ch – chain
- sl st – slip stitch
- sc – single crochet
- hdc – half double crochet
- dc – double crochet
- BLO – back loop only
- sk – skip
- sp – space
- st(s) – stitch(es)
- rnd – round
Special stitches
- Shell: 3 dc in the same space.
- Picot: ch 3, sl st in the 3rd ch from the hook.
- Joining picot: ch 1, sl st in the matching picot of the finished neighbor, ch 1, sl st in the first ch of this picot.
- 3-dc cluster (cl): yarn over, insert the hook in the stitch, pull up a loop, yarn over, pull through 2 loops; repeat from * to * 2 more times in the same stitch, then yarn over and pull through all 4 loops.
Gauge and Checkpoints
Gauge: 20 sc and 22 rows = 4 in (10.2 cm). Five rows of dc = 2 in (5.1 cm).
Make one complete butterfly before you start a panel. Block it and measure it. That one test piece controls every number that follows.
Checkpoints
- After wing Rnd 1, the ring is 1 in (2.5 cm) across.
- After wing Rnd 3, the distance from upper wingtip to upper wingtip is 4.5 in (11.4 cm).
- After wing Rnd 5, the width is 6.5 in (16.5 cm).
- After wing Rnd 6, the butterfly is 7 in (17.8 cm) wide × 6 in (15.2 cm) tall after blocking.
- The finished body is 3 in (7.6 cm) × ¾ in (1.9 cm).
If your butterfly comes out bigger than 7 in (17.8 cm), go down to a 3.25 mm hook. If it comes out smaller, go up to a 3.75 mm hook. A difference of only ¼ in (0.6 cm) per butterfly adds up to 2 in (5.1 cm) over 8 rows of butterflies.
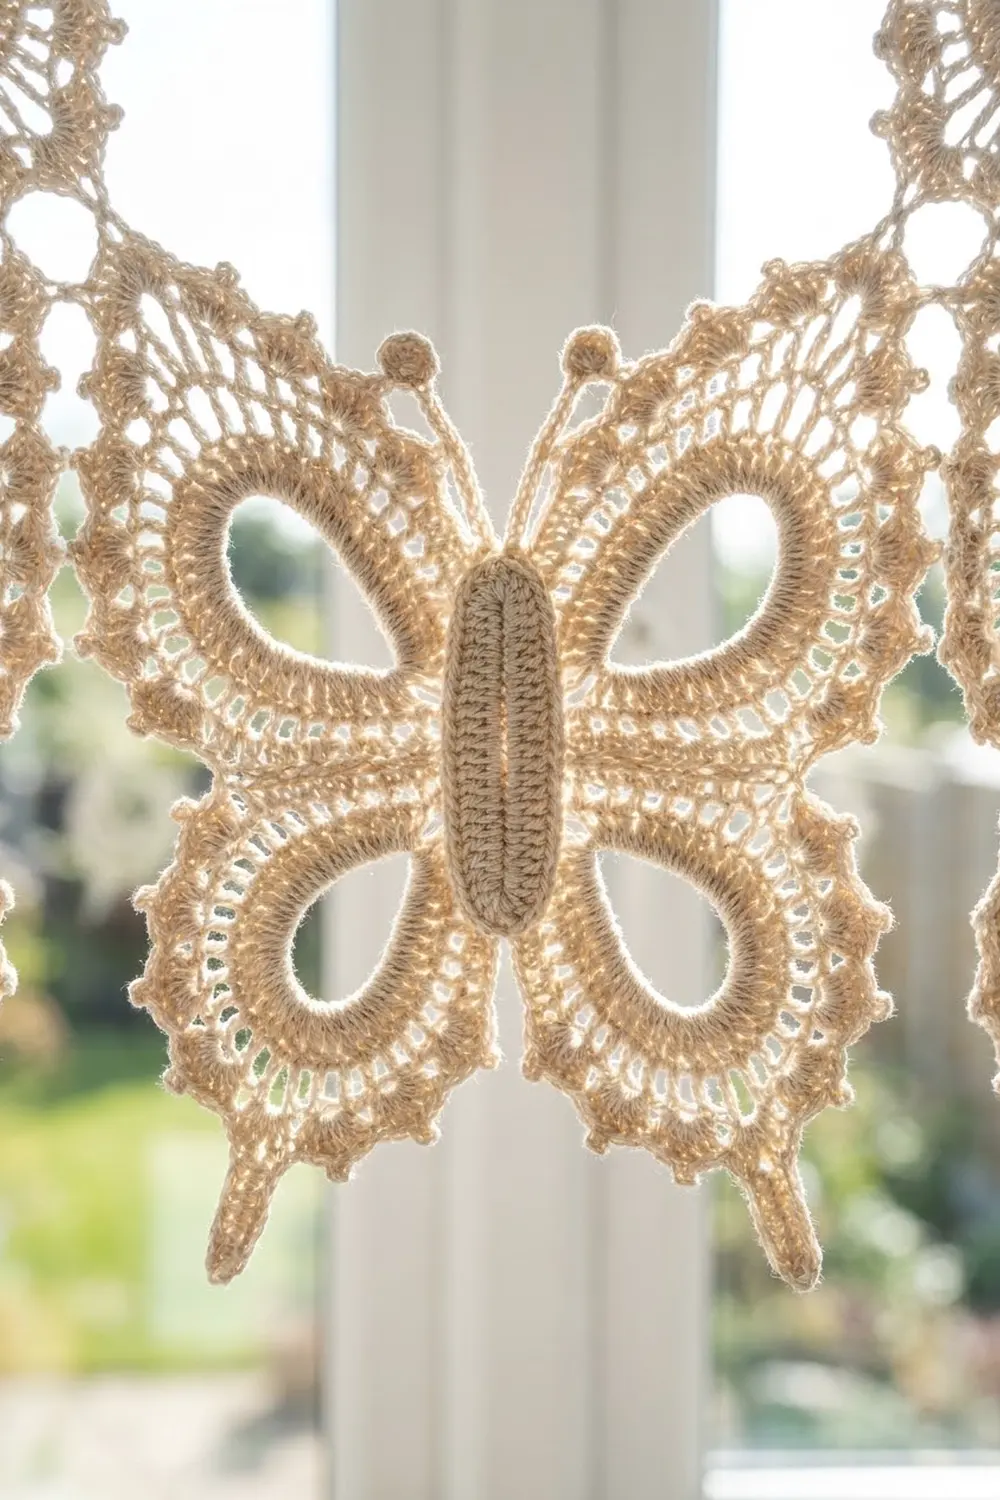
Butterfly Wings (make 32)
The 4 wings are worked in this order: upper right (UR), lower right (LR), lower left (LL), upper left (UL).
Rnd 1: Ch 6 and sl st in the first ch to form a ring. Ch 1, then work 16 sc in the ring. Join with a sl st in the first sc. (16 sc)
Rnd 2: This round makes the 4 wing windows.
- Ch 1, sc in the same st as the join.
- Ch 18 for the UR loop, then sc in the next 4 sc.
- Ch 12 for the LR loop, then sc in the next 4 sc.
- Ch 12 for the LL loop, then sc in the next 4 sc.
- Ch 18 for the UL loop, then sc in the next 3 sc.
- Join with a sl st in the first sc.
(16 sc and 4 ch-loops. Each gap between loops has 4 sc.)
Rnd 3: This round outlines each window.
- In the UR ch-18 loop, work (2 sc, 2 hdc, 22 dc, 2 hdc, 2 sc).
- Work a gap: sk the next sc, sl st in the next 2 sc, sk the next sc.
- In the LR ch-12 loop, work (2 sc, 2 hdc, 12 dc, 2 hdc, 2 sc), then work a gap.
- In the LL loop, repeat the LR stitches, then work a gap.
- In the UL loop, repeat the UR stitches.
- Sk the next sc and sl st in the next 2 sc. You end at the join.
(Each upper wing has 30 sts and each lower wing has 20 sts, for 100 sts in all, plus 8 gap sl sts.)
The dc wrap around the chain loop, so the teardrop windows stay open.
Rnd 4: This round makes the mesh band.
- Each upper wing: sc in the 2 sc, hdc in the 2 hdc, [dc in the next dc, ch 1] 21 times, dc in the last dc, hdc in the 2 hdc, sc in the 2 sc. (30 sts and 21 ch-1 sps)
- Each lower wing: sc in the 2 sc, hdc in the 2 hdc, [dc in the next dc, ch 1] 11 times, dc in the last dc, hdc in the 2 hdc, sc in the 2 sc. (20 sts and 11 ch-1 sps)
- Between wings: sl st in each of the 2 gap sl sts.
Rnd 5: This round makes the shell scallops.
- Each upper wing: sl st in the first 5 sts. Work a shell in ch-1 sp 1, then sc in the next sp. Repeat this (shell in the odd-numbered sps, sc in the even-numbered sps) until you have worked a shell in sp 21. Sl st in the last dc and the next 4 sts. (11 shells and 10 sc)
- Each lower wing: work the same way across its 11 sps. (6 shells and 5 sc)
- Between wings: sl st in the 2 gap sl sts.
Rnd 6: This round adds the picot edge and the tails.
- Each shell: sc in the 1st dc, then sc in the 2nd dc and make a picot, then sc in the 3rd dc.
- Between shells: sl st in the sc.
- Wing ends and gaps: sl st across them as you did in Rnd 5.
- Totals: each upper wing has 33 sc, 11 picots, and 10 sl sts. Each lower wing has 18 sc, 5 picots, and 1 tail.
Tail: On LR shell 4 and LL shell 3, work the tail in place of the picot:
- Sc in the 2nd dc and ch 8.
- Sl st in the 2nd ch from the hook, sc in the next 2 ch, hdc in the next 2 ch, dc in the next 2 ch.
- Sl st in the same dc.
The tail is about 1¼ in (3.2 cm) long and tapers to a point.
Number the picots in the order you work them within each wing. Because of the working direction, UR picot n mirrors UL picot 12 − n, and LR picot n mirrors LL picot 7 − n.
Fasten off and weave in the ends.
Butterfly Body (make 32)
Rnd 1:
- Ch 16. Sc in the 2nd ch from the hook and in the next 13 ch.
- Work 3 sc in the last ch. This end is the head.
- Working along the other side of the foundation chain, sc in the next 13 ch.
- Work 2 sc in the first ch. This end is the tail end.
- Join with a sl st. (32 sc)
Rnd 2: Ch 1, sc in BLO of each st around, then join. (32 sc) The front loops left behind make a fine ridge around the body.
Antennae:
- Sl st in st 15, which is the first of the 3 head sts.
- Ch 11. Work a 3-dc cluster in the 4th ch from the hook to make the knob.
- Sl st in each of the remaining 7 ch, then sl st in st 15.
- Sl st in st 16 and st 17.
- Make the second antenna the same way and finish with a sl st in st 17.
Fasten off, leaving a 12 in (30.5 cm) tail. Center the body over the ring with the head between the upper wings. Whipstitch it in place through Rnd 1 of the wings.
Make All Pieces
Make 32 wing pieces and 32 bodies, all in Natural/Ecru. That is 16 of each per panel.
Layout for one panel (A = left column, B = right column):
Row 1:  A1  B1
Row 2:  A2  B2
Row 3:  A3  B3
Row 4:  A4  B4
Row 5:  A5  B5
Row 6:  A6  B6
Row 7:  A7  B7
Row 8:  A8  B8
Joining
Method: Join as you go. Complete A1 in full. For every butterfly after A1, work Rnd 6 as written, but swap in joining picots where the new butterfly touches a finished one.
Where butterflies join
- Side to side (new butterfly to the right of a finished one):
- New UL picot 5 joins the finished butterfly’s UR picot 7.
- New LL picot 5 joins the finished butterfly’s LR picot 2.
- Top to bottom (new butterfly below a finished one):
- New UR picot 2 joins the tip ch of the LR tail above.
- New UL picot 10 joins the tip ch of the LL tail above.
Order: A1, B1, A2, B2, and so on down the panel. Each A butterfly joins to the one above it. Each B butterfly joins to the one above it and to the A butterfly on its left.
Tension: Keep the joining ch-1s the same size as your normal picot chains. A tight join pulls the wings into a pucker, and a loose one leaves a visible gap. Join points add no extra width or height to the panel.
Size checkpoint: Measure after Row 4. The panel should be 14 in (35.6 cm) wide and 24 in (61 cm) tall. At the end, the joined panel should be 14 in (35.6 cm) × 48 in (121.9 cm).
Border: Rod-Pocket Band
The band runs across the top edge only. The sides and the bottom are left as open picot lace, so no stitches are added there. The band is worked at 20 sts = 4 in (10.2 cm).
Row 1 (top edge = 2 butterflies × 35 sts = 70 sts): Each butterfly section is ch 9, sc in UL picot 8, ch 15, sc in UR picot 4, ch 9. That makes 35 sts per butterfly.
- Ch 9, sc in A1’s UL picot 8, ch 15, sc in A1’s UR picot 4, ch 9.
- Ch 9, sc in B1’s UL picot 8, ch 15, sc in B1’s UR picot 4, ch 9.
The two ch-9s side by side make one ch-18 bridge between the butterflies. (70 sts: 66 ch + 4 sc)
Row 2: Ch 1, turn. Sc in each st across. (70 sc)
Rows 3–8: Ch 3 (counts as dc), turn. Dc in each st across. (70 dc per row)
Row 9: Ch 1, turn. Sc in each st across. (70 sc) Fasten off, leaving a 40 in (101.6 cm) tail.
Fold: Fold the band to the back between Rows 5 and 6. Whipstitch Row 9 to Row 2. The unfolded band is 2.8 in (7.1 cm) tall, so it folds to 1.4 in (3.6 cm). The pocket fits a rod up to ¾ in (1.9 cm) across.
Why the math works: At 5 sts per inch, 35 sts = 7 in (17.8 cm), which is exactly one butterfly’s width. Two butterflies give 70 sts = 14 in (35.6 cm), the same as the joined panel. Because no stitches are added at the seam, the band lies flat and doesn’t ripple.
Final Blocking
- Lay the panel flat on blocking mats, face down.
- Pin the band straight to 14 in (35.6 cm).
- Pin each butterfly to 7 in (17.8 cm) × 6 in (15.2 cm), with one pin in every picot.
- Pin the tails into points and open each window into a clean teardrop.
- Spray until the cotton is damp but not soaked.
- Leave it pinned until it is completely dry, at least 12 hours.
- Unpin, then lift the body and antennae gently with your fingers so they stand slightly raised.
Final Quality-Control Checklist
- 16 butterflies per panel in a 2 × 8 grid
- Every butterfly is 7 in (17.8 cm) × 6 in (15.2 cm)
- Every upper wing has 11 picots, and every lower wing has 5 picots plus 1 tail
- All 4 windows are open and evenly shaped
- Every row of the band has 70 sts
- The panel is 14 in (35.6 cm) × 49.4 in (125.5 cm)
- Each body is centered, with both antennae knobs facing up
- All ends are woven in and none show through the lace
Troubleshooting
- The windows close up or bunch: The chain loop is too tight. Chain more loosely, or go up a hook size for Rnd 2 only.
- The wings cup: The Rnd 3 dc are too tight. Relax your tension; the stitch count stays the same.
- The panel leans to one side: You have joined the wrong picot numbers. Check the mirror rule for that butterfly.
- The band ripples: You have more than 70 sts in a row. Recount Row 1.
- The tails curl: Steam-block them flat while they are still pinned.
Care
Hand wash in cool water with mild soap and press the water out in a towel. Don’t wring. Lay the panel flat and pin it out to dry.

Final Notes
Everything rests on the test butterfly. At gauge, one butterfly measures 7 in (17.8 cm) × 6 in (15.2 cm). Two across and eight down make a panel of 14 in (35.6 cm) × 48 in (121.9 cm). Seventy stitches in the band match that 14 in (35.6 cm) width. Folding the band to 1.4 in (3.6 cm) brings the panel to 49.4 in (125.5 cm) tall. If you check each measurement as you reach it, the second panel will match the first.
Happy crocheting!