

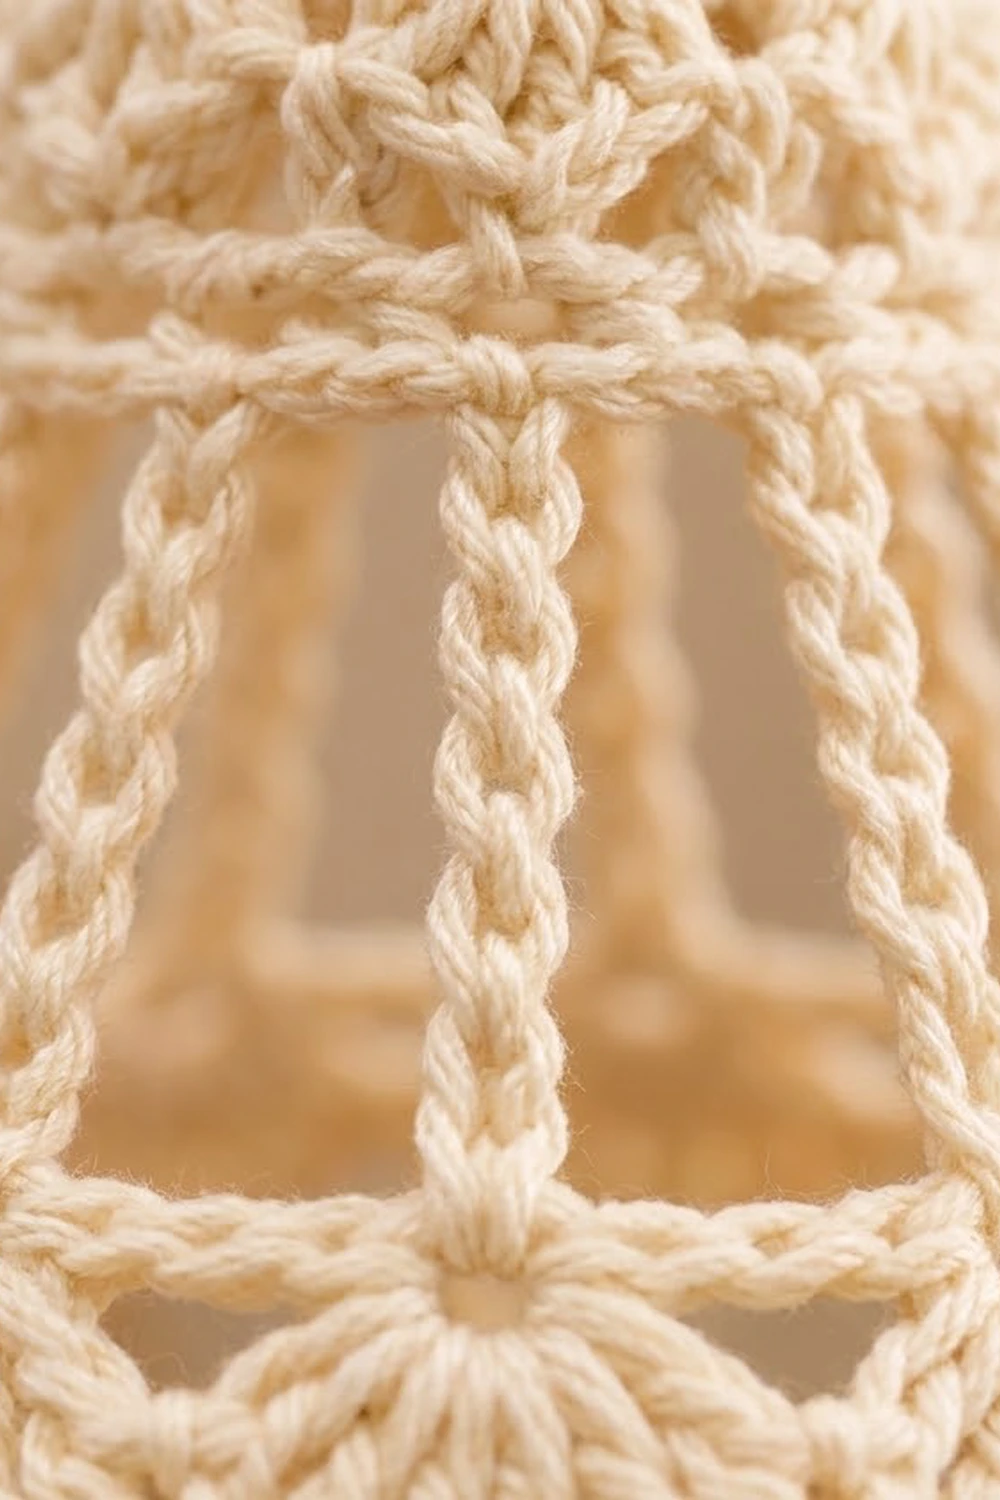
This ornament is a small cream bell with an open, lantern-like look. A domed crown of staggered fan shells sits on a neat band. Below the band, slender braided cords flare out to a scalloped hem, and a round clapper hangs just under the edge. Because the middle section is open, tree lights glow through it.
The sample is worked in one color, a soft ivory cotton thread. That keeps it in a classic heirloom style that suits rustic, Scandinavian, or vintage decorating. You can also make it in white, gold, or red without changing anything else.
The finished bell is 3.5 in (8.9 cm) tall and 3.5 in (8.9 cm) wide across the scallops. The loop adds about 1.5 in (3.8 cm) above it and the clapper hangs about 0.5 in (1.3 cm) below it, for a total hanging length of about 5.5 in (14.0 cm). The pattern uses US crochet terms throughout.
You crochet the bell top-down in joined rounds. First comes the crown, then the band, then the slip-stitch cord pillars. Next, a chain ring links the cord tips, and a scalloped edging finishes the hem. Finally, you add a small stuffed clapper and a cord loop, then stiffen the bell so it holds its shape.
Finished Size and Construction
- Finished size: 3.5 in (8.9 cm) tall × 3.5 in (8.9 cm) wide at the hem
- Total hanging length: about 5.5 in (14.0 cm), including loop and clapper
- Skill level: Intermediate
- Terminology: US
- Yarn weight: Size 3 cotton crochet thread (Lace / 0–1 category)
- Hook: 2.5 mm
- Number of pieces: 1 bell body, plus a small clapper ball and a hanging cord sewn on
- Layout: one standalone 3D ornament, open at the bottom
- Body size before the edging: 2.5 in (6.4 cm) tall, with a 2.7 in (6.9 cm) diameter at the lower ring
- Edging depth: 1 in (2.5 cm)
Materials
Yarn: Use a mercerized cotton crochet thread in size 3. Mercerized cotton gives crisp stitch definition and takes stiffener well. Avoid acrylic: it won’t hold a starched shape.
- Cream/Ivory: 12 g, about 50 m (55 yd), enough for one bell including the clapper and loop
These quantities include a margin of about 20%. If you’re making a full set of ornaments, one 100 g ball makes roughly eight bells.
Tools:
– 2.5 mm crochet hook
– Tapestry needle
– Scissors
– Stitch marker
– A small pinch of fiberfill or thread scraps (for the clapper)
– Fabric stiffener, or white glue mixed 1:1 with water
– A cone form for shaping: a rolled cardstock cone, a small funnel, or a bell-shaped glass
– Rust-proof pins and plastic wrap
Abbreviations (US Terms)
- ch – chain
- sl st – slip stitch
- sc – single crochet
- hdc – half double crochet
- dc – double crochet
- sc2tog – single crochet 2 together
- sp – space
- st(s) – stitch(es)
- MR – magic ring
- rep – repeat
Special stitches:
- Shell: 3 dc in the stitch indicated.
- V-st: (dc, ch 2, dc) in the stitch indicated.
- Fan: 9 dc in the ch-2 sp of a V-st.
- Cord: Ch 13. Sl st in the 2nd ch from the hook and in each of the next 11 ch (12 sl sts). The skipped chain at the far end is the cord’s tip.
Gauge and Checkpoints
Gauge: 7 sc = 1 in (2.5 cm) in the round. Exact gauge matters less here than for a garment, but staying close keeps the cords and scallops in proportion.
Before committing to a set, make one bell and check it at each stage:
- After Round 3: the flat circle measures 1.5 in (3.8 cm) across.
- After Round 8: the band measures 5.7 in (14.5 cm) around, which is about 1.8 in (4.6 cm) across.
- After Round 9: each cord hangs about 1.5 in (3.8 cm) long.
- After Round 11: the lower band measures 8.6 in (21.8 cm) around, which is about 2.7 in (6.9 cm) across.
- Finished: 3.5 in (8.9 cm) across the scallops after stiffening.
If your bell is too big, go down to a 2.25 mm hook. If it’s too small, go up to a 2.75 mm hook. If only the cords are off, add or remove 1 chain per cord. That changes each cord by about 0.1 in (0.3 cm).
Crown
Work in joined rounds with the right side facing. Don’t turn. The ch-3 at the start of a round counts as a dc. The ch-1 at the start of a round never counts as a stitch.
Round 1: Make a MR. Ch 3, then work 9 dc in the ring. Join with a sl st to the top of the ch-3. Pull the ring closed, leaving a tiny opening. (10 dc)
Round 2: Ch 3, dc in the same st, then 2 dc in each st around. Join. (20 dc)
Round 3: Ch 3, 2 dc in the next st, dc in the next st, 2 dc in the next st. Rep from * around. Join. (30 dc)
Checkpoint: the circle should lie flat and measure 1.5 in (3.8 cm) across.
Round 4 (first shell round): Ch 1, sc in the next st, skip 1 st, shell in the next st. Rep from * 10 times in total. Join to the first sc.
(10 sc + 10 shells = 10 + 30 = 40 sts)
This is a conversion round: the 30 stitches below are used in 10 groups of 3 (1 sc + 1 skipped + 1 shell base), and each shell adds 2 extra dc. That gives 30 + 10 = 40 stitches.
Round 5 (staggered shell round): Ch 3 (counts as the first dc of a shell), 2 dc in the same sc. Sc in the center dc of the next shell, shell in the next sc. Rep from * around, ending with sc in the center dc of the last shell. Join to the top of the ch-3.
(10 shells + 10 sc = 40 sts)
The new shells sit above the sc of the previous round, which creates the staggered fan texture. Because this round doesn’t increase, the crown begins to curve downward into a dome.
Band
Round 6: Ch 1, sc in each dc and each sc around. Join. (40 sc)
Round 7: Ch 2 (doesn’t count), hdc in each st around. Join to the first hdc. (40 hdc)
Round 8: Ch 1, sc in each st around. Join. (40 sc)
Checkpoint: the band should measure 5.7 in (14.5 cm) around. With the dome sitting on top, the bell should now look like a small cap about 1.8 in (4.6 cm) across.
Pillars
Round 9: Ch 1. Sc in the next st, make a cord, then sc in each of the next 3 sts. Rep from * 10 times in total. Join to the first sc and fasten off.
(40 sc + 10 cords)
Each cord starts from the first sc of a 4-stitch group. That spaces 10 cords evenly around the 40-stitch band: 10 × 4 = 40. The sl sts worked back along each chain give the cords their braided look.
Checkpoint: each cord measures 1.5 in (3.8 cm) and hangs straight. Check that none of them is twisted before moving on.
Lower Ring
Round 10: Join the thread with a sc in the tip of any cord. Ch 5, sc in the tip of the next cord. Rep from * 9 more times. For the last repeat, ch 5 and join to the first sc instead of working another sc.
(10 sc + 10 ch-5 sps = 10 + 50 = 60 sts)
Lay the work down and check the ring before you continue. Each cord should run from the band straight to the ring, flaring out evenly.
Edging
The edging plays the role of a border on this bell. It turns the ring into a solid lower band and then into 10 scallops.
Edging gauge: this section matches the body gauge of 7 sc = 1 in (2.5 cm). The 60-stitch base gives 8.6 in (21.8 cm) of circumference, and the fans flare that out to the finished 3.5 in (8.9 cm) width.
Round 11: Ch 1. Sc in the sc, 5 sc in the next ch-5 sp. Rep from * around. Join.
(10 + 50 = 60 sc)
This is a conversion round: 1 sc in each of the 10 sc, plus 5 sc in each of the 10 spaces. The stitch count stays at 60, matching the ring.
Round 12: Ch 2 (doesn’t count), hdc in each st around. Join. (60 hdc)
Round 13 (eyelet round): Ch 1. Sc in the next st, skip 2 sts, V-st in the next st, skip 2 sts. Rep from * 10 times in total. Join to the first sc.
(10 sc + 10 V-sts)
Each repeat uses 6 stitches (1 + 2 + 1 + 2), and 10 × 6 = 60. The V-st’s ch-2 space becomes the eyelet at the center of each scallop.
Round 14 (scallop round): Sl st into the next dc and the next ch-2 sp. Ch 3 (counts as dc), then 8 dc in the same sp to complete the first fan. Sc in the next sc, fan in the ch-2 sp of the next V-st. Rep from * around, ending with sc in the last sc. Join to the top of the ch-3 and fasten off.
(10 fans of 9 dc + 10 sc = 90 + 10 = 100 sts)
Why the math works: each of the 10 repeats sits directly under one cord’s section of the ring. Every repeat uses 6 base stitches. The 9 dc of each fan fan outward from a single eyelet, so the hem spreads to 3.5 in (8.9 cm) while the 60-stitch base stays 2.7 in (6.9 cm) across. That gives the bell its curve.
Clapper
Round 1: Make a MR and work 6 sc in it. (6 sc)
Round 2: Work 2 sc in each st. (12 sc)
Rounds 3–4: Sc in each st. (12 sc)
Stuff the ball firmly with fiberfill or thread scraps.
Round 5: Work sc2tog 6 times. (6 sc)
Fasten off, leaving a 10 in (25.4 cm) tail. Weave the tail through the front loops of the last round and pull to close. The ball should be about 0.6 in (1.5 cm) across.
Clapper cord: Ch 26. Sl st in the 2nd ch from the hook and in each ch across (25 sl sts). This makes a cord about 3.1 in (7.9 cm) long. Sew one end of the cord to the top of the clapper.
Hanging Loop and Assembly
Loop: Ch 25. Sl st in the 2nd ch from the hook and in each ch across (24 sl sts). The cord should be about 3 in (7.6 cm) long. Fold it in half and sew both ends to the center top of the crown, over the magic ring. The loop should stand about 1.5 in (3.8 cm) tall.
Clapper: Thread the free end of the clapper cord through the ring opening from the inside and secure it to the base of the loop. Adjust the length so the lower half of the ball hangs about 0.5 in (1.3 cm) below the scallop edge, then knot and weave in the ends.
Final Blocking
- Weave in all remaining ends before stiffening.
- Wrap the cone form in plastic wrap. Check that it fills the bell from the band to the hem.
- Soak the bell in fabric stiffener, or in the 1:1 glue-and-water mix. Squeeze out the excess and blot it in a towel.
- Slide the bell onto the form. Hold the clapper and loop up and out of the way with a pin or clip.
- Straighten each cord so it runs from the band to the ring in a straight line, with no twists.
- Pin each scallop point so the hem measures 3.5 in (8.9 cm) across.
- Clear any stiffener from the eyelets and the open windows with a pin.
- Let it dry completely for 24 hours, then remove it from the form and release the clapper.
Final Quality-Control Checklist
- [ ] Crown has 10 staggered shells in each of Rounds 4 and 5
- [ ] Band rounds total 40 stitches each
- [ ] Exactly 10 cords, evenly spaced every 4 stitches
- [ ] All cords are the same length and untwisted
- [ ] Lower band has 60 stitches
- [ ] 10 scallops, each with a visible center eyelet
- [ ] Hem measures 3.5 in (8.9 cm) across; total height is 3.5 in (8.9 cm)
- [ ] Clapper hangs centered, about 0.5 in (1.3 cm) below the hem
- [ ] Loop is firmly sewn and centered
- [ ] Bell holds its shape when hung
Troubleshooting
Crown ruffles instead of doming: Your tension is loose in Rounds 4–5. Go down a hook size for the crown only.
Crown is too pointed: You may have skipped too many stitches in Round 4. Recount: each repeat should use exactly 3 stitches.
Cords curl or twist: Work the slip stitches looser, and steam the cords flat before stiffening.
Bell leans to one side: You likely missed a cord tip in Round 10. Count the 10 sc before continuing.
Hem is wavy: That’s normal before stiffening. If it’s still wavy after blocking, your fans have extra dc; recount to 9 per fan.
Clapper hides inside the bell: Lengthen the clapper cord by tying it lower at the loop base.
Care
Dust gently, or spot-clean with a damp cloth. Store flat or hanging, away from heat and humidity, which can soften the stiffener.

Final Notes
The measurement chain is short and easy to follow. The crown circle is 1.5 in (3.8 cm), the band is 1.8 in (4.6 cm) across, the cords are 1.5 in (3.8 cm) long, the lower band is 2.7 in (6.9 cm) across, and the scalloped hem finishes at 3.5 in (8.9 cm). If each checkpoint matches, the bell will come out right.
Once you’ve made one bell, the rest of the set goes quickly. They make lovely gift toppers, tree ornaments, and keepsake decorations. Happy crocheting!