

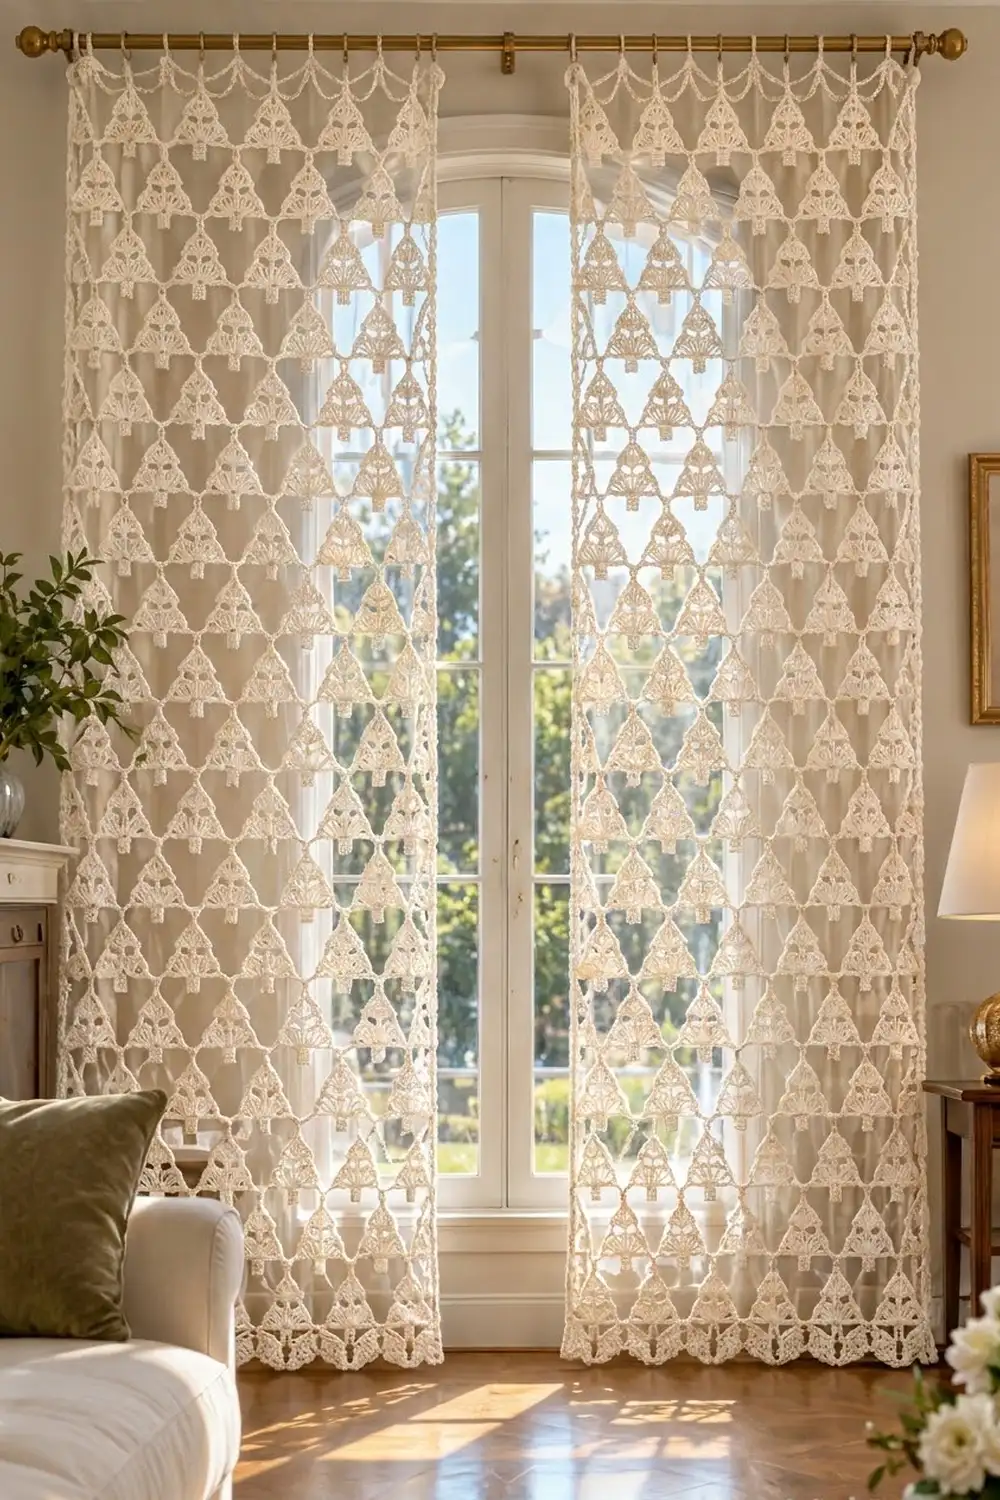
The Ivory Pines Lace Curtain is a pair of airy panels made from small triangular tree motifs. Each tree has six fan shells stacked in three tiers, an outline frame, and a little square trunk. Thin chain cords link the trees into a light, open lace that lets the sunlight through.
The whole curtain is one soft ivory cotton, so the texture does all the work. The look is calm and Scandinavian. It suits a winter window, but it works all year too. This pattern uses US crochet terms throughout.
Each finished panel measures 48 in (121.9 cm) wide by about 83.75 in (212.7 cm) long, plus the hanging tabs. The pattern makes two panels.
You crochet each tree in short rows from the bottom tier up, work a frame round around it, then add the trunk. Starting with the second tree, you join each motif to its neighbors during its frame round (join-as-you-go). A three-row tab header finishes the top of each panel.
Finished Size and Construction
- Finished size (each panel): 48 in (121.9 cm) wide × 83.75 in (212.7 cm) long, tabs not included
- Skill level: Intermediate
- Terminology: US
- Yarn weight: DK (#3) cotton
- Hook: 4.0 mm (US G-6)
- Number of pieces: 144 tree motifs (72 per panel)
- Layout (each panel): 6 trees across × 12 trees down
- Piece size: tree body 6 in (15.2 cm) wide × 3.5 in (8.9 cm) tall; trunk 1.1 in (2.8 cm) wide × 1.5 in (3.8 cm) tall
- Size before border: 48 in (121.9 cm) wide × 83 in (210.8 cm) long
- Border depth: 0.75 in (1.9 cm) tab header across the top edge only
Materials
Use a smooth mercerized or combed DK cotton. It gives crisp fans and holds its shape when hanging, and it doesn’t stretch the way acrylic does under the weight of a long panel.
- Ivory/cream DK cotton: 600 g, about 1,380 m (for example, 12 balls of 50 g / 115 m each)
Each motif uses about 3.5 g (8 m). The header uses about 8 g (18 m) per panel. These quantities include a margin of roughly 15% for swatching and joins. Buy all the yarn from one dye lot.
Tools:
– 4.0 mm (US G-6) crochet hook
– 4.5 mm (US 7) hook, optional, for loose chains
– Tapestry needle
– Locking stitch markers
– Tape measure
– Foam blocking mats and rust-proof pins
– Spray bottle
Abbreviations (US Terms)
- ch – chain
- sl st – slip stitch
- sc – single crochet
- dc – double crochet
- st(s) – stitch(es)
- sk – skip
Special stitch – Shell: 7 dc in the same stitch. The 4th dc is the shell’s center.
Gauge and Checkpoints
Base gauge: 18 sc = 4 in (10.2 cm). Chain loosely, so that 9 ch = 2 in (5.1 cm). This chain gauge is important, because every chain cord and the header rely on it.
Make one complete tree before you start the curtain, and check it at each stage:
- After Row 1: 5.6 in (14.2 cm) wide × 1 in (2.5 cm) tall
- After Row 3: 5.6 in (14.2 cm) wide × 3 in (7.6 cm) tall
- After the frame: 6 in (15.2 cm) wide × 3.5 in (8.9 cm) tall, not counting the loops
- Corner and tip loops: each ch-9 loop folded flat reaches 1 in (2.5 cm)
- After the trunk: 1.1 in (2.8 cm) wide × 1.5 in (3.8 cm) long
If your tree is too big, go down 0.5 mm in hook size. If it is too small, go up 0.5 mm. If only your chains are off, change just the chain hook. Small errors add up: across 6 trees and 12 rows, being 0.25 in (0.6 cm) off per tree changes the panel by 1.5 in (3.8 cm) in width and 3 in (7.6 cm) in length.
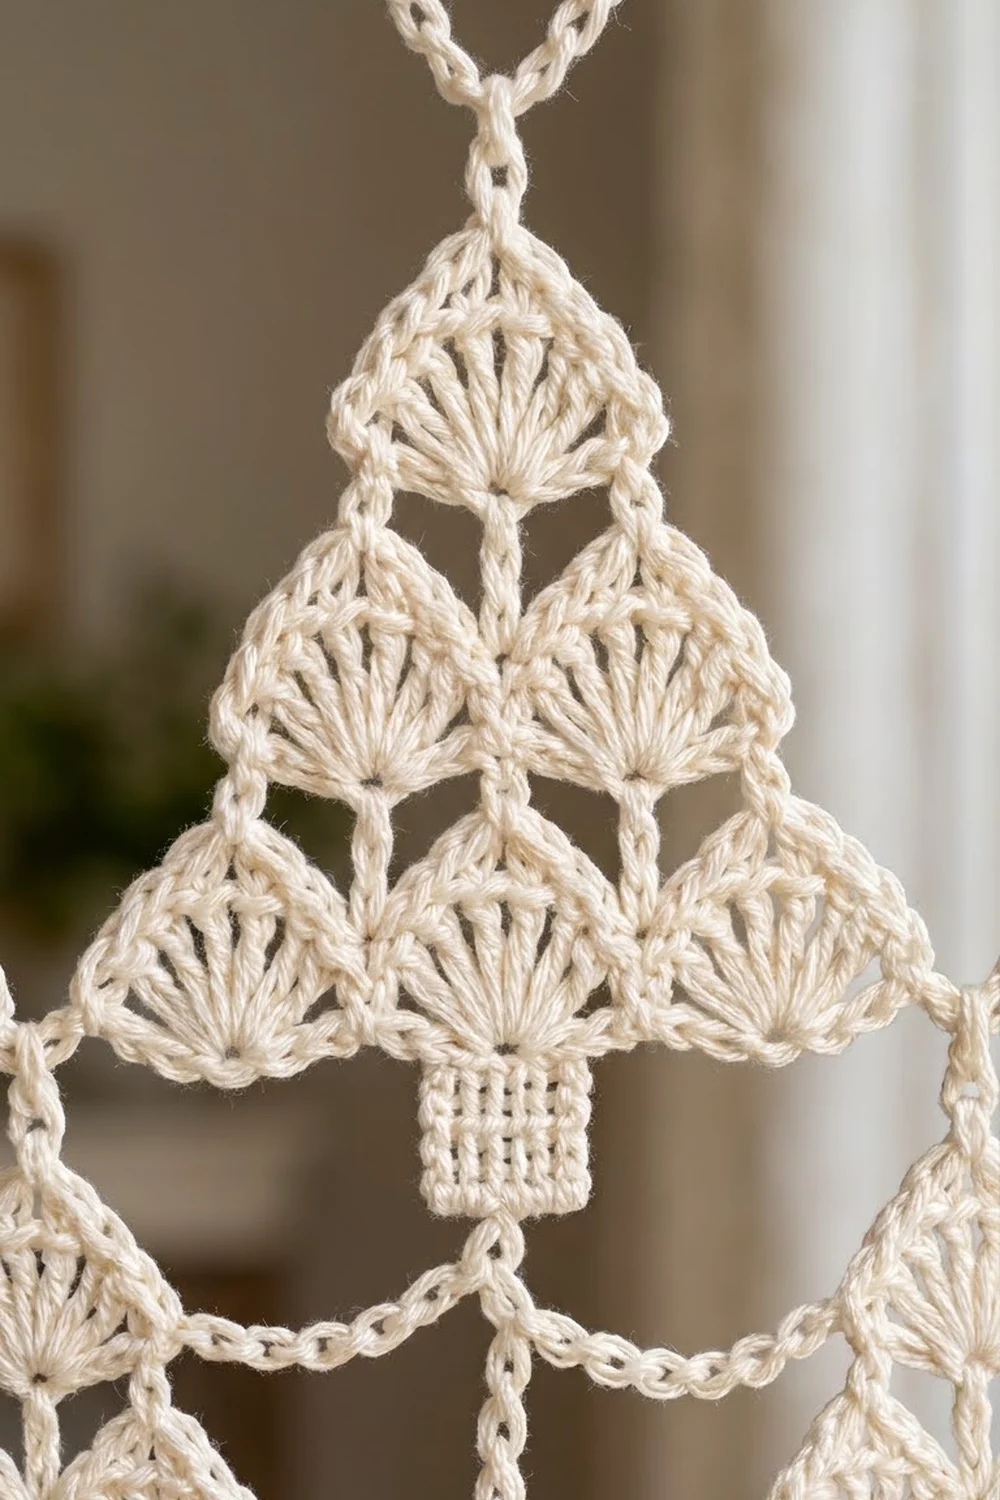
Tree Motif
Body
Foundation: Ch 26.
Row 1 (bottom tier): Sc in 2nd ch from hook, sk 3 ch, shell in next ch, sk 3 ch, sc in next ch; repeat from * 2 more times. (3 shells, 4 sc = 25 sts)
Row 2 (middle tier): Turn. Sl st in each of the next 4 sts (end sc and first 3 dc), sl st in the next dc (center of the shell). Ch 1, sc in the same dc, sk 3 dc, shell in next sc, sk 3 dc, sc in next dc (center of the next shell); repeat from * once more. (2 shells, 3 sc = 17 sts)
Row 3 (top tier): Turn. Sl st in each of the next 4 sts, sl st in the next dc (center). Ch 1, sc in the same dc, sk 3 dc, shell in next sc, sk 3 dc, sc in next dc. (1 shell, 2 sc = 9 sts)
Each new tier sits in the gaps between the shells of the tier below, so the fans stack into a 3-2-1 triangle.
Frame Round
Do not turn. You’ll work down one side, along the foundation, up the other side, and over the top shell.
Round 4: Ch 1.
– First side: Sc in the same sc, sc in the 3 exposed outer dc of the Row 2 shell, sc in the Row 2 end sc, sc in the 3 exposed outer dc of the Row 1 shell, sc in the Row 1 end sc. (9 sc)
– Corner: (Sc, ch 9, sc) in the free loop of the foundation ch at the base of that sc.
– Bottom: Sc in each of the next 23 free loops of the foundation ch.
– Corner: (Sc, ch 9, sc) in the last free loop.
– Second side: Work 9 sc the same way as the first side. Where there are slip stitches, work through them into the stitches below.
– Top shell: Sc in dc 1–3, (sc, ch 9, sc) in the center dc, sc in dc 5–7. (8 sc)
Join with a sl st to the first sc. (53 sc: 9 + 2 + 23 + 2 + 9 + 8, plus 3 ch-9 loops) Fasten off.
The frame gives each fan a smooth, raised outline. The three ch-9 loops are your joining points.
Trunk
With the tree upside down, count the 23 bottom sc between the corner groups. The center stitch is the 12th.
Row 1: Join yarn in the 10th bottom sc. Ch 3 (counts as dc), dc in each of the next 4 sc. (5 dc)
Rows 2–4: Ch 3, turn, dc in each st across. (5 dc)
Fasten off. The trunk measures 1.1 in (2.8 cm) wide × 1.5 in (3.8 cm) long, and its 3rd stitch lines up with the tree’s tip.
Make All Pieces
You’ll make 144 trees in total, all in ivory:
- Panel A: 72 trees
- Panel B: 72 trees
Only the first tree of each panel is made completely on its own. Every other tree is joined during its frame round (Round 4).
Layout for each panel (T = tree; – = corner swag; | = vertical cord):
T – T – T – T – T – T     row 1 (tips join the header)
|   |   |   |   |   |
T – T – T – T – T – T     row 2
|   |   |   |   |   |
   ... repeat ...
T – T – T – T – T – T     row 12 (trunks hang free)
Work across each row from left to right, then start the next row down.
Joining (Join-As-You-Go)
You make all the joins inside Round 4. Replace the plain loop with a joining loop wherever the new tree touches a tree you’ve already made.
Corner join (to the tree on the left): At the corner that faces the neighbor, work (sc, ch 4, sl st into the center of the neighbor’s ch-9 corner loop, ch 4, sc). This is the same length as a ch-9 loop, so the swag between the two trees measures 2 in (5.1 cm): 1 in (2.5 cm) of loop on each side.
Tip join (to the tree above, rows 2–12): On the top shell, work (sc, ch 8, sl st into the 3rd dc of the last trunk row of the tree above, ch 8, sc) in the center dc. The two strands lie together as one slim cord, 2 in (5.1 cm) long.
Stitch-to-stitch logic: Each tree joins only at its two bottom corners and its tip. The trunk-to-tip cord keeps the columns straight. Because the corner swags replace the plain loops one for one, the motif’s stitch count stays at 53 sc. Joining adds no stitches.
Tension advice: Chain at your gauge chain tension. If your join chains are tighter than the plain loops, the swags pull the trees out of line and the panel puckers. Lay the work flat every few trees to check.
Size checkpoints:
– Three trees joined in a row measure 22 in (55.9 cm) from outer corner to outer corner, not counting the outer loops (6 + 2 + 6 + 2 + 6).
– Tip-to-tip spacing across is 8 in (20.3 cm).
– Tip-to-tip spacing down is 7 in (17.8 cm): 5 in (12.7 cm) of tree and trunk plus a 2 in (5.1 cm) cord.
– A full row of 6 trees spans 46 in (116.8 cm). With the outer loops included, it spans 48 in (121.9 cm).
– A full panel before the border is 83 in (210.8 cm) long: a 1 in (2.5 cm) tip loop, plus 12 × 5 in (12.7 cm) of trees, plus 11 × 2 in (5.1 cm) of cords.
Border (Tab Header)
The sides and bottom stay as open lace, just like the photographed curtain, with the free corner loops and trunks hanging along the edges. The header goes across the top edge only.
Border gauge: 18 sts = 4 in (10.2 cm), counting both sc and loose ch. Each tree in Row 1 of the header gets exactly 36 sts.
Row 1 (bridge row): Make a slip knot. Ch 16, work 4 sc into the ch-9 tip loop of the next top-row tree, ch 16; repeat from * across all 6 trees. (Per tree: 16 + 4 + 16 = 36 sts. Total: 6 × 36 = 216 sts)
Between two trees, the two sets of 16 chains meet, giving 32 ch from tip to tip.
Row 2: Ch 1, turn, sc in each st across. (216 sc)
Row 3 (tab row): Ch 1, turn. Sc in each of the next 16 sts, ch 20, sk 4 sts, sc in each of the next 16 sts; repeat from * 5 more times. (Per tree: 32 sc + 1 ch-20 tab. Total: 192 sc + 6 tabs)
Fasten off. Each tab is about 4.4 in (11.2 cm) long and fits a rod up to 1.25 in (3.2 cm) in diameter.
Why the math works: 36 sts at 4.5 sts per inch equals 8 in (20.3 cm), which is exactly the tip-to-tip spacing across. Six trees × 36 sts = 216 sts = 48 in (121.9 cm). That matches the joined width including the outer corner loops, because the first and last 18 sts each reach 4 in (10.2 cm) from the outer tips, the same distance as half a tree plus one corner loop. Each tab sits directly above a tree tip. Rows 2–3 add 0.75 in (1.9 cm) of depth, so the finished panel measures 48 in (121.9 cm) × 83.75 in (212.7 cm).
Final Blocking
- Weave in every end along a frame round or through the trunk stitches. Never leave an end loose in a chain cord.
- Lay one section of the panel (about 3 rows) on foam mats.
- Pin each tree tip and both bottom corners, keeping 8 in (20.3 cm) between tips across and 7 in (17.8 cm) between tips down.
- Pin the top of each fan so the frame curves evenly.
- Pull each trunk straight down and pin its bottom corners.
- Spray until damp, not soaked, and let it dry completely.
- Move on to the next section, overlapping one row with the section you just blocked.
- Block the header flat, pinning each tab straight up.
Final Quality-Control Checklist
- Every tree has 3-2-1 shells with 7 dc each.
- Every frame round has 53 sc and 3 loops or joins.
- Every trunk is 5 dc × 4 rows and centered under the tip.
- All corner swags measure 2 in (5.1 cm).
- All vertical cords measure 2 in (5.1 cm).
- Header rows are 216, 216, and 192 sts + 6 tabs.
- Each panel measures 48 in (121.9 cm) × 83.75 in (212.7 cm).
- Both panels match each other within 0.5 in (1.3 cm).
Troubleshooting
- Fans cup or ruffle: Your shells are too loose for the skipped chains. Try a smaller hook for the shells.
- Tree leans to one side: You started Row 2 or 3 in the wrong dc. The sl sts must end in the 4th (center) dc.
- Trunk off-center: Recount the 23 bottom sc and start in the 10th.
- Columns drift sideways: You joined the tip cord to the wrong trunk stitch. Use the 3rd dc.
- Header ruffles: Your chains are too loose. Redo Row 1 with a smaller hook.
- Header pulls the trees together: Your chains are too tight. Use the 4.5 mm hook for Row 1 chains.
- Panel too short: Your vertical cords are tight. Check that 8 ch measure about 1.75 in (4.4 cm).
Care
Hand wash in cool water with mild detergent, roll in a towel to remove water, and dry flat or re-pin to block. Don’t hang the panel while it’s wet, because the weight of the water stretches the cords.
Final Notes
The measurement chain is simple. Gauge sets the tree at 6 in (15.2 cm) wide. Each tree plus a 2 in (5.1 cm) swag gives 8 in (20.3 cm) across, and each tree plus its trunk and a 2 in (5.1 cm) cord gives 7 in (17.8 cm) down. Six trees across make 48 in (121.9 cm), which the 216-stitch header matches exactly, and twelve rows plus the header give 83.75 in (212.7 cm). Check the first tree carefully and the rest of the curtain will follow.
Happy crocheting!