

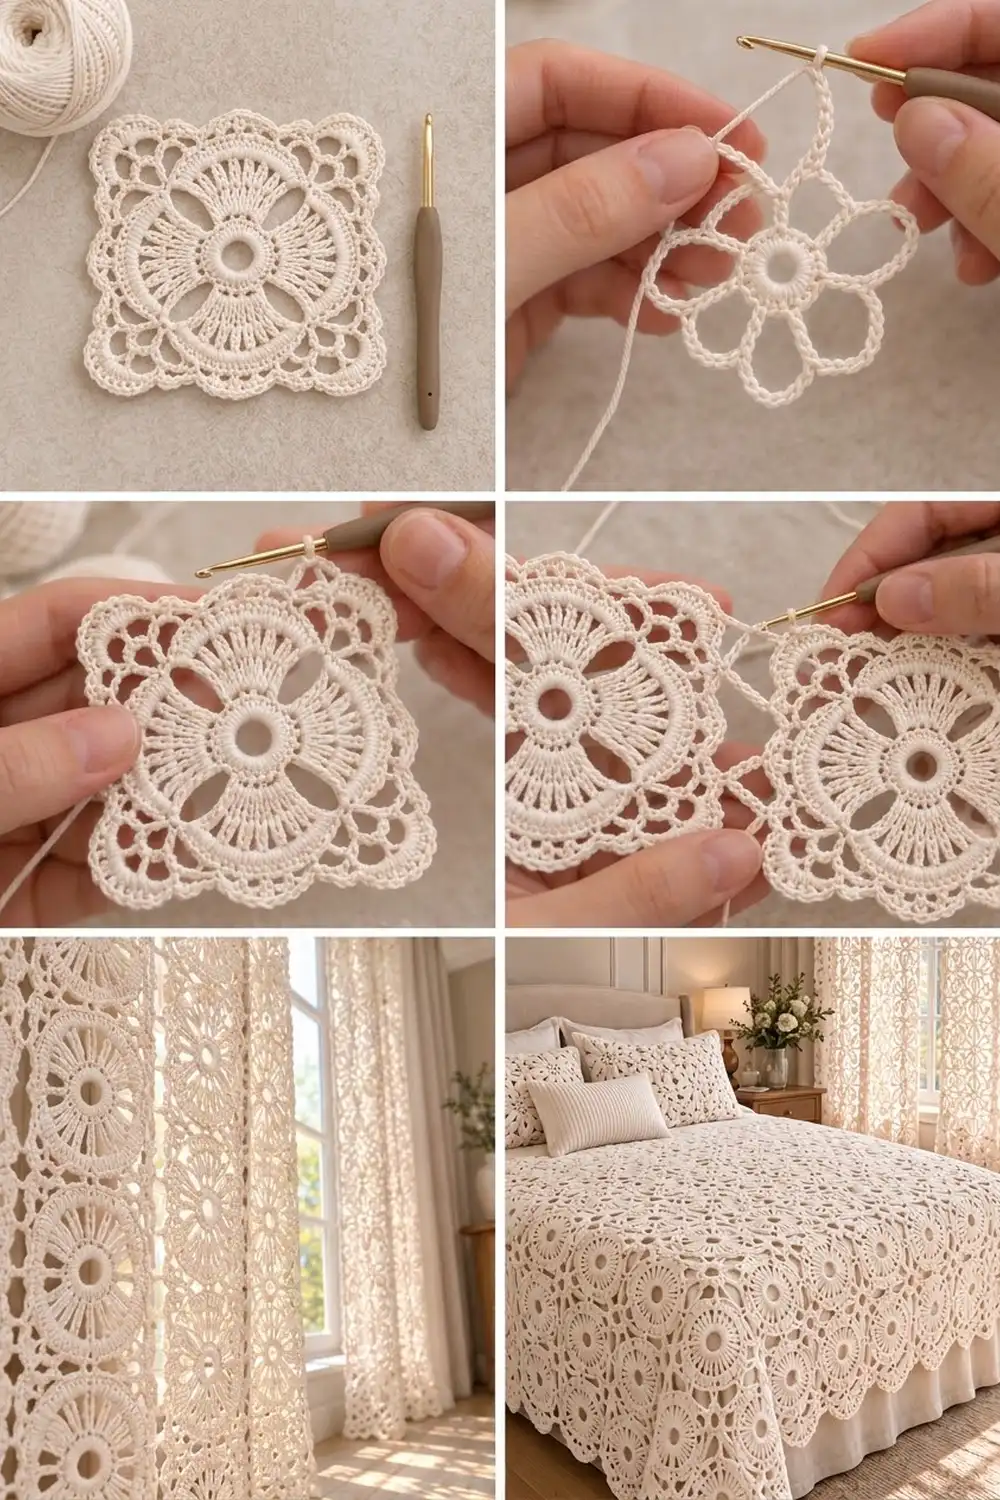
This ivory lace square has a small open ring at its heart and four fan-shaped petals that radiate outward like a quatrefoil window. A solid round closes the petals into a circle. Graduated chain loops then turn the circle into a square, and the motif finishes with a soft scalloped edge.
The design uses one color: a warm ivory cotton that shows off the texture of the radiating stitches. It’s a classic heirloom style that suits vintage, cottage, and neutral rooms.
The pattern uses US crochet terms. The finished motif measures 6 in (15.2 cm) square after blocking.
The piece is worked in the round from the center out, in 8 rounds. Rounds 1–5 build the circular quatrefoil center. Round 6 squares it off. Rounds 7–8 form the lace mesh and scalloped border.
Finished Size and Construction
- Finished size: 6 in × 6 in (15.2 cm × 15.2 cm), blocked
- Skill level: Intermediate
- Terminology: US crochet terms
- Yarn weight: Sport weight (2) mercerized cotton
- Hook: 2.5 mm (US B/1 or C/2)
- Number of pieces: 1 single motif
- Layout: One square, worked in the round
- Piece size (circle after Round 5): 4 in (10.2 cm) diameter
- Size before border (after Round 6): 4.75 in (12.1 cm) square
- Border depth (Rounds 7–8): 5/8 in (1.6 cm) on each side
Materials
Yarn: Use a smooth, tightly plied mercerized cotton in sport weight. Mercerized cotton gives crisp stitch definition and blocks flat. Avoid fuzzy or loosely spun yarns because the fan ribs and chain loops will blur.
- Ivory / off-white: about 15 g (approx. 50 m / 55 yd)
The quantity includes a margin of roughly 20% for your gauge swatch, joining tails, and small tension differences.
Tools:
– 2.5 mm crochet hook
– Tapestry needle
– Scissors
– 2 stitch markers
– Blocking mat and rustproof pins
– Spray bottle with clean water
– Ruler or tape measure
Abbreviations (US Terms)
- ch – chain
- sl st – slip stitch
- sc – single crochet
- hdc – half double crochet
- dc – double crochet
- tr – treble crochet (yarn over twice)
- sp – space
- st(s) – stitch(es)
- sk – skip
- rep – repeat
- beg – beginning
Special stitch – Scallop: (sc, hdc, 3 dc, hdc, sc) all in the same chain space = 7 sts.
Special stitch – Corner Scallop: (sc, hdc, 5 dc, hdc, sc) all in the same corner chain space = 9 sts.
Turning chains: The beg ch-3 counts as a dc and the beg ch-4 counts as a tr throughout. The ch-1 at the start of sc rounds does not count as a stitch.
Gauge and Checkpoints
Gauge is measured on the motif itself, so make one test motif before committing to a larger yarn purchase.
Checkpoints (lightly pressed flat, unblocked):
- After Round 1: ring with 24 dc measures 1.25 in (3.2 cm) across.
- After Round 3: petal tips span about 2.25 in (5.7 cm).
- After Round 4: petal tips span about 3 in (7.6 cm).
- After Round 5: circle measures 4 in (10.2 cm) across.
- After Round 6: square measures 4.75 in (12.1 cm) side to side.
- After Round 7: square measures 5.5 in (14.0 cm).
- After Round 8: square measures 5.75 in (14.6 cm) unblocked and opens to 6 in (15.2 cm) when blocked.
If your motif is too big: go down one hook size (2.25 mm) or tighten your chains. Loose chains are the most common cause of oversizing in lace.
If your motif is too small: go up to a 2.75 mm hook. Check that your tr stitches are pulled up to full height and not squashed.
A difference of 1/4 in (0.6 cm) at Round 5 grows to roughly 3/8 in at the final edge, so fix gauge early.
Pattern
Round 1 – Center Ring
Ch 10, sl st to the first ch to form a ring.
Ch 3 (counts as dc), work 23 dc into the ring. Join with sl st to the top of beg ch-3.
Stitch count: 24 dc.
The ring stays visibly open in the center, about 1/2 in (1.3 cm) across. If it closes up, your foundation chain is too tight.
Round 2 – Petal Bases
Ch 4 (counts as tr), tr in next 3 sts, ch 5, sk 2 sts.
Tr in next 4 sts, ch 5, sk 2 sts. Rep from * 2 more times. Join with sl st to top of beg ch-4.
Stitch count: 16 tr (4 groups of 4) and 4 ch-5 sps.
Check: 4 groups × (4 worked + 2 skipped) = 24 sts, which uses every stitch of Round 1.
Round 3 – Fans Widen
Ch 4 (counts as tr), tr in same st as join, 2 tr in each of next 3 tr, ch 6, sk ch-5 sp.
2 tr in each of next 4 tr, ch 6, sk ch-5 sp. Rep from * 2 more times. Join to top of beg ch-4.
Stitch count: 32 tr (4 petals of 8 tr) and 4 ch-6 sps.
Round 4 – Ribbed Fans
Ch 5 (counts as tr + ch 1), tr in next tr, ch 1, rep from * 5 more times, tr in next tr, ch 7, sk ch-6 sp.
Next petal: Tr in next tr, [ch 1, tr in next tr] 7 times, ch 7, sk ch-6 sp. Rep from * 2 more times. Join to the 4th ch of beg ch-5.
Stitch count: 32 tr (8 per petal), 28 ch-1 sps (7 per petal), and 4 ch-7 sps.
The ch-1 gaps open each petal into the radiating ribbed fan. The ch-7 arches span the gaps between petals and frame the four open windows.
Round 5 – Closing the Circle
Ch 3 (counts as dc). Dc in each ch-1 sp and each tr across the first petal, so that petal ends with a dc in its last tr. Work 9 dc in the ch-7 sp.
Dc in each tr and each ch-1 sp across the next petal, 9 dc in next ch-7 sp. Rep from * 2 more times. Join to top of beg ch-3.
Stitch count: 96 dc. Each repeat has 15 dc over the petal (8 tr + 7 sps) plus 9 dc over the window arch, for 24 dc. Four repeats make 96.
This is the solid ring that encloses the quatrefoil. The open windows sit beneath each 9-dc group.
Checkpoint: 4 in (10.2 cm) diameter, lying flat. If it ruffles, your tension is loose; if it cups, it is tight.
Round 6 – Squaring the Circle
The corners sit above the windows. Each corner st is the 5th (center) dc of a 9-dc window group.
Sl st across to the first corner st.
Ch 4 (counts as tr), ch 5, tr in same st (first corner made).
Side: Ch 4, sk 3 sts, dc in next st; ch 4, sk 3 sts, hdc in next st; ch 4, sk 3 sts, sc in next st (center of the petal); ch 4, sk 3 sts, hdc in next st; ch 4, sk 3 sts, dc in next st; ch 4, sk 3 sts.
Corner: (tr, ch 5, tr) in next st (the next corner st).
Rep Side and Corner 2 more times, then work one more Side. Instead of the last corner, join with sl st to top of beg ch-4.
Stitch count: 8 tr, 8 dc, 8 hdc, and 4 sc, with 24 ch-4 sps (6 per side) and 4 corner ch-5 sps.
Why it works: Each side spans 24 sts of Round 5: 6 skips of 3 sts plus 6 worked sts. The stitch height steps down from tr at the corners to sc at the petal center. That fills the corners out to the same reach as the middle of each side, which turns the circle into a square.
Checkpoint (size before border): 4.75 in (12.1 cm) square.
Round 7 – Lace Mesh (Border Round 1)
Sl st into first corner ch-5 sp.
Ch 1, (sc, ch 5, sc) in same corner sp.
[Ch 5, sc in next ch-4 sp] 6 times, ch 5, (sc, ch 5, sc) in next corner sp. Rep from * 2 more times, then [ch 5, sc in next ch-4 sp] 6 times, ch 5. Join with sl st to first sc.
Stitch count: 32 sc and 32 ch-5 loops (4 corner loops + 28 side loops, 7 per side).
Round 8 – Scalloped Edge (Border Round 2)
Sl st into first corner ch-5 loop.
Work a Corner Scallop (9 sts) in the corner loop.
Work a Scallop (7 sts) in each of the next 7 side loops, Corner Scallop in next corner loop. Rep from * 2 more times, then a Scallop in each of the last 7 side loops. Join with sl st to first sc. Fasten off.
Stitch count: 232 sts. That’s 4 Corner Scallops × 9 = 36 and 28 Scallops × 7 = 196.
Border
Rounds 7 and 8 form the border. They add 5/8 in (1.6 cm) per side once blocked, taking the square from 4.75 in (12.1 cm) to 6 in (15.2 cm).
Border gauge: each ch-5 loop in Round 7 spans about 5/8 in (1.6 cm) along a side, before blocking.
Per-side counts:
- Round 6 (base): 6 ch-4 sps per side, sitting between the 2 corner ch-5 sps.
- Round 7: 7 ch-5 loops per side, sitting between the 2 corner loops. There is 1 more loop per side than in Round 6 because a chain loop bridges each of the 6 sps plus the step into the corner.
- Round 8: 7 Scallops (49 sts) per side, sitting between 2 Corner Scallops (9 sts each). Each corner scallop is shared by 2 sides, so the total is 4 × 49 + 4 × 9 = 232.
Why the math works: The extra loop per side in Round 7 adds length along the edge to match the larger outer perimeter. The corner loops get 9 sts instead of 7 so the scallop can turn 90 degrees without cupping. The edge lies flat because the stitches added per side grow in step with the perimeter at each round.
Final Blocking
- Weave in all tails along the backs of solid stitches, not through chain loops. Trim close.
- Pin a 6 in (15.2 cm) square guide onto your blocking mat, or mark it with pins.
- Spritz the motif evenly with water until it is damp but not dripping. You can also soak it and gently roll it in a towel.
- Pin the four corner scallops at the guide corners first.
- Pin the center scallop on each side to the guide line. Then pin every other scallop so all edges sit straight.
- Open the four petal windows with a pin and round each fan evenly. Keep the center ring circular.
- Let it dry completely, at least 6–8 hours, before unpinning.
Mercerized cotton can be steam-blocked if you prefer. Hold the iron 1 in (2.5 cm) above the motif and never press directly on it.
Final Quality-Control Checklist
- Center ring is open and round, about 1/2 in (1.3 cm) across
- Four petals have 8 tr each, with evenly spaced ribs
- Four open windows sit at the diagonals
- Round 5 has 96 dc and lies flat
- Each side of Round 6 has 6 ch-4 sps, stepping tr–dc–hdc–sc–hdc–dc–tr
- Round 7 has 7 ch-5 loops per side plus 4 corner loops
- Round 8 has 7 Scallops per side plus 4 Corner Scallops (232 sts)
- Blocked size is 6 in (15.2 cm) square, ±1/8 in (0.3 cm)
- Corners are square and the edges are straight
- No tails are visible from the front
Troubleshooting
The center ring closes up: Use a looser foundation ch-10, or work Round 1 over a longer chain (ch 12).
The petals look crowded or ruffled: Your Round 3 tr may be too loose. Go down a hook size for Rounds 3–4 only.
The windows are tiny: The ch-6 and ch-7 arches are too tight. Chain more loosely, or add 1 ch to each arch. If you do, add 1 dc to each 9-dc group in Round 5 only if the arch still crowds.
The motif cups after Round 5: Your tension is tight. Relax your grip or use a larger hook for this round.
The square has rounded corners: Check that the corners use full tr in Round 6 and that the corner sts sit directly above the window centers.
The edge waves after Round 8: Your scallops are too full. Swap the 3 dc to 3 hdc in side Scallops, or block more firmly.
The final count is off: Count Round 7 loops per side. Nearly every edge error comes from a missed or extra ch-5 loop.
Care
Hand wash in cool water with a mild detergent, press out the water in a towel, and dry flat, re-pinning to 6 in (15.2 cm) if needed. Avoid bleach so the ivory stays soft and warm.

Final Notes
The measurement chain runs like this:
- 1.25 in (3.2 cm) ring after Round 1
- 4 in (10.2 cm) circle after Round 5
- 4.75 in (12.1 cm) square after Round 6
- 5.5 in (14.0 cm) after the mesh round
- 6 in (15.2 cm) blocked after the scallops
Check each checkpoint as you go and the finished square will come out true and flat. It works well as a coaster or doily, or as a test square if you later want to plan a bigger lace project.
Happy crocheting!