

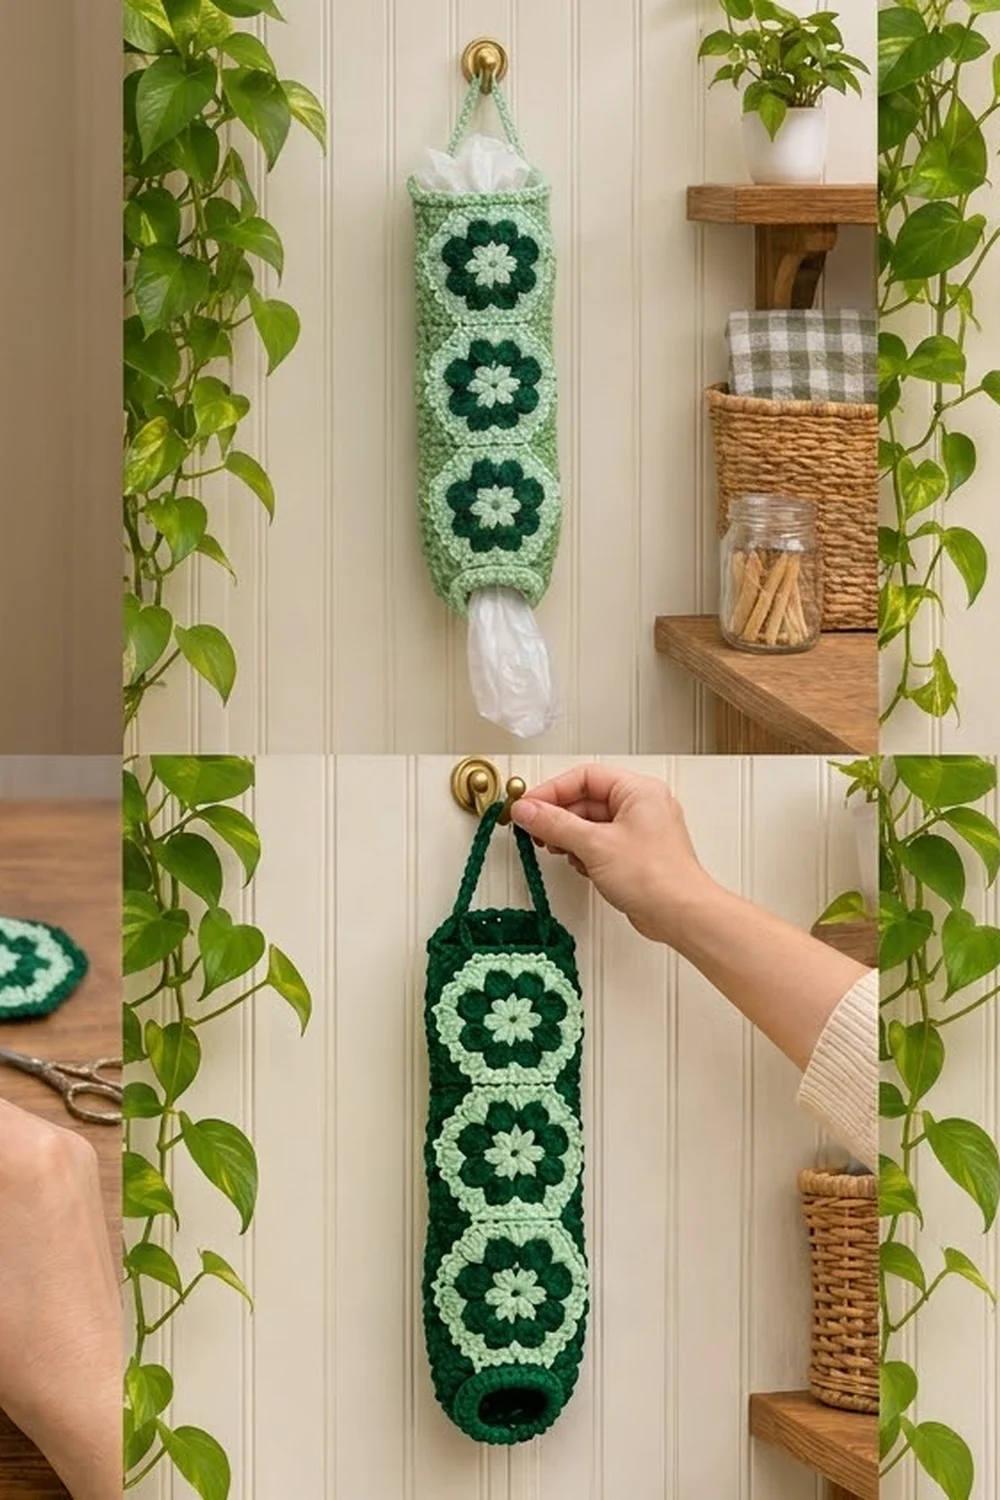
The Ivy Bloom Bag Holder is a tall, slim tube that keeps loose plastic bags tidy on a hook by the door or inside a pantry. Three flower hexagons run down the front and three run down the back. Bags go in at the open top and come out one at a time through the narrow cuff at the bottom.
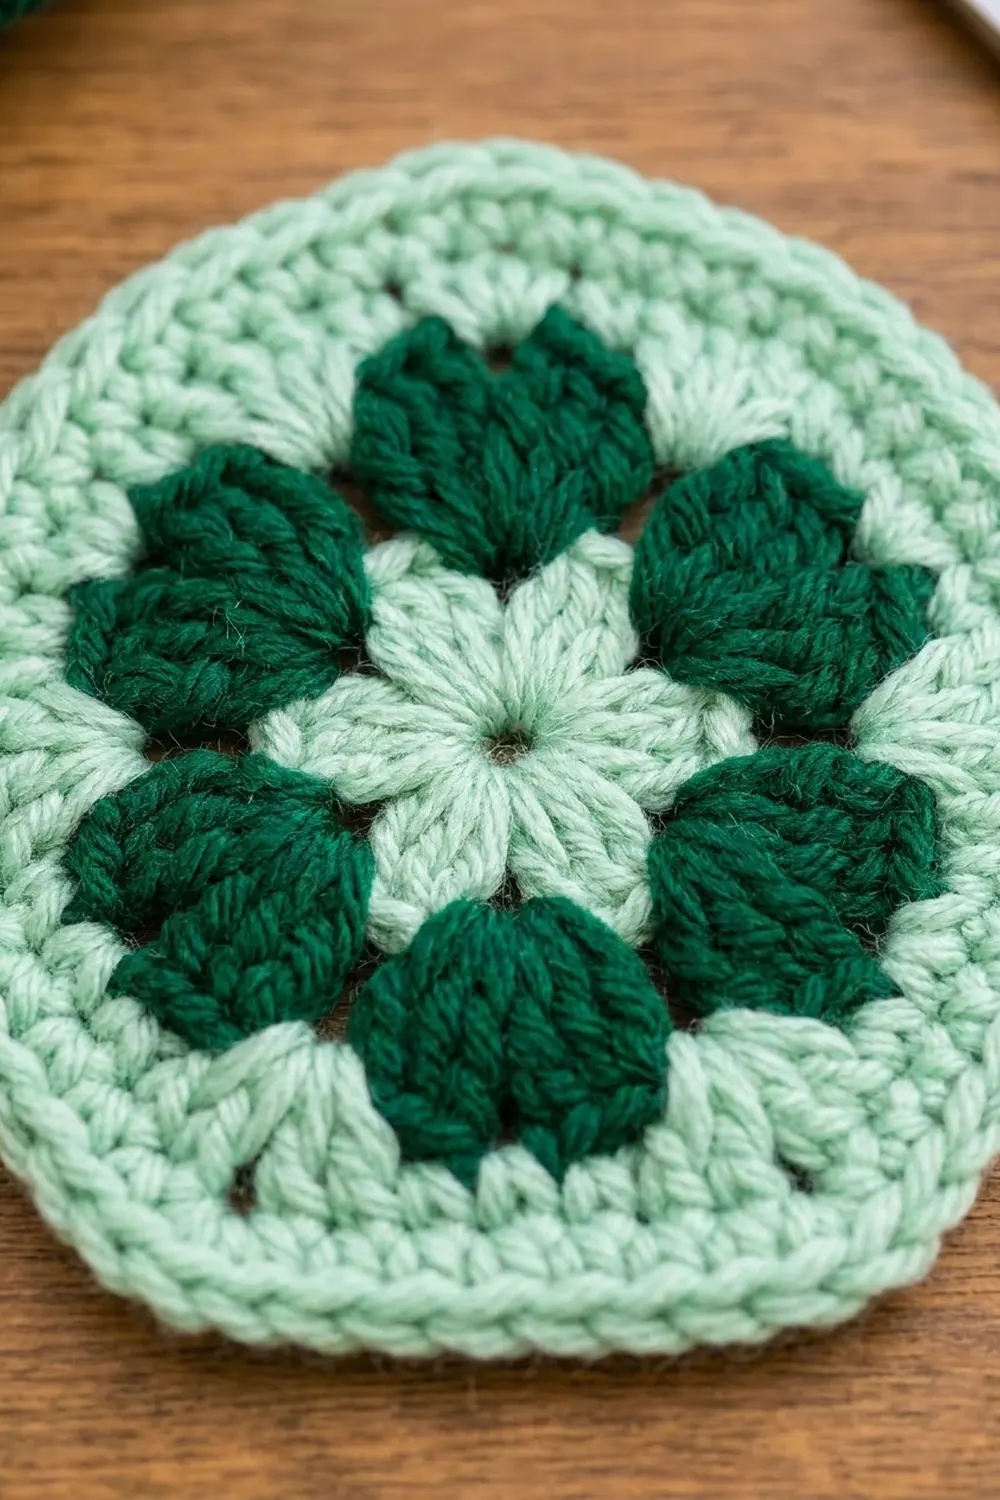
The colors are deep forest green and soft mint. Every hexagon has a mint center, six plump dark green petals, and a wide mint outline. Dark green ties it all together in the side fill, the top band, the hanging strap, and the bottom cuff, so it looks fresh and a little vintage, like a cottage kitchen. If you’d like a lighter version, swap the two colors and you get a mint-dominant holder with dark green flowers.
This pattern uses US crochet terms. The finished holder is 6.2 in (15.7 cm) wide across the body when laid flat and 16 in (40.6 cm) long, not counting the strap.
Here’s the construction in brief: you make six hexagons and join them into two strips of three. Two rows of graduated fill on each long edge turn each zigzag strip into a straight-sided panel. Then you seam the two panels into a tube, add a band and strap at the top, and finish with a cuff that narrows at the bottom.
Finished Size and Construction
- Finished size: 6.2 in (15.7 cm) wide x 16 in (40.6 cm) long, laid flat
- Skill level: Intermediate
- Terminology: US
- Yarn weight: Medium #4 (worsted) cotton
- Hook: 5.0 mm (H-8)
- Number of pieces: 6 hexagons, joined into 2 panels
- Layout: each panel is 1 hexagon wide x 3 hexagons tall
- Hexagon size: 4.5 in (11.4 cm) flat-to-flat, 5.2 in (13.2 cm) point-to-point, 2.6 in (6.6 cm) per side
- Size before border (one joined strip): 5.2 in (13.2 cm) x 13.5 in (34.3 cm)
- Border depth: side fill 0.5 in (1.3 cm) per long edge, top band 1 in (2.5 cm), bottom cuff 1.5 in (3.8 cm)
Materials
Use a smooth worsted-weight cotton or cotton blend. Cotton holds its shape when the tube is packed with bags, it shows off the stitch definition of the petals, and you can wash it. Avoid very splitty or fuzzy yarns, because they make the spike stitches and seams hard to see.
- MC (forest green): 90 g, approximately 140 m
- CC (mint green): 50 g, approximately 77 m
These quantities include a margin of roughly 15 to 20 percent over what the sample used.
Tools:
- 5.0 mm (H-8) crochet hook
- Tapestry needle
- Locking stitch markers (at least 6)
- Scissors
- Measuring tape
- Blocking mat and rust-proof pins
- Spray bottle
Abbreviations (US Terms)
- ch – chain
- sl st – slip stitch
- sc – single crochet
- hdc – half double crochet
- dc – double crochet
- tr – treble crochet (yarn over twice)
- dtr – double treble crochet (yarn over 3 times, then work off 2 loops at a time 4 times)
- sc2tog – single crochet 2 together
- MR – magic ring
- sp – space
- st(s) – stitch(es)
- RS / WS – right side / wrong side
- MC / CC – main color / contrast color
Spike dc: yarn over and insert the hook into the gap between two 2-dc groups of Round 2 (the gap between two petals). Pull up a loop long enough to reach the current round, then [yarn over, pull through 2 loops] twice.
Gauge and Checkpoints
Gauge: 14 sts x 16 rows of sc = 4 in (10.2 cm). Dc is worked at the same 14 sts = 4 in (10.2 cm).
Make one complete hexagon before you start the rest, and check it at each stage:
- After Round 1: 1.5 in (3.8 cm) across
- After Round 3: 3.25 in (8.3 cm) across, from petal tip to the opposite petal tip
- After Round 5: 4.5 in (11.4 cm) flat-to-flat and 2.6 in (6.6 cm) per side
If the hexagon is too big, go down 0.5 mm in hook size. If it’s too small, go up 0.5 mm. Each 0.1 in (0.3 cm) of error per hexagon adds up to about 0.3 in (0.8 cm) over the length of the tube. Once your test hexagon matches, write down your hook size and use it for all six.
Hexagon (Make 6)
Round 1 (CC): MR, ch 3 (counts as dc), dc in ring, ch 1, [2 dc in ring, ch 1] 5 times. Join with a sl st to the top of the beginning ch-3. (12 dc, 6 ch-1 sps) Fasten off.
Round 2 (MC): Join in any ch-1 sp. Ch 3 (counts as dc), then work (dc, ch 1, 2 dc) in the same sp. [(2 dc, ch 1, 2 dc) in the next ch-1 sp] 5 times. Join. (24 dc, 6 ch-1 sps)
Round 3 (MC): Sl st into the next dc and the next ch-1 sp. Ch 3 (counts as dc), then 6 dc in the same sp. [7 dc in the next ch-1 sp] 5 times. Join. (42 dc, in 6 petals of 7) Fasten off.
The 7-dc shells sit on top of the Round 2 V-groups, which pushes them outward into rounded petals.
Round 4 (CC): Join with a standing spike dc between any two petals. [Sc in each of the next 7 dc, spike dc between petals] 5 times, then sc in each of the next 7 dc. Join to the first spike. (42 sc + 6 spike dc = 48 sts)
Round 5 (CC): Ch 5 (counts as dc + ch 2), then dc in the same spike. This is the first corner. Dc in each of the next 7 sc. [(dc, ch 2, dc) in the next spike, dc in each of the next 7 sc] 5 times. Join to the 3rd ch of the beginning ch-5. (54 dc, 6 ch-2 corner sps)
Each side now has 9 dc: 1 corner dc, 7 dc, and 1 corner dc. The 9 includes that side’s two corner stitches, and the ch-2 sps sit between the sides. Fasten off, weave in ends, and steam lightly so the motif lies flat.
Make All Pieces
- Hexagons: 6 total
- CC per hexagon: Rounds 1, 4, and 5
- MC per hexagon: Rounds 2 and 3
Layout, with flat edges at the top and bottom and points at the left and right:
FRONT PANEL      BACK PANEL
  [ Hex 1 ]        [ Hex 4 ]
  [ Hex 2 ]        [ Hex 5 ]
  [ Hex 3 ]        [ Hex 6 ]
Joining
Strips: Hold Hex 1 and Hex 2 with WS together, matching the bottom flat side of Hex 1 to the top flat side of Hex 2. With MC, work 1 sc through both corner ch-2 sps, 1 sc through both loops of each of the 9 matching dc, and 1 sc through the next pair of corner ch-2 sps. (11 sc per seam)
Join Hex 2 to Hex 3 the same way. Repeat with Hexes 4 to 6.
The stitches match one to one, so neither motif gets stretched. These seams make the thin dark green line between the flowers. Keep your tension even and match the fabric: if a seam puckers, use a hook 0.5 mm larger for joining only.
Checkpoint: each strip measures 5.2 in (13.2 cm) x 13.5 in (34.3 cm).
Border
The border has three parts: side fill on each panel, a tube seam, and the top and bottom finishes. Border gauge is the same 14 sc = 4 in (10.2 cm).
Side Fill (each long edge of each panel)
Each long edge of a strip zigzags. Every hexagon contributes its upper and lower slanted sides (9 sts each) and the ch-2 sp at its point. Between hexagons there is a notch where the joining sc sits, and there is a half-notch at the top and bottom corners. Each notch is 1.3 in (3.3 cm) deep.
Row 1 (MC, RS): Join in the top corner ch-2 sp of the long edge with a sl st. Ch 5 (counts as dtr). Then, for each hexagon:
- Upper slanted side: tr, tr, dc, dc, hdc, hdc, sc, sc, sc
- Point ch-2 sp: sc
- Lower slanted side: sc, sc, sc, hdc, hdc, dc, dc, tr, tr
That is 19 sts per hexagon. After Hex 1 and after Hex 2, work 1 dtr in the end sc of the joining seam. After Hex 3, work 1 dtr in the bottom corner ch-2 sp.
Count: 1 end dtr + (3 hexagons x 19) + 2 seam dtr + 1 end dtr = 61 sts. This is the same as 3 hexagons x 18 side sts (54), plus 3 point sc, 2 seam dtr, and 2 end dtr.
Row 2: Ch 3 (counts as dc) and turn. Then work 1 st in each st:
- dc in each dtr and tr
- hdc in each dc
- sc in each hdc and sc
(61 sts) Fasten off.
The two rows together are 1.7 in (4.3 cm) tall at the notches and 0.5 in (1.3 cm) at the points. That 1.2 in (3.0 cm) difference fills the notches almost completely, and blocking evens out the rest. Repeat on the other long edge of the same panel, and on both long edges of the second panel.
Checkpoint: each panel measures 6.2 in (15.7 cm) wide: 5.2 in (13.2 cm) plus 0.5 in (1.3 cm) on each side.
Tube Seam
Hold the panels RS together, with the fill rows matched. Sl st through both loops of all 61 sts on one long edge. Repeat on the other long edge, then turn the tube RS out. The seams end up inside, so the sides look smooth.
Top Band
Round 1 (MC): Join at one side seam at the top. Across each panel, work:
- 2 sc in the side of the Row 2 end st
- 3 sc in the side of the Row 1 end dtr
- 1 sc in the hexagon corner ch-2 sp
- 9 sc across the top side
- 1 sc in the other corner sp
- 3 sc in the side of the dtr
- 2 sc in the side of the dc
That is 21 sts per panel. Join. (42 sc)
Rounds 2–4: Sc in each st around. (42 sc)
The band is 1 in (2.5 cm) deep. Why the math works: 42 sts ÷ 3.5 sts per in = 12 in (30.5 cm) around, or 6.0 in (15.2 cm) flat. That is a hair narrower than the body, so the opening stays crisp instead of flaring.
Strap
At the end of Round 4, stay at the side seam. Ch 30, then sl st in the st directly above the opposite side seam, 21 sts away. Turn, sc in each ch, and sl st into the next band st. (30 sc) Turn, skip the sl st, sc in each sc, and sl st into the band. (30 sc) Fasten off.
The strap is 8.6 in (21.8 cm) long and forms an arch about 3.5 in (8.9 cm) high. Because it’s anchored at both seams, the weight of the bags is spread evenly and the opening doesn’t sag.
Bottom Cuff
Round 1 (MC): Work along the bottom edge exactly as for Round 1 of the top band. (42 sc)
Round 2: [Sc in the next 5 sts, sc2tog] 6 times. (36 sts)
Round 3: [Sc in the next 4 sts, sc2tog] 6 times. (30 sts)
Round 4: [Sc in the next 3 sts, sc2tog] 6 times. (24 sts)
Rounds 5–6: Sc in each st around. (24 sts) Fasten off.
The cuff is 1.5 in (3.8 cm) deep. Its opening is 6.9 in (17.5 cm) around, or about 3.4 in (8.6 cm) flat, which is snug enough to dispense one bag at a time.
Final Blocking
- Weave in all ends along same-color stitches.
- Lay the tube flat with the side seams at the edges.
- Pin the body to 6.2 in (15.7 cm) wide and 13.5 in (34.3 cm) from the top of the band to the top of the cuff.
- Push each hexagon into a crisp shape with 2.6 in (6.6 cm) sides.
- Mist until damp, but not soaked.
- Let it dry completely, then turn it over and repeat lightly on the back.
- Steam the strap straight while it hangs.
Final Quality-Control Checklist
- [ ] 6 hexagons, each 4.5 in (11.4 cm) flat-to-flat with 54 dc
- [ ] 4 hexagon seams of 11 sc each
- [ ] 4 side-fill edges of 61 sts in each row
- [ ] Panels 6.2 in (15.7 cm) wide
- [ ] Top band 42 sts, 1 in (2.5 cm) deep
- [ ] Strap 30 sc per row, attached at both seams
- [ ] Cuff ends at 24 sts
- [ ] Total length 16 in (40.6 cm)
Troubleshooting
- Petals cup: Round 3 is too tight. Go up 0.5 mm for that round only.
- Hexagon ruffles: check that each side of Round 5 has 7 dc between corners, not 8.
- Spike stitches pull the petals in: draw the long loop up a little higher before finishing the stitch.
- Notches still dip: replace the seam dtr with a trtr (yarn over 4 times).
- Edge waves after the fill: you probably added stitches. Recount to 61.
- Tube twists when hanging: check that both tube seams run straight from band to cuff, then re-block.
- Strap twists: work both strap rows from the same side, and steam it.
- Cuff opening too loose: add a 7th round of [sc 2, sc2tog] 6 times to get 18 sts.
Care
Machine wash cold on a gentle cycle in a mesh bag. Reshape while damp and dry flat. Don’t hang it while wet, or the strap will stretch.
Final Notes
The measurement chain runs like this. A 2.6 in (6.6 cm) side gives a 4.5 in (11.4 cm) hexagon. Three hexagons make a 13.5 in (34.3 cm) strip. The fill brings the panel to 6.2 in (15.7 cm) wide. The bands add 2.5 in (6.4 cm), for a finished length of 16 in (40.6 cm). Check each link in the chain before you move on, and the holder will come out true.
Happy crocheting!