

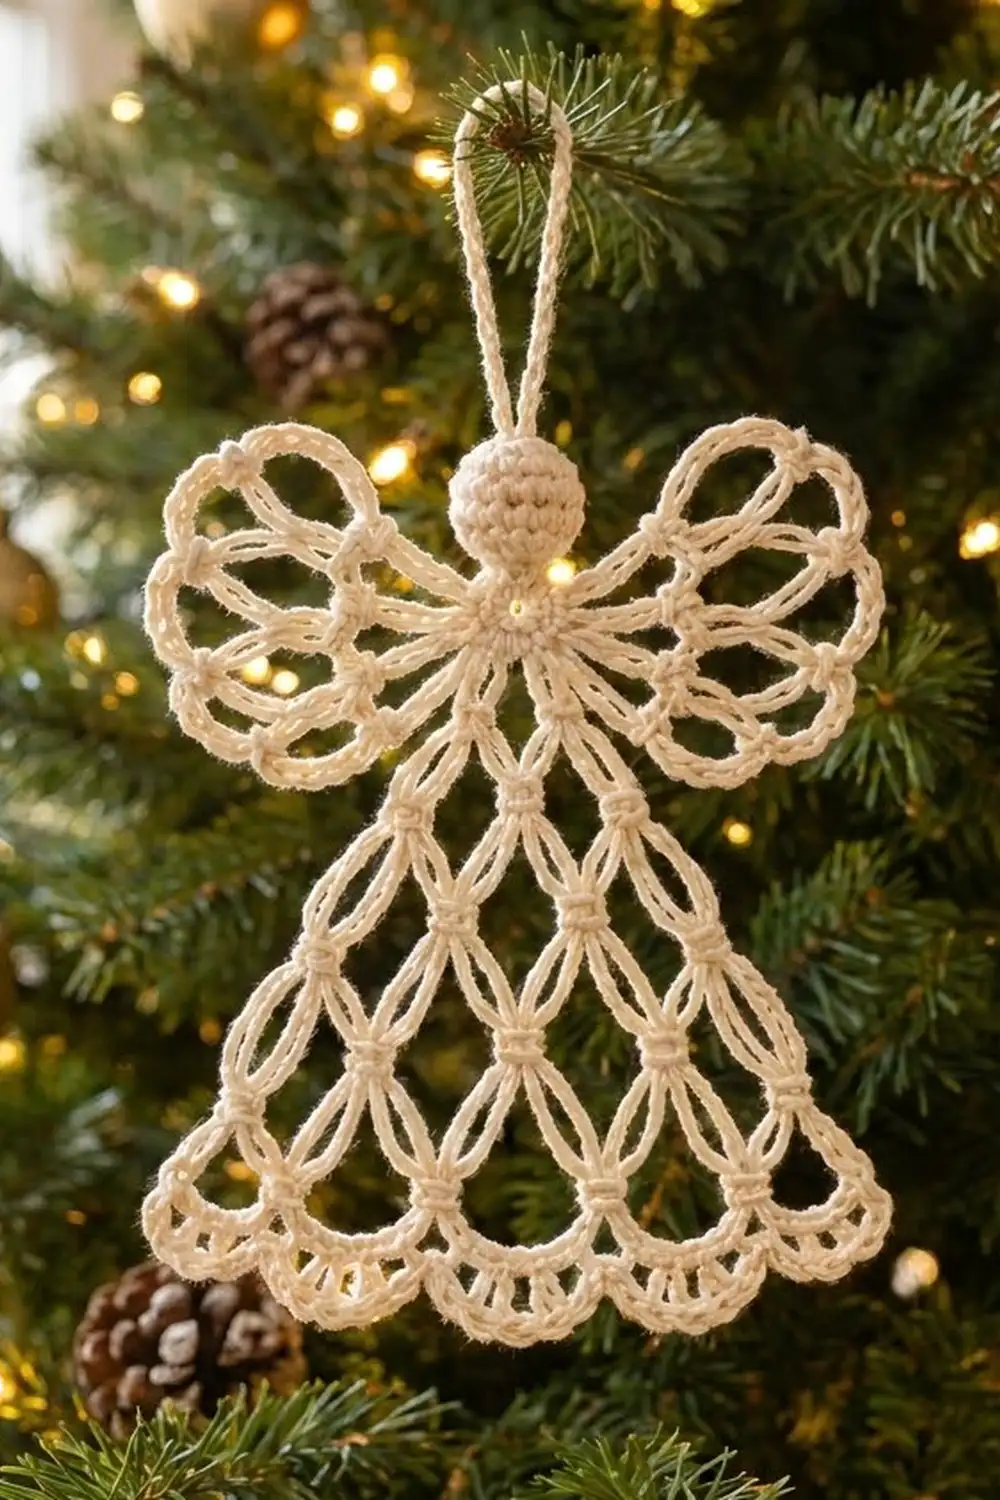
The Lace Herald Angel is a small, airy ornament made from one cream cotton thread. She has a round head and two looped wings that spread like a butterfly’s. Her bell-shaped skirt is made of open diamond mesh and ends in a row of rounded scallops. She looks delicate, but she is made from just chains, single crochet, and slip stitches.
The style is vintage lace with a soft, homemade feel. Ivory or cream thread looks lovely against green branches and gold baubles. White, pale gold, or soft silver-gray also work well.
This pattern uses US crochet terms. The finished angel is 5 in (12.7 cm) wide at the hem and 5.2 in (13.2 cm) tall from the top of the head to the hem. Her wingspan is 4.5 in (11.4 cm), and the hanging loop adds about 1.25 in (3.2 cm).
The angel is made in one continuous piece. You start with the head as a small stuffed ball. From the neck you chain the right wing, then the left wing. Then you work the skirt in turned mesh rows that grow by one space each row. Three hem rows add the scallops, and the starting tail becomes the hanging loop.
Finished Size and Construction
- Finished size: 5 in (12.7 cm) wide x 5.2 in (13.2 cm) tall, plus a 1.25 in (3.2 cm) loop
- Wingspan: 4.5 in (11.4 cm)
- Skill level: Intermediate (simple stitches, careful placement)
- Terminology: US crochet terms
- Yarn weight: Size 3 cotton crochet thread
- Hook: 2.25 mm (US B-1)
- Number of pieces: 1
- Layout: Single stand-alone ornament, no joining
- Piece size before hem: 4.8 in (12.2 cm) wide x 4.7 in (11.9 cm) tall
- Hem (border) depth: 0.5 in (1.3 cm)
Materials
Yarn: Use a mercerized size 3 cotton crochet thread. Mercerized cotton has a slight sheen, shows the knots clearly, and holds its shape after starching. Avoid fuzzy or very stretchy fibers, because the mesh will lose its crisp diamonds.
- Cream (one color only): 8 g, about 24 yd (22 m)
These amounts include a safety margin. One angel uses roughly 5 g, so a single 50 g ball makes about six angels for a matching set.
Tools:
- 2.25 mm (US B-1) crochet hook
- Small pinch of polyester fiberfill (or matching thread scraps)
- Tapestry needle
- Scissors
- Rustproof pins and a foam blocking board
- Fabric stiffener or spray starch (optional, recommended)
- Ruler or tape measure
Abbreviations (US Terms)
- ch – chain
- sc – single crochet
- sc2tog – single crochet 2 together
- sl st – slip stitch
- sk – skip
- sp(s) – space(s)
- st(s) – stitch(es)
- MR – magic ring
- rep – repeat
Special technique – sc around a loop: Put the hook under the whole chain loop (not into a single chain), yarn over, and pull up a loop. Yarn over again and pull through both loops. This makes the small “knot” that ties chain lines together.
Gauge and Checkpoints
Gauge: 8 sc = 1 in (2.5 cm) and 8 ch = 1 in (2.5 cm), worked fairly firmly.
Lace gauge is easiest to check on the piece itself. Make one test angel first and measure it at each stage below.
- Head: 0.5 in (1.3 cm) across after Rnd 6
- Each wing: reaches about 2 in (5.1 cm) out from the neck
- Skirt after Row 3: 2.4 in (6.1 cm) wide, 1.8 in (4.6 cm) tall, measured gently stretched
- Skirt after Row 7: 4.8 in (12.2 cm) wide, 4.2 in (10.7 cm) tall
- After hem: 5 in (12.7 cm) wide, 5.2 in (13.2 cm) total height
Each mesh row adds about 0.6 in (1.5 cm) of height. Each mesh space is about 0.6 in (1.5 cm) wide.
If your angel is too big: go down to a 2.0 mm hook, or tighten your chains. If it is too small: go up to a 2.5 mm hook. Do not change the chain counts, because the shape of the wings and hem depends on them.
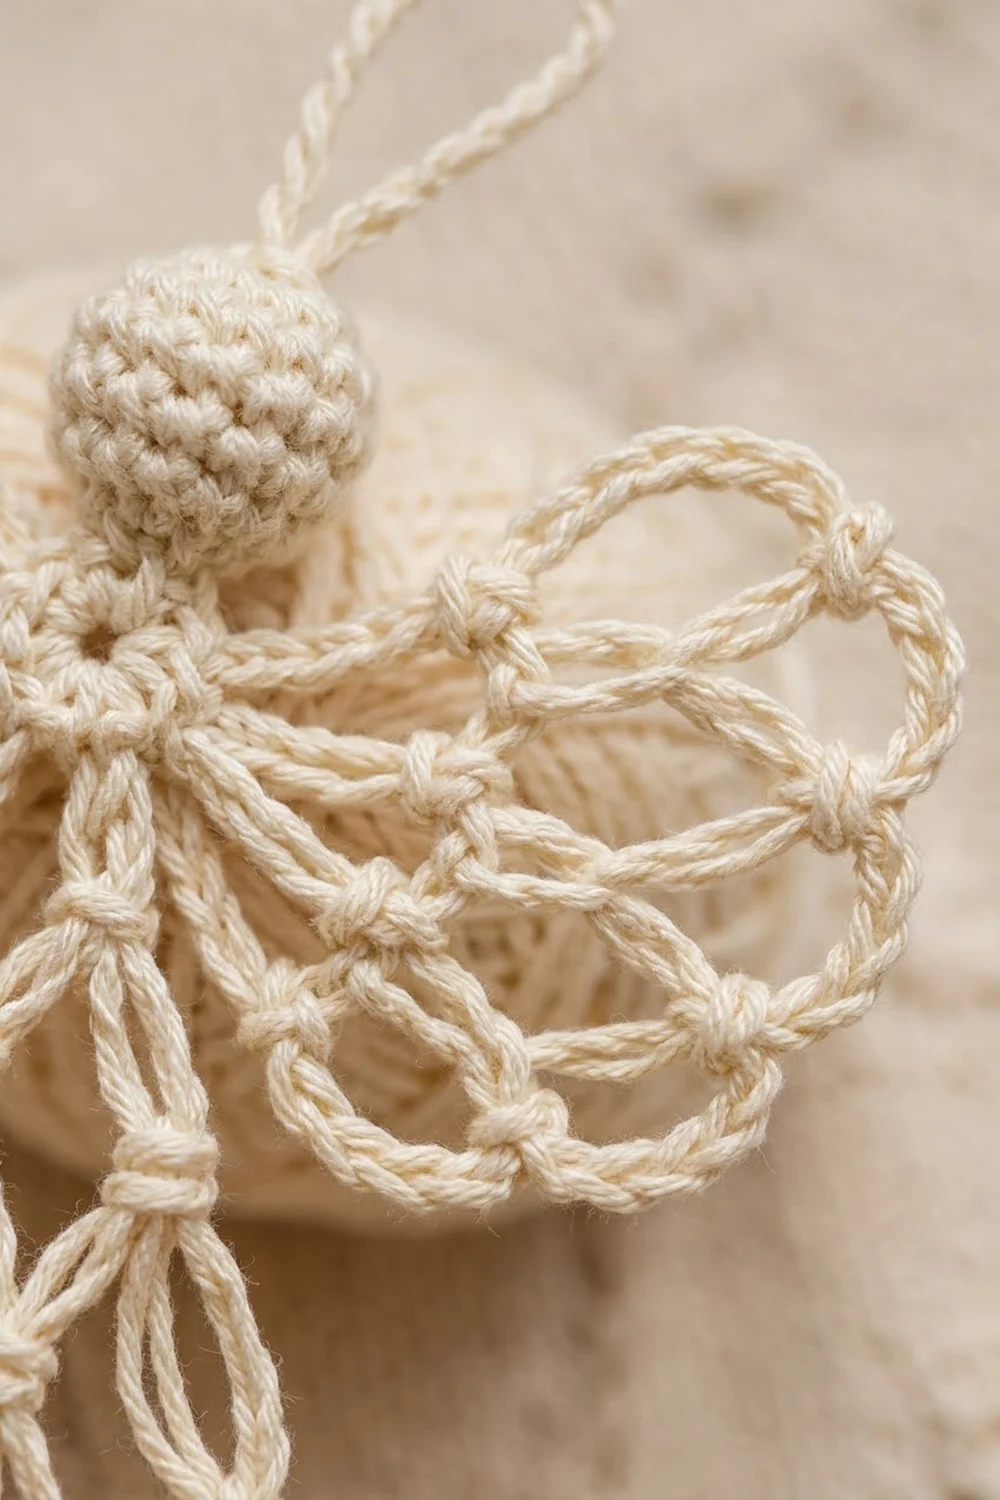
Head
Leave a 10 in (25.4 cm) starting tail. You will use it later for the hanging loop, so keep it on the outside of the ball.
Rnd 1: Make a MR, ch 1, 6 sc in ring. Pull the ring closed. Do not join; work in a spiral. (6 sts)
Rnd 2: 2 sc in each st around. (12 sts)
Rnd 3: Sc in each st around. (12 sts)
Rnd 4: Sc in each st around. (12 sts)
Rnd 5: Sc2tog 6 times. (6 sts)
Stuff the ball firmly with a small pinch of fiberfill. Push the stuffing into a round shape with the back of the hook.
Rnd 6: Sc2tog 3 times. (3 sts)
Do not fasten off. The last stitch you made is the neck point. Every wing and skirt chain starts and ends here. The ball should measure 0.5 in (1.3 cm) across.
Right Wing
Foundation loops:
- Ch 20, sl st in the neck point. (Lower loop)
- Ch 28, sl st in the neck point. (Middle loop, the longest)
- Ch 24, sl st in the neck point. (Upper loop)
Lay the head face up. Fan the three loops out to the right: the upper loop angles slightly up, the middle loop points straight out, and the lower loop angles down.
Outline: Work around each loop using “sc around a loop.”
- Ch 5, sc around the lower loop one quarter of the way along it.
- Ch 5, sc around the tip of the lower loop.
- Ch 5, sc around the lower loop three quarters of the way along it.
- Ch 5, sc around the middle loop one quarter of the way along it.
- Ch 5, sc around the tip of the middle loop.
- Ch 5, sc around the middle loop three quarters of the way along it.
- Ch 5, sc around the upper loop one quarter of the way along it.
- Ch 5, sc around the tip of the upper loop.
- Ch 5, sc around the upper loop three quarters of the way along it.
- Ch 5, sl st in the neck point.
Count: 3 foundation loops, 10 ch-5 arches, 9 sc knots.
The outline arches sit just outside the foundation loops. Together they make the knotted double line that gives the wing its scalloped edge. The wing should reach about 2 in (5.1 cm) from the neck.
Left Wing
Repeat the foundation loops and the outline exactly as for the right wing, but fan the loops out to the left. Work the outline from the lower loop up to the upper loop, as before.
Count: 3 foundation loops, 10 ch-5 arches, 9 sc knots.
With both wings done, the wingspan is 4.5 in (11.4 cm): 2 in (5.1 cm) per wing plus the 0.5 in (1.3 cm) head.
Skirt
The skirt is a growing triangle of chain mesh, worked in turned rows from the neck down. Each row adds an extra space at both ends, but it also has one fewer space between its knots than the row above has spaces. So each row has exactly one more space than the row before.
Row 1: Ch 5, sc in the neck point, ch 5, sc in the neck point. (2 ch-5 sps)
Row 2: Turn, ch 5, sc in the first ch-5 sp, ch 5, sc in the next ch-5 sp, ch 5, sc in the same sp. (3 ch-5 sps)
Row 3: Turn, ch 5, sc in the first ch-5 sp, (ch 5, sc in the next ch-5 sp) across, ch 5, sc in the same last sp. (4 ch-5 sps)
Checkpoint: 2.4 in (6.1 cm) wide, 1.8 in (4.6 cm) tall.
Row 4: Rep Row 3. (5 ch-5 sps)
Row 5: Rep Row 3. (6 ch-5 sps)
Row 6: Rep Row 3. (7 ch-5 sps)
Row 7: Rep Row 3. (8 ch-5 sps)
Count rule: Each row has (row number + 1) ch-5 spaces.
Checkpoint: 4.8 in (12.2 cm) wide (8 sps x 0.6 in / 1.5 cm) and 4.2 in (10.7 cm) tall (7 rows x 0.6 in / 1.5 cm). The skirt should look like an open bell of diamonds, with a knot at each meeting point. With the head, the angel is now 4.7 in (11.9 cm) tall.
Hem Border
The hem is the border of this piece. It runs along the bottom edge only.
Border gauge: 8 sc = 1 in (2.5 cm).
Row 8 (base row): Turn, ch 1, 5 sc in each ch-5 sp across. (8 sps x 5 sc = 40 sc)
At 8 sc per inch, 40 sc measures 5 in (12.7 cm). That is 0.2 in (0.5 cm) wider than the mesh, which gives the hem its gentle flare.
Row 9 (arch row): Turn, ch 1. *Sc in the next sc, ch 4, sk 3 sc, sc in the next sc. Rep from * 7 more times. (16 sc, 8 ch-4 arches)
Each repeat uses exactly 5 sts: 2 worked into and 3 skipped. 8 repeats x 5 sts = 40 sts, so the row ends exactly in the last sc. Each arch sits over one mesh space.
Row 10 (scallop row): Turn, ch 1, sl st in the first sc. *7 sc in the next ch-4 arch, sl st in each of the next 2 sc. Rep from * 6 more times. Then work 7 sc in the last ch-4 arch and sl st in the last sc. (56 sc, 16 sl st)
Count check: 8 scallops x 7 sc = 56 sc. The slip stitches are 1 at the start, 7 repeats x 2 = 14 in the middle, and 1 at the end, for 16 total. That matches the 16 sc of Row 9, one sl st per sc.
Why the math works: Each mesh space feeds 5 base sc, each group of 5 base sc becomes one arch, and each arch becomes one scallop. So 8 spaces give 8 scallops. Each scallop is 0.625 in (1.6 cm) wide, for a total of 5 in (12.7 cm). The three hem rows add 0.5 in (1.3 cm) of depth.
Fasten off, leaving a 6 in (15.2 cm) tail, and weave it in along the hem.
Hanging Loop
At the top of the head, pull up a loop with the 10 in (25.4 cm) starting tail. Ch 20, then sl st into the top of the head right next to the magic ring. Fasten off and weave the end down into the ball.
The loop hangs about 1.25 in (3.2 cm) above the head.
Final Blocking
- Soak the angel in cool water for 5 minutes, then roll it in a towel to press out extra water.
- If you are using stiffener, dip the damp angel in it and squeeze out the extra.
- Lay it face up on the foam board. Pin the neck point and the top of the head first.
- Pin the hem to 5 in (12.7 cm) wide, with one pin at the top of each scallop.
- Pin the skirt sides straight so the skirt measures 4.2 in (10.7 cm) from the neck to the base of the hem.
- Fan out each wing so it reaches 2 in (5.1 cm) from the neck. Pin the tip of every foundation loop and every outline knot.
- Pin every mesh knot so the diamonds open evenly.
- Shape the hanging loop with a pin through its center.
- Let it dry completely, at least 12 hours, before removing the pins.
Final Quality-Control Checklist
- Head is a firm, round ball 0.5 in (1.3 cm) across with no stuffing showing
- Each wing has 3 foundation loops, 10 outline arches, and 9 knots
- Both wings match in size and angle
- Skirt has 7 mesh rows, ending with 8 ch-5 sps
- Hem has 8 even scallops of 7 sc each
- Finished size is 5 in (12.7 cm) wide x 5.2 in (13.2 cm) tall
- Hanging loop is centered on the head
- All tails are woven in securely and trimmed
Troubleshooting
The skirt twists or leans. You probably missed the extra “ch 5, sc in the same sp” at the end of a row. Count the spaces; each row should have one more than the last.
The hem ruffles. Your sc are looser than the mesh. Keep 5 sc per space, but use a smaller hook for Rows 8–10 only.
The hem pulls in. Your sc are tight. Go up one hook size for the hem rows.
The wings flop. Use stiffener, and pin each outline knot while blocking.
Stuffing shows through the head. Use thread scraps instead of fiberfill, or tighten your tension on Rnds 3–5.
The knots slide along the loops. Work “sc around a loop” firmly, under the whole loop, not into a single chain.
Care
Hand wash in cool water, reshape, and dry flat. Re-starch if the angel softens, and store her flat in tissue paper between seasons.
Final Notes
The measurements build on each other. The head is 0.5 in (1.3 cm), and each wing reaches 2 in (5.1 cm), for a 4.5 in (11.4 cm) wingspan. Seven mesh rows of 0.6 in (1.5 cm) make a skirt 4.2 in (10.7 cm) tall and 4.8 in (12.2 cm) wide. Eight spaces become 40 base sc, then 8 arches, then 8 scallops. The hem adds 0.5 in (1.3 cm) of depth, for a finished angel of 5 in (12.7 cm) by 5.2 in (13.2 cm).
Once your first angel matches these checkpoints, the rest will go quickly.
Happy crocheting!