

This lace parasol ornament looks delicate, but every part of it is worked flat, row by row. The canopy has thin ribs that fan out from a small knob at the top. It opens into chain mesh and finishes with three fan shells and a scalloped lower edge. A corded handle with a J-shaped curl hangs below, and a sturdy loop sits on top for hanging.
The ornament is worked in one color: ivory or cream size 10 cotton crochet thread. The soft, single tone gives it a vintage, Victorian look that suits a Christmas tree, a gift tag or a wedding table. This pattern uses US crochet terms throughout.
The finished ornament is 4 in (10.2 cm) wide across the canopy and 4.75 in (12.1 cm) tall from the knob to the bottom of the curl. With the hanging loop it is 5.75 in (14.6 cm) tall.
You start the canopy as a small fan and work it outward in turned rows. Next you add the scallop border round, then the knob and loop at the top, and last the handle from the center of the lower edge. Everything stays in one piece.
Finished Size and Construction
- Finished size: 4 in (10.2 cm) wide x 4.75 in (12.1 cm) tall; 5.75 in (14.6 cm) with loop
- Skill level: Intermediate (thread lace)
- Terminology: US crochet terms
- Yarn weight: Lace (0), size 10 cotton crochet thread
- Hook: 1.5 mm (US steel size 8)
- Number of pieces: 1
- Layout: Single ornament, no joining
- Piece size: Canopy 4 in (10.2 cm) wide x 2 in (5.1 cm) tall; handle 2.75 in (7.0 cm) long below the canopy
- Size before border: Canopy 3.5 in (8.9 cm) wide x 1.75 in (4.4 cm) tall
- Border depth: 0.25 in (0.6 cm)
Materials
Thread: Use a mercerized size 10 cotton crochet thread. Mercerized cotton has a slight sheen, shows the lace clearly and holds its shape well after stiffening. Avoid fuzzy or acrylic threads, because they blur the fan shells and won’t block crisply.
- Ivory/cream: 5 g, about 28 m (31 yd) per ornament
This amount includes a safety margin of about 20%. If you plan to make a set, one standard ball of size 10 thread will make many ornaments.
Tools:
- 1.5 mm (US steel size 8) crochet hook
- Fine tapestry needle
- Small sharp scissors
- Fabric stiffener, or a strong starch solution
- Blocking board or foam, plus rustproof pins
- Pencil or dowel about 0.5 in (1.3 cm) across, for shaping the curl
- Plastic wrap
Abbreviations (US Terms)
- ch – chain
- sl st – slip stitch
- sc – single crochet
- hdc – half double crochet
- dc – double crochet
- sp – space
- st(s) – stitch(es)
- sk – skip
- RS / WS – right side / wrong side
- rep – repeat
Special stitch: popcorn (pc). Work 5 dc in the same st. Take the hook out of the loop. Insert the hook from front to back into the top of the first dc, pick up the dropped loop and pull it through. Ch 1 to close.
Gauge and Checkpoints
Gauge: 4 rows of dc measure 1 in (2.5 cm). 8 sc measure 1 in (2.5 cm).
Make one full canopy before you commit to a whole set. Thread gauge depends on how you hold the thread, so the checkpoints below matter more than a swatch.
- After Row 1: Small half-disc, 0.25 in (0.6 cm) from the apex to the edge.
- After Row 4: Apex to edge measures 1 in (2.5 cm).
- After Row 7: Apex to the lower edge measures 1.75 in (4.4 cm). Tip to tip measures 3.5 in (8.9 cm).
- After the border: Canopy is 4 in (10.2 cm) wide x 2 in (5.1 cm) tall.
- After the handle: Total height without the loop is 4.75 in (12.1 cm).
Too big? Change to a 1.25 mm hook, or shorten the chain loops by tightening how you pull up each ch.
Too small? Change to a 1.75 mm hook.
A difference of 0.25 in (0.6 cm) is fine for an ornament. If you’re making a matching set, keep every ornament on the same hook.
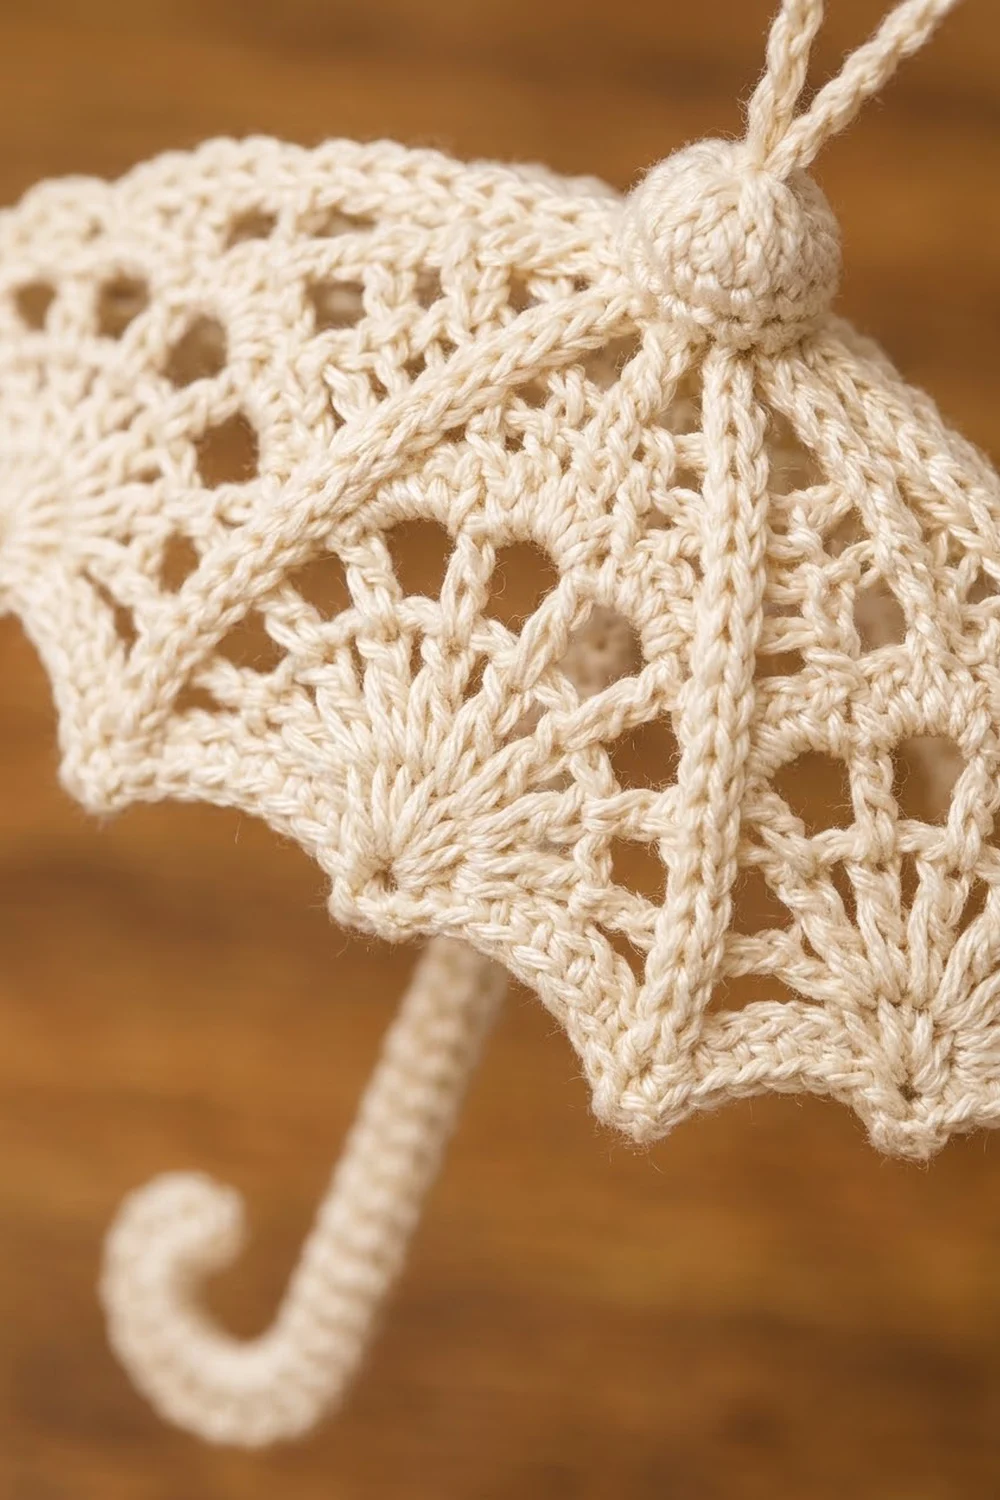
Canopy
The canopy is a fan worked from the apex outward. Turn at the end of every row. The ch-3 at the start of a row counts as a dc, and the last dc of each row goes into the top of the previous turning ch. The 8 dc from Row 1 become the 8 main ribs.
Row 1 (RS): Ch 4. Work 7 dc in the 4th ch from hook. The 3 skipped ch count as the first dc. (8 dc, 7 gaps)
Row 2: Ch 3, ch 1, dc in next dc; rep from * 6 more times. (8 dc, 7 ch-1 sps)*
Row 3: Ch 3, ch 2, dc in next dc; rep from * 6 more times. (8 dc, 7 ch-2 sps)*
Row 4: Ch 3, ch 3, dc in next dc; rep from * 6 more times. (8 dc, 7 ch-3 sps)*
Checkpoint: apex to edge measures 1 in (2.5 cm).
Row 5: Ch 3, ch 2, dc in next ch-3 sp, ch 2, dc in next dc; rep from * 6 more times. (15 dc, 14 ch-2 sps)*
The canopy now has 8 main ribs, with one center dc between each pair. That makes 7 panels, and each panel reads rib, center dc, rib.
Row 6 (windows and fans): In this row, panels alternate between a window (W) and a fan (F). The order is W, F, W, F, W, F, W, so the row is symmetrical and reads the same from either direction.
Ch 3. Then work the 7 panels as follows:
- Window: Ch 3, sk ch-2 sp, sc in center dc, ch 3, sk ch-2 sp, dc in next rib dc.
- Fan: Ch 1, sk ch-2 sp, 7 dc in center dc, ch 1, sk ch-2 sp, dc in next rib dc.
Row total: 8 rib dc + 4 window sc + 21 fan dc = 33 sts, plus 8 ch-3 sps and 6 ch-1 sps.
Row 7: Ch 3. Work the same panel order:
- Window: Ch 4, sc in sc, ch 4, dc in next rib dc.
- Fan: Ch 1, dc in first fan dc, (ch 1, dc in next fan dc) 6 times, ch 1, dc in next rib dc.
Row total: 8 rib dc + 4 sc + 21 fan dc = 33 sts, plus 8 ch-4 sps and 24 ch-1 sps. Each fan now has 7 dc and 8 ch-1 sps.
Checkpoint: apex to lower edge measures 1.75 in (4.4 cm), and tip to tip measures 3.5 in (8.9 cm). Lay the canopy flat. The three fans should open into even half-circles.
Don’t fasten off.
Border
Border gauge: 8 sc = 1 in (2.5 cm) along the straight side edges. Each side edge measures 1.75 in (4.4 cm), so it needs 1.75 x 8 = 14 sc.
Corner definition: The two lower corner stitches belong to the lower-edge count. The side counts below don’t include them, and the single apex stitch is counted separately.
Border Rnd 1: Ch 1, turn.
Lower edge: Sc in first rib dc. Then work each panel:
- Window: (sc, hdc, 3 dc, hdc, sc) in ch-4 sp, sl st in sc, (sc, hdc, 3 dc, hdc, sc) in next ch-4 sp, sc in next rib dc.
- Fan: (sc in ch-1 sp, sc in next dc) 7 times, sc in last ch-1 sp, sc in next rib dc.
Each window gives 7 + 1 + 7 = 15 sts, made as two small scallops. Each fan gives 8 + 7 = 15 sts, made as one large scallop. The last sc goes into the top of the turning ch.
Lower edge total: 8 rib sc + (7 panels x 15) = 113 sts.
First side edge: Rotate the work. Work 2 sc into the end of each row from Row 7 back to Row 1. (14 sc)
Apex: 1 sc in the base of Row 1. (1 sc)
Second side edge: Work 2 sc into the end of each row from Row 1 to Row 7. (14 sc)
Sl st in the first sc to join.
Round total: 113 + 14 + 1 + 14 = 143 sts. Fasten off.
Why the math works: Every panel is exactly 15 sts wide, and each one sits between rib stitches that are also worked 1-for-1. That keeps the lower edge balanced, so no scallop is crowded. Each side has 7 rows at 2 sc per row, which matches the 8 sc per inch gauge over 1.75 in (4.4 cm). The sides stay flat without pulling the dome in or making it ripple. The border adds 0.25 in (0.6 cm) of depth, so the canopy grows from 3.5 in (8.9 cm) to 4 in (10.2 cm) wide and from 1.75 in (4.4 cm) to 2 in (5.1 cm) tall.
Knob and Hanging Loop
With RS facing, join the thread with a sl st in the apex sc.
Knob: Ch 2. Work 1 popcorn in the apex sc, finishing with the ch 1.
Loop: Ch 20. Sl st in the top of the popcorn to form a loop.
Cording: Work 28 sc into the ch-20 loop, packing the stitches closely together. Sl st in the top of the popcorn. Fasten off.
The 28 sc cover the chain completely and make a firm loop about 1 in (2.5 cm) tall.
Handle
The handle hangs from the center of the lower edge. That center is stitch 57 of the 113 lower-edge sts: the sc worked into the 4th (middle) dc of the center fan.
With RS facing, join the thread with a sl st in stitch 57.
Foundation: Ch 23.
Row 1: Sc in the 2nd ch from hook and in each of the next 5 ch. These 6 sc form the curl zone. Then work hdc in each of the next 16 ch for the shaft. Sl st in the same canopy stitch, then sl st in the next canopy stitch. (22 sts: 6 sc + 16 hdc)
Row 2: Turn, but don’t chain. Working down the other side of the strip, sc in each of the 16 hdc. Then work 2 sc in each of the 6 curl sc. (28 sc: 16 + 12)
Fasten off. The extra stitches along the curl’s outer edge make the end roll into a J shape on its own.
Checkpoint: the shaft measures 2 in (5.1 cm). The curl drops another 0.75 in (1.9 cm), for a total of 2.75 in (7.0 cm) below the canopy.
Weave in all ends along the ribs and through the handle stitches, where they’re hidden.
Final Blocking
- Mix the fabric stiffener as the label directs. For starch, use a strong solution.
- Soak the ornament fully, then gently squeeze out the extra liquid. Blot it in a towel.
- Cover the blocking board with plastic wrap.
- Pin the apex knob first. Then pin the two canopy tips 4 in (10.2 cm) apart.
- Ease the side edges into a gentle dome curve and pin every 0.5 in (1.3 cm).
- Pin the tip of each scallop. Open each fan shell into an even half-circle, and open each window so you can see the chain loops clearly.
- Line up the handle straight below the center fan. Wrap the curl around the 0.5 in (1.3 cm) pencil or dowel and pin it in place.
- Pin the loop flat in a teardrop shape.
- Let it dry completely, at least 12 hours. Then unpin it and check the measurements.
Final Quality-Control Checklist
- [ ] Canopy is 4 in (10.2 cm) wide and 2 in (5.1 cm) tall
- [ ] Total height is 4.75 in (12.1 cm) without the loop and 5.75 in (14.6 cm) with it
- [ ] 8 ribs radiate evenly from the knob
- [ ] 3 fans of 7 dc each, with 4 windows between and beside them
- [ ] Lower edge has 113 sts and each side has 14 sc
- [ ] Handle hangs from stitch 57, at the exact center
- [ ] Curl turns cleanly into a J and the loop is firm
- [ ] All ends are hidden and trimmed, with no stiffener flakes showing
Troubleshooting
The canopy cups or won’t lie flat. Your dc are probably too short for the chain spaces. Loosen the dc slightly, or go down to a 1.25 mm hook so the chains tighten.
The canopy ruffles. The chain spaces are too long. Pull each ch up snugly, or check your tension in Row 4.
Fans lean to one side. The 7 dc probably went into a ch sp instead of the center dc. Work them into the top of the center dc.
The handle is off-center. Count again from the corner. The handle belongs in stitch 57, the middle dc of the center fan.
The curl won’t hold. Check that you worked 2 sc in each of all 6 curl stitches. Re-wet the curl and pin it around a narrower dowel.
Side edges pucker. You worked fewer than 2 sc per row end. Undo the side and work exactly 14 sc.
Care
Dust the ornament gently with a soft brush. If it needs washing, hand-wash it in cool water and then stiffen and block it again exactly as described above.

Final Notes
Each stage builds on the one before. Row 4 reaches 1 in (2.5 cm) from the apex, and Row 7 reaches 1.75 in (4.4 cm). The canopy is 3.5 in (8.9 cm) wide before the border. The 0.25 in (0.6 cm) border brings it to 4 in (10.2 cm) wide and 2 in (5.1 cm) tall. The handle adds 2.75 in (7.0 cm) for a total of 4.75 in (12.1 cm), and the loop brings the ornament to 5.75 in (14.6 cm).
If your stitches match the checkpoints at Row 4 and Row 7, every ornament in your set will match. Make one, check it, then make as many as your tree needs.
Happy crocheting!