

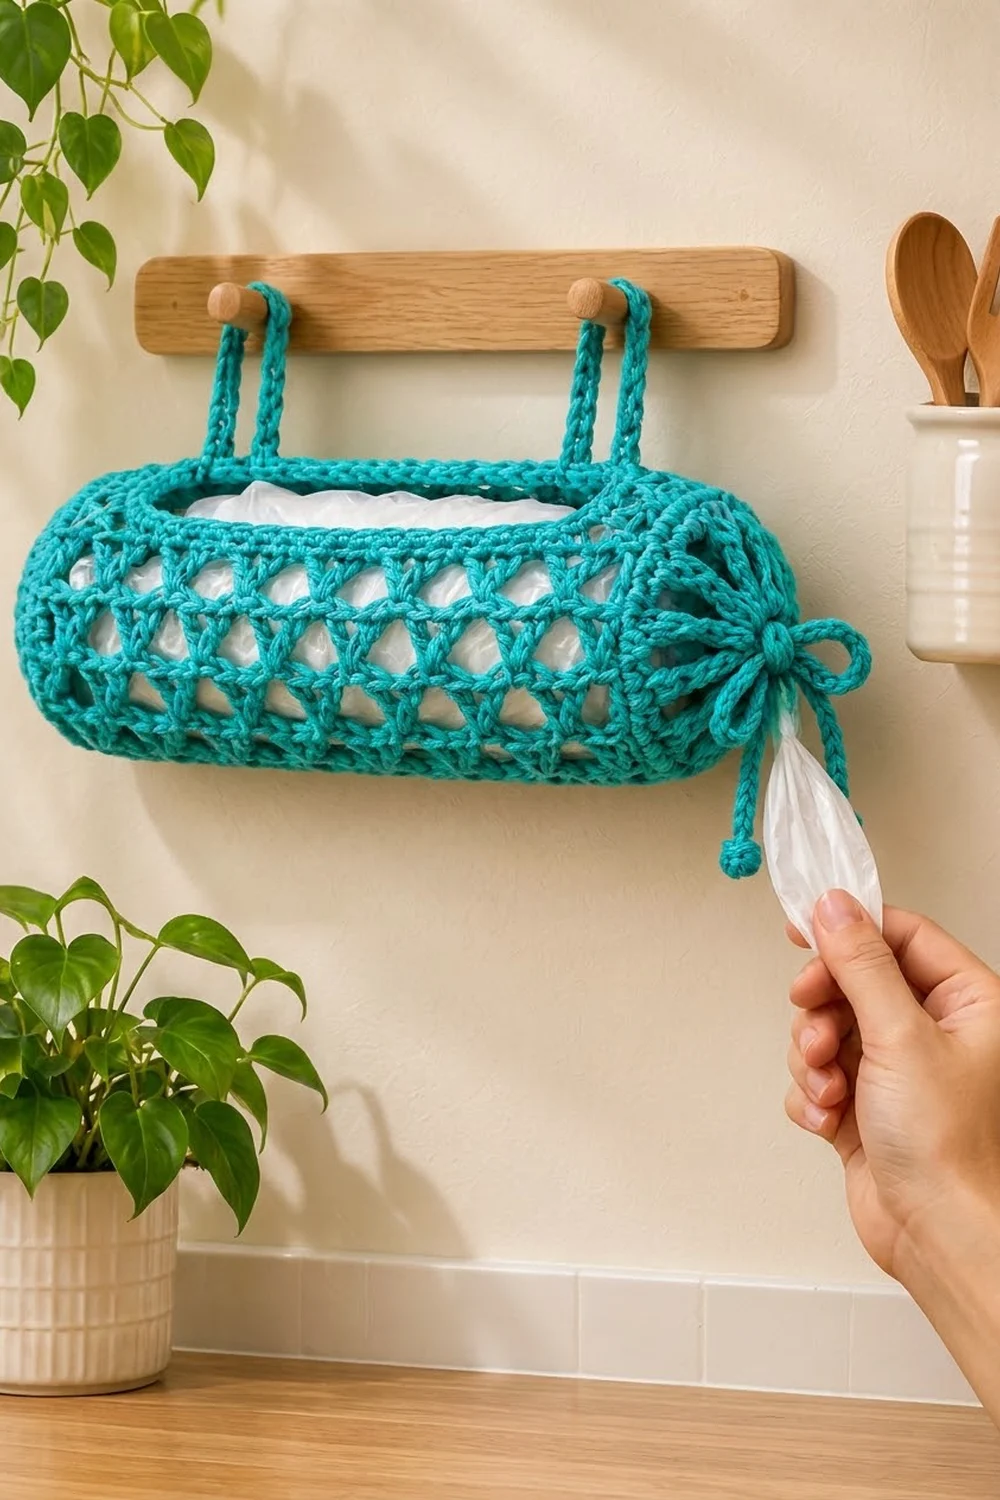
Plastic bags tend to pile up in a drawer. The Lagoon Lattice Bag Holder gives them a tidy home on the wall. It’s an open-mesh tube in bright teal. You push bags in through a long slot on top and pull them out one at a time from the drawstring end.
The mesh is built from stacked V-stitches, which makes a light, airy lattice so you can see how many bags are left. Firm single-crochet rows frame the loading slot. One end is closed with a flat cap, and the other end gathers with a chain-cord drawstring that has little bobble balls at the tips. Two small strap loops hang it from pegs or hooks.
This pattern uses US crochet terms. The finished body is 14 in (35.6 cm) long and 15.5 in (39.4 cm) around, so it measures about 5 in (12.7 cm) across when filled.
Construction overview: You crochet one flat rectangle in rows, roll it into a tube, and seam it only at each end, so the open middle becomes the slot. Then you edge the slot, close one end with a cap, and work an eyelet rim on the other end. Finally, you make two hanging loops and a drawstring and attach them.
Finished Size and Construction
- Finished size: 14 in (35.6 cm) body length; 15.5 in (39.4 cm) circumference; about 5 in (12.7 cm) diameter when filled
- Skill level: Easy / advanced beginner
- Terminology: US crochet terms
- Yarn weight: Worsted (#4), cotton or cotton blend
- Hook: 5.0 mm (US H-8)
- Number of pieces: 1 main body, 2 hanging loops, 1 drawstring (assembled into one holder)
- Layout: Flat panel rolled into a horizontal tube with a top slot
- Piece size (flat panel): 14 in × 15.5 in (35.6 cm × 39.4 cm)
- Size before border: Tube 14 in (35.6 cm) long with a 10 in (25.4 cm) slot
- Border depth: Slot edging 0.25 in (0.6 cm); drawstring rim about 1 in (2.5 cm)
Materials
Yarn: Use a smooth worsted-weight cotton. Cotton keeps its shape when the holder is full, and it doesn’t stretch out under the weight of the bags. Avoid fuzzy yarns, because they hide the V-stitch lattice.
- Teal: 120 g, about 190 m (208 yd)
These amounts include a margin of about 15%, so you won’t run short if your tension is a little looser.
Tools:
– 5.0 mm (US H-8) crochet hook
– Tapestry needle
– 4 locking stitch markers
– Scissors
– Measuring tape
– Rust-proof pins and a towel for blocking
Abbreviations (US Terms)
- ch – chain
- sl st – slip stitch
- sc – single crochet
- sc2tog – single crochet 2 together
- dc – double crochet
- sp – space
- st(s) – stitch(es)
- rnd – round
- RS / WS – right side / wrong side
Special stitches:
- V-st (V-stitch): (dc, ch 1, dc) in the same stitch or space.
- Bobble: *Yarn over, insert the hook in the indicated chain, yarn over and pull up a loop, yarn over and draw through 2 loops; repeat from * 3 more times in the same chain (5 loops on hook), yarn over and draw through all 5 loops.
Gauge and Checkpoints
Sc gauge: 16 sc = 4 in (10.2 cm)
V-stitch gauge: 5 V-st rows = 3 in (7.6 cm), so each V-st row is 0.6 in (1.5 cm) tall. Each sc row is about 0.25 in (0.6 cm) tall.
Make a test swatch first: Ch 15. Work Row 1 as in the pattern (14 sc). Then work 5 V-st rows with 4 V-sts per row. The swatch should be 3.5 in (8.9 cm) wide, and the 5 V-st rows should be 3 in (7.6 cm) tall.
Checkpoints:
– After Row 1: 56 sc, 14 in (35.6 cm) wide
– After Row 16 (15 V-st rows): 9.25 in (23.5 cm) tall
– After Row 26: 15.25 in (38.7 cm) tall
– After Row 27: 15.5 in (39.4 cm) tall
If your swatch is too big, go down a hook size, to 4.5 mm. If it’s too small, go up to 5.5 mm. Width matters most, because the slot edging count depends on the 56-stitch row being 14 in (35.6 cm). Height can be fine-tuned by adding or removing V-st rows in pairs, but the end-rim count will change by 4 sc for each pair (2 sc per V-st row).

Main Body Panel
The panel is worked flat in rows. The foundation chain sets the length of the tube, and the rows build up its circumference.
Ch 57.
Row 1 (RS): Sc in 2nd ch from hook and in each ch across. Turn. (56 sc)
Row 2 (WS): Ch 3 (counts as dc). Skip the next sc, V-st in the next sc, skip 2 sc, V-st in the next sc; repeat from * 16 more times, skip the next sc, dc in the last sc. Turn. (18 V-sts + 2 edge dc = 38 dc and 18 ch-1 sps)*
Check the math: 1 (st under the ch-3) + 1 skipped + 1 V-st + (17 × 3) + 1 skipped + 1 last st = 56 sts.
Rows 3–26: Ch 3 (counts as dc). V-st in the ch-1 sp of each V-st across, dc in the top of the turning ch. Turn. (18 V-sts + 2 edge dc = 38 dc and 18 ch-1 sps per row)
The V-sts stack directly on top of each other, which forms the open vertical lattice columns. You now have 25 V-st rows.
Row 27 (conversion row): Ch 1. Sc in the first dc, sc in the next dc, sc in the ch-1 sp, sc in the next dc; repeat from * 17 more times, sc in the top of the turning ch. (38 sc worked one per existing dc + 18 sc added in ch-1 sps = 56 sc)*
Fasten off, leaving a 20 in (50.8 cm) tail for seaming.
The panel should measure 14 in × 15.5 in (35.6 cm × 39.4 cm). Lightly steam or wet-block it flat to these measurements before seaming.
Hanging Loops (Make 2)
Ch 21.
Row 1: Sc in 2nd ch from hook and in each ch across. Turn. (20 sc)
Row 2: Ch 1, sc in each st across. (20 sc)
Fasten off, leaving an 8 in (20.3 cm) tail. Each strap is 5 in (12.7 cm) long and about 0.5 in (1.3 cm) wide.
Drawstring
Ball 1: Ch 4. Work a bobble in the 4th ch from hook. Ch 1 to lock it.
Cord: Ch 120. Turn the work and sl st in the back bump of each of the 120 chains, back toward Ball 1. This gives a firm, rounded cord about 30 in (76.2 cm) long.
Ball 2: Ch 4, bobble in the 4th ch from hook, ch 1. Fasten off.
Weave each tail into its bobble so the bobble stuffs itself into a small, round knob.
Assembly
1. Roll the tube. With the RS facing out, fold the panel so that the free loops of the foundation chain (Row 1 edge) meet the tops of the Row 27 stitches. Both edges have 56 stitches, and they line up stitch for stitch.
2. Seam the ends only. Place a marker at stitch 8 and stitch 49 on both edges. Using the long tail and a tapestry needle, whipstitch stitches 1–8 together, matching each foundation loop to the Row 27 stitch directly opposite it. Repeat for stitches 49–56. Leave stitches 9–48 (40 sts) unjoined. This opening is the 10 in (25.4 cm) loading slot, with 2 in (5.1 cm) of seam at each end: 8 + 40 + 8 = 56.
3. Keep tension even. Pull each whipstitch snug but not tight, so the seam lies flat and matches the fabric. A puckered seam will make the slot ends dip.
Size checkpoint: The tube should measure 14 in (35.6 cm) long and 15.5 in (39.4 cm) around, with a 10 in (25.4 cm) slot centered on top.
Border: Slot Edging and End Finishing
Border gauge is the same as the sc gauge: 4 sc per inch (2.5 cm).
Slot Edging
With the RS facing, join the yarn at one end of the slot, in the seam.
Rnd 1: Ch 1. Sc in the same place (corner). Sc in each of the 40 free foundation loops along one slot edge. Sc in the seam at the far end of the slot (corner). Sc in each of the 40 unjoined Row 27 stitches along the other edge. Sl st to the first sc. (40 + 1 + 40 + 1 = 82 sc)
Fasten off and weave in the end.
Why it works: 40 sc at 4 sc per inch is exactly 10 in (25.4 cm), the length of the slot. The edge stays flat and doesn’t flare or pull in, and the corner sc at each end strengthens the point where the bags push against the seam.
End Rims: Row-End Count
At each end of the tube, the 27 row-ends form one continuous ring: 25 V-st row-ends (dc height) plus 2 sc row-ends (Row 1 and Row 27, which meet at the seam).
Work 2 sc into each dc row-end and 1 sc into each sc row-end: (25 × 2) + (2 × 1) = 52 sc.
52 sc at 4 sc per inch equals 13 in (33.0 cm), slightly less than the 15.5 in (39.4 cm) circumference. This small draw-in is intentional. It firms the rim and rounds the ends of the tube.
Closed End Cap (left end)
Join the yarn at the seam.
Rnd 1: Ch 1, work 52 sc evenly around the row-ends as described above. Sl st to the first sc. (52 sc)
Rnd 2: Ch 1, sc in the next 2 sts, sc2tog; repeat from * 12 more times. Sl st to the first sc. (39 sc)*
Rnd 3: Ch 1, sc in the next st, sc2tog; repeat from * 12 more times. Sl st to the first sc. (26 sc)*
Rnd 4: Ch 1, sc2tog 13 times. Sl st to the first st. (13 sts)
Rnd 5: Ch 1, sc2tog 6 times, sc in the last st. (7 sts)
Fasten off. Thread the tail through the front loops of all 7 stitches, pull it tight to close the center, and weave it in. The cap should lie flat and solid.
Drawstring Rim (right end)
Join the yarn at the seam.
Rnd 1: Ch 1, work 52 sc evenly around the row-ends. Sl st to the first sc. (52 sc)
Rnd 2 (eyelet round): Ch 4 (counts as dc + ch 1). Skip the next sc, dc in the next sc, ch 1, skip the next sc; repeat from * 24 more times. Sl st to the 3rd ch of the beginning ch-4. (26 dc and 26 ch-1 sps)*
Rnd 3: Ch 1, sc in each dc and in each ch-1 sp around. Sl st to the first sc. (26 sc + 26 sc = 52 sc)
Fasten off. The rim is about 1 in (2.5 cm) deep.
Attach the Loops and Drawstring
Hanging loops: Fold each strap in half. Center one loop on the top of each 2 in (5.1 cm) seamed section, 1 in (2.5 cm) from the end of the tube. Sew 0.5 in (1.3 cm) of each strap end flat against the body, stitching through the strap ends and the body fabric. Each loop stands about 2 in (5.1 cm) tall.
Drawstring: Starting at the front of the tube, weave the cord in and out through the 26 ch-1 eyelets of Rnd 2, so both ends come out next to each other. Pull until the opening is about 1.5 in (3.8 cm) across, then tie a bow.
Final Blocking
- Untie the drawstring and pull it loose.
- Spritz the whole holder with water until it is damp but not soaked.
- Stuff the tube with a rolled towel that is about 5 in (12.7 cm) in diameter.
- Smooth the V-st columns so they run straight along the tube.
- Pin the slot edging flat along the towel, to 10 in (25.4 cm).
- Shape the closed cap flat and round.
- Lay the straps upright, or pin them over a pencil so they keep their loop shape.
- Let it dry completely, then remove the towel and retie the drawstring.
Final Quality-Control Checklist
- The body measures 14 in (35.6 cm) long and 15.5 in (39.4 cm) around.
- All V-st rows have 18 V-sts, and the columns are straight.
- Row 1 and Row 27 each have 56 sc.
- The slot is 10 in (25.4 cm) long, with 8 seamed stitches at each end.
- The slot edging has 82 sc.
- Both end rims start with 52 sc.
- The cap closes with no hole in the center.
- The eyelet round has 26 evenly spaced openings.
- Both loops are the same height and securely sewn.
- The drawstring balls are firm, and all ends are woven in.
Troubleshooting
V-st columns lean to one side: You may be working into the stitch next to the ch-1 sp instead of into the space itself. Always insert your hook into the center of the V.
Panel is too short in length: Your sc gauge is tight. Remake it with a larger hook. Don’t add chains, or the V-st repeat won’t come out even.
Slot edge ripples: You worked more than 40 sc per side. Pull it out and redo it, one sc per stitch.
Slot edge puckers: Your tension is too tight. Go up half a hook size for the edging round only.
Hole in the closed cap: Weave the tail through the stitches a second time and pull it tighter.
Bags fall out of the drawstring end: Cinch the opening down to 1 in (2.5 cm) and double-knot the bow.
Loops tilt forward: Sew the strap ends lower down the back of the tube so the weight sits behind the slot.
Care
Hand wash in cool water and lay flat to dry, with the tube stuffed so it holds its shape. Remove the drawstring before washing if you want to keep the bobble ends crisp.
Final Notes
The measurement chain is short: 16 sc = 4 in (10.2 cm) gives a 56-stitch, 14 in (35.6 cm) panel. 25 V-st rows plus 2 sc rows give 15.5 in (39.4 cm) of circumference. Seaming 8 stitches at each end leaves a 40-stitch, 10 in (25.4 cm) slot, which takes 40 edging stitches per side. The 27 row-ends convert to 52 sc at each end, which either decrease to a closed cap or become 26 drawstring eyelets. If you get your gauge right in the swatch, every count after that falls into place.
Happy crocheting!