

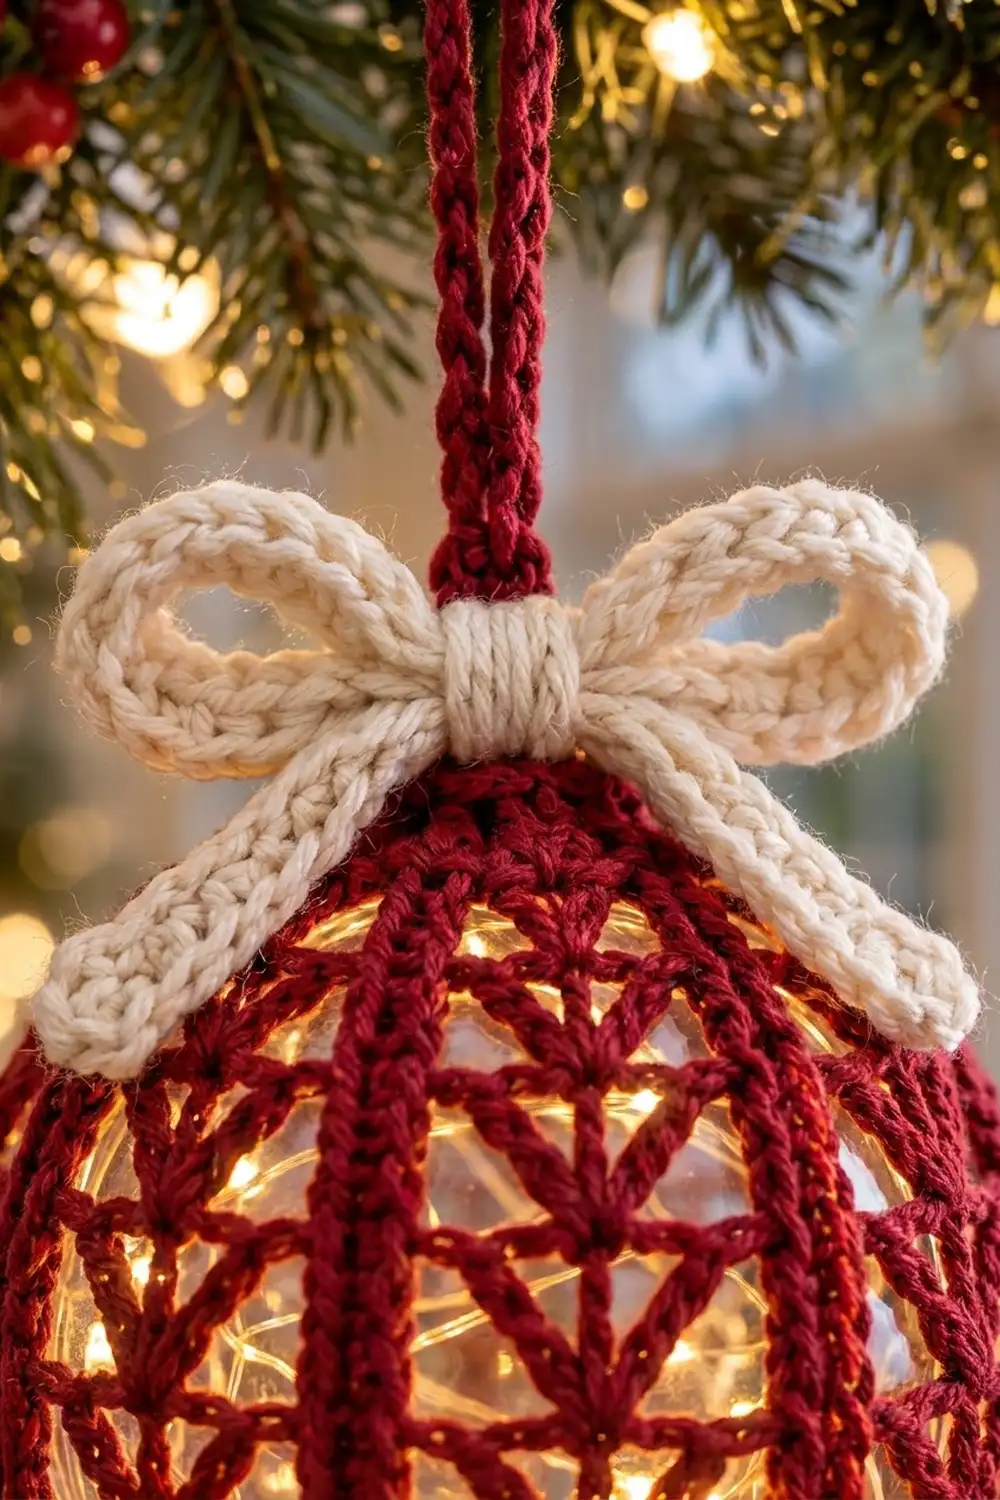
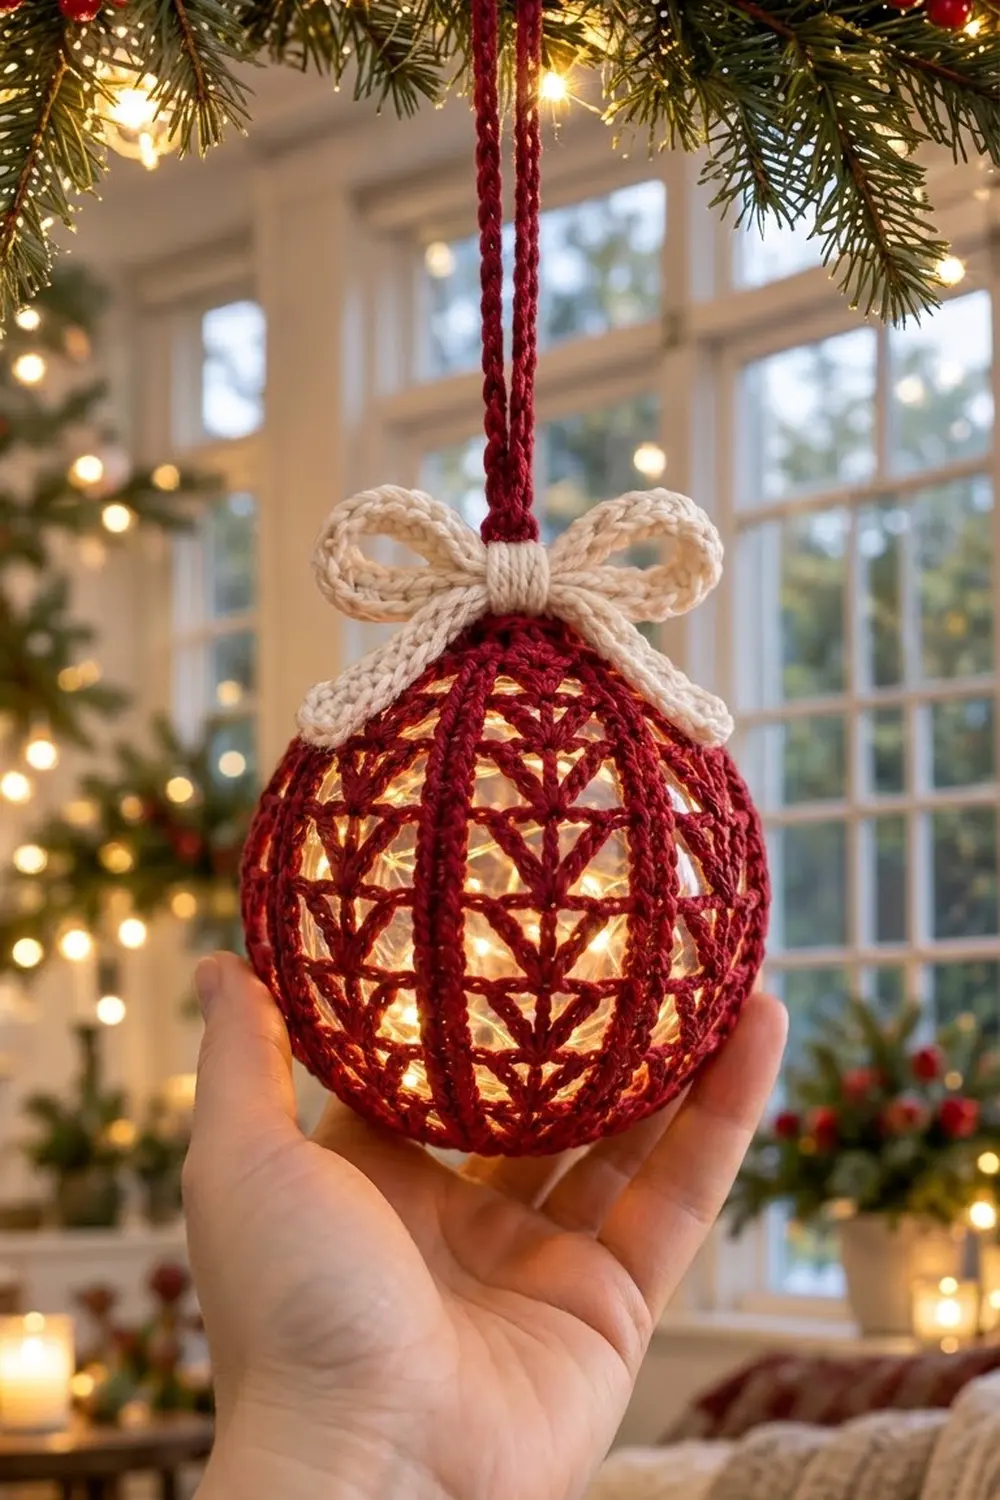
This ornament cover turns a plain clear ball into a glowing little lantern. Raised burgundy ribs run from the cap down to the bottom pole, and between them are open lace panels with stacked Y-shaped motifs. When you put fairy lights inside the ball, the light shines out through every gap.
The palette is classic Christmas: deep burgundy for the cover and hanging cord, and a soft cream bow on top. The look is cozy and traditional, and the lace keeps it light and airy.
The pattern uses US crochet terms. The finished cover fits a 4 in (10.2 cm) ball ornament with a circumference of about 12.6 in (32.0 cm). Laid flat before you fit it, the tube measures 6 in (15.2 cm) wide and 6.2 in (15.7 cm) tall.
You work the cover as one seamless tube in joined rounds, right side facing throughout, so you never turn. Short decrease edgings shape the top and bottom. A drawstring gathers the top around the ornament cap, and the bottom cinches closed. Last, you make a slip-stitch hanging cord and a three-strip bow and attach them.
Finished Size and Construction
- Fits: 4 in (10.2 cm) diameter ball ornament
- Skill level: Intermediate (front post stitches, working in the round)
- Terminology: US
- Yarn weight: Sport (#2), cotton or cotton blend
- Hook: 3.25 mm (US D)
- Number of pieces: 1 lace cover, plus 3 small bow strips and 1 hanging cord
- Layout: Single tube with 8 pattern repeats around (8 ribs, 8 lace panels)
- Repeat width: 9 stitches = 1.5 in (3.8 cm)
- Size before edgings: 12 in (30.5 cm) circumference x 4.8 in (12.2 cm) tall
- Edging depth: top 0.6 in (1.5 cm), bottom 0.8 in (2.0 cm)
Materials
Choose a smooth, tightly plied sport-weight cotton or cotton blend. Crisp stitch definition matters here because the ribs and Y-motifs are the whole design. Avoid fuzzy or very dark yarn, because both block the light.
- Burgundy (MC): 22 g, about 75 m (82 yd), for the cover, drawstring and doubled hanging cord
- Cream (CC): 6 g, about 20 m (22 yd), for the bow
These quantities include a safety margin of about 20%.
Tools:
– 3.25 mm (US D) crochet hook
– Clear 4 in (10.2 cm) ball ornament (glass or plastic) with a removable cap
– Battery fairy lights (optional)
– Stitch markers
– Tapestry needle
– Scissors
– Measuring tape
Abbreviations (US Terms)
- ch – chain
- sl st – slip stitch
- sc – single crochet
- dc – double crochet
- sk – skip
- st(s) – stitch(es)
- sc2tog – single crochet 2 together
- FPdc – front post double crochet: yarn over, insert hook from front to back to front around the post of the stitch, then complete a dc
- FPdc2tog – front post dc 2 together: [yarn over, insert around the next post from the front, pull up a loop, yarn over, pull through 2] twice, then yarn over and pull through all 3 loops
- Fan – (dc, ch 1, dc, ch 1, dc) all in the same stitch
How the stitches build the motifs: Each lace panel is 7 stitches wide. The stem round places a single dc at the panel’s center. On the next round, the fan sits on top of that dc: its center dc continues the stem, and its two outer dc lean outward to form the diagonal legs. The pair of FPdc between panels stacks into the raised double rib.
Gauge and Checkpoints
Gauge: 2 pattern repeats (18 sts) = 3 in (7.6 cm), and 5 rounds = 2 in (5.1 cm), measured over the lace pattern without stretching.
The gauge piece is the cover itself. Work the foundation and Rounds 1–5, then measure before you continue.
Checkpoints:
1. After Round 1: the ring laid flat measures 6 in (15.2 cm) across, which is a 12 in (30.5 cm) circumference.
2. After Round 6: the body measures 2.4 in (6.1 cm) tall.
3. After Round 12: the body measures 4.8 in (12.2 cm) tall and still 6 in (15.2 cm) flat.
4. Test fit: slide the tube over the ornament’s widest point. It should stretch by about 0.6 in (1.5 cm) and hug the ball snugly with no ripples.
If the tube is too big: go down to a 3.0 mm hook. A loose cover sags and the ribs wander off vertical.
If the tube is too small: go up to a 3.5 mm hook. Overstretched lace distorts the Y-motifs.
Don’t change the stitch count to fix gauge, because the repeat math depends on 72 stitches.
Cover Body
With MC, ch 72. Join with a sl st to the first ch to form a ring, taking care not to twist the chain.
Round 1 (foundation): Ch 2 (does not count as a stitch). Dc in each ch around and join with a sl st to the first dc. (72 dc)
Place a marker in the first dc. Stitches 1–2 of each 9-stitch repeat are rib stitches, and stitches 3–9 are the panel.
Round 2 (stem round): Ch 2 (does not count). FPdc around each of the next 2 sts, ch 3, sk 3 sts, dc in the next st, ch 3, sk 3 sts; repeat from * 7 more times. Join with a sl st to the first FPdc.
(72 sts: 16 FPdc + 8 dc + 48 ch)*
Round 3 (fan round): Ch 2 (does not count). FPdc around each of the next 2 FPdc, ch 1, sk 3 ch, Fan in the next dc, ch 1, sk 3 ch; repeat from * 7 more times. Join.
(72 sts: 16 FPdc + 24 dc + 32 ch)*
Each panel now reads: ch 1, dc, ch 1, dc, ch 1, dc, ch 1. That is still 7 stitches.
Round 4 (stem round): Ch 2 (does not count). FPdc around each of the next 2 FPdc, ch 3, sk (ch 1, dc, ch 1), dc in the center dc of the Fan, ch 3, sk (ch 1, dc, ch 1); repeat from * 7 more times. Join.
(72 sts: 16 FPdc + 8 dc + 48 ch)*
Round 5: Repeat Round 3. (72 sts)
Rounds 6–11: Repeat Rounds 4 and 5 three more times. This ends with a fan round on Round 11. (72 sts each round)
Each Fan sits on top of the previous stem dc. The result is a column of stacked Y-shapes, each with legs fanning upward from a center point, joined by short horizontal chain bars.
Round 12 (closing round): Ch 2 (does not count). FPdc around each of the next 2 FPdc, then 1 dc in each of the next 7 sts (work into each ch and each dc); repeat from * 7 more times. Join.
(72 sts: 16 FPdc + 56 dc, worked 1 stitch per existing stitch with 0 added)*
The body now measures 12 in (30.5 cm) around and 4.8 in (12.2 cm) tall.
Edgings (Top and Bottom)
The edgings take the place of a border. They pull the tube in toward the cap and the bottom pole so the cover follows the curve of the ball.
Edging gauge: the sc and decrease rounds come out about 0.3 in (0.8 cm) tall each, slightly shorter than the lace rounds.
Top Edging (worked into Round 12)
Round T1: Ch 2 (does not count). FPdc around each of the next 2 FPdc, sc in the next dc, [sc2tog] 3 times; repeat from * 7 more times. Join.
Per repeat, 3 existing sts are worked 1-to-1 (2 FPdc + 1 sc) and 6 sts are worked in pairs into 3 sc2tog, giving 6 sts.
(8 repeats x 6 = 48 sts)*
Round T2: Ch 1 (does not count). FPdc2tog over the next 2 FPdc, [sc2tog] twice; repeat from * 7 more times. Join.
(8 repeats x 3 = 24 sts)*
Fasten off and leave an 8 in (20.3 cm) tail. Cut a separate 12 in (30.5 cm) length of MC for the drawstring and weave it in and out through every stitch of Round T2. Leave both ends loose for now.
The rib stays continuous to the very top: in T2 each pair of ribs merges into one raised stitch, so the ribs taper like meridians toward the cap.
Bottom Edging (worked into the foundation chain)
Turn the tube upside down. Join MC with a sl st in the free loop of the foundation ch below the first rib stitch.
Round B1: Ch 1 (does not count). Sc in each of the next 3 free loops, [sc2tog] 3 times; repeat from * 7 more times. Join.
Per repeat: 3 worked 1-to-1 plus 3 decreases = 6.
(8 x 6 = 48 sts)*
Round B2: Ch 1 (does not count). [Sc2tog] 3 times; repeat from * 7 more times. Join. (8 x 3 = 24 sts)*
Round B3: Ch 1 (does not count). Sc2tog 12 times. Join. (12 sts)
Fasten off and leave a 6 in (15.2 cm) tail. Thread the tail through the front loops of all 12 sts, pull tight to close the bottom, and weave in the end.
Why the math works: 8 repeats x 9 sts = 72, which is 12 in (30.5 cm) at 6 sts per inch. Each edging round removes exactly half the stitches per repeat (9 → 6 → 3 at the top, 9 → 6 → 3 → 1.5 at the bottom), so the ribs stay evenly spaced all the way to both poles. The total cover length is 0.8 + 4.8 + 0.6 = 6.2 in (15.7 cm). The pole-to-pole arc of the ornament is about 6.3 in (16.0 cm), and the metal cap covers the small difference at the top.
Hanging Cord
Hold 2 strands of MC together. Ch 51, then sl st in the back bump of the 2nd ch from the hook and in each ch across. (50 sl st)
The cord measures about 7 in (17.8 cm). Fasten off and leave both tails long.
Bow
Work all three strips with CC. Sc gauge is about 6 sc = 1 in (2.5 cm).
Loop strip: Ch 41.
– Row 1: Sc in the 2nd ch from the hook and in each ch across. (40 sc)
– Row 2: Ch 1, turn, sc in each st across. (40 sc)
Fasten off. The strip is 6.7 in (17.0 cm) long and 0.3 in (0.8 cm) wide.
Tail strip: Ch 25. Work Rows 1–2 as for the loop strip. (24 sc per row)
The strip is 4 in (10.2 cm) long.
Center wrap: Ch 9.
– Row 1: Sc in the 2nd ch from the hook and across. (8 sc)
– Rows 2–3: Ch 1, turn, sc across. (8 sc each row)
The wrap is 1.3 in (3.3 cm) long and 0.5 in (1.3 cm) wide.
Assemble:
1. Fold both ends of the loop strip to the center, overlapping by 0.25 in (0.6 cm), to make two equal loops. Tack them in place.
2. Fold the tail strip in half to make an upside-down V and lay it behind the loops at the center.
3. Wrap the center piece tightly around both layers and sew its short ends together at the back.
The finished bow is about 3.5 in (8.9 cm) wide.
Fitting and Attaching
- Remove the ornament cap and add the lights, if you’re using them. Put the cap back on.
- Slide the cover over the ball from the top, centering the ribs vertically.
- Pull the drawstring until Round T2 sits snugly around the base of the cap. Knot it twice and hide the ends inside.
- Fold the hanging cord in half. Thread the folded end through the cap’s wire hanger, then pass the two cut ends through the loop (a lark’s head knot). Stitch the cord’s ends to Round T2.
- Sew the bow over the base of the cord at the front, using the CC tails, so the loops sit level and the tails point downward.
Final Blocking
- Fit the cover on the ornament first, because the ball is your blocking form.
- Mist the cover lightly with water until it’s just damp.
- Use your fingertips to straighten each rib so it runs vertically from pole to pole.
- Open every Y-motif so the legs fan evenly and the chain bars sit level.
- Let it dry completely, away from heat, before switching on any lights.
- Shape the bow loops with your fingers while they’re damp, and stuff them with a little tissue to dry rounded.
Final Quality-Control Checklist
- Every round has 72 stitches, and the edgings have 48, 24 and 12.
- All 8 ribs run vertically with no spiral.
- All 8 panels show complete, evenly stacked Y-motifs.
- The tube measured 12 in (30.5 cm) around and 4.8 in (12.2 cm) tall before the edgings.
- The top edge sits snugly at the cap, with no gaps.
- The bottom is fully closed, with no hole.
- The hanging cord is secure and about 3.5 in (8.9 cm) long when folded.
- The bow is centered and the loops are equal.
- All ends are woven in.
Troubleshooting
Ribs spiral around the ball. You may have skipped or added a stitch at the join. Always join to the first FPdc and start the next round on that same rib.
The Y-motifs lean sideways. The Fan is landing in a chain instead of the stem dc. Count 3 chains before each Fan.
The cover is loose at the equator. Your tension is too relaxed. Rework with a 3.0 mm hook.
The top won’t gather. The drawstring is caught on itself. Weave it through every T2 stitch in a single pass.
The bottom closure puckers. Pull the tail gradually, and run it through front loops only.
The bow flops. Add one more stitch at the back of the center wrap to cinch it tighter.
Care
Spot clean with a damp cloth. If the cover needs washing, remove it from the ornament, hand wash it in cool water, and dry it flat before refitting.
Final Notes
The measurement chain is simple. 72 stitches give 12 in (30.5 cm) around, which stretches to fit a 12.6 in (32.0 cm) ornament. Twelve rounds give 4.8 in (12.2 cm) of body. The edgings add 0.6 in (1.5 cm) at the top and 0.8 in (2.0 cm) at the bottom, for 6.2 in (15.7 cm) from pole to pole. Check gauge after Round 5, keep the ribs lined up at every join, and the cover will slide on and glow beautifully.
Happy crocheting!