

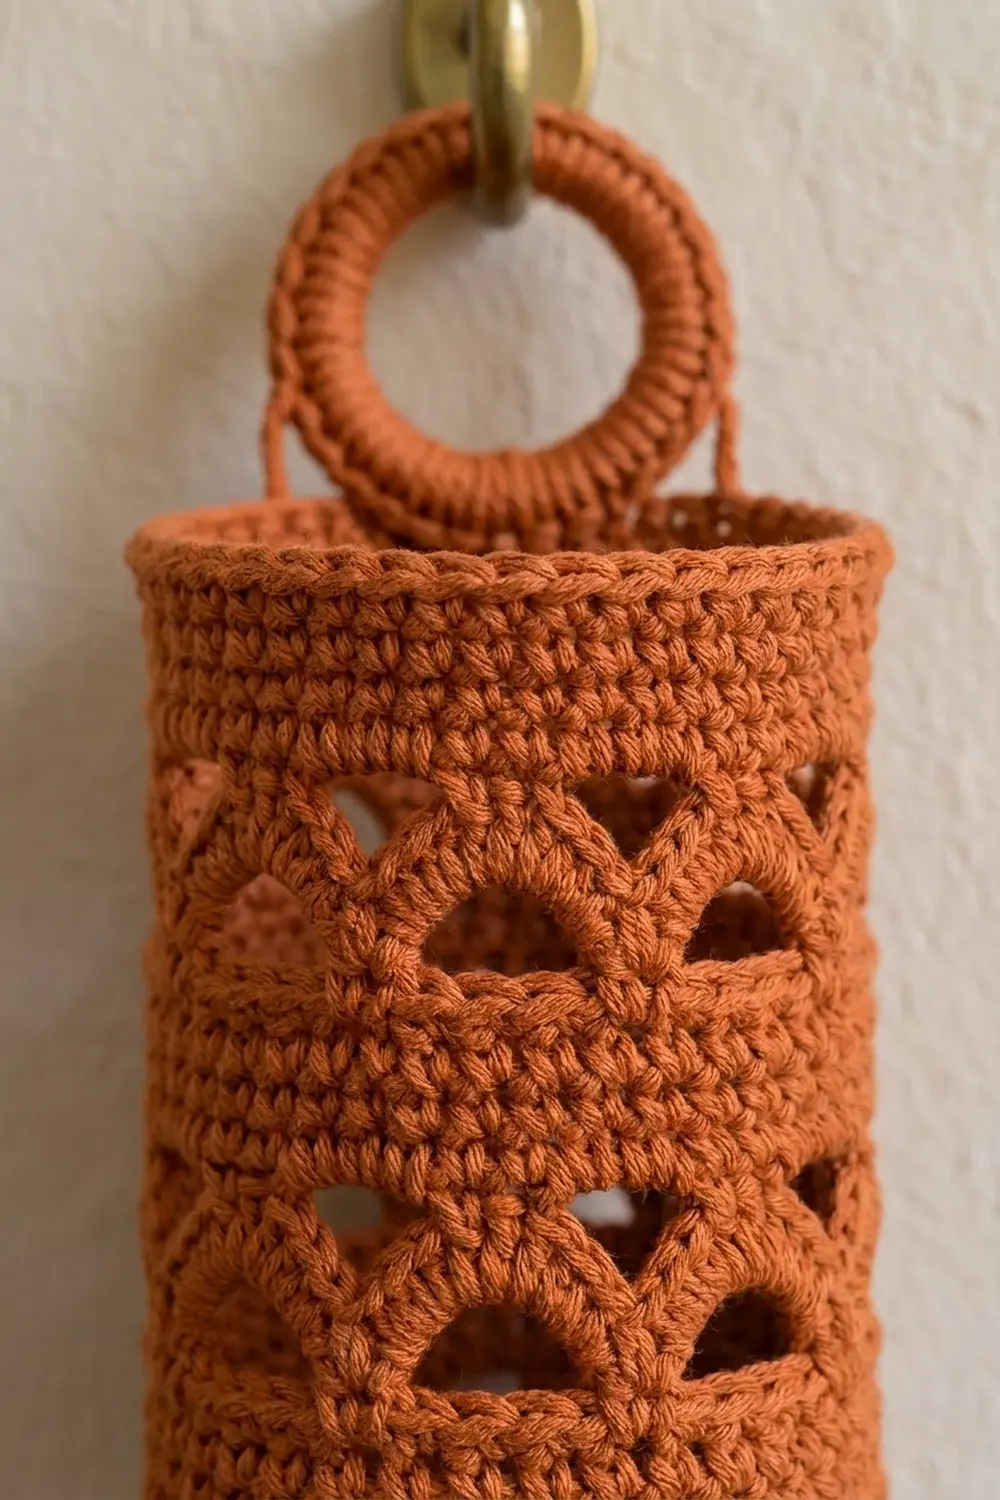
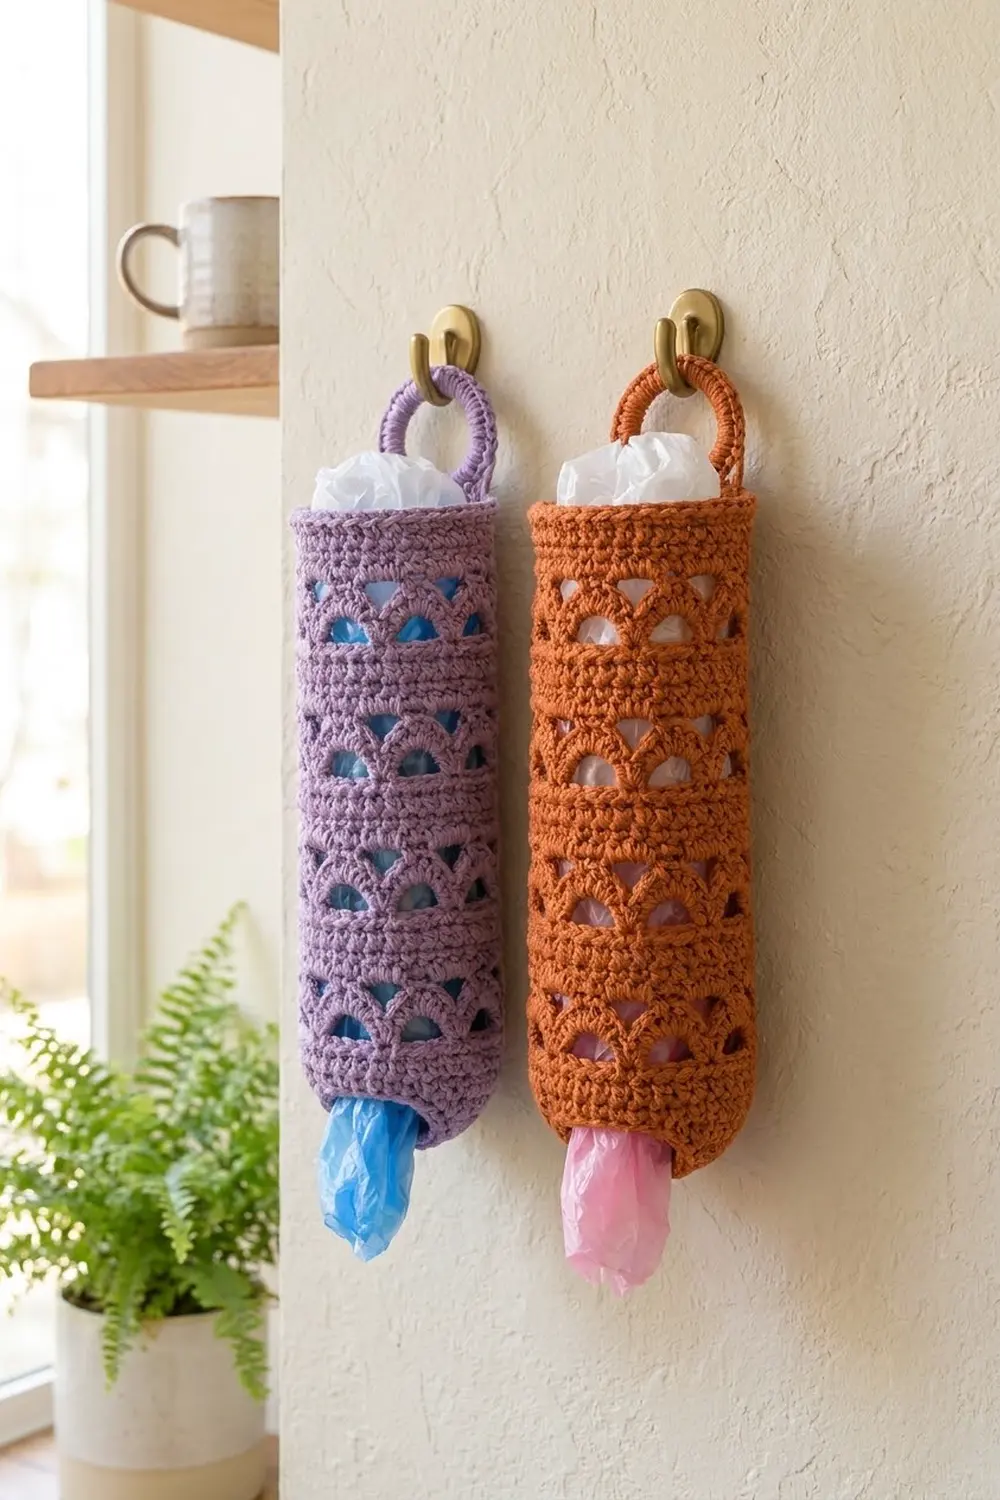
The Lavender Arches Bag Holder is a tall, tidy tube that hangs on a hook and keeps plastic bags out of sight. You stuff bags in through the wide top and pull them out one at a time through a smaller opening at the bottom. The walls alternate dense bands of single crochet with lacy bands of staggered arches, so the holder looks light but stays sturdy.
The sample is a soft lavender cotton, and it works just as well in burnt orange, sage, or any kitchen color. The style is clean and slightly retro, with a crocheted-over ring at the top for hanging.
This pattern uses US crochet terms. The finished holder is 14 in (35.6 cm) tall, not counting the ring, and 13.5 in (34.3 cm) around, which is about 4.3 in (10.9 cm) across.
You start at the bottom with a chain ring that becomes the dispensing opening. You increase for 5 rounds to form a curved base, then work straight up the tube in alternating solid and arch bands. A firm two-round edging finishes the rim. Last, you cover a ring with single crochet and attach it with a short strap.
Finished Size and Construction
- Finished size: 14 in (35.6 cm) tall × 13.5 in (34.3 cm) circumference, about 4.3 in (10.9 cm) diameter
- Hanging ring: 2.5 in (6.4 cm) outer diameter after covering
- Skill level: Easy / advanced beginner
- Terminology: US
- Yarn weight: Worsted (#4), cotton or cotton blend
- Hook: 5.0 mm (H-8)
- Number of pieces: 1 tube body, plus 1 covered ring attached with a strap
- Layout: worked in joined rounds, bottom up
- Piece size before border: 13.75 in (34.9 cm) tall
- Border depth: 0.25 in (0.6 cm), 2 rounds at the top rim and 1 slip-stitch round at the bottom opening
Materials
Yarn: A worsted-weight cotton or cotton blend gives crisp arches and holds the tube’s shape. Avoid very fuzzy or stretchy acrylic, because the tube may sag once it’s full of bags.
- Main color (lavender, or burnt orange for the alternate colorway): 100 g / 180 m (197 yd)
This amount includes a margin of about 25% above what the sample used, so you have extra for your gauge swatch and any small differences in tension.
Tools:
- 5.0 mm (H-8) crochet hook
- 1 metal or plastic ring, 2 in (5.1 cm) inner diameter
- Stitch marker
- Tapestry needle
- Scissors
- Measuring tape
- Spray bottle and a tall bottle or rolled towel for blocking
Abbreviations (US Terms)
- ch – chain
- sl st – slip stitch
- sc – single crochet
- hdc – half double crochet
- inc – 2 sc in the same stitch
- BLO – back loop only
- sk – skip
- sp – space
- st(s) – stitch(es)
Special stitch – Arch: ch 5, sk the next 4 sts. The ch-5 bridges a 4-st gap and bows slightly upward. On the next round, 4 hdc worked into the ch-5 sp turn the bridge into a rounded scallop with a half-moon opening underneath.
Gauge and Checkpoints
Gauge: 16 sc × 16 rounds = 4 in (10.2 cm) in sc worked in joined rounds.
Test one piece first. Your base (Rounds 1–5) is your gauge swatch. Make it, then check:
- Checkpoint 1 (after Round 5): The outer edge is 54 sts and measures 13.5 in (34.3 cm) around, about 4.3 in (10.9 cm) across. The center hole is about 2.4 in (6.1 cm) across. The base should cup gently, which is intentional.
- Checkpoint 2 (after Round 13, first arch band): The arch band measures 1.5 in (3.8 cm) tall.
- Checkpoint 3 (after Round 29): The tube measures about 7.5 in (19.1 cm) from the base fold.
- Checkpoint 4 (after Round 48): The tube is 13.75 in (34.9 cm) tall, including the curved base.
If your piece is too big, go down a hook size, to 4.5 mm (US 7). If it is too small, go up to 5.5 mm (I-9). Change hooks rather than stitch counts, because the arch pattern needs a multiple of 6 stitches.
Pattern: Base
Join every round with a sl st to the first sc. The ch 1 at the start of a round never counts as a stitch. Place a marker in the first st of each round.
Foundation: Ch 30 and join with a sl st to the first ch to form a ring. Make sure the chain isn’t twisted. This ring becomes the dispensing opening.
Round 1: Ch 1, sc in each ch around, join. (30 sts)
Round 2: Ch 1, sc in next 4 sts, inc in next st, repeat from * 6 times, join. (36 sts)
Round 3: Ch 1, sc in next 5 sts, inc in next st, repeat from * 6 times, join. (42 sts)
Round 4: Ch 1, sc in next 6 sts, inc in next st, repeat from * 6 times, join. (48 sts)
Round 5: Ch 1, sc in next 7 sts, inc in next st, repeat from * 6 times, join. (54 sts)
Check Checkpoint 1 now. The base is slightly wider than flat, so it cups inward and forms the rounded bottom you see on the finished holder.
Pattern: Tube Body
Solid Band 1:
Round 6: Ch 1, sc in BLO of each st around, join. (54 sts) This makes a turning ridge, and the wall begins to rise.
Rounds 7–9: Ch 1, sc in each st around, join. (54 sts each round)
Arch Band 1:
Round 10 (Arch Tier A): Ch 1, sc in next 2 sts, ch 5, sk next 4 sts, repeat from * 9 times, join. (18 sc and 9 ch-5 sps)
Round 11 (Scallop Tier A): Ch 1, sc in next 2 sc, 4 hdc in next ch-5 sp, repeat from * 9 times, join. (54 sts: 18 sc + 36 hdc)
In each repeat of Round 11, positions 1–2 are sc and positions 3–6 are hdc.
Round 12 (Arch Tier B, staggered): Sl st in the first 3 sts. Ch 1, sc in the next 2 sts (positions 4–5), ch 5, sk next 4 sts (positions 6, 1, 2, 3), sc in next 2 sts (positions 4–5), repeat from * 8 times. Ch 5, sk the last 4 sts, then join to the first sc. (18 sc and 9 ch-5 sps)
The new solid pairs sit over the centers of the scallops below, so the second tier of arches is offset from the first. The 3 sl sts sit inside the last skipped section and don’t count as stitches.
Round 13 (Scallop Tier B): Ch 1, sc in next 2 sc, 4 hdc in next ch-5 sp, repeat from * 9 times, join. (54 sts)
Your round start has shifted 3 sts to the left. That’s fine on a tube, and you don’t need to correct it.
Solid Band 2: Rounds 14–17: Ch 1, sc in each st around, join. (54 sts each round)
Arch Band 2: Rounds 18–21: Repeat Rounds 10–13.
Solid Band 3: Rounds 22–25: Repeat Round 14.
Arch Band 3: Rounds 26–29: Repeat Rounds 10–13.
Check Checkpoint 3 now.
Solid Band 4: Rounds 30–33: Repeat Round 14.
Arch Band 4: Rounds 34–37: Repeat Rounds 10–13.
Solid Band 5: Rounds 38–41: Repeat Round 14.
Arch Band 5: Rounds 42–45: Repeat Rounds 10–13.
Top Solid Band: Rounds 46–48: Ch 1, sc in each st around, join. (54 sts each round)
Height summary before border:
- Six solid sections: 4 rounds × 5 bands + 3 top rounds = 23 rounds, or 5.75 in (14.6 cm)
- Five arch bands × 1.5 in (3.8 cm) = 7.5 in (19.1 cm)
- Wall total: 13.25 in (33.7 cm)
- Curved base: adds about 0.5 in (1.3 cm)
That gives 13.75 in (34.9 cm) before the border, which is Checkpoint 4. Don’t fasten off yet; go straight to the top border.
Border
Border gauge: The border uses the same gauge as the body, 16 sts = 4 in (10.2 cm). Each border round has exactly as many stitches as the edge it’s worked on, with no increases or decreases.
Top Rim
Border Round 1 (Round 49): Ch 1, sc in each st around, join. (54 sts) That’s 54 sts on 54 sts, worked 1 per existing stitch with 0 added.
Border Round 2 (Round 50): Ch 1, sl st loosely in each st around, join. (54 sl sts) Again, 54 worked 1 per existing stitch, with 0 added.
Fasten off and weave in the end. The slip-stitch round tightens and stiffens the rim so it keeps its round shape when bags are stuffed in.
Bottom Opening
Border Round 3: Turn the tube upside down. Join yarn with a sl st in any loop of the foundation chain, on the opposite side of Round 1. Sl st loosely in each of the 30 foundation loops, then join. (30 sl sts) That’s 30 worked 1 per existing foundation loop, with 0 added.
Fasten off.
Why the math works: Each edge keeps the same number of stitches it was built with. The rim stays at 54 sts, or 13.5 in (34.3 cm), so it matches the tube and won’t flare or pucker. The opening stays at 30 sts, or 7.5 in (19.1 cm) around, which is about 2.4 in (6.1 cm) across. The slip stitches stop the opening from stretching, so bags come out one at a time instead of falling through. The two top rounds add 0.25 in (0.6 cm), so the finished height is 13.75 + 0.25 = 14 in (35.6 cm).
Hanging Ring and Strap
Covered Ring: Join yarn with a sl st around the 2-in (5.1 cm) ring. Ch 1, then work 36 sc around the ring, pushing the stitches snugly together so no ring shows. Join with a sl st to the first sc. (36 sc) Fasten off and weave in the ends. The covered ring measures 2.5 in (6.4 cm) across the outside.
Strap: Find the round-start area of Round 50 and choose the center back of the tube. Join yarn with a standing sc in a sl st of Round 50. You can also join with a sl st and ch 1 instead.
- Row 1: Sc in the next 5 sts. (6 sc) Turn.
- Rows 2–8: Ch 1, sc in each st across, turn. (6 sc each row)
The strap is now 2 in (5.1 cm) long. Pass it through the covered ring from front to back. Fold it toward the inside of the tube so Row 8 lies against the inside wall just below Row 1. Whipstitch all 6 sts of Row 8 to the inside of Rounds 48–49. Weave in the ends.
The folded strap holds the ring about 0.75 in (1.9 cm) above the rim.
Final Blocking
- Weave in all remaining tails, and run each one through at least 2 in (5.1 cm) of solid sc.
- Slide the tube over a tall bottle, a rolled towel, or a cardboard tube about 4.3 in (10.9 cm) across.
- Lightly mist the whole piece with water until it is damp but not soaked.
- With your fingers, ease each scallop into a smooth half-moon and open each arch evenly.
- Smooth the solid bands so the round lines run level.
- Shape the base by curling it in around the 2.4-in (6.1 cm) opening.
- Let it dry completely on the form, which takes 12–24 hours.
- Remove it and measure: 14 in (35.6 cm) tall and 13.5 in (34.3 cm) around.
Final Quality-Control Checklist
- Base: 30 sts at the opening, increasing evenly to 54 sts, with a clear BLO ridge at Round 6.
- All 5 arch bands have 9 arches per tier, and the two tiers in each band are staggered.
- Every scallop has exactly 4 hdc, and all arches are the same size.
- All six solid sections lie flat, with no drift in the stitch count.
- The rim is firm and round, measuring 13.5 in (34.3 cm).
- The bottom opening measures about 2.4 in (6.1 cm) across and holds its shape.
- The ring is fully covered, with 36 sc.
- The strap is centered at the back and securely sewn inside.
- All ends are woven in invisibly.
- The finished height is 14 in (35.6 cm).
Troubleshooting
The tube spirals or leans. You may be joining into the wrong stitch. Always join into the first sc, not the ch 1.
The arches look flat or square. Your chains are too tight. Loosen your ch-5, or work the chains with a hook one size larger.
The tube flares at the arch bands. Your hdc are too loose. Snug up your tension, or try 4 sc instead of 4 hdc in each ch-5 sp, as long as your stitch count still comes out to 54.
The second tier isn’t staggered. You skipped the 3 sl sts at the start of the tier B round. Rework that round.
Bags fall straight through. Your bottom opening is stretched. Work the slip-stitch round more tightly, or skip 1 foundation loop every 10 sts to get 27 sl sts.
The base won’t curve. Use a smaller hook for Rounds 1–5 only.
Wrong stitch count. Count each round in repeats of 6. Any count other than 54 will break the arch pattern.
Care
Hand wash in cool water with mild soap, press out the water in a towel, and reshape the holder over a bottle to dry. Don’t tumble dry, because heat can shrink cotton and distort the arches.
Final Notes
Every measurement in this pattern follows from one gauge:
- 16 sc = 4 in (10.2 cm), so 54 sts = 13.5 in (34.3 cm) around.
- That circumference gives a diameter of 4.3 in (10.9 cm).
- 30 sts at the start = a 2.4-in (6.1 cm) dispensing opening.
- Five 1.5-in (3.8 cm) arch bands + six solid sections + the curved base = 13.75 in (34.9 cm).
- The 0.25-in (0.6 cm) border brings the finished height to 14 in (35.6 cm).
- The 2.5-in (6.4 cm) covered ring hangs above the rim.
If you check each measurement as you go, the finished holder will hang straight and dispense bags neatly.
Happy crocheting!