

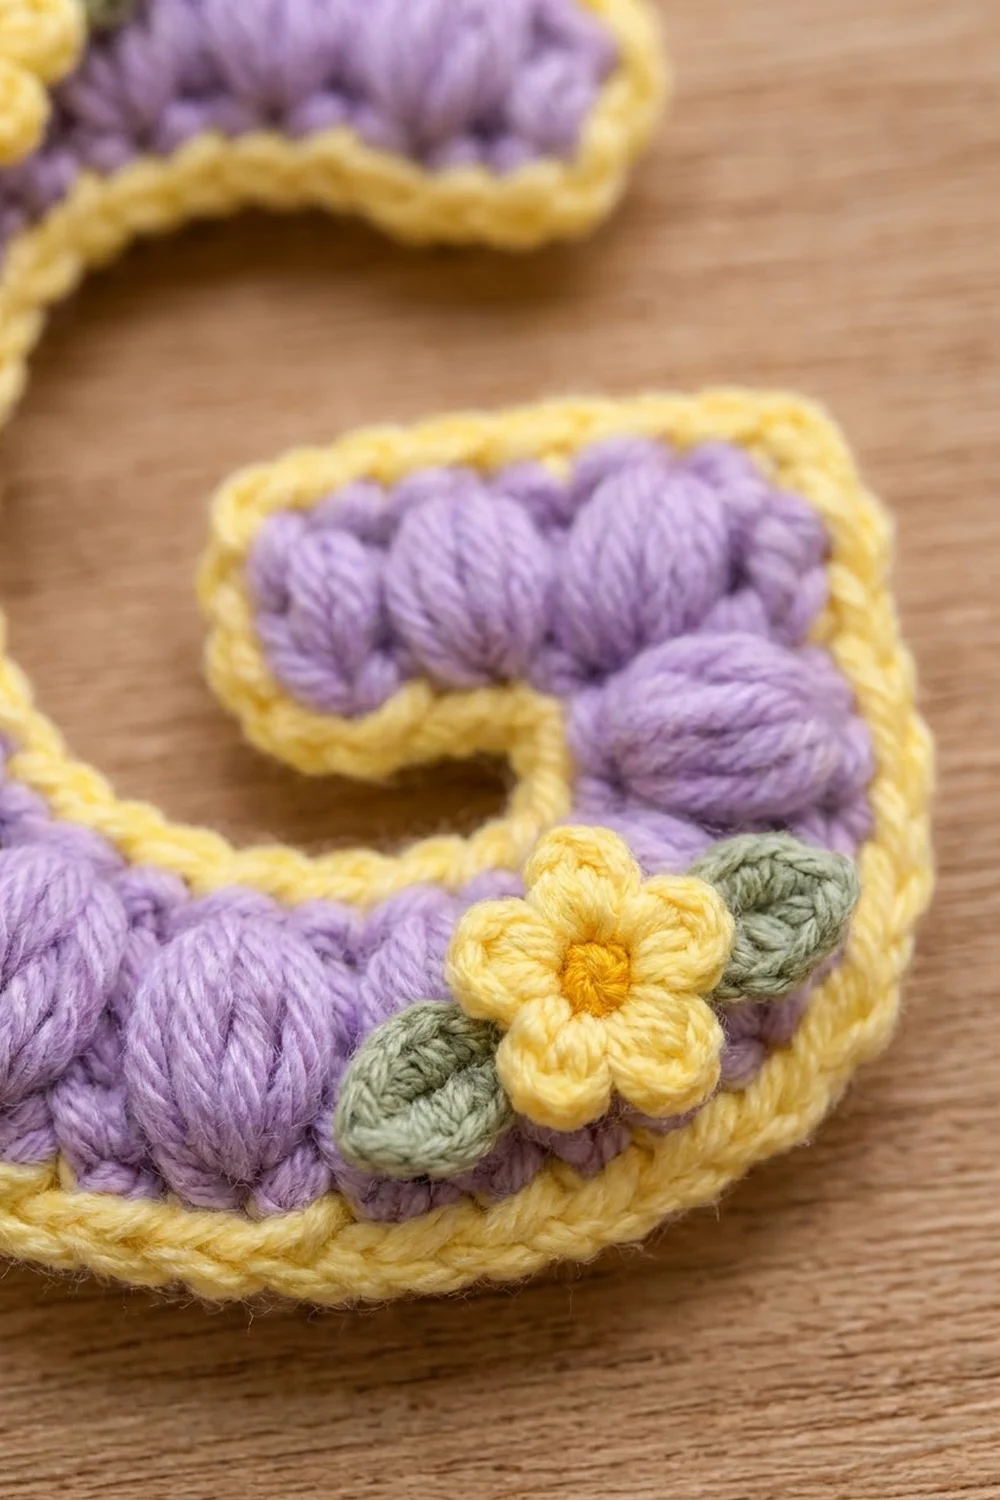
This little letter G charm combines soft lavender puff stitches with a crisp butter-yellow edge and three tiny yellow flowers. It’s a sweet personalized accessory for a tote bag, backpack, or set of keys, and it makes a quick gift for anyone whose name starts with G.
The palette is gentle and springlike: lavender for the body, pale yellow for the border and petals, golden yellow for the flower centers, and sage green for the leaves. A gold keyring and short chain finish it off.
This pattern uses US crochet terms. The finished charm measures 3.5 in (8.9 cm) tall and 3 in (7.6 cm) wide, not counting the hardware.
The construction is simple. You crochet one straight three-row strip with a single line of puffs in the middle. Increases along the outer edge make the strip curve, and you pin it into a G shape. Two border rounds then lock the shape in place. Last, you sew on the small flowers and leaves and attach the keyring.
Finished Size and Construction
- Finished size: 3.5 in (8.9 cm) tall × 3 in (7.6 cm) wide
- Skill level: Easy-intermediate
- Terminology: US crochet terms
- Yarn weight: DK (light worsted, #3)
- Hook: 3.5 mm (E-4)
- Number of pieces: 1 letter body, plus 3 flowers and 6 leaves as appliqués
- Layout: Single charm, no joining
- Strip size (before shaping): 6.4 in (16.3 cm) long × 0.75 in (1.9 cm) wide
- Size before border: 3.1 in (7.9 cm) tall × 2.6 in (6.6 cm) wide
- Border depth: 0.2 in (0.5 cm) on each side
- Letter stroke width (bordered): about 1.15 in (2.9 cm)
Materials
Choose a smooth DK yarn in cotton, a cotton blend, or soft acrylic. Cotton gives the cleanest puffs and holds its shape best on a charm that gets handled a lot. Avoid fuzzy yarns, which hide the puff texture.
Yarn:
– Lavender (body): 10 g / 23 m
– Pale yellow (border and petals): 5 g / 11 m
– Golden yellow (flower centers): 1 g / 2 m
– Sage green (leaves): 2 g / 4 m
All quantities include a small margin for swatching and weaving in ends.
Tools:
– 3.5 mm (E-4) crochet hook
– Tapestry needle
– Scissors
– Rustproof pins and a foam blocking mat
– Steam iron or spray bottle
– Gold split keyring, 1 in (2.5 cm) diameter, with a 1.5 in (3.8 cm) chain
– 1 gold jump ring, 6 mm, plus 2 pairs of flat-nose pliers
– Stitch marker
Abbreviations (US Terms)
- ch – chain
- sl st – slip stitch
- sc – single crochet
- hdc – half double crochet
- dc – double crochet
- st(s) – stitch(es)
- MR – magic ring
- RS – right side
Special stitch – Puff stitch (puff): (Yarn over, insert hook in indicated st, yarn over and pull up a loop to about 0.4 in / 1 cm) 4 times. You now have 9 loops on the hook. Yarn over and pull through all 9 loops, then ch 1 to close. The closing ch 1 does not count as a stitch. On the next row, work into the top of the puff, not into the closing chain.
Gauge and Checkpoints
Gauge: 20 sc and 22 rows = 4 in (10.2 cm) in sc with a 3.5 mm hook.
Because this is a small piece, the strip works as your test. Crochet Row 1 and measure it before going on.
Checkpoints:
– After Row 1: 32 sc should measure 6.4 in (16.3 cm).
– After Row 3: the strip should be 0.75 in (1.9 cm) wide, measured across the straight crossbar end.
– After shaping and blocking: the letter should measure 3.1 in (7.9 cm) tall × 2.6 in (6.6 cm) wide.
– After the border: the letter should measure 3.5 in (8.9 cm) tall × 3 in (7.6 cm) wide.
If your strip is too long (more than 6.6 in / 16.8 cm), go down to a 3.25 mm hook. If it’s too short (less than 6.2 in / 15.7 cm), go up to a 3.75 mm hook. Keep the stitch counts the same and change only the hook, because the curve shaping depends on the exact counts.
Letter Body (Lavender)
The strip is worked in rows. The foundation edge (Row 1) becomes the inner edge of the G, and Row 3 becomes the outer edge. The end of the strip where you begin Row 3 becomes the crossbar tip.
Row 1: With lavender, ch 33. Sc in 2nd ch from hook and in each ch across. Turn. (32 sc)
Checkpoint: 6.4 in (16.3 cm).
Row 2 (puff row): Ch 1 (does not count as a st). Sc in first st, puff in next st, sc in next st; repeat from * 14 more times, sc in last st. Turn. (15 puffs + 17 sc = 32 sts)*
Push each puff gently toward the RS so the puffs sit on the front. The RS is the side facing you on this row.
Row 3 (shaping row): Ch 1. Work into the tops of the Row 2 sts, skipping the closing chains of the puffs:
- Crossbar: sc in each of the first 6 sts. (6 sc)
- Crossbar corner: 3 sc in next st. (3 sc)
- Upright: sc in each of the next 3 sts. (3 sc)
- Arc: *sc in next st, 2 sc in next st; repeat from * 10 more times. (33 sc)
Row 3 count: 32 sts worked once each + 13 extra sts (2 at the corner and 11 along the arc) = 45 sc.
Fasten off, leaving a 4 in (10.2 cm) tail.
The 13 extra stitches make the outer edge about 40% longer than the inner edge. This lets the strip curl into the round bowl of the G and make a firm turn where the upright meets the crossbar.
Shaping the G
- Lay the strip RS up on the blocking mat with the foundation edge on the inside.
- Starting from the crossbar end, pin the first 6 sts in a straight horizontal line pointing left. This is the crossbar.
- At the 3-sc corner, turn the strip downward. Pin the next 3 sts as the short vertical upright on the right side of the letter.
- Curve the arc section from the bottom right, along the bottom, up the left side, and across the top. Stop with the tip at the upper right, about 0.6 in (1.5 cm) above the crossbar.
- Check the inner opening. The gap between the top arm tip and the crossbar should be about 0.5 in (1.3 cm).
- Steam lightly or mist with water. Let it dry fully while pinned.
Checkpoint: 3.1 in (7.9 cm) tall × 2.6 in (6.6 cm) wide.
Border (Pale Yellow)
Border gauge: One round of sc plus one round of sl st adds 0.2 in (0.5 cm) to each edge. That turns 3.1 × 2.6 in (7.9 × 6.6 cm) into 3.5 × 3 in (8.9 × 7.6 cm).
Keep the strip pinned, or re-pin it, while you work Round 1 so it doesn’t lose its shape.
Round 1: With RS facing, join pale yellow in the first st of Row 3 (outer edge, crossbar tip). Ch 1.
- Outer edge: 3 sc in the first st (corner), sc in each of the next 43 sts, 3 sc in the last st (corner). (49 sc = 45 sts + 4 corner extras)
- Top tip end: 2 sc evenly in the side of Row 2. (2 sc)
- Inner edge: working into the free loops of the foundation chain, 3 sc in the first ch (corner), sc in each of the next 30 chs, 3 sc in the last ch (corner). (36 sc = 32 sts + 4 corner extras)
- Crossbar tip end: 2 sc evenly in the side of Row 2. (2 sc)
Sl st to the first sc. (89 sc total: 49 + 2 + 36 + 2)
The ends of Rows 1 and 3 are covered by the corner stitches, so each short end needs only the 2 sc worked into the side of the puff row.
Round 2: Ch 1. Sl st loosely in each sc around. Join to the first sl st. (89 sl sts)
Fasten off and weave in all ends on the wrong side.
Why the math works: Each corner gets 3 sc, which is enough fabric for the four sharp corners at the strip ends to lie flat. The outer border edge follows the 45 already-increased Row 3 stitches, so it curves naturally. The inner edge follows the 32 foundation stitches, so it stays snug around the opening. Round 2 adds no stitches. It only adds height and a braided look, so it can’t ruffle or cup.
Checkpoint: 3.5 in (8.9 cm) tall × 3 in (7.6 cm) wide.
Flowers (Make 3)
Round 1: With golden yellow, make an MR. 5 sc in the ring. Pull the ring tight and sl st to the first sc. Fasten off. (5 sc)
Round 2: Join pale yellow in any sc. (Ch 2, 2 dc, ch 2, sl st) in the same sc, sl st in next sc; repeat from * 4 more times, working the last sl st into the joining st. (5 petals)*
Fasten off, leaving a 6 in (15.2 cm) tail for sewing.
Checkpoint: each flower is about 0.75 in (1.9 cm) across.
Leaves (Make 6)
With sage green, ch 5. Sl st in 2nd ch from hook, sc in next ch, hdc in next ch, sc in last ch. Fasten off, leaving a 5 in (12.7 cm) tail.
Checkpoint: each leaf is about 0.5 in (1.3 cm) long, with a pointed tip.
Assembly
- Flower 1: upper left of the arc, about 0.75 in (1.9 cm) from the top tip, with one leaf on each side.
- Flower 2: on the left side, slightly below the middle, with one leaf above it and one leaf below it.
- Flower 3: lower right of the bowl, just left of the upright, with one leaf on each side.
Tuck the base of each leaf under the edge of its flower. Using the tails, sew each leaf down along its center line, then sew each flower around the center ring. The stitches should go through the lavender body only, not through the border. Weave in all ends on the back.
Hardware: Open the jump ring and push it through the full border (both rounds) at the top edge of the upper-right arm, about 0.5 in (1.3 cm) in from the tip. Hook it onto the last link of the keyring chain and close it firmly with pliers.
Final Blocking
- Lay the finished charm face down on a towel so the puffs and flowers aren’t flattened.
- Mist the back lightly with water.
- Pin the outline to 3.5 in (8.9 cm) × 3 in (7.6 cm), keeping the crossbar straight and the opening about 0.5 in (1.3 cm) wide.
- Hold a steam iron 1 in (2.5 cm) above the back, without touching it, for a few seconds. Skip steam on acrylic and use mist only.
- Let it dry completely, then unpin and fluff each puff with your fingertip.
Final Quality-Control Checklist
- Row 1 has 32 sc, Row 2 has 15 puffs, and Row 3 has 45 sc.
- All puffs face the front.
- The crossbar is straight and points left, and the upright is short and vertical.
- Border Round 1 has 89 sc, with 3 sc at each of the 4 corners.
- Border Round 2 has 89 sl sts and lies flat with no ruffling.
- The charm measures 3.5 × 3 in (8.9 × 7.6 cm).
- The three flowers are placed at the upper left, the left side, and the lower right, each with 2 leaves.
- The jump ring goes through both border rounds and is fully closed.
- All ends are woven in on the back.
Troubleshooting
Puffs look flat or uneven: Pull every loop up to the same height before closing, and keep the closing ch 1 snug.
Strip won’t curve enough: Check that the arc section of Row 3 has exactly 33 sc. If it does, steam it more firmly while it’s pinned.
Outer border ruffles: Your border tension is looser than your body tension. Go down half a hook size for Round 1.
Inner opening closes up or puckers: Work Round 1 more loosely along the foundation edge, or go up half a hook size for that section only.
Corners look pointed or bunched: Make sure you worked exactly 3 sc into each corner stitch, not 4.
Charm twists when hanging: Move the jump ring closer to the center of the top arm and re-block.
Care
Hand wash in cool water with mild soap, press out the water in a towel, and dry flat in shape. Remove the keyring before washing so the metal doesn’t tarnish.

Final Notes
Everything here follows a short measurement chain. A 32-stitch strip measures 6.4 in (16.3 cm). Thirteen increases curve it into a G that measures 3.1 × 2.6 in (7.9 × 6.6 cm). A two-round border of 89 stitches brings it to a finished 3.5 × 3 in (8.9 × 7.6 cm). If each checkpoint matches, the flowers and keyring will sit just where they should. Once you know the method, you can stitch a matching charm for every name on your list.
Happy crocheting!