

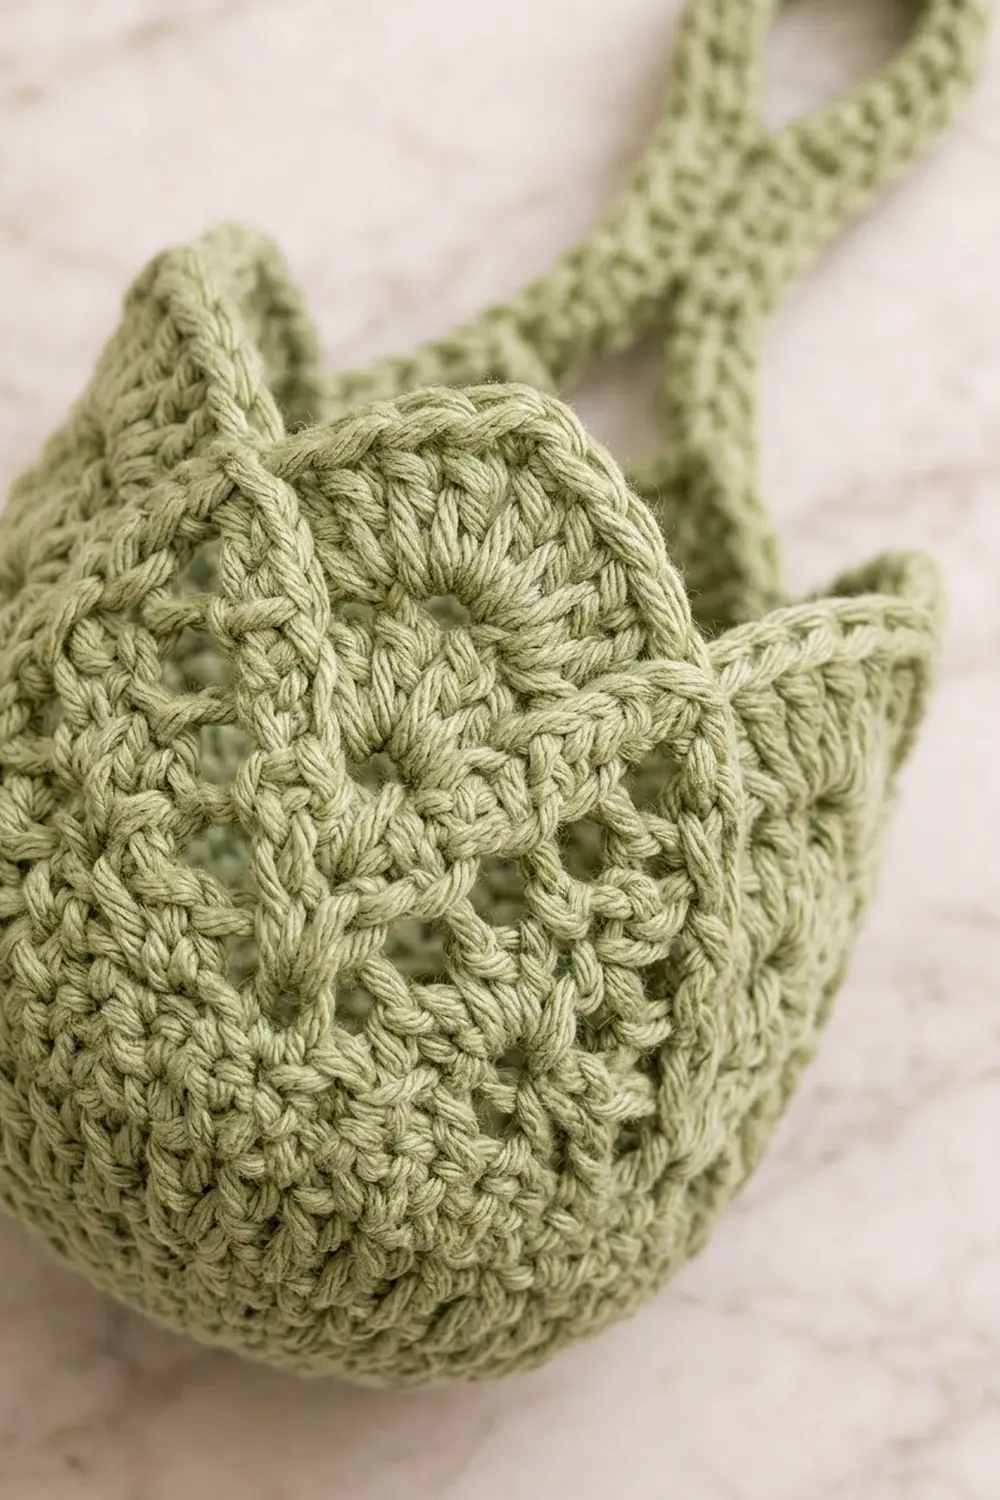
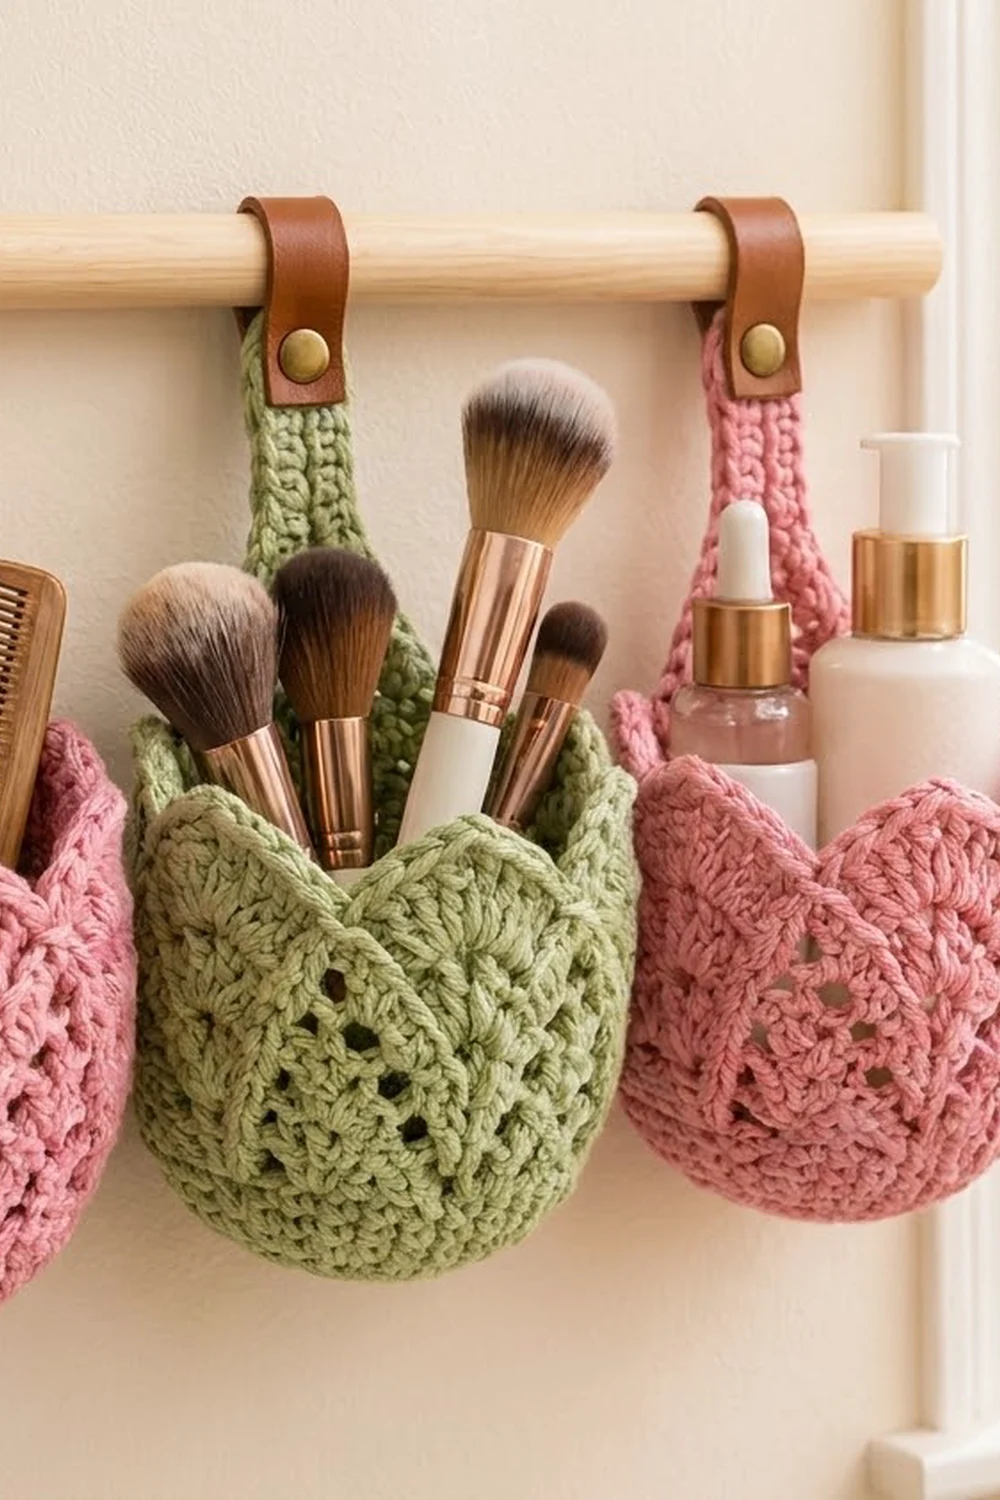
These tulip baskets are small and sturdy, and they hang from a wooden dowel. Each one has a flat round base and a rounded lacy body that ends in six pointed petal tips. When you hang three in a row, they look like a row of tulips on the wall.
The sample set has two baskets in dusty rose pink and one in sage green, hung pink, green, pink. Cotton gives the stitches clear definition and keeps the walls firm enough for brushes, combs and small bottles.
This pattern uses US crochet terms. Each finished basket is about 4.75 in (12.1 cm) wide and 5.5 in (14.0 cm) tall. Each strap is 7 in (17.8 cm) long before you attach it.
You work the base in joined rounds of single crochet. Then you turn the wall up through the back loops and work a band of solid rounds, followed by five rounds of double-crochet lace with eyelets that open into a V. Next you shape six petal tips in short rows and outline them with an edging round. The strap is a separate strip that splits into two legs, and you sew the legs inside the rim.
Finished Size and Construction
- Finished size (one basket): 4.75 in (12.1 cm) wide x 5.5 in (14.0 cm) tall
- Skill level: Easy-intermediate
- Terminology: US
- Yarn weight: Worsted (#4) cotton
- Hook: 4.5 mm (US 7)
- Number of pieces: 3 baskets + 3 straps (separate, not joined to each other)
- Layout: Hung side by side on one dowel: pink, green, pink
- Base size: 4.25 in (10.8 cm) across
- Size before edging: 3.75 in (9.5 cm) tall to the top of Rnd 19, 5.25 in (13.3 cm) to the petal tips
- Edging depth: 0.25 in (0.6 cm)
Materials
Use a smooth, firm 100% cotton or cotton blend in worsted weight, about 95 m per 50 g. Avoid soft acrylic, because the basket will slump. Mercerized cotton shows the eyelets most clearly.
- Dusty rose pink: 150 g (285 m), enough for 2 baskets and 2 straps
- Sage green: 75 g (143 m), enough for 1 basket and 1 strap
These amounts include a margin of roughly 15% above the yardage the sample used.
Tools and hardware
- 4.5 mm (US 7) crochet hook
- Tapestry needle
- 6 stitch markers
- Scissors and a ruler
- 3 leather strips, 0.75 in (1.9 cm) wide x 5 in (12.7 cm) long, each with a brass snap or rivet stud
- 1 wooden dowel, 0.75 in (1.9 cm) in diameter x 18 in (45.7 cm) long, plus 2 small wall hooks
Abbreviations (US Terms)
- ch – chain
- sl st – slip stitch
- sc – single crochet
- dc – double crochet
- sc2tog – single crochet 2 together
- BLO – back loop only
- MR – magic ring
- sk – skip
- sp – space
- st(s) – stitch(es)
Special stitch – sc2tog: Insert the hook in the next st, yarn over and pull up a loop. Insert the hook in the following st, yarn over and pull up a loop. Yarn over and pull through all 3 loops on the hook. This decreases by 1.
Round notes: Join every round with a sl st to the first st. In the sc rounds, ch 1 does not count as a st. In the dc rounds, ch 3 counts as the first dc.
Gauge and Checkpoints
Gauge: 16 sc x 16 rows = 4 in (10.2 cm). In double crochet, 8 rounds = 4 in (10.2 cm), so each dc round is about 0.5 in (1.3 cm) tall.
Make one complete basket before starting the others. Use these checkpoints:
- After Rnd 4 (24 sts): 1.9 in (4.8 cm) across
- After Rnd 9 (54 sts): 4.25 in (10.8 cm) across
- After Rnd 13: the wall is 1 in (2.5 cm) tall
- After Rnd 18: the wall is 3.5 in (8.9 cm) tall
- After the petals: 5.25 in (13.3 cm) tall at the tips
If the base measures more than 4.5 in (11.4 cm), go down to a 4 mm hook. If it measures less than 4 in (10.2 cm), go up to a 5 mm hook. Don’t change the stitch counts. The base has to be the right size for the 6 petal repeats to fit.
Basket Base
Rnd 1: MR, ch 1, 6 sc in ring, join. (6 sts)
Rnd 2: Ch 1, 2 sc in each st around, join. (12 sts)
Rnd 3: Ch 1, sc in next st, 2 sc in next st 6 times, join. (18 sts)
Rnd 4: Ch 1, sc in next 2 sts, 2 sc in next st 6 times, join. (24 sts)
Rnd 5: Ch 1, sc in next 3 sts, 2 sc in next st 6 times, join. (30 sts)
Rnd 6: Ch 1, sc in next 4 sts, 2 sc in next st 6 times, join. (36 sts)
Rnd 7: Ch 1, sc in next 5 sts, 2 sc in next st 6 times, join. (42 sts)
Rnd 8: Ch 1, sc in next 6 sts, 2 sc in next st 6 times, join. (48 sts)
Rnd 9: Ch 1, sc in next 7 sts, 2 sc in next st 6 times, join. (54 sts)
Checkpoint: the base lies flat and measures 4.25 in (10.8 cm) across.
Lower Wall
Rnd 10 (turning round): Ch 1, sc in BLO of each st around, join. (54 sts)
This round leaves a ridge of front loops on the outside, and the wall turns upward from there.
Rnd 11 (belly increase): Ch 1, sc in next 8 sts, 2 sc in next st 6 times, join. (60 sts)
This round adds the gentle bulge and gives you 6 repeats of 10 sts.
Rnds 12–13: Ch 1, sc in each st around, join. (60 sts)
Place a marker in every 10th st, starting with the first st. Each marker shows the start of a petal repeat.
Lace Petal Panels
Rnd 14: Ch 3 (counts as dc), dc in each st around, join to top of ch-3. (60 dc)
Rnd 15: Ch 3, dc in next 3 sts, ch 2, sk 2, dc in next 8 sts 5 times, ch 2, sk 2, dc in last 4 sts, join. (48 dc + 6 ch-2 sps)
Each repeat is dc 4, ch-2 sp, dc 4, so 1 eyelet sits at the center of each petal.
Rnd 16: Ch 3, dc in next 2 sts, ch 1, sk 1, 2 dc in ch-2 sp, ch 1, sk 1, dc in next 6 sts 5 times, ch 1, sk 1, 2 dc in ch-2 sp, ch 1, sk 1, dc in last 3 sts, join. (48 dc + 12 ch-1 sps)
Each repeat is dc 3, sp, dc 2, sp, dc 3. The center eyelet becomes 2 eyelets.
Rnd 17: Ch 3, dc in next st, ch 1, sk next dc, dc in ch-1 sp, dc in next 2 dc, dc in ch-1 sp, ch 1, sk next dc, dc in next 4 dc 5 times, ch 1, sk next dc, dc in ch-1 sp, dc in next 2 dc, dc in ch-1 sp, ch 1, sk next dc, dc in last 2 sts, join. (48 dc + 12 ch-1 sps)
Each repeat is dc 2, sp, dc 4, sp, dc 2.
Rnd 18: Ch 3, ch 1, sk next dc, dc in ch-1 sp, dc in next 4 dc, dc in ch-1 sp, ch 1, sk next dc, dc in next 2 dc 5 times, ch 1, sk next dc, dc in ch-1 sp, dc in next 4 dc, dc in ch-1 sp, ch 1, sk next dc, dc in last st, join. (48 dc + 12 ch-1 sps)
Each repeat is dc 1, sp, dc 6, sp, dc 1. The eyelets now form a V that opens upward, and a 2-dc column separates neighboring petals.
Rnd 19: Ch 1, sc in each dc and each ch-1 sp around, join. Fasten off. (60 sc)
Checkpoint: the wall is 3.75 in (9.5 cm) tall from the base ridge, and 4.75 in (12.1 cm) across at its widest.
Petal Tips
Work each petal in rows over its own 10 sts of Rnd 19. Center it over the V of eyelets below.
Row 1: Join yarn in the first st of a repeat, ch 1, sc in same st and in next 9 sts, turn. (10 sts)
Row 2: Ch 1, sc2tog, sc in next 6 sts, sc2tog, turn. (8 sts)
Row 3: Ch 1, sc2tog, sc in next 4 sts, sc2tog, turn. (6 sts)
Row 4: Ch 1, sc2tog, sc in next 2 sts, sc2tog, turn. (4 sts)
Row 5: Ch 1, sc2tog twice, turn. (2 sts)
Row 6: Ch 1, sc2tog. Fasten off. (1 st, which is the tip)
Repeat in each of the 5 remaining repeats to make 6 petals. Neighboring petals touch at the base, so there are 6 V-shaped valleys between them. Weave in the ends on the inside.
Checkpoint: each petal is 1.5 in (3.8 cm) tall and 2.5 in (6.4 cm) wide at the base.
Petal Edging (Border)
Edging gauge: 1 sc per row end. Each sc row is 0.25 in (0.6 cm) tall and each sc is 0.25 in (0.6 cm) wide, so this ratio keeps the petal edges flat.
Edging Rnd: Join yarn with a sl st in any valley. Work 5 sc up the right edge of the petal (1 in each row end of Rows 1–5), (sc, ch 2, sc) in the Row 6 tip st, 5 sc down the left edge (1 in each row end of Rows 5–1), sl st in the valley between this petal and the next 6 times, ending with the last sl st in the first valley. Fasten off.
Count per petal: 5 + 2 + 5 = 12 sc, 1 ch-2 tip and 1 valley sl st.
Count per basket: 72 sc, 6 ch-2 tips and 6 sl sts.
Why the math works: Each side of a petal has 5 row ends below the tip, and each one gets exactly 1 sc. That matches the edge length, so the edge doesn’t ruffle or pull in. The extra sc and ch-2 at the tip sharpen the point. The sl st in each valley pulls the notch tight, so every petal looks separate. The edging adds 0.25 in (0.6 cm), which brings the basket to 5.5 in (14.0 cm) tall.
Hanging Strap
Row 1: Ch 5, sc in 2nd ch from hook and in each ch across, turn. (4 sts)
Rows 2–10: Ch 1, sc in each st across, turn. (4 sts)
The stem is now 2.5 in (6.4 cm) long and 1 in (2.5 cm) wide.
Leg A, Rows 11–28: Ch 1, sc in first 2 sts only, turn. (2 sts) Work 18 rows in total, then fasten off with a 12 in (30.5 cm) tail.
Leg B, Rows 11–28: Join yarn in the 3rd st of Row 10, ch 1, sc in the same st and the next st, turn. (2 sts) Work 18 rows to match Leg A, then fasten off with a 12 in (30.5 cm) tail.
Each leg is 4.5 in (11.4 cm) long and 0.5 in (1.3 cm) wide. The whole strap is 7 in (17.8 cm) long.
Make All Pieces
- Dusty rose pink: 2 baskets + 2 straps
- Sage green: 1 basket + 1 strap
Hanging layout, left to right on the dowel:
[ Pink ] [ Green ] [ Pink ]
Joining (Strap to Basket and Dowel)
The baskets are not sewn to each other. Joining here means attaching each strap to its own basket and then to the dowel.
Method: Whipstitch with the leg tails.
- Pick 2 opposite petals, such as petal 1 and petal 4. They are 3 repeats, or 30 sts of Rnd 19, apart.
- Lay the last 2 rows of Leg A on the inside of the wall, centered under petal 1. Overlap Rnds 18–19 by 0.5 in (1.3 cm).
- Whipstitch the 2 sts of the leg’s last row to 2 sc of Rnd 19, one leg st to one Rnd 19 st. Then stitch down both side edges of the leg into the dc posts of Rnd 18.
- Repeat with Leg B under petal 4. Make sure the strap isn’t twisted.
Tension: Pull each whipstitch snug but not tight. If you pull too hard, the rim will dimple.
Dowel: Fold a leather strip around the dowel. Sandwich the top 0.75 in (1.9 cm) of the stem between its ends and close the snap or rivet through all layers. Space the 3 straps 5.5 in (14.0 cm) apart, center to center.
Size checkpoint: When the basket hangs, the point where the legs split should sit about 3.25 in (8.3 cm) above the rim. If one basket hangs lower than the others, shift its leather tab higher on the stem.
Final Blocking
- Spritz the basket until it is damp but not wet.
- Stuff it firmly with a plastic bag or a 4.5 in (11.4 cm) wide jar so the belly is rounded.
- Pinch each petal tip into a point and press each valley sl st inward.
- Lay the strap flat and straighten the legs with your fingers.
- Let everything dry completely, for at least 12 hours, before hanging.
Final Quality-Control Checklist
- The base measures 4.25 in (10.8 cm) and lies flat
- Rnd 19 has 60 sc and there are exactly 6 petals
- Each petal’s eyelets form a clean V
- The edging has 12 sc per petal, with a ch-2 at every tip
- All 3 baskets are within 0.25 in (0.6 cm) of each other in height
- The legs are attached to opposite petals and the strap is not twisted
- The leather studs are fully closed
- All ends are woven in on the inside
Troubleshooting
- The base cups or ruffles: Your gauge is off. Change hooks rather than stitch counts.
- The petal repeat doesn’t come out even: Recount Rnd 11. It must have exactly 60 sts.
- The eyelets drift sideways: You skipped the wrong dc. Make sure each ch-1 sits directly beside its neighbor sp.
- The petal edges wave: You worked more than 1 sc in a row end. Work exactly 5 per side.
- The basket tilts when hung: The legs aren’t opposite each other. Count 30 sts between them and sew again.
- The walls are floppy: Go down a hook size, or block over a jar and let it dry fully.
Care
Hand wash in cool water, press out the water in a towel and reshape over a jar to dry. Take off the leather tabs before washing.
Final Notes
The measurement chain is short. Gauge of 16 sc = 4 in (10.2 cm) gives a 4.25 in (10.8 cm) base of 54 sts. Rnd 11 raises that to 60 sts, which makes 6 petal repeats of 10 sts. Five lace rounds and Rnd 19 bring the wall to 3.75 in (9.5 cm). Petals add 1.5 in (3.8 cm), and the edging adds 0.25 in (0.6 cm), for 5.5 in (14.0 cm) in total. If each checkpoint matches, all three tulips will hang at the same height.
Happy crocheting!