

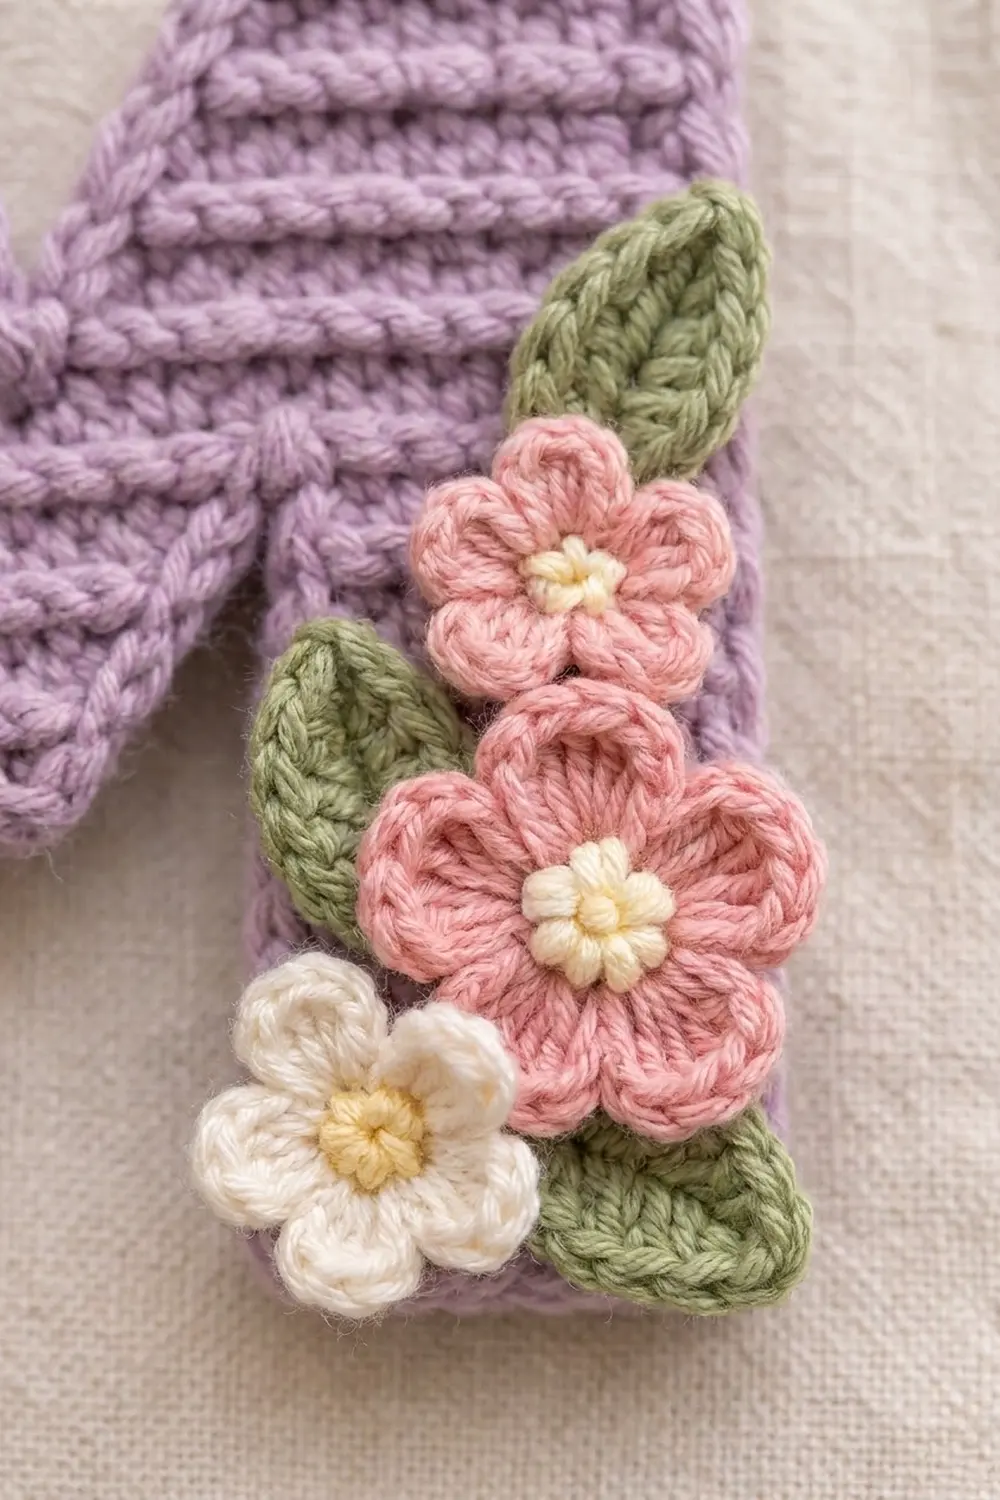
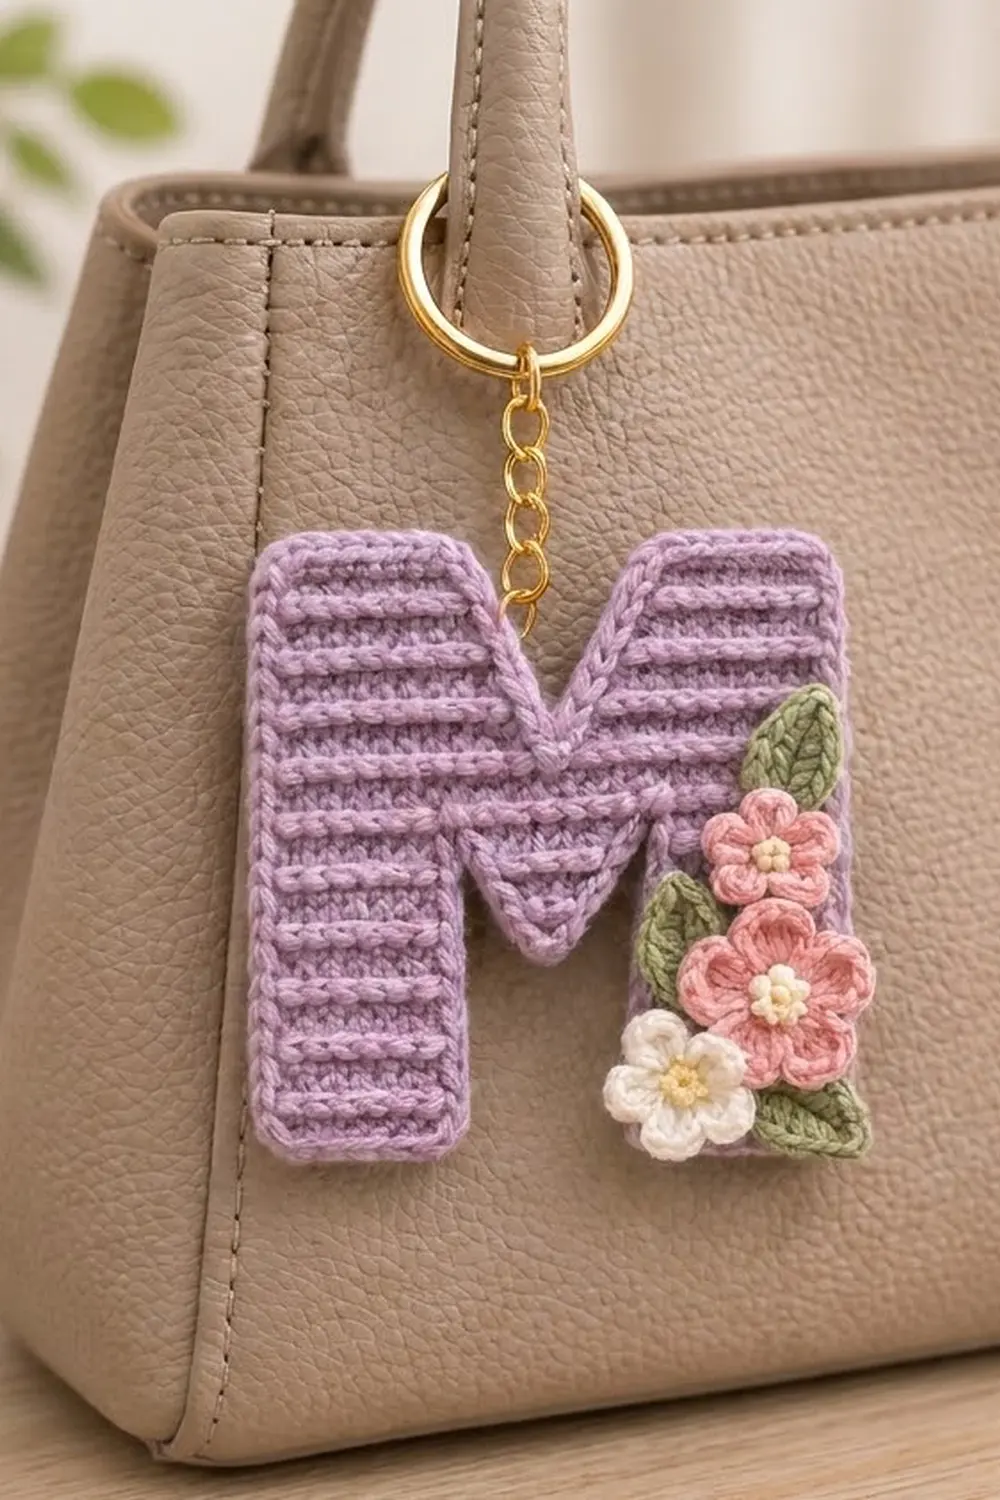
This keychain is one flat letter M in soft lavender with a small bouquet of pink and cream flowers and sage leaves. It hangs from a gold split ring on a short chain, so you can clip it to a handbag or a set of keys, or give it to someone whose name starts with M.
The ridges come from single crochet worked in the back loop only. A slip-stitch round around the outside adds a raised outline that looks like a chain and keeps the letter shape crisp. The colors are lavender for the letter, pink and cream for the flowers, pale yellow for the flower centers, and sage green for the leaves.
The pattern uses US crochet terms. The finished letter is about 3.25 in (8.3 cm) wide and 3.75 in (9.5 cm) tall, not counting the ring and chain.
Here’s how it’s built: you crochet the two legs separately, join them with a chain bridge, and work a few full-width rows. Then you split the work to shape the V notch at the top. A two-round border outlines the letter. Last, you sew three small flowers and three leaves onto the lower right leg.
Finished Size and Construction
- Finished size: 3.25 in (8.3 cm) wide x 3.75 in (9.5 cm) tall
- Skill level: Easy / advanced beginner
- Terminology: US crochet terms
- Yarn weight: DK (light worsted, weight 3) cotton
- Hook: 3.0 mm
- Number of pieces: 1 letter, plus 3 flowers and 3 leaves sewn on as appliqués
- Layout: one letter M with the flowers grouped on the lower right leg
- Piece size before border: 18 sts x 21 rows = 3 in (7.6 cm) x 3.5 in (8.9 cm)
- Border depth: about 1/8 in (0.3 cm) on every side
Materials
Use a smooth DK cotton, either mercerized or combed. Cotton keeps the ridges and sharp corners better than acrylic, and it holds up to daily handling. The amounts below assume about 120 m per 50 g (2.4 m per gram).
- Lavender (letter and border): 10 g / 24 m
- Pink (two flowers): 3 g / 7 m
- Cream (one flower): 2 g / 5 m
- Pale yellow (flower centers): 1 g / 2 m
- Sage green (leaves): 2 g / 5 m
These amounts include a small safety margin.
Tools:
- 3.0 mm crochet hook
- Gold split key ring, 1 in (2.5 cm) across, with a chain about 1 in (2.5 cm) long
- 1 small jump ring and flat-nose pliers
- Tapestry needle and scissors
- 2 stitch markers
- Rustproof pins and a blocking mat
- Ruler or tape measure
Abbreviations (US Terms)
- ch – chain
- sl st – slip stitch
- sc – single crochet
- hdc – half double crochet
- dc – double crochet
- BLO – back loop only
- sc2tog – single crochet 2 together
- MR – magic ring
- st(s) – stitch(es)
- RS – right side
Special stitch – BLO sc2tog: Put the hook into the back loop of the next st, yarn over, and pull up a loop. Put the hook into the back loop of the following st, yarn over, and pull up a loop. Yarn over and pull through all 3 loops. This keeps the ridges unbroken where you decrease.
Gauge and Checkpoints
Gauge: 24 sc and 24 rows = 4 in (10.2 cm) in sc BLO, worked flat. That is 6 sts and 6 rows per 1 in (2.5 cm).
This is a single small piece, so the first leg works as your gauge swatch. Measure it before you go on.
- After Row 8 of one leg: 1 in (2.5 cm) wide and about 1 1/3 in (3.4 cm) tall.
- After Row 12: 3 in (7.6 cm) wide and 2 in (5.1 cm) tall.
- After Row 21: 3 in (7.6 cm) x 3.5 in (8.9 cm). Each top of the M is about 0.83 in (2.1 cm) wide, and the V opening is about 1 1/3 in (3.4 cm) across.
- After the border: 3.25 in (8.3 cm) x 3.75 in (9.5 cm).
If the leg is too big, change to a 2.75 mm hook. If it’s too small, change to a 3.25 mm hook. A difference of 1/4 in (0.6 cm) is easy to see on a letter this small, so it’s worth starting the leg again.
The Letter M
Work flat. From Row 2 on, work every sc in BLO. The ch 1 at the start of a row does not count as a stitch. Turn at the end of every row.
First Leg
Foundation: With lavender, ch 7.
Row 1: Sc in 2nd ch from hook and in each ch across, turn. (6 sts)
Rows 2–8: Ch 1, sc BLO in each st across, turn. (6 sts)
Fasten off. Put a marker on Row 8 so you know which side was facing you.
Second Leg
Work the same as the first leg through Row 8. Do not fasten off.
Joining the Legs
Row 9: Ch 1, sc BLO in each of the 6 sts of the second leg, then ch 6. Hold the first leg so its marked Row 8 faces the same way as the second leg, and sc BLO in each of its 6 sts. Turn. (6 sc + 6 ch + 6 sc = 18 sts)
The 6 chains form the top of the opening between the legs.
Row 10: Ch 1, sc BLO in the next 6 sts, sc in the back bump of each of the 6 ch, sc BLO in the last 6 sts, turn. (18 sts)
Working into the back bump leaves the top loops of the chain free for the border.
Rows 11–12: Ch 1, sc BLO in each st across, turn. (18 sts)
Checkpoint: 3 in (7.6 cm) wide and 2 in (5.1 cm) tall.
V Notch – First Half
The work now splits into two halves of 9 sts. Every decrease is made at the center edge, so the opening widens as it rises and forms the V.
Row 13: Ch 1, sc BLO in the first 9 sts, leave the other 9 sts unworked, turn. (9 sts)
Row 14: Ch 1, BLO sc2tog, sc BLO in next 7 sts, turn. (8 sts)
Row 15: Ch 1, sc BLO across, turn. (8 sts)
Row 16: Ch 1, BLO sc2tog, sc BLO in next 6 sts, turn. (7 sts)
Row 17: Ch 1, sc BLO across, turn. (7 sts)
Row 18: Ch 1, BLO sc2tog, sc BLO in next 5 sts, turn. (6 sts)
Row 19: Ch 1, sc BLO across, turn. (6 sts)
Row 20: Ch 1, BLO sc2tog, sc BLO in next 4 sts, turn. (5 sts)
Row 21: Ch 1, sc BLO across. (5 sts)
Fasten off.
V Notch – Second Half
Row 13: With the same side facing as Row 13 of the first half, join lavender in the back loop of the first unworked st next to the first half. Ch 1, sc BLO in the same st and in the remaining 8 sts, turn. (9 sts)
Row 14: Ch 1, sc BLO in next 7 sts, BLO sc2tog, turn. (8 sts)
Row 15: Ch 1, sc BLO across, turn. (8 sts)
Row 16: Ch 1, sc BLO in next 5 sts, BLO sc2tog, turn. (7 sts)
Row 17: Ch 1, sc BLO across, turn. (7 sts)
Row 18: Ch 1, sc BLO in next 4 sts, BLO sc2tog, turn. (6 sts)
Row 19: Ch 1, sc BLO across, turn. (6 sts)
Row 20: Ch 1, sc BLO in next 3 sts, BLO sc2tog, turn. (5 sts)
Row 21: Ch 1, sc BLO across. (5 sts)
Fasten off and weave in all ends.
Checkpoint: the two tops are 5 sts each with an 8-st gap between them, and 5 + 8 + 5 = 18, the full width. The letter measures 3 in (7.6 cm) x 3.5 in (8.9 cm).
Border
Border gauge: The border keeps the same 6 sts per 1 in (2.5 cm). Work 1 sc in each row end along the sides and 1 sc in each st along the top and bottom edges. That keeps the edge flat.
The letter has 8 outer corners: 2 at the bottom of each leg and 2 at the top of each half. Each one gets 3 sc. The 3 inner corners (the 2 at the top of the leg opening and the point of the V) get no extra stitches. Just work them snugly.
Round 1 (sc)
With RS facing, join lavender at the bottom left corner of the letter. Work counterclockwise:
- Left leg bottom: 3 sc in first ch, sc in next 4 ch, 3 sc in last ch. (6 worked + 4 added = 10 sts)
- Left leg, inner side: 1 sc in each of 8 row ends. (8 sts)
- Top of opening: 1 sc in the free loop of each of the 6 chains from Row 9. (6 sts)
- Right leg, inner side: 1 sc in each of 8 row ends. (8 sts)
- Right leg bottom: 3 sc in first ch, sc in next 4 ch, 3 sc in last ch. (6 worked + 4 added = 10 sts)
- Right outer side: 1 sc in each of 21 row ends. (21 sts)
- Right top: 3 sc in first st, sc in next 3 sts, 3 sc in last st. (5 worked + 4 added = 9 sts)
- Right diagonal down to the V: 1 sc in each of 9 row ends. (9 sts)
- Left diagonal up from the V: 1 sc in each of 9 row ends. (9 sts)
- Left top: 3 sc in first st, sc in next 3 sts, 3 sc in last st. (5 worked + 4 added = 9 sts)
- Left outer side: 1 sc in each of 21 row ends. (21 sts)
Sl st to first sc. Total: 120 sts.
Why the math works: The stitches worked one per edge stitch add up to 6 + 6 + 5 + 5 + 21 + 21 + 8 + 8 + 6 + 9 + 9 = 104. The 8 outer corners add 2 sts each, so 104 + 16 = 120. The inner corners add nothing, which keeps the opening and the V from rippling.
Round 2 (outline)
Round 2: Ch 1, sl st in the BLO of each st around, and join with a sl st to the first sl st. (120 sl sts)
This round makes the raised outline. Keep it even and slightly relaxed so the edge doesn’t pull in. Fasten off and weave in the end.
Checkpoint: 3.25 in (8.3 cm) x 3.75 in (9.5 cm).
Flowers and Leaves
Leave a 6 in (15.2 cm) tail on every piece for sewing.
Small Pink Flower (make 1) – 0.7 in (1.8 cm)
Round 1: With pale yellow, 5 sc in MR, sl st to first sc. Fasten off. (5 sts)
Round 2: Join pink. In each st: (sl st, ch 1, 2 hdc, ch 1, sl st). (5 petals)
Large Pink Flower (make 1) – 0.9 in (2.3 cm)
Round 1: With pale yellow, 5 sc in MR, sl st to first sc. Fasten off. (5 sts)
Round 2: Join pink. Ch 1, 2 sc in each st, sl st to first sc. (10 sts)
Round 3: *Sl st in next st, (hdc, 3 dc, hdc) in next st; repeat from * 4 more times, sl st to first sl st. (5 petals)
Cream Flower (make 1) – 0.8 in (2.0 cm)
Round 1: With pale yellow, 5 sc in MR, sl st to first sc. Fasten off. (5 sts)
Round 2: Join cream. In each st: (sl st, ch 2, 2 dc, ch 2, sl st). (5 petals)
Leaf (make 3) – 0.8 in (2.0 cm) x 0.4 in (1.0 cm)
With sage green, ch 7. Sc in 2nd ch from hook, hdc in next ch, dc in next 2 ch, hdc in next ch. In the last ch, work (sc, ch 2, sl st in 2nd ch from hook, sc) to make the tip. Working along the free loops on the other side: hdc, dc, dc, hdc, sc. Sl st to first sc. (10 sts plus the tip)
Arranging the Cluster
With the letter RS up, place the pieces on the lower half of the right leg:
          leaf
     small pink flower
leaf   large pink flower
   cream flower    leaf
Pin the pieces in place first. Sew the leaves first and then the flowers, stitching through the centers and the base of each petal. Leave the petal tips free so they lift slightly. The cluster can overlap the right border a little.
Hardware
Open the jump ring with pliers and push it through 2 border sts at the outer top corner of the left top. Add the end link of the chain and close the jump ring firmly.
Final Blocking
- Mist the letter lightly with water. If the flowers are already on, mist around them.
- Lay it RS up on the mat.
- Pin the 8 outer corners to 3.25 in (8.3 cm) x 3.75 in (9.5 cm).
- Pin the V point and the inner corners of the opening.
- Smooth the ridges so they run straight across.
- Let it dry completely before you take out the pins.
Final Quality-Control Checklist
- The letter measures 3.25 in (8.3 cm) x 3.75 in (9.5 cm).
- Both legs are 6 sts wide and 8 rows tall below the joining row.
- Both tops are 5 sts wide, and the V is centered.
- Rounds 1 and 2 each have 120 sts.
- The outline lies flat at every corner.
- The flowers are secure, and no stitching shows on the front.
- The jump ring is completely closed.
Troubleshooting
Ridges look uneven: Work BLO on every row from Row 2 on.
The legs are different heights: Count the row ends. Each leg needs exactly 8 rows.
The V is off-center: Each half must start with 9 sts.
The edges ripple: Recount Round 1. Extra sts on the sides or at the inner corners make the edge ripple.
The outline pulls in: Loosen your tension, or work Round 2 with a 3.25 mm hook.
The petals are flat: Pull the magic ring tight and work the petals a little firmer.
Care
Hand wash in cool water with mild soap and dry flat. Keep the metal hardware dry to protect the gold finish.
Final Notes
All the measurements follow from the gauge of 6 sts and 6 rows per 1 in (2.5 cm):
- Each leg is 1 in (2.5 cm) wide.
- After Row 21 the letter is 3 in (7.6 cm) x 3.5 in (8.9 cm).
- The border adds 120 sts and about 1/8 in (0.3 cm) on each side.
- The finished letter is 3.25 in (8.3 cm) x 3.75 in (9.5 cm).
If you measure at each checkpoint, the letter will come out crisp and flat, ready for its flowers.
Happy crocheting!