

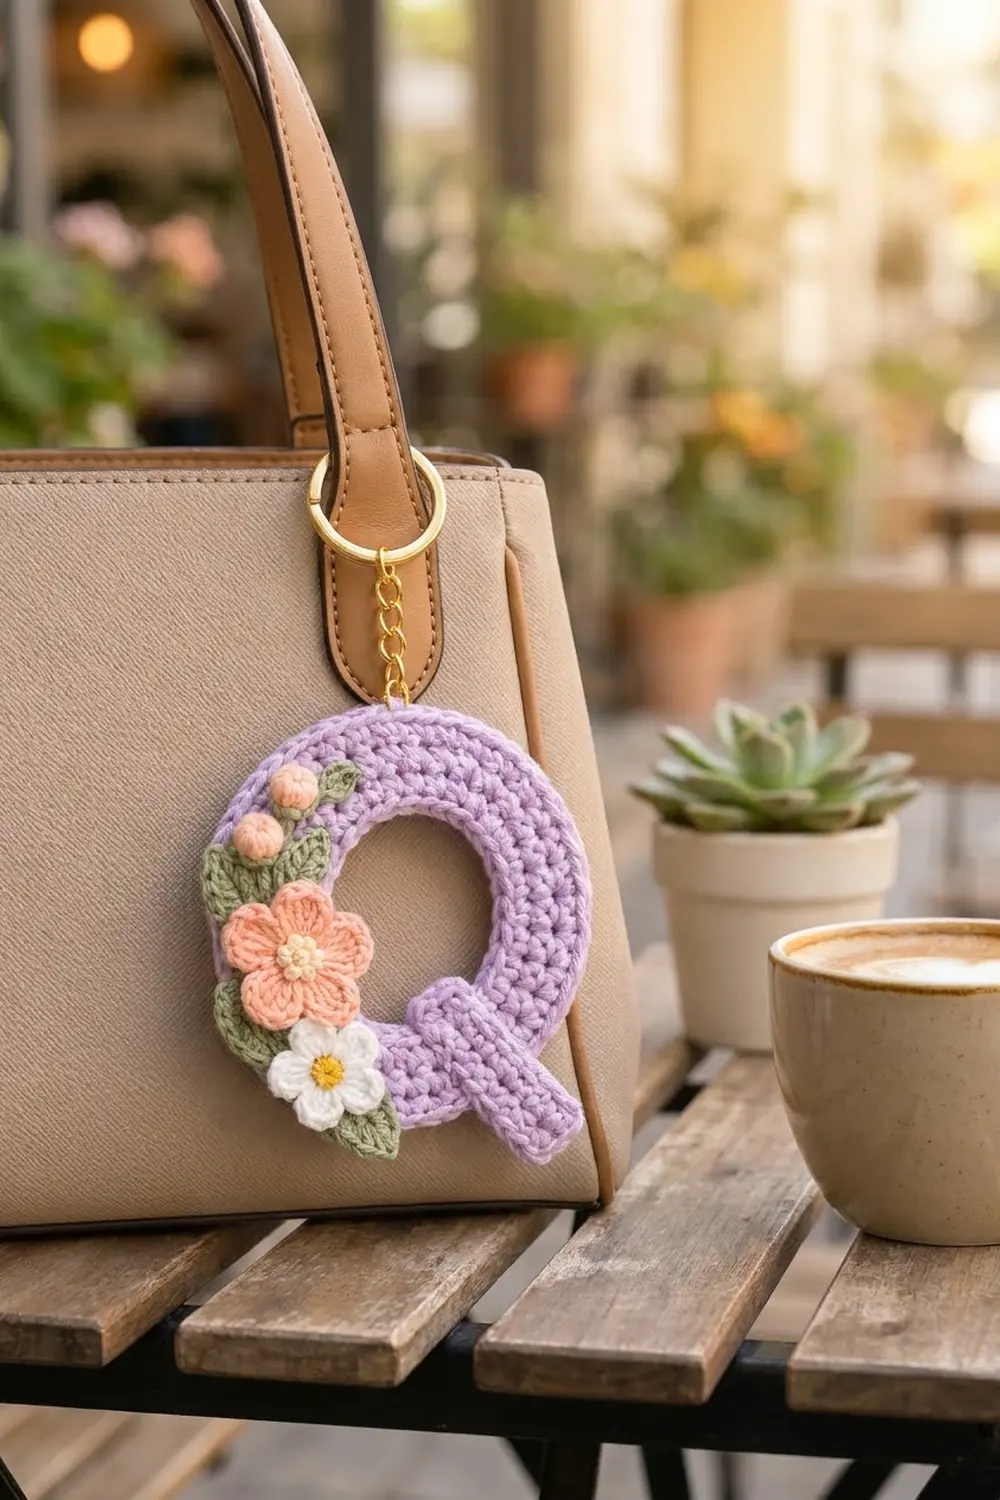
This Lavender Blossom Letter Q is a small, flat initial keychain for a bag handle, a set of keys, or a gift tag. A soft lavender ring makes the body of the Q. A short rounded bar crosses its lower right edge as the tail, and a cluster of flowers sits on the upper left side.
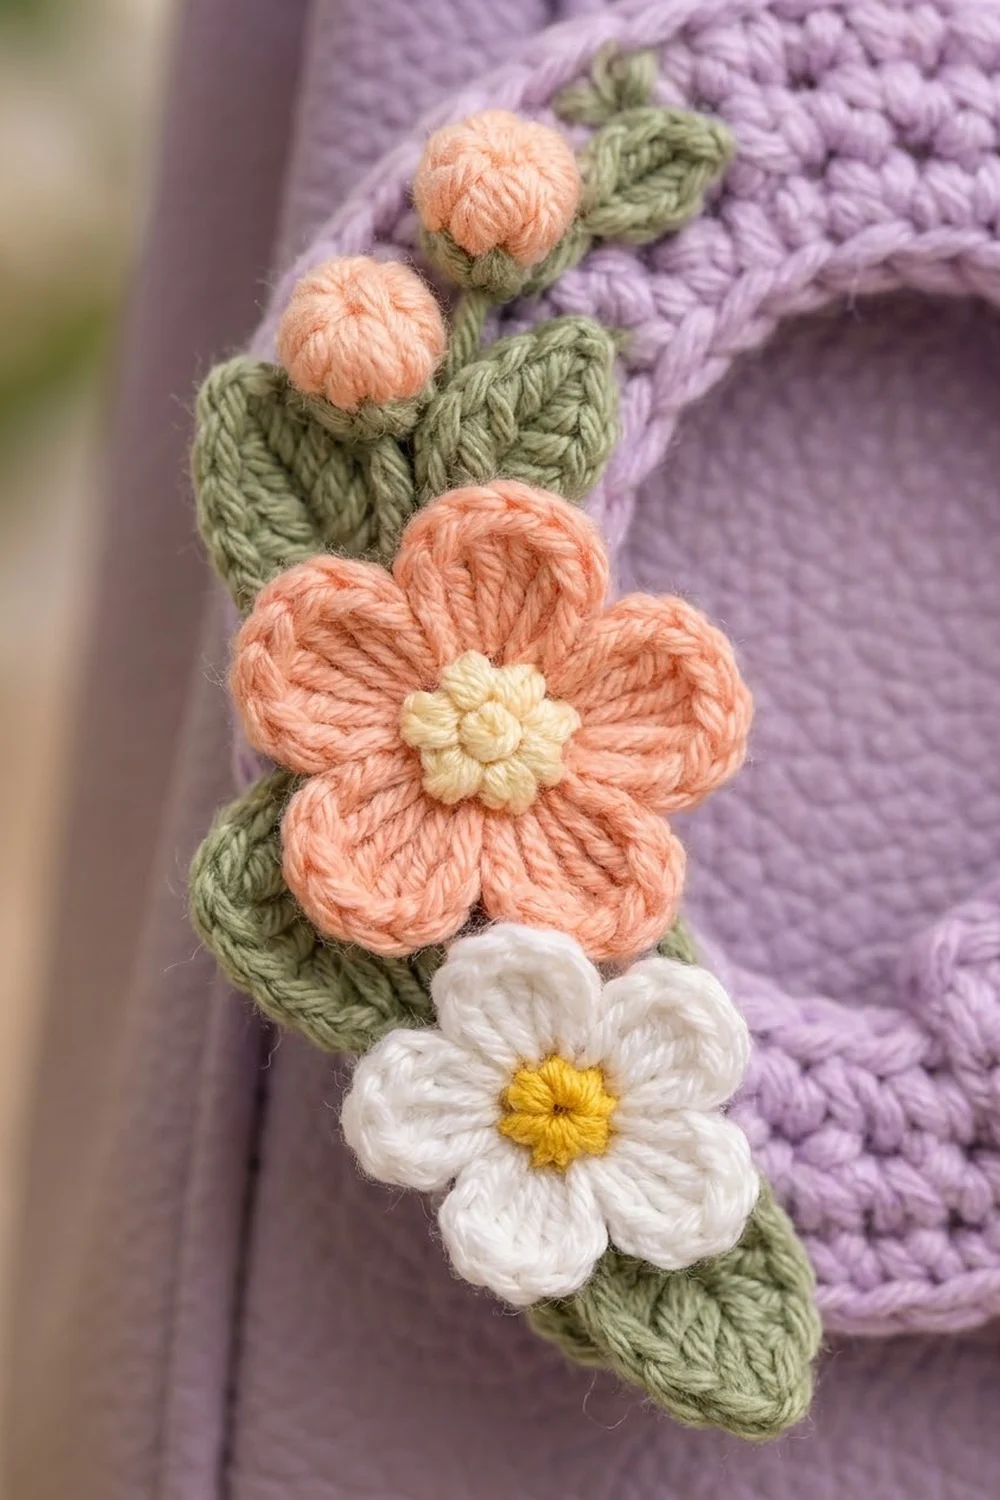
The colors are gentle and springlike. Lavender is used for the letter and peach for a large five-petal flower and two round buds. A smaller daisy-style flower is white, both flower centers are pale yellow, and the leaves are sage green. A gold split key ring hangs from a short gold chain at the top.
The pattern uses US crochet terms. The finished letter measures about 3.8 in (9.7 cm) wide and 4.5 in (11.4 cm) tall, not counting the hardware.
The construction is simple. First you crochet the ring outward from a chain loop in joined rounds of single crochet, then add one border round. The tail is a small oval worked around a foundation chain and sewn on at an angle. You make the flowers, buds, and leaves separately and stitch them in place last.
Finished Size and Construction
- Finished size: about 3.8 in (9.7 cm) wide x 4.5 in (11.4 cm) tall, not including hardware
- Skill level: Easy to intermediate
- Terminology: US crochet terms
- Yarn weight: DK (light worsted, #3)
- Hook: 3.5 mm (E-4)
- Number of pieces: 1 finished keychain, built from 1 ring, 1 tail, 2 flowers, 2 buds, and 5 leaves
- Layout: a single letter Q, with flowers clustered from about 7 o’clock to 11 o’clock on the ring
- Ring size before border: 3.4 in (8.6 cm) outer diameter, with a 1.4 in (3.6 cm) center hole
- Ring size after border: 3.8 in (9.7 cm) outer diameter
- Border depth: 0.2 in (0.5 cm)
- Tail size: 0.8 in (2.0 cm) x 2.2 in (5.6 cm)
Materials
Choose a smooth DK cotton or cotton blend. Cotton shows each stitch clearly and holds a flat shape, which matters for a keychain that gets handled every day. Avoid fuzzy or very stretchy yarns, because the letter will lose its outline.
- Lavender (MC): 10 g, about 23 m
- Peach: 4 g, about 9 m
- Sage green: 3 g, about 7 m
- White: 2 g, about 5 m
- Pale yellow: 1 g, about 2 m
These amounts include roughly 30 percent extra for gauge testing and weaving in ends.
Tools:
- 3.5 mm (E-4) crochet hook
- Tapestry needle
- Stitch markers
- 1 gold split key ring, 1 in (2.5 cm) diameter
- 1 short gold chain, about 0.75 in (1.9 cm) long, with 2 jump rings
- Small pliers for the jump rings
- Scissors, blocking mat, and rust-proof pins
- Optional: a small amount of fiberfill or yarn scraps for the buds
Abbreviations (US Terms)
- ch: chain
- sl st: slip stitch
- sc: single crochet
- hdc: half double crochet
- dc: double crochet
- inc: 2 sc in the same stitch
- sc2tog: single crochet 2 together
- MR: magic ring
- st(s): stitch(es)
- rnd(s): round(s)
Special stitch (Petal): work (hdc, dc, dc, hdc) all in the same stitch. Each petal uses 1 stitch of the previous round and makes 4 new stitches.
Gauge and Checkpoints
Gauge: 5 sc and 5 rnds = 1 in (2.5 cm). A swatch of 10 sc x 10 rows should measure 2 in (5.1 cm) square.
Because the ring is small, the quickest gauge test is the ring itself. Work Rnds 1 to 3, lay the piece flat, and measure it.
Ring checkpoints (outer diameter):
- After Rnd 1: 1.8 in (4.6 cm)
- After Rnd 3: 2.6 in (6.6 cm)
- After Rnd 5: 3.4 in (8.6 cm)
- After the border: 3.8 in (9.7 cm)
Each round adds about 0.4 in (1.0 cm) to the diameter. Being off by up to 0.1 in (0.3 cm) either way is fine.
If your ring is too big, go down to a 3.25 mm hook or crochet more tightly. If it is too small, go up to a 3.75 mm hook. If the ring ruffles, your stitches are shorter than the gauge. If it cups, they are taller. Fix this with the hook size rather than changing the stitch counts, because the counts are what keep the ring flat.
Ring (Body of the Q)
With lavender, ch 24. Join with a sl st to the first ch to form a loop, taking care not to twist the chain.
Rnd 1: Ch 1, (sc in each of next 3 ch, inc in next ch) 6 times. Join with sl st to first sc. (30 sts)
This round converts the chain into stitches: 24 sts worked 1 per chain + 6 extra sts = 30.
Rnd 2: Ch 1, (sc in each of next 4 sts, inc in next st) 6 times. Join. (36 sts)
Rnd 3: Ch 1, (sc in each of next 5 sts, inc in next st) 6 times. Join. (42 sts)
Checkpoint: the ring measures 2.6 in (6.6 cm) across.
Rnd 4: Ch 1, (sc in each of next 6 sts, inc in next st) 6 times. Join. (48 sts)
Rnd 5: Ch 1, (sc in each of next 7 sts, inc in next st) 6 times. Join. (54 sts)
Checkpoint: the outer diameter is 3.4 in (8.6 cm), the center hole is 1.4 in (3.6 cm), and the band is 1 in (2.5 cm) wide. Do not fasten off. Go on to the Border section.
Why it lies flat: each round is 0.2 in (0.5 cm) tall, so each new round’s circumference grows by 2 x pi x 0.2 in, about 1.26 in (3.2 cm). At 5 sts per in, that is about 6 extra stitches, which matches the 6 increases per round.
Tail
With lavender, ch 10.
Rnd 1: Sc in 2nd ch from hook, sc in each of next 7 ch, 3 sc in last ch. Turn the piece to work along the other side of the chain: sc in each of next 7 ch, 2 sc in the same ch as the first sc. Join with sl st to first sc. (20 sts)
Count: 1 + 7 + 3 + 7 + 2 = 20. Each end has 3 sts and each long side has 7 sts.
Checkpoint: 0.4 in (1.0 cm) wide x 1.8 in (4.6 cm) long.
Rnd 2: Ch 1, inc in first st, sc in each of next 7 sts, inc in each of next 3 sts, sc in each of next 7 sts, inc in each of last 2 sts. Join. (26 sts)
Count: 2 + 7 + 6 + 7 + 4 = 26. Each end now has 6 sts and each long side still has 7 sts, which gives neatly rounded ends.
Checkpoint: 0.8 in (2.0 cm) wide x 2.2 in (5.6 cm) long. Fasten off, leaving a 12 in (30.5 cm) tail for sewing.
Large Peach Flower
Rnd 1: With pale yellow, make a MR and work 10 sc into it. Pull the ring closed and join. (10 sts) Fasten off yellow.
Rnd 2: Join peach in any st. (Petal in next st, sl st in next st) 5 times. Join to the first st. (5 petals: 20 petal sts + 5 sl sts = 25 sts)
Checkpoint: 1.3 in (3.3 cm) across. Fasten off, leaving an 8 in (20.3 cm) tail. With a strand of yellow, add 3 or 4 small French knots in the center for the dotted look.
White Flower
Rnd 1: With pale yellow, make a MR and work 5 sc into it. Pull the ring closed and join. (5 sts) Fasten off yellow.
Rnd 2: Join white in any st. In each st around, work (sl st, ch 2, 2 dc, ch 2, sl st). Join. (5 petals)
Checkpoint: 1 in (2.5 cm) across. Fasten off, leaving an 8 in (20.3 cm) tail.
Peach Buds (Make 2)
Rnd 1: With peach, make a MR and work 6 sc into it. Join. (6 sts)
Rnd 2: Ch 1, sc in each st around. Join. (6 sts)
Tuck a pinch of fiberfill or yarn scraps inside.
Rnd 3: Ch 1, sc2tog 3 times. (3 sts) Fasten off. Thread the tail through the remaining sts and pull closed.
Checkpoint: about 0.4 in (1.0 cm) round.
Leaves (Make 5)
With sage green, ch 7.
Starting in the 2nd ch from the hook, work: sl st, sc, hdc, dc, hdc, then (sc, ch 2, sc) in the last ch for the tip. Working along the other side of the chain, work hdc, dc, hdc, sc, sl st in the remaining 5 ch. Join with sl st to the first sl st.
Count: the first side uses 6 chains and the second side uses 5, because the two sides share the tip chain.
Checkpoint: 1 in (2.5 cm) long x 0.5 in (1.3 cm) wide. Fasten off, leaving an 8 in (20.3 cm) tail.
Border
Border gauge: the border is worked in the same sc at 5 sts per in. Adding 0.2 in (0.5 cm) all around increases the diameter by 0.4 in (1.0 cm) and the circumference by about 1.26 in (3.2 cm). At this gauge, that is 6 extra stitches.
Border Rnd 1 (outer edge): Continuing with lavender from Rnd 5, ch 1, (sc in each of next 8 sts, inc in next st) 6 times. Join. (60 sts)
Count: 54 sts worked 1 per stitch + 6 extra sts = 60. Each of the 6 sections between increases has 10 sts (8 sc + 2 from the increase). Fasten off and weave in the end.
Border Rnd 2 (inner edge): Join lavender in any stitch of the foundation chain on the inside of the ring. Sl st loosely in each foundation ch around. Join. (24 sl sts)
This round covers the bare chain loops so the center hole has the same smooth edge as the outside. If you work it loosely, it does not change the size of the hole.
Why the math works: 60 sts at 5 sts per in gives a circumference of 12 in (30.5 cm). That equals pi x 3.8 in (9.7 cm), so the border lands exactly on the target diameter.
Checkpoint: the outer diameter is 3.8 in (9.7 cm) and the band is 1.2 in (3.0 cm) wide.
Attach the tail: Lay the tail across the lower right of the ring at about 4 o’clock, angled down and to the right. The upper end sits on the band about 0.4 in (1.0 cm) from the center hole. The lower end extends about 1 in (2.5 cm) past the outer border. Whipstitch all around the part of the tail that overlaps the ring. Sew through the back loops of the tail’s edge stitches so the seam is hidden.
Final Blocking
- Lightly mist the ring and the attached tail with water until damp, not soaked.
- Lay the letter face up on a blocking mat.
- Pin the outer edge at 8 evenly spaced points to form a 3.8 in (9.7 cm) circle, using the grid lines as a guide.
- Pin the center hole open to 1.4 in (3.6 cm), and pin the tail straight along its diagonal.
- Let it dry completely, about 4 to 6 hours.
- Unpin it and arrange the appliqués. Place the 2 buds at about 11 o’clock, the large peach flower at 9 o’clock, and the white flower at 7 o’clock. Tuck the 5 leaves behind them, pointing outward, with their tips peeking past the outer edge.
- Sew on the leaves first, then the flowers on top, then the buds. Use small stitches that go only through the back layer of each piece, so nothing shows on the front.
- Open a jump ring, put it through the border at 12 o’clock, and link it to the chain. Attach the key ring to the other end of the chain with the second jump ring.
Final Quality-Control Checklist
- The outer border round has 60 sts and the ring lies flat.
- The outer diameter is 3.8 in (9.7 cm), give or take 0.1 in (0.3 cm).
- The center hole is round and about 1.4 in (3.6 cm) across.
- The tail has 26 sts and measures 0.8 in (2.0 cm) x 2.2 in (5.6 cm).
- The tail sits at a clean diagonal with no visible stitches.
- Both flowers have 5 even petals and a yellow center.
- The buds are firm and round.
- All 5 leaves are secure and their tips do not curl.
- The jump rings are fully closed.
- All ends are woven in on the back.
Troubleshooting
The ring ruffles: Your stitches are too short for the number of increases. Go down a hook size or loosen your tension slightly.
The ring cups into a bowl: Your stitches are too tall. Go up a hook size, and check that you made 6 increases in every round.
The center hole is too small: The foundation chain was too tight. Start again, using a hook one size larger for the chain only.
The tail looks crooked: Re-pin it during blocking and add a few extra tacking stitches near the outer edge.
The petals look uneven: Make sure each petal sits in its own stitch and each sl st sits in the next stitch, with nothing skipped.
The leaves curl: Pin them flat, mist them, and let them dry before sewing.
The keychain stretches over time: Sew a small circle of felt to the back of the ring to stiffen it.
Care
Hand wash in cool water with mild soap, press out the water in a towel, and dry flat. If you can, remove the metal hardware before washing.
Final Notes
The measurements build in a short, easy-to-track chain. A 24-ch loop gives a 1.4 in (3.6 cm) center hole. Five rounds with 6 increases each bring the ring to 54 sts and 3.4 in (8.6 cm). One border round adds 6 more sts, for 60 in total and a final diameter of 3.8 in (9.7 cm). The 26-st tail measures 0.8 in (2.0 cm) x 2.2 in (5.6 cm) and brings the letter to 4.5 in (11.4 cm) tall. Check each stage against these numbers and your Q will match the design.
Once you know the method, you can change the flower colors to suit any bag or friend.
Happy crocheting!