

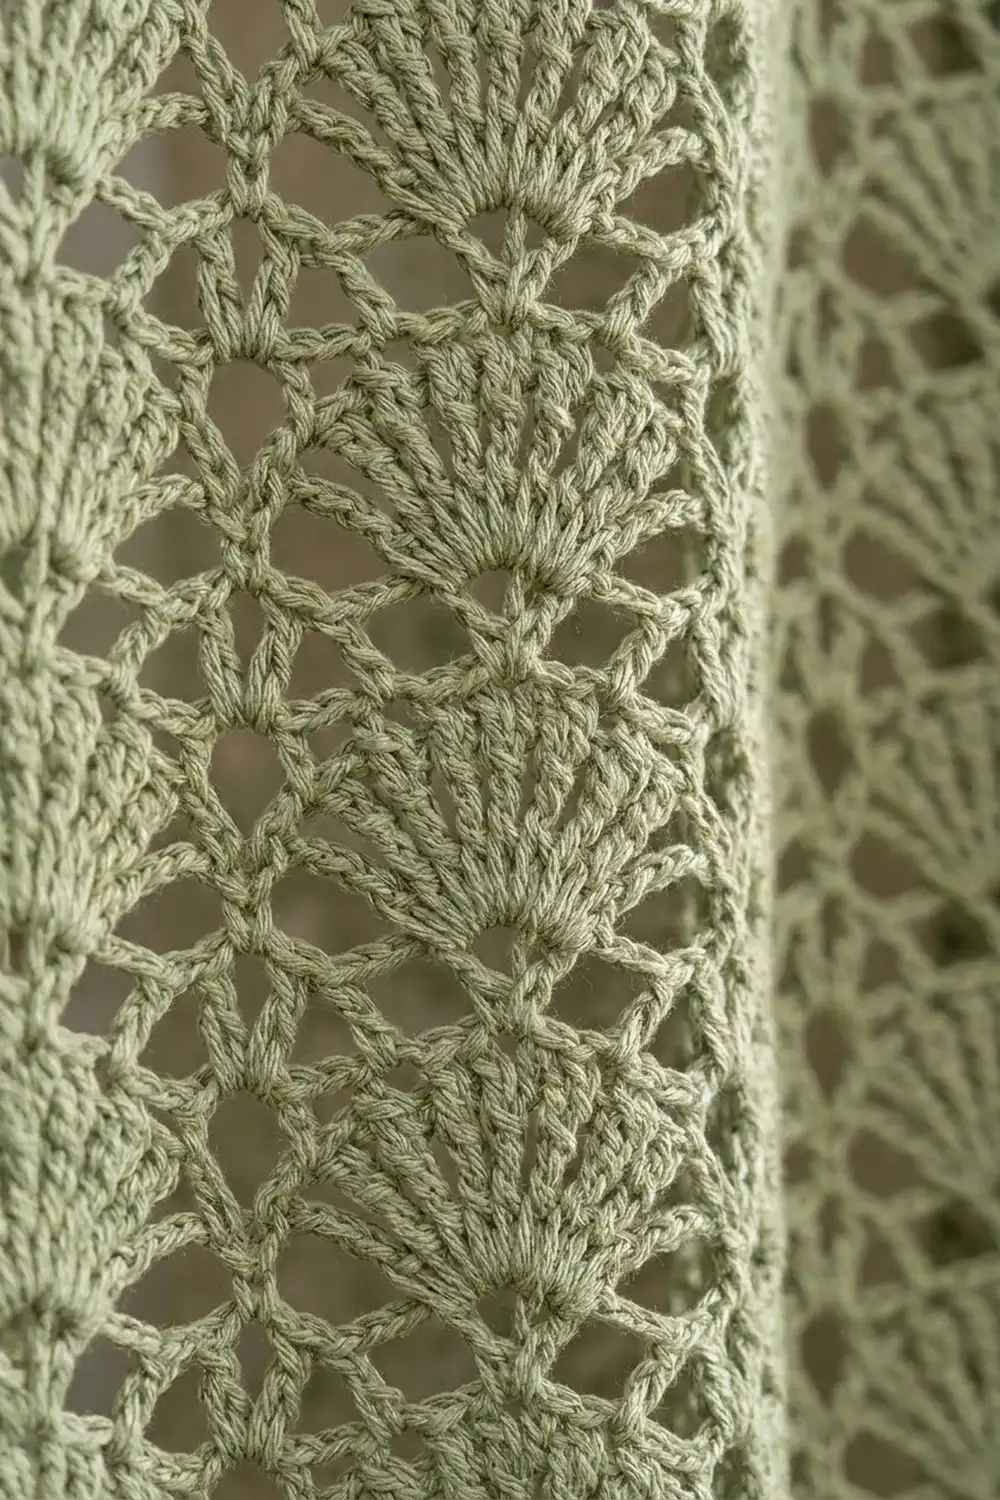
This curtain panel is soft, airy and calm to look at. Columns of solid fan shells run from top to bottom, and each one is framed by an open lattice of chain arches. Light comes through the mesh while the fans keep the panel looking full.
The sample uses one color, a muted sage green worsted-weight cotton. The style is cottage and vintage, but the single color and tidy columns also suit a modern room. A solid band of double crochet at the top holds the curtain clip rings, and a row of rounded scallops finishes the lower edge.
The pattern uses US crochet terms. One finished panel measures 42.5 in (108.0 cm) wide and 84.25 in (214.0 cm) long after the border and blocking.
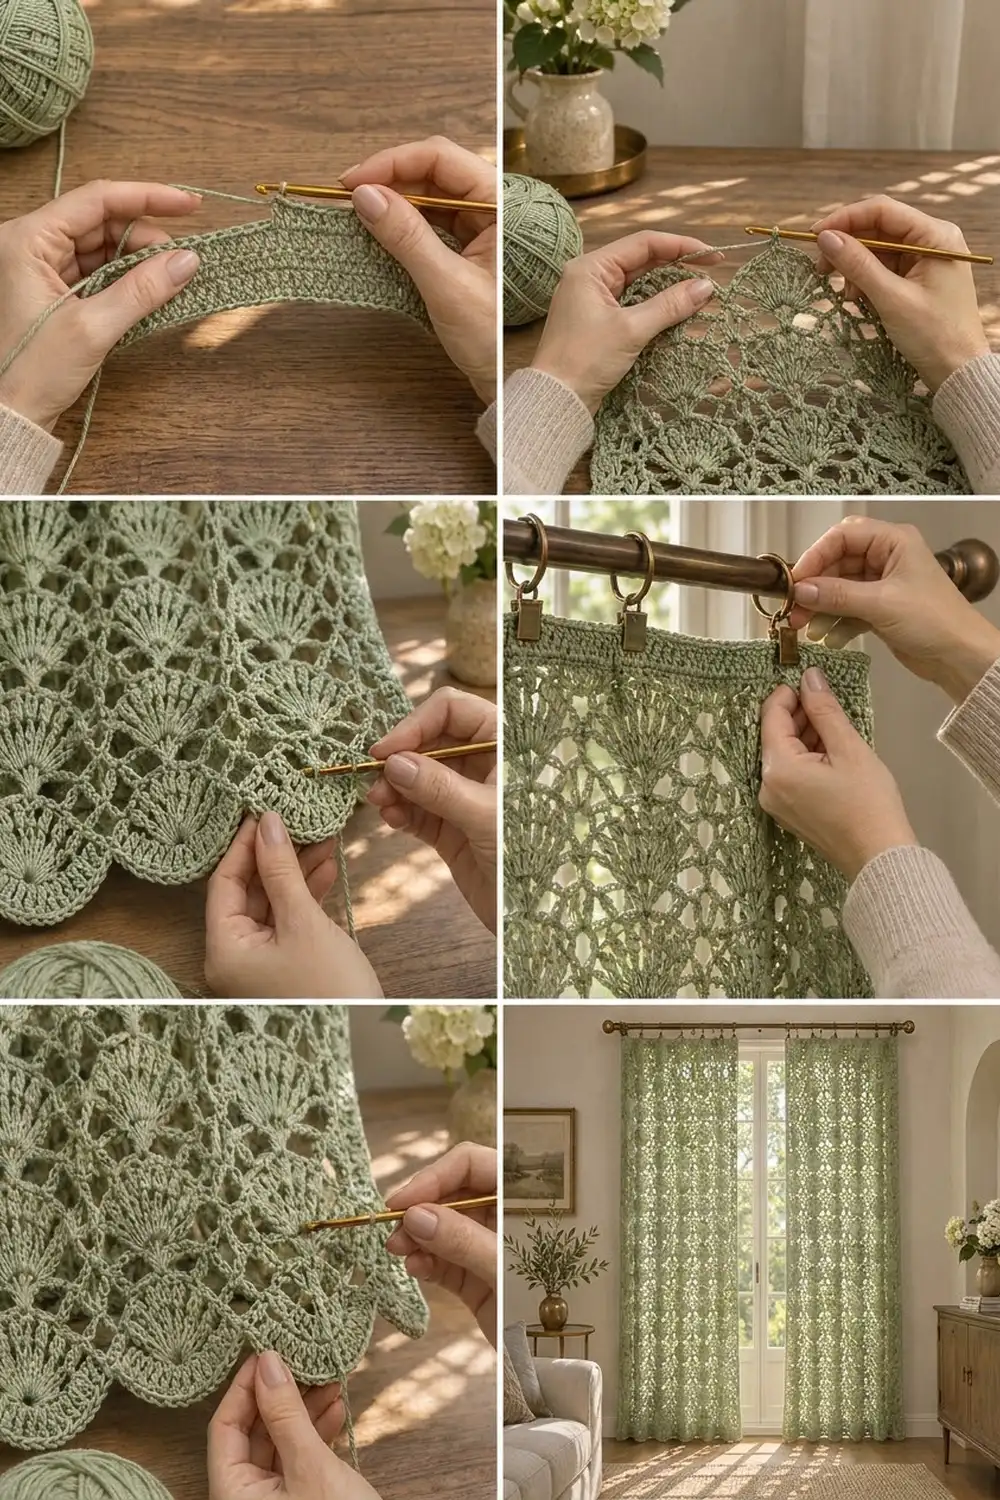
The construction is simple. You crochet one rectangle in rows from the top down: first a solid header band, then a 2-row fan-and-arch lace, then two scallop rows at the bottom. A single row of sc finishes the sides and top. The photos show two identical panels hung as a pair, so make two panels the same way. They hang side by side and are never joined.
Finished Size and Construction
- Finished size (one panel): 42.5 in (108.0 cm) wide x 84.25 in (214.0 cm) long
- Skill level: Intermediate
- Terminology: US crochet terms
- Yarn weight: Worsted (#4) cotton
- Hook: 5.0 mm (H-8)
- Number of pieces: 1 panel (make 2 for a pair)
- Layout: One rectangle worked in rows from top to bottom, with no joining
- Piece size: 14 fan columns, each 3 in (7.6 cm) wide
- Size before border: 42 in (106.7 cm) wide x 84 in (213.4 cm) long, including the header and scallops
- Border depth: 0.25 in (0.6 cm) on the sides and top. The scallops form the bottom edge.
Materials
Choose a smooth mercerized or combed cotton in worsted weight. Cotton keeps the fan shapes crisp, stops the lace from drooping too much, and washes well. Avoid fuzzy or loosely plied yarn, which blurs the arches.
- Sage green: 850 g, about 1,445 m per panel (1,700 g, about 2,890 m for a pair). With a typical 100 g / 170 m skein, that is 9 skeins per panel.
Tools:
- 5.0 mm (H-8) crochet hook
- Tapestry needle
- Stitch markers
- Rust-proof pins and blocking mats, or a clean floor covered with towels
- Measuring tape
- Curtain rod and clip rings (12 rings per panel)
The yarn amounts include a margin of about 15% for the gauge swatch and small differences in tension.
Abbreviations (US Terms)
- ch – chain
- sc – single crochet
- dc – double crochet
- sk – skip
- st(s) – stitch(es)
- sp – space
- rep – repeat
Special stitches:
- Fan: 9 dc worked into the same st.
- Picot: (sc, ch 3, sc) worked into the same st.
Gauge and Checkpoints
Header gauge: 16 dc and 8 rows = 4 in (10.2 cm).
Lace gauge: One 12-st repeat is 3 in (7.6 cm) wide. One 2-row lace repeat (Rows 2–3) is 2 in (5.1 cm) tall.
Make a test swatch first. Ch 27. Work the 4 header rows with 25 sts, then lace Row 1, then Rows 2–3 three times. This gives you 2 fan columns. Block the swatch lightly. It should measure 6 in (15.2 cm) wide x 8.5 in (21.6 cm) tall.
Checkpoints on the panel:
- After the header: 42 in (106.7 cm) wide x 2 in (5.1 cm) tall.
- After 10 lace repeats: 22.5 in (57.2 cm) long.
- After 20 lace repeats: 42.5 in (108.0 cm) long.
- After 40 lace repeats: 82.5 in (209.6 cm) long.
- After the scallops: 84 in (213.4 cm) long.
If your fabric is too big, go down one hook size (4.5 mm). If it is too small, go up one size (5.5 mm). An error of only 0.25 in (0.6 cm) per repeat adds up to 3.5 in (8.9 cm) across 14 repeats, so check the swatch carefully. You can also change the length by adding or removing 2-row lace repeats. Each one is 2 in (5.1 cm).
Header Band
The header is a solid strip that holds the clip rings.
Foundation: Ch 171.
Row 1: Dc in 4th ch from hook (the 3 skipped ch count as a dc) and in each ch across. Turn. (169 sts)
Rows 2–4: Ch 3 (counts as dc), dc in each st across, ending with a dc in the top of the turning ch. Turn. (169 sts)
The header now measures 42 in (106.7 cm) x 2 in (5.1 cm). 169 = 14 repeats of 12 sts + 1 edge st, which sets up the lace exactly. Keep these rows firm and even, because the clips put all the weight of the curtain on them.
Lace Body
Row 1 (arch set-up): Ch 1, sc in first st, ch 5, sk 5 sts, sc in next st; rep from * across, ending with a sc in the top of the turning ch. Turn. (29 sc and 28 ch-5 arches)*
Check the math: 1 sc + 28 x (5 skipped + 1 sc) = 169 sts used. Think of the sc in this order: edge, center, between, center, between, and so on, ending with edge. The fans go into the “center” sc.
Row 2 (fan row): Ch 5 (counts as dc + ch 2), sc in first arch, Fan in next sc, sc in next arch, *ch 5, sc in next arch, Fan in next sc, sc in next arch; rep from * 12 more times, ch 2, dc in last sc. Turn.
Row 2 count: 14 fans (126 dc), 28 sc, 13 ch-5 sps, 2 edge dc and 2 ch-2 sps. Each ch-5 passes over a “between” sc, so every fan sits in its own column with an open gap on each side.
Row 3 (arch row): Ch 1, sc in first dc, ch 5, sc in 5th dc of first Fan, ch 5, sc in next ch-5 sp, ch 5, sc in 5th dc of next Fan; rep from * 12 more times, ch 5, sc in 3rd ch of turning ch-5. Turn. (29 sc and 28 ch-5 arches)*
Row 3 count: 1 arch at the start + 13 x 2 arches + 1 arch at the end = 28 arches. This matches Row 1 exactly, and the new “center” sc sit on top of the fan centers. That is how the fans stack into straight vertical columns, and it creates the arched lattice between them.
The arches over each fan pull its outer dc slightly together. This gives the shell its rounded, cupped look in the photo, so don’t loosen those chains to flatten it.
Rows 4–81: Repeat Rows 2–3 thirty-nine more times, for 40 lace repeats in all. End with an arch row (Row 3).
The panel should now be 82.5 in (209.6 cm) long: a 2 in (5.1 cm) header, a 0.5 in (1.3 cm) set-up row and 80 in (203.2 cm) of lace.
Scallop Edge
The scallops line up under the fan columns.
Scallop Row 1: Ch 1, sc in first sc, 5 dc in next arch, dc in next sc, 5 dc in next arch, sc in next sc; rep from * 13 more times. Turn. (14 scallops of 11 dc each = 154 dc, plus 15 sc = 169 sts)*
Scallop Row 2: Ch 1, sc in first sc, sc in next 5 dc, Picot in next dc, sc in next 5 dc, sc in next sc; rep from * 13 more times. Fasten off. (183 sc and 14 picots)*
Check: 1 sc + 14 x (5 + 2 + 5 + 1) = 183 sc. Each picot sits on the center dc of its scallop, directly under a fan column. The panel now measures 42 in (106.7 cm) x 84 in (213.4 cm).
Border
The border is one row of sc along both sides and the top. It firms up the edges and squares the panel.
Border gauge: 4 sc per 1 in (2.5 cm) along the row ends.
Side placement, row by row:
- Each header dc row: 2 sc (4 rows = 8 sc)
- Lace Row 1: 2 sc
- Each fan row (Row 2 type): 5 sc, worked around the edge dc
- Each arch row (Row 3 type): 3 sc
- Scallop Row 1: 4 sc
- Scallop Row 2: 2 sc
Border Row: Join the yarn at one bottom corner. Ch 1. Work 336 sc up the first side, placed as listed above. Work 3 sc in the first foundation st at the top corner. Sc in each of the next 167 foundation sts. Work 3 sc in the last foundation st at the second corner. Work 336 sc down the second side. Fasten off.
Counts:
- Each side: 336 sc (corners not included)
- Top: 173 sc, including the two 3-sc corner groups (3 + 167 + 3)
- Total: 336 + 173 + 336 = 845 sc
Why the math works: Each side gets 8 (header) + 2 (Row 1) + 40 x (5 + 3) (lace) + 4 + 2 (scallops) = 336 sc. At 4 sc per inch, 336 sc = 84 in (213.4 cm), which is exactly the length of the side. Along the top, the 169 foundation sts get 169 sc, plus 2 extra sc in each corner st, so the top lies flat and the corners turn cleanly. The border adds 0.25 in (0.6 cm) to each side and the top, for a finished size of 42.5 in (108.0 cm) x 84.25 in (214.0 cm).
Final Blocking
- Weave in all ends through solid areas (the header, the fan stitches or the border), not across open arches.
- Soak the panel in cool water for 15 minutes.
- Roll it in a towel and press out the water. Do not wring it.
- Lay it flat on mats or a towel-covered floor.
- Pin the corners to 42.5 in (108.0 cm) x 84.25 in (214.0 cm).
- Pin the top edge straight, then pin each side every 6 in (15.2 cm).
- Pin each picot so the scallops open into even curves.
- Use your fingers to center each fan and straighten the arches.
- Let the panel dry completely, then unpin it.
- Block the second panel the same way and compare the two side by side.
Final Quality-Control Checklist
- The panel measures 42.5 in (108.0 cm) x 84.25 in (214.0 cm).
- 14 fan columns run straight from the header to the scallops.
- Every fan has 9 dc.
- Every arch row has 28 arches.
- The bottom edge has 14 scallops, each with a centered picot.
- The side edges are straight, with no waves or puckers.
- The two panels are within 0.5 in (1.3 cm) of each other in length.
- All ends are hidden and secure.
Troubleshooting
Fans drift sideways. A Fan went into a “between” sc. Recount the arches. A Fan always goes into the sc in the middle of each pair of arches.
An arch row has the wrong count. Check the first and last arches. Row 3 starts and ends with one arch running from the edge to a fan center.
The sides ripple. There are too many border sc. Pull them out and follow the row-by-row placement exactly.
The sides pull in. There are too few border sc, or they are too tight. Add sc evenly or work them more loosely.
The panel gets longer as it hangs. Cotton lace stretches. Hang your swatch for an hour before you measure it, and remove a lace repeat if needed.
The scallops curl. Block them firmly and pin every picot.
The header sags between the clips. Space the 12 clip rings about 3.75 in (9.5 cm) apart.
Care
Hand wash in cool water with mild soap, then dry flat and reshape the scallops. Don’t hang the panel while it’s wet, because the weight of the water stretches the lace.
Final Notes
The whole panel depends on one chain of measurements. Your gauge gives a 12-st repeat of 3 in (7.6 cm). Fourteen repeats give 169 sts and a width of 42 in (106.7 cm). The header adds 2 in (5.1 cm), the set-up row adds 0.5 in (1.3 cm), 40 lace repeats add 80 in (203.2 cm) and the scallops add 1.5 in (3.8 cm), for 84 in (213.4 cm). The border adds 0.25 in (0.6 cm) on the sides and top, for a finished 42.5 in (108.0 cm) x 84.25 in (214.0 cm).
Make the second panel with the same hook and the same number of rows, and the pair will hang evenly.
Happy crocheting!