

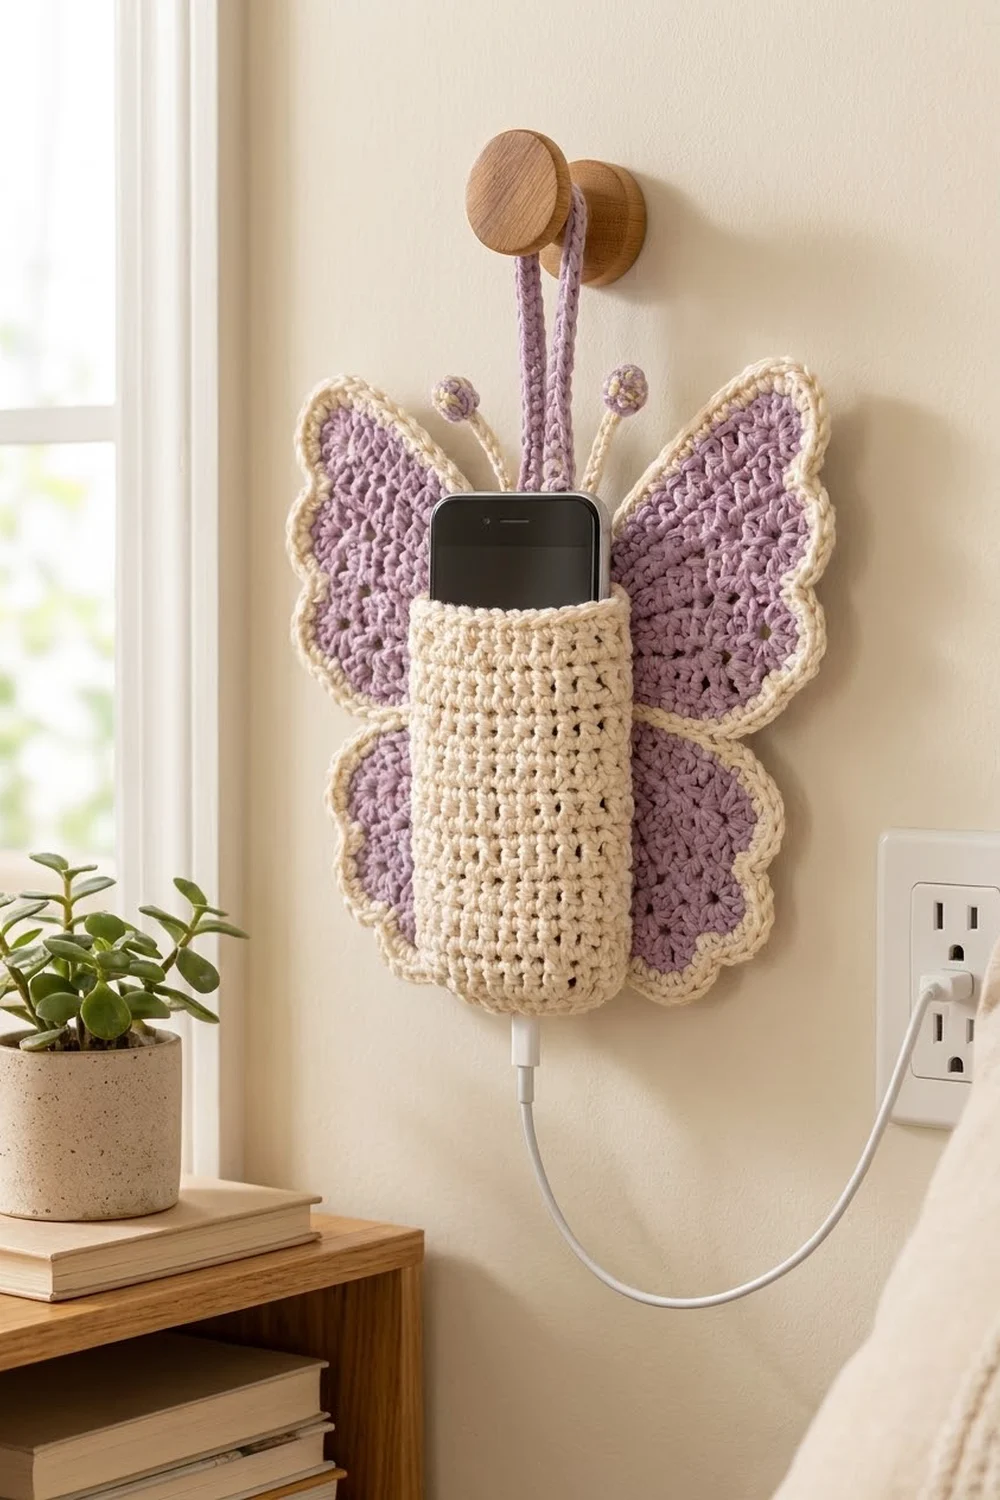
The Lavender Flutter Butterfly Phone Holder hangs next to an outlet and gives your phone a soft place to rest while it charges. The four soft lavender wings have cream scalloped edges. A neat cream pocket sits in the center, where a butterfly’s body would be.
The palette is two colors: lavender for the wings, antenna tips and hanging loop, and cream for the borders, body, antennae and pocket. The look is calm and cottage-style, and the pocket’s firm single crochet stands out against the open texture of the double-crochet wings.
This pattern uses US crochet terms. The assembled holder measures about 10 in (25.4 cm) wide and 8.5 in (21.6 cm) tall, not counting the antennae and loop. The pocket is 4 in (10.2 cm) wide and 5.5 in (14.0 cm) tall, so it fits most phones up to about 3.25 in (8.3 cm) wide.
Each wing is a 120-degree fan worked in turned rows from a magic ring, then edged in cream. The body is a single-crochet oval worked around a chain. The pocket is a tube worked in joined rounds, starting from an oval base that has a slot for the cable. Everything is whipstitched together at the end.
Finished Size and Construction
- Finished size: 10 in × 8.5 in (25.4 × 21.6 cm), not counting antennae and loop
- Skill level: Easy-intermediate
- Terminology: US
- Yarn weight: #4 worsted, cotton or cotton blend
- Hook: 5.0 mm (H-8)
- Number of pieces: 4 wings, 1 body, 2 antennae (each with a tip), 1 pocket, 1 hanging loop
- Layout: Mirrored pairs of upper and lower wings on each side of a central body, with the pocket on top
- Upper wing size: 4.5 in (11.4 cm) radius before border, 5 in (12.7 cm) after
- Lower wing size: 3 in (7.6 cm) radius before border, 3.5 in (8.9 cm) after
- Border depth: 0.5 in (1.3 cm), 2 rounds
Materials
Use a smooth worsted cotton so the stitches stay crisp and the pocket stays firm. Acrylic works too, but it stretches more under the weight of a phone.
- Lavender: 25 g, about 45 m
- Cream: 40 g, about 70 m
Tools:
– 5.0 mm (H-8) crochet hook
– Tapestry needle
– Stitch markers
– Blocking mat and rust-proof pins
– Spray bottle
– Measuring tape
The yarn amounts above include a margin of about 20 percent for gauge swatches and differences in tension.
Abbreviations (US Terms)
- ch: chain
- sl st: slip stitch
- sc: single crochet
- hdc: half double crochet
- dc: double crochet
- sk: skip
- st(s): stitch(es)
- sp: space
- RS: right side
- MR: magic ring
Special stitch — Shell: (hdc, dc, hdc) all worked in the same stitch.
Gauge and Checkpoints
- Wing gauge: 14 dc and 8 rows = 4 in (10.2 cm)
- Pocket and body gauge: 16 sc and 18 rounds = 4 in (10.2 cm)
Make one upper wing completely before starting anything else, because it is your real gauge test.
Checkpoints:
– Upper wing after Row 9: 4.5 in (11.4 cm), measured from the ring to the arc
– Lower wing after Row 6: 3 in (7.6 cm)
– Body after Round 2: 8 in × 1.25 in (20.3 × 3.2 cm)
– Pocket after Round 12: about 2.75 in (7.0 cm) tall
– Pocket when finished: 4 in × 5.5 in (10.2 × 14.0 cm), measured flat
If your pieces come out too big, go down half a hook size. If they come out too small, go up half a size. The pocket must stay snug, so if you need to, change the hook only for the pocket.
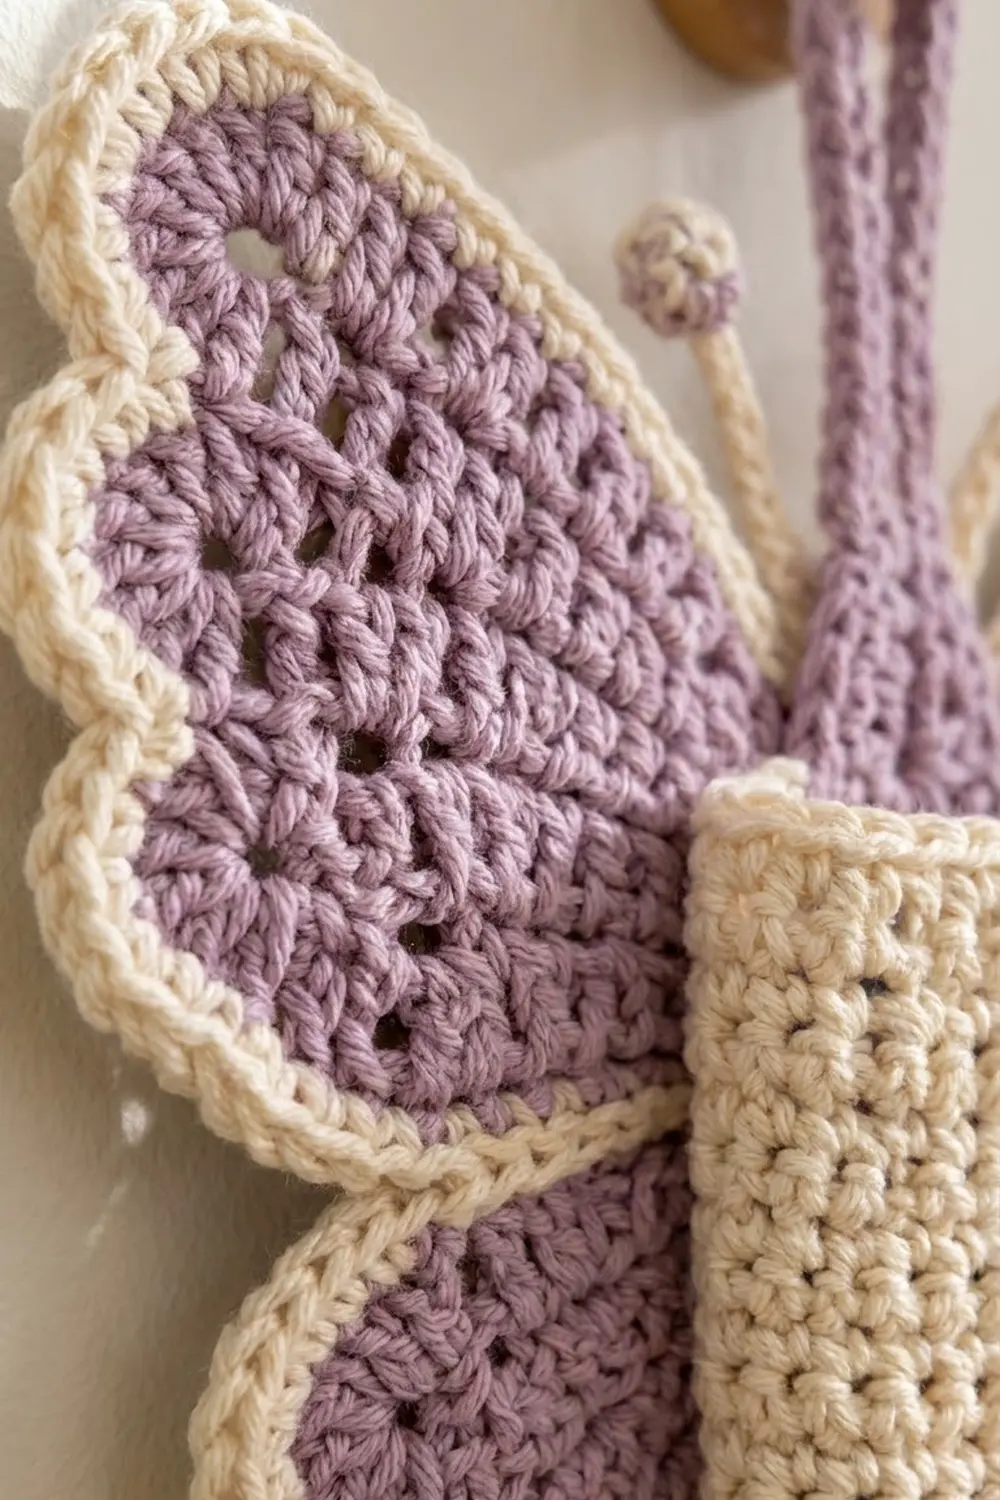
Upper Wings (Make 2, Lavender)
Rows are turned. The ch 3 at the start of each row counts as 1 dc.
Row 1: In a MR, ch 3, 3 dc. Pull the ring tight and turn. (4 dc)
Row 2: Ch 3, dc in the same st, 2 dc in each of the next 3 sts. Turn. (8 dc)
Row 3: Ch 3, dc in the same st, dc in next, [2 dc in next, dc in next] 3 times. Turn. (12 dc)
Row 4: Ch 3, dc in the same st, dc in next 2, [2 dc in next, dc in next 2] 3 times. Turn. (16 dc)
Rows 5–9: Keep the same pattern. Each row has 4 evenly spaced increases, and the number of plain dc between increases goes up by 1 each row. Row 5 has 20 dc, Row 6 has 24, Row 7 has 28, Row 8 has 32 and Row 9 has 36.
Fasten off. Each wing is a fan with a curved edge (the arc) and two straight edges, each 9 row-ends long, that meet at the ring. The rows of dc create the radiating lines.
Lower Wings (Make 2, Lavender)
Work Rows 1–6 exactly as for the upper wings. Row 6 has 24 dc. Fasten off.
Body (Make 1, Cream)
The body is worked in joined rounds around a foundation chain. Do not turn.
Round 1: Ch 31. Sc in the 2nd ch from the hook and in the next 28 ch, then 3 sc in the last ch. Rotate the work and continue along the other side of the chain: sc in the next 28 ch, then 2 sc in the last ch, which is the same ch as your first sc. Join with a sl st. (62 sc: 28 sc on each side and 3 sc at each end)
Round 2: Ch 1. Work 1 sc in each st, but work 2 sc in each of the 3 end sts at both ends. Join. (62 sts worked 1 per st + 6 extra = 68 sc)
Fasten off and leave a long tail for sewing. Check that the body measures 8 in × 1.25 in (20.3 × 3.2 cm).
Antennae (Make 2)
Tip: With lavender, work 6 sc in a MR and join. Switch to cream. Ch 1 and work 2 sc in each st around, then join. (12 sc) The tip should be about 0.75 in (1.9 cm) across.
Stalk: Without fastening off, ch 13. Sl st in the back bump of the 2nd ch from the hook and in each remaining ch. (12 sl st) The stalk should be about 3 in (7.6 cm) long. Fasten off and leave a tail.
Pocket (Make 1, Cream)
Work in joined rounds without turning. You will make the oval base first, then work straight up from it.
Round 1: Ch 16. Sc in the 2nd ch from the hook and in the next 13 ch, then 3 sc in the last ch. Rotate and work along the other side of the chain: sc in the next 4 ch, ch 4, sk the next 4 ch, sc in the next 5 ch, then 2 sc in the last ch. Join. (14 + 3 + 4 + 4 ch + 5 + 2 = 32 sts) The ch-4 gap is the cable slot. Mark this side as the front.
Rounds 2–25: Ch 1, sc in each st around, including each ch of the slot. Join. (32 sc) The 3-sc groups at the ends of Round 1 give the pocket its rounded bottom corners.
Fasten off. When flattened, the pocket is 16 sts wide, which is 4 in (10.2 cm), and 5.5 in (14.0 cm) tall.
Hanging Loop (Make 1, Lavender)
Ch 41. Sc in the 2nd ch from the hook and in each ch across. (40 sc) The strip is about 10 in (25.4 cm) long. Fold it in half to make a 5 in (12.7 cm) loop.
Make All Pieces
Lavender: 2 upper wings, 2 lower wings, 2 antenna-tip centers and 1 hanging loop.
Cream: 4 wing borders, 1 body, 2 antenna stalks and tip edges, and 1 pocket.
Before you start joining, add the border to all four wings (see Wing Border below) and block every piece.
Layout (front view):
          o            o
           \   LOOP   /
   [ UPPER L ]  |B|  [ UPPER R ]
   [ UPPER L ]  |O|  [ UPPER R ]
  [ LOWER L ] [POCKET] [ LOWER R ]
   [ LOWER L ]  |Y|  [ LOWER R ]
All four wing tips meet at one center point, C. For each upper wing, one straight edge points straight up from C and the other points out and down at about 30 degrees below horizontal. For each lower wing, one straight edge points straight down from C and the other points out and up at about 30 degrees above horizontal. Each lower wing tucks behind its upper wing.
Joining
Method: Whipstitch with cream yarn, working through the back loops of the Round 2 border stitches.
Center seams: In Round 2 of the border, each straight edge has 19 sts: 1 corner sc plus 18 sc. Place the vertical edges of the two upper wings side by side and whipstitch them together 1 stitch to 1 stitch, 19 to 19, starting at the top corners. Do the same for the vertical edges of the lower wings, which have 13 sts each (1 corner sc plus 12 sc).
Wing overlap: On each side, slide the lower wing behind the upper wing. Use a running stitch to sew the lower straight edge of the upper wing (19 sts) to the lower wing underneath it.
Body: Center the body over the center seams. Its top should sit 4.5 in (11.4 cm) above C and its bottom 3.5 in (8.9 cm) below C. Whipstitch all 68 sts of its outer edge to the wings.
Antennae: Sew one stalk to each side of the top of the body and angle them outward.
Pocket: Flatten the pocket with the slot facing front, so the slot sits along the front of the bottom edge. Line the bottom of the pocket up with the bottom of the body. Whipstitch only the back layer of the pocket to the panel, along both side folds (25 rounds each) and across the curved bottom. Keep the slot clear.
Loop: Fold the loop in half and sew both ends to the back of the panel, behind the top of the body. Stitch through every layer and go over the same spot twice. This loop carries the full weight of the phone.
Tension: Pull each whipstitch just enough to close the gap. If you pull harder, the seams will pucker.
Size checkpoint: The assembled holder should measure 10 in × 8.5 in (25.4 × 21.6 cm).
Wing Border (Work on Each Wing Before Joining)
Border gauge: 4 sc per 1 in (2.5 cm). A dc row-end is 0.5 in (1.3 cm) tall, so 2 sc per row-end keeps the straight edges flat.
Upper wing, Round 1: With the RS facing, join cream in the first st of Row 9. Ch 1, then sc in each st across the arc, working 2 sc in the 18th st. (36 sts worked 1 per st + 1 extra = 37 sc on the arc) Ch 1 for the corner. Work 2 sc in each of the 9 row-ends down the first straight edge (18 sc), then 2 sc in each of the 9 row-ends up the second straight edge (18 sc). Ch 1 for the corner and join. (73 sc and 2 corner ch-1 sps)
Upper wing, Round 2: Ch 1, sc in the first st, then [sk 1, shell in next, sk 1, sc in next] 9 times, so the last sc lands in the 37th st. Sc in the corner sp, sc in each of the next 36 sts, then sc in the next corner sp. Join. (Arc: 10 sc and 9 shells. Straight sides: 38 sc.)
Lower wing, Round 1: With the RS facing, join cream in the first st of Row 6. Work as for the upper wing, but put the 2 sc in the 12th st of the arc. (24 + 1 = 25 sc on the arc) Then work 2 sc in each of the 6 row-ends on each straight edge (12 + 12 = 24 sc). (49 sc and 2 corner ch-1 sps)
Lower wing, Round 2: Ch 1, sc in the first st, then [sk 1, shell in next, sk 1, sc in next] 6 times. Sc in the corner sp, sc in the next 24 sts, then sc in the next corner sp. Join. (Arc: 7 sc and 6 shells. Straight sides: 26 sc.)
Why the math works:
– Each shell repeat uses 4 sts. A run of 4n + 1 stitches starts and ends with a sc, and both 37 (9 repeats) and 25 (6 repeats) fit that rule.
– At 4 sc per inch, 37 sc covers 9.25 in (23.5 cm), which matches the 9.4 in (23.9 cm) arc of the upper wing.
– On the lower wing, 25 sc covers 6.25 in (15.9 cm), which matches its 6.3 in (16.0 cm) arc. The border gently pulls in the slightly full dc fans so they lie flat.
Final Blocking
- Before you assemble, mist each piece lightly and pin it to its checkpoint size.
- For the wings, pin each shell into a rounded point, keep the straight edges straight and let them dry.
- After assembly, lay the holder face down, mist the back and smooth the wings flat.
- Insert a phone-sized piece of card wrapped in plastic into the pocket so it dries in shape.
- Let everything dry completely before hanging.
Final Quality-Control Checklist
- Each upper wing measures 5 in (12.7 cm), and each lower wing measures 3.5 in (8.9 cm).
- There are 9 shells on each upper wing and 6 on each lower wing, with no ruffling.
- The body measures 8 in × 1.25 in (20.3 × 3.2 cm) and is centered.
- The pocket measures 4 in × 5.5 in (10.2 × 14.0 cm), and the cable slot is open.
- The loop is reinforced and holds when you tug it firmly.
- All yarn tails are woven in securely.
Troubleshooting
- The wing cups: You are adding too few stitches. Check that each row has 4 more sts than the row before.
- The wing ruffles: Your tension is loose. Go down a hook size, or block it firmly.
- The shells don’t come out even: Recount Round 1. The arc must have exactly 37 sts on an upper wing and 25 on a lower wing.
- The pocket is too loose: Use a smaller hook or leave out 2 sts, but keep the total an even number.
- The panel sags when it hangs: Add an extra line of stitching between the pocket and the body.
Care
Hand wash in cool water and lay flat to dry, reshaping the wings as it dries. Do not wring or tumble dry it.
Final Notes
Here is how the measurements fit together:
– Gauge of 14 dc per 4 in (10.2 cm) gives fans of 4.5 in (11.4 cm) and 3 in (7.6 cm).
– A 0.5 in (1.3 cm) border brings the wings to 5 in (12.7 cm) and 3.5 in (8.9 cm).
– Joined at the center, the wings make a 10 in × 8.5 in (25.4 × 21.6 cm) butterfly.
– The 8 in (20.3 cm) body and the 4 in × 5.5 in (10.2 × 14.0 cm) pocket sit centered on top.
If you check each number as you go, the finished piece will come out right.
Happy crocheting!