

The Marigold Lattice panel is a light, airy curtain made from square flower blocks. Each block has a chunky four-petal flower floating in an open cream mesh frame, so daylight comes through without the room feeling bare.
The palette is mustard yellow, warm gray and soft cream. Flower colors are arranged in a diagonal pattern. Raised mustard ridges divide the columns, small gray bow-ties sit between the flowers, and a textured mustard border and tabs finish the panel in a farmhouse-meets-boho style.
This pattern uses US crochet terms. One finished panel measures 20.5 x 62 in (52.1 x 157.5 cm), not counting the tabs. The photo shows a matching pair, so make two panels if you want the same look.
To build it, you make 30 blocks and join them into 3 columns of 10 blocks with cream slip stitch. Then you join the columns with a mustard single crochet ridge, add three border rounds, sew on the gray bow-ties and attach five tabs.
Finished Size and Construction
- Finished size (one panel): 20.5 x 62 in (52.1 x 157.5 cm), not counting tabs
- Skill level: Intermediate
- Terminology: US
- Yarn weight: Worsted (#4), cotton or cotton blend
- Hook: 5.0 mm (H-8)
- Number of pieces: 30 blocks, 27 bow-ties, 5 tabs
- Layout: 3 blocks wide x 10 blocks tall
- Block size: 6 x 6 in (15.2 x 15.2 cm), 23 dc per side
- Size before border: 18.5 x 60 in (47.0 x 152.4 cm)
- Border depth: about 1 in (2.5 cm)
Materials
Use a smooth, mercerized or matte cotton in worsted weight. Cotton shows the stitches clearly, keeps its shape when hung and doesn’t fuzz in sunlight. The amounts below assume about 85 m per 50 g.
For one panel:
– Color A, mustard: 200 g (340 m)
– Color B, warm gray: 100 g (170 m)
– Color C, cream: 500 g (850 m)
Double all amounts for a pair. These quantities include a margin of about 15–20% for gauge differences and swatching.
Tools:
– 5.0 mm (H-8) crochet hook
– Tapestry needle
– Stitch markers
– Scissors
– Rust-proof pins and a blocking surface
– Spray bottle
– Measuring tape
Abbreviations (US Terms)
- ch – chain
- sl st – slip stitch
- sc – single crochet
- hdc – half double crochet
- dc – double crochet
- tr – treble crochet
- dtr – double treble crochet
- sk – skip
- sp – space
- st(s) – stitch(es)
- RS / WS – right side / wrong side
- BLO – back loop only
Special stitches:
– 2-dc cluster: Yarn over, insert the hook, pull up a loop, yarn over and pull through 2 loops. Repeat once more in the same place, then yarn over and pull through all 3 loops on the hook.
– Crab stitch (reverse sc): Work sc from left to right (right-handed), inserting the hook into the next stitch to the right.
Gauge and Checkpoints
Make one complete block before anything else. The block is your gauge swatch, and every later measurement depends on it.
Base gauge: about 15 dc = 4 in (10.2 cm).
Block checkpoints:
– After Round 1: center about 1.25 in (3.2 cm) across
– After Round 2: flower about 3.25 in (8.3 cm) from petal tip to petal tip
– After Round 4: about 4.5 in (11.4 cm) square
– After Round 5: about 5.25 in (13.3 cm) square
– After Round 6: 6 in (15.2 cm) square, 23 dc per side
If your block is bigger than 6 in (15.2 cm), go down to a 4.5 mm hook. If it is smaller, go up to a 5.5 mm hook. A difference of 0.25 in (0.6 cm) per block grows to 2.5 in (6.4 cm) over 10 blocks, so fix gauge now.
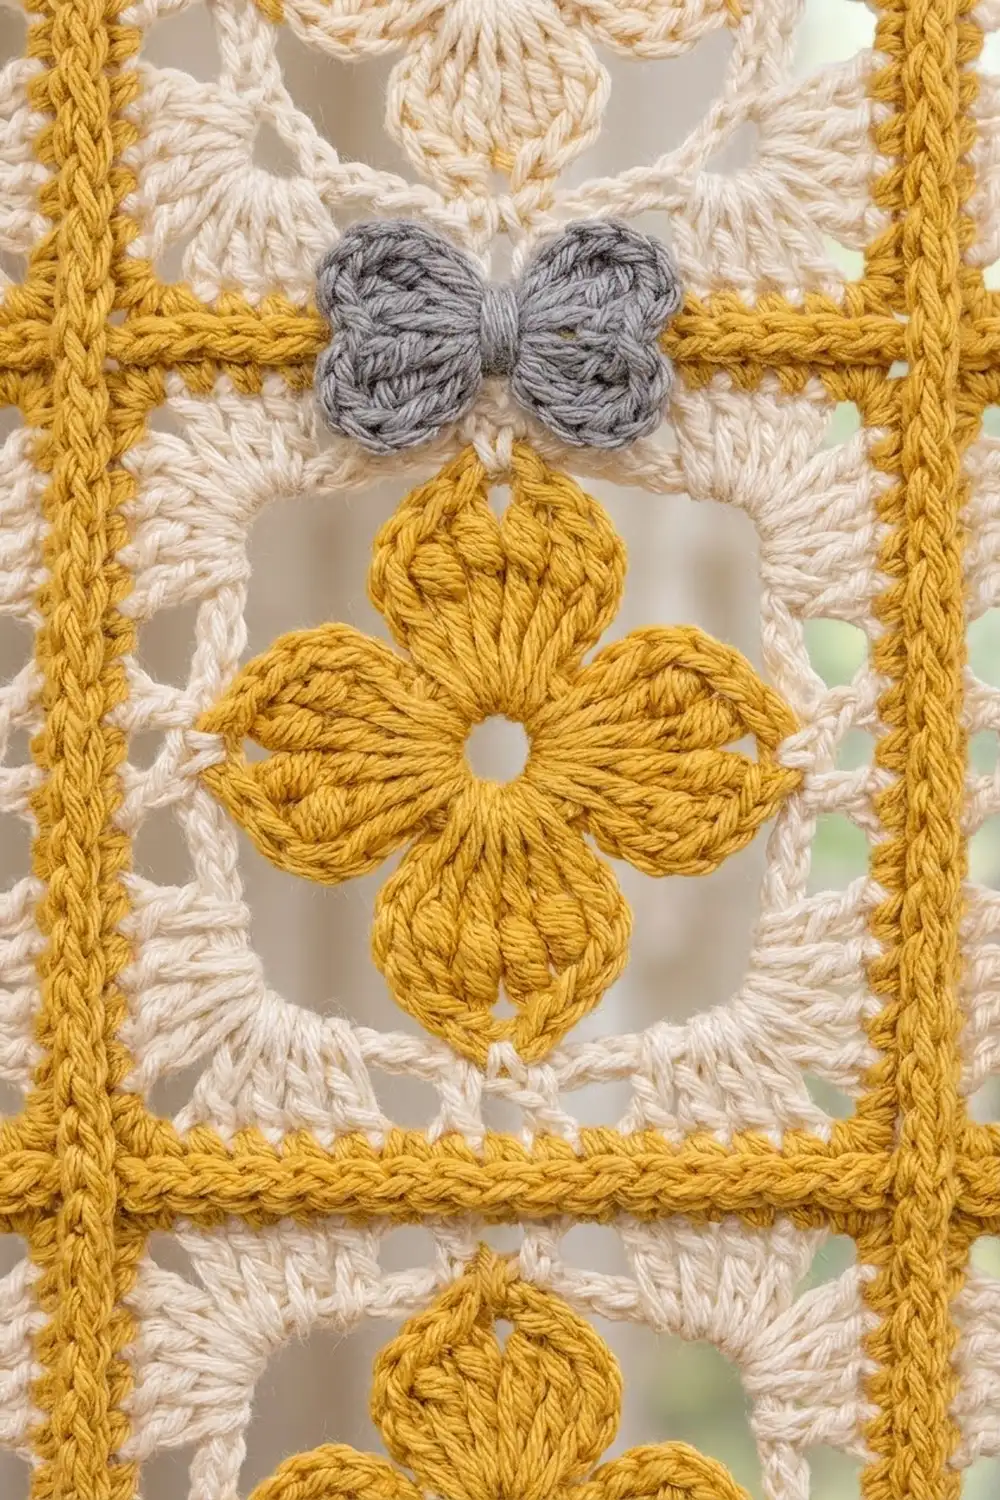
Flower Block (Make 30)
Use Color A, B or C for Rounds 1–2 (the flower), as shown in the layout below. Use Color C for Rounds 3–6 (the frame).
Round 1 (flower color): Make a magic ring. Ch 3 (counts as dc), then work 11 dc in the ring. Pull the ring snug but leave a small open center. Sl st to the top of ch-3. (12 dc)
Round 2 (petals): Ch 1. Sc in next st, (hdc, dc, 3 tr, dc, hdc) in next st, sc in next st; repeat from * 3 more times. Sl st to the first sc. Fasten off. (36 sts: 4 petals of 9 sts each)*
Each petal fans out from a single stitch, and the middle tr is the petal tip. Two sc sit side by side between neighboring petals.
Round 3 (Color C, framing): With RS facing, join C with sc in the center tr of any petal. Ch 5, then work (dtr, ch 3, dtr) in the space between the 2 sc of the neighboring petals. Ch 5, sc in the center tr of the next petal; repeat from * 3 more times, leaving out the last sc. Sl st to the first sc. (4 sc, 8 dtr, 8 ch-5 sps, 4 ch-3 corner sps)*
The petal tips now point to the middle of each side, and the dtr pairs make the corners.
Round 4: Ch 3 (counts as dc). 5 dc in next ch-5 sp, dc in next dtr, (2 dc, ch 2, 2 dc) in corner ch-3 sp, dc in next dtr, 5 dc in next ch-5 sp, dc in next sc; repeat from * 3 more times, ending the last repeat at *. Sl st to the top of ch-3.
This is a conversion round. Each side has 13 sts worked into the Round 3 sts and spaces (1 + 5 + 1 + 5 + 1), plus 2 + 2 corner dc, for 17 dc per side between corner ch-2 sps (68 dc total).
Round 5 (mesh): Sl st in the next 8 dc and into the corner ch-2 sp. Ch 6 (counts as dc + ch 3), then dc in the same sp. Ch 1, sk next dc, (dc in next dc, ch 1, sk next dc) 8 times, (dc, ch 3, dc) in next corner sp; repeat from * 3 more times, ending the last repeat at *. Sl st to the 3rd ch of the beginning ch-6.
Per side: 8 dc + 9 ch-1 sps = 17 sts between corners, plus 1 corner dc at each end.
Round 6: Sl st into the corner ch-3 sp. Ch 3 (counts as dc), then (dc, ch 2, 2 dc) in the same sp. Dc in next corner dc, (dc in next ch-1 sp, dc in next dc) 8 times, dc in next ch-1 sp, dc in next corner dc, (2 dc, ch 2, 2 dc) in next corner sp; repeat from * 3 more times, ending the last repeat at *. Sl st to the top of ch-3. Fasten off and weave in the ends.
This is a conversion round. Each side has 19 sts worked 1 into each Round 5 st and space (1 + 16 + 1 + 1), plus 2 + 2 corner dc, for 23 dc per side between corner ch-2 sps (92 dc total). The 23 count already includes that side’s corner dc.
Checkpoint: 6 x 6 in (15.2 x 15.2 cm).
Bow-Tie Accent (Make 27, Color B)
Make a magic ring. Ch 3, 2-dc cluster in ring, ch 3, sl st in ring; repeat from * once more. Pull the ring tight and fasten off, leaving a 6 in (15.2 cm) tail. (2 petals)*
Each bow-tie is about 1.5 in (3.8 cm) wide.
Tab (Make 5, Color A)
Ch 9. Starting in the 3rd ch from the hook, hdc in each ch across (the first ch-2 does not count). (7 hdc)
Rows 2–21: Ch 2 (does not count), turn, hdc in each st across. (7 hdc)
Each tab is about 1.75 x 8 in (4.4 x 20.3 cm). Fasten off, leaving a 12 in (30.5 cm) tail.
Make All Pieces
Make 10 blocks with each flower color:
- A (mustard flower): 10 blocks
- B (gray flower): 10 blocks
- C (cream flower): 10 blocks
Lay the blocks out with RS up:
Row 1:  A  B  C
Row 2:  B  C  A
Row 3:  C  A  B
Row 4:  A  B  C
Row 5:  B  C  A
Row 6:  C  A  B
Row 7:  A  B  C
Row 8:  B  C  A
Row 9:  C  A  B
Row 10: A  B  C
Each column has a mix of all three colors, and the diagonals repeat every three rows. Take a photo of the layout before you start joining.
Joining
Step 1: Join blocks into columns (Color C). Put two blocks RS together. Join C in the matching corner ch-2 sps and work 1 sl st through both layers. Sl st in the BLO of each matching pair of 23 dc, then sl st in the matching corner ch-2 sps at the other end. (25 sl st per seam)
Work stitch to stitch: 23 dc meet 23 dc, so the seam can’t stretch. Repeat until each column is 10 blocks tall, with 9 seams per column.
Checkpoint: Each column should measure 6 x 60 in (15.2 x 152.4 cm). Each long side has 10 x 23 = 230 dc.
Step 2: Join the columns (Color A). Put two columns WS together so the ridge sits on the RS. Join A at the top in the first pair of dc. Sc through both layers in each pair of matching dc. At each of the 9 horizontal seams, work 1 sc through both pairs of joined corner sps. (230 + 9 = 239 sc per seam)
Repeat for the second column seam.
Tension: Keep the sc loose and even. Hold the joined part flat on a table every 2–3 blocks. If the seam pulls in, the panel will gather when it hangs.
Size checkpoint: 18.5 x 60 in (47.0 x 152.4 cm). Each raised seam adds about 0.25 in (0.6 cm) of width.
Border (Color A)
Border gauge: Sc, hdc and crab stitch are each about as wide as one dc. Working 1 border stitch into each dc keeps the edges the same length as the joined blocks, so they won’t ruffle or pull in.
Round 1: With RS facing, join A in the top right corner ch-2 sp. Ch 1, then work (sc, ch 2, sc) in the same sp. Sc in each dc around. At each seam along the edge, skip the joined corner sps and the column-seam ridges, adding no stitches. Work (sc, ch 2, sc) in each outer corner sp. Sl st to the first sc.
- Long sides: 10 x 23 = 230 sc + 2 corner sc = 232 per side
- Short sides: 3 x 23 = 69 sc + 2 corner sc = 71 per side
- Total: 2(230) + 2(69) + 8 = 606 sc
Round 2: Sl st into the corner sp. Ch 2 (does not count), then (hdc, ch 2, hdc) in the same sp. Hdc in each sc around, working (hdc, ch 2, hdc) in each corner sp. Sl st to the first hdc.
- Long sides: 232 + 2 = 234 per side
- Short sides: 71 + 2 = 73 per side
- Total: 614 hdc
Round 3: Ch 1. Work crab stitch in each hdc around, with 2 crab stitches in each corner sp. Sl st to the first st. Fasten off.
- Long sides: 234 + 2 = 236 per side
- Short sides: 73 + 2 = 75 per side
- Total: 622 sts
Each round adds exactly 1 stitch per side at each corner and nothing else. That’s why the corners stay square while the edges stay straight. The border adds about 1 in (2.5 cm) on every side: 18.5 + 2 = 20.5 in (52.1 cm) wide and 60 + 2 = 62 in (157.5 cm) long.
Finishing Details
Bow-ties: On each horizontal seam inside a column, center one bow-tie between the two flowers with the petals pointing left and right. Sew it down through the center ring and the tip of each petal. (9 per column, 27 total)
Tabs: Fold each tab in half. Sew both ends to the WS of the top border, overlapping it by 1 in (2.5 cm), so the loop rises about 3 in (7.6 cm) above the panel.
Place one tab at each top corner, one over each column seam and one at the center. Check that the gaps are even, about 2.9 in (7.4 cm), and adjust slightly if needed.
Final Blocking
- Weave in all remaining ends on the WS. Run each end along a stitch post in at least two directions.
- Lay the panel flat on blocking mats or a clean sheet on carpet, WS up.
- Pin the outer edge to 20.5 x 62 in (52.1 x 157.5 cm). Start at the four corners, then pin the midpoints, then fill in every 2–3 in (5.1–7.6 cm).
- Check that each block reads 6 in (15.2 cm) and that the seams run straight.
- Spray the panel until damp but not dripping.
- Gently open each flower’s petals and the frame’s mesh spaces with your fingers.
- Leave it to dry completely, usually 12–24 hours.
- Unpin it and hang it on the rod. Let it settle for a day before judging how it drapes.
Final Quality-Control Checklist
- 30 blocks, each 6 in (15.2 cm) with 23 dc per side
- Flower colors match the layout grid
- 25 sl st on each column seam and 239 sc on each mustard seam
- Border counts: 232/71, then 234/73, then 236/75 per side
- Panel measures 20.5 x 62 in (52.1 x 157.5 cm)
- 27 bow-ties centered on the seams
- 5 evenly spaced tabs, sewn securely
- No visible tails on the RS
Troubleshooting
- Petals cup instead of lying flat: Your Round 1 ring may be too tight. Leave a small center hole, and check that each petal has 9 sts.
- Frame corners curl: Your dtr are too tight. Pull each loop up to its full height.
- Block is not square: Count Round 4 again. Each side should have 17 dc.
- Mesh closes up: Make the ch-1 sps a little looser, and block with the mesh opened.
- Panel gathers when hung: The mustard seams are too tight. Rework them with a hook one size larger.
- Border ruffles: You probably added stitches at the seams. Use exactly 230 or 69 sts per side in Round 1.
- Tabs sag: Sew through both border rounds, not just the crab stitch edge.
Care
Hand wash cold or machine wash on a gentle cycle in a laundry bag, then lay flat to dry and reshape. Avoid hot tumble drying and long periods of hard direct sun, which can fade the mustard.

Final Notes
The measurements build in a chain:
- Each block is 6 in (15.2 cm) with 23 dc per side.
- Ten blocks make each column 60 in (152.4 cm) long.
- Three columns plus two 0.25 in (0.6 cm) ridges make 18.5 in (47.0 cm) of width.
- The 1 in (2.5 cm) border brings the panel to 20.5 x 62 in (52.1 x 157.5 cm).
If you check gauge at the first block and count at every checkpoint, the panel will come out square and hang straight. Make a second panel for the matching pair.
Happy crocheting!