

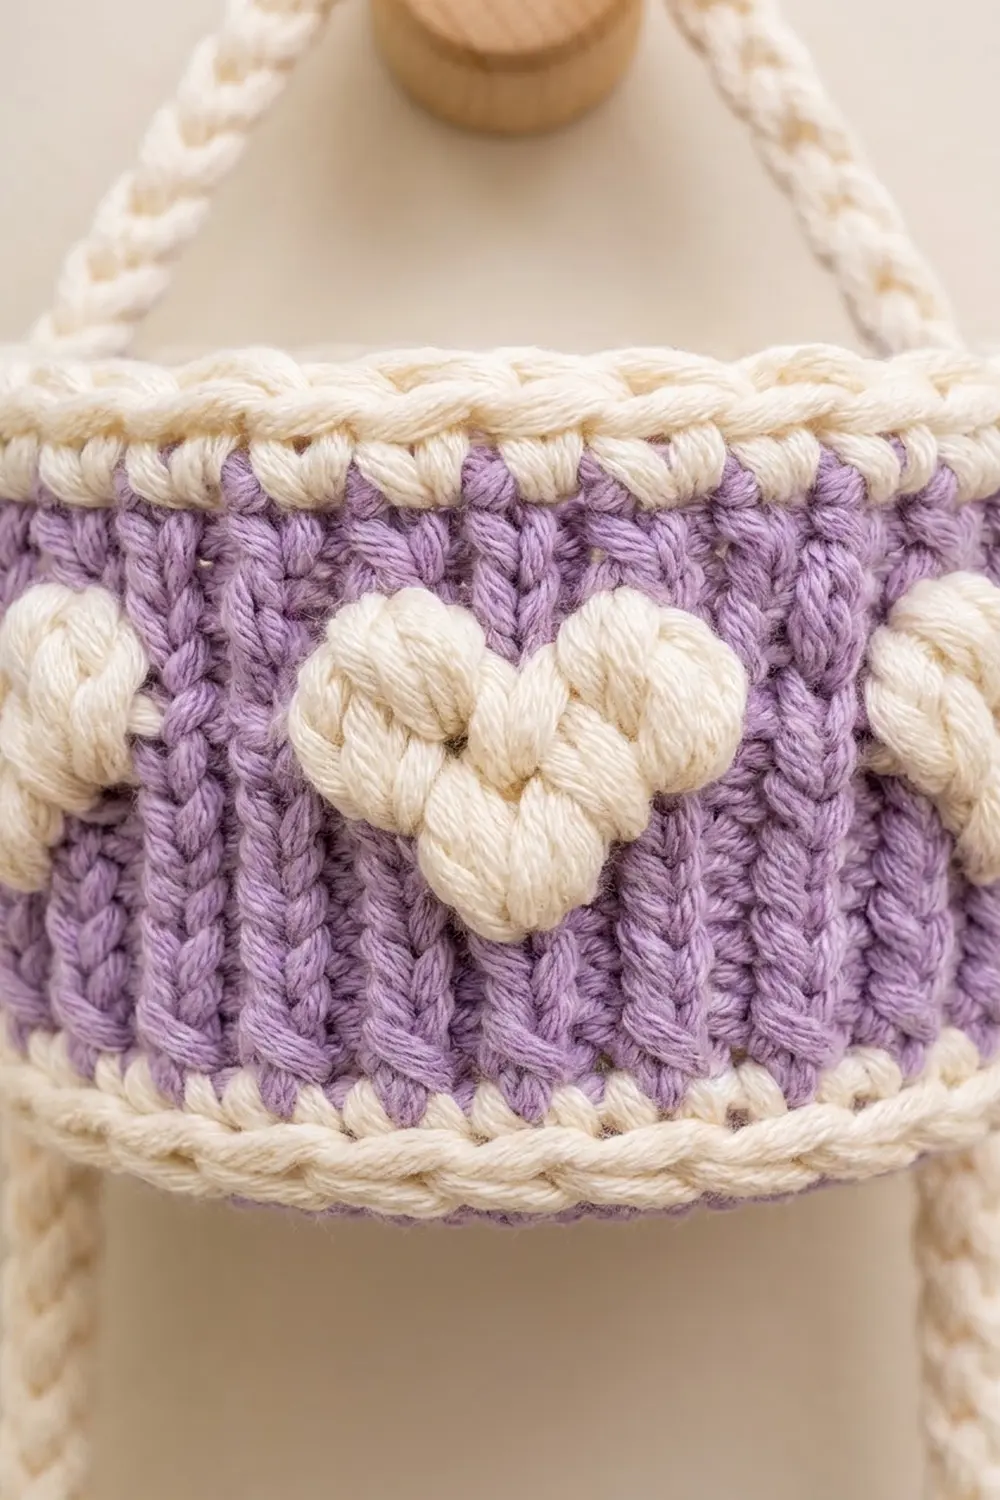
This hanging organizer has three stacked baskets in soft lavender. Each basket has a row of puffy cream hearts around the middle and cream rolled edges at the top and bottom. Two braided cream straps link the baskets and come together in a peak, so the whole piece hangs from a single peg or hook. Each basket holds one standard toilet roll, and the organizer also works well for washcloths, hair ties or small toiletries.
The style is cottage-sweet without being fussy. The lavender walls have a knit-look texture from waistcoat stitch. The cream edges are worked in reverse single crochet, which makes a firm rope-like roll that helps the baskets keep their shape.
The pattern uses US crochet terms. The baskets measure about 5.25 in (13.3 cm), 5.75 in (14.6 cm) and 6.25 in (15.9 cm) across, and each is about 3 in (7.6 cm) tall. Once assembled, the organizer hangs about 21.5 in (54.6 cm) from the peak to the bottom edge.
Construction is simple. You work each base flat in joined rounds and build the wall straight up from it. Next you make eighteen small heart appliqués and two braided cords. Finally, you sew the hearts on and stitch the cords up opposite sides of all three baskets.
Finished Size and Construction
- Finished size: about 21.5 in (54.6 cm) tall when hanging
- Skill level: Easy-intermediate
- Terminology: US
- Yarn weight: Worsted (#4), cotton or cotton blend
- Hook: 5 mm (H-8)
- Number of pieces: 23 (3 baskets, 18 hearts, 2 straps)
- Layout: 3 baskets stacked vertically, small at the top and large at the bottom
- Basket sizes: small 5.25 in (13.3 cm), medium 5.75 in (14.6 cm), large 6.25 in (15.9 cm) in diameter
- Wall height before the rim: about 2.5 in (6.4 cm)
- Rim depth: about 0.5 in (1.3 cm), which brings the total wall height to about 3 in (7.6 cm)
Materials
Cotton is the best choice for this project. It holds a crisp shape, survives a humid bathroom and makes very clear stitch definition. Avoid acrylic that is very soft or splitty, because it can make the baskets sag.
- Lavender: 90 g, about 180 m (197 yd)
- Cream: 60 g, about 120 m (131 yd)
- 5 mm (H-8) crochet hook
- Tapestry needle
- Stitch markers (at least 4)
- Scissors and a tape measure
- A jar or can about 5 in (12.7 cm) across, for blocking
The quantities above include a margin of about 25% for swatching and tails.
Abbreviations (US Terms)
- ch: chain
- sl st: slip stitch
- sc: single crochet
- dc: double crochet
- tr: treble crochet
- BLO: back loop only
- FLO: front loop only
- rev sc: reverse single crochet (crab stitch), worked from left to right
- st(s): stitch(es)
Waistcoat stitch (wsc): Insert your hook through the center of the “V” of the stitch below, between its two front legs rather than under the top loops, and complete a sc. This makes the vertical knit-look columns.
Puff stitch (puff): [Yarn over, insert hook, yarn over, pull up a loop] 3 times, then yarn over and pull through all 7 loops on the hook.
Gauge and Checkpoints
Gauge: 16 sc × 18 rounds = 4 in (10.2 cm). Waistcoat stitch gives the same stitch count with a slightly firmer fabric.
Make the small basket base first and use it as your gauge test. Check it at these points:
- After Rnd 4 (24 sts): about 2 in (5.1 cm) across
- After Rnd 8 (48 sts): about 3.75 in (9.5 cm) across
- After Rnd 11 (66 sts): 5.25 in (13.3 cm) across
If the base is too big, go down half a hook size. If it is too small, go up half a size. If the base ruffles, your increases are too tight for your tension, so go up a hook size rather than skipping increases. If it cups, go down a size.
Basket Base (Make 3 Sizes)
All rounds are joined with a sl st to the first st, then ch 1, which does not count as a stitch.
Use lavender.
- Rnd 1: Make a magic ring, ch 1, work 6 sc into the ring and join. (6)
- Rnd 2: Work 2 sc in each st. (12)
- Rnd 3: [Sc in next st, 2 sc in next st] 6 times. (18)
- Rnd 4: Sc in next st, 2 sc in next st, [sc in next 2 sts, 2 sc in next st] 5 times, sc in next st. (24)
- Rnd 5: [Sc in next 3 sts, 2 sc in next st] 6 times. (30)
- Rnd 6: Sc in next 2 sts, 2 sc in next st, [sc in next 4 sts, 2 sc in next st] 5 times, sc in next 2 sts. (36)
- Rnd 7: [Sc in next 5 sts, 2 sc in next st] 6 times. (42)
- Rnd 8: Sc in next 3 sts, 2 sc in next st, [sc in next 6 sts, 2 sc in next st] 5 times, sc in next 3 sts. (48)
- Rnd 9: [Sc in next 7 sts, 2 sc in next st] 6 times. (54)
- Rnd 10: Sc in next 4 sts, 2 sc in next st, [sc in next 8 sts, 2 sc in next st] 5 times, sc in next 4 sts. (60)
- Rnd 11: [Sc in next 9 sts, 2 sc in next st] 6 times. (66)
Small basket: Stop after Rnd 11. The final count is 66 sts and the base measures 5.25 in (13.3 cm) across.
- Rnd 12: Sc in next 5 sts, 2 sc in next st, [sc in next 10 sts, 2 sc in next st] 5 times, sc in next 5 sts. (72)
Medium basket: Stop after Rnd 12. The final count is 72 sts and the base measures 5.75 in (14.6 cm) across.
- Rnd 13: [Sc in next 11 sts, 2 sc in next st] 6 times. (78)
Large basket: Stop after Rnd 13. The final count is 78 sts and the base measures 6.25 in (15.9 cm) across.
Fasten off the lavender. From here on, S means the final stitch count of the base you are working on: 66, 72 or 78.
Basket Wall
There are no increases in the wall, so every wall round has S stitches.
- W1 (conversion round): Join cream in any st. Work sc BLO in each st. The count is S worked 1 per existing st + 0 added = S. This round makes the base turn up into a wall and leaves a ring of free front loops on the last base round.
- W2: Sc in each st. (S) Fasten off the cream.
- W3: Join lavender. Work wsc in each st. (S)
- W4–W11: Wsc in each st. (S) That gives 9 lavender rounds in total, which form a band about 2 in (5.1 cm) tall. Fasten off the lavender.
Checkpoint: The wall should now be about 2.5 in (6.4 cm) tall. The circumference should be 16.5 in (41.9 cm) for the small basket, 18 in (45.7 cm) for the medium and 19.5 in (49.5 cm) for the large.
Heart Appliqués (Make 18)
Use cream.
Make a magic ring and work the following into the ring: ch 3, 2 puff, 2 dc, ch 1, tr, ch 1, 2 dc, 2 puff, ch 3, sl st into the ring. That is 4 puffs, 4 dc and 1 tr.
Pull the ring tight so it closes into the dip at the top center of the heart. The tr forms the bottom point. Fasten off and leave a 10 in (25.4 cm) tail for sewing.
Each heart is about 1.25 in (3.2 cm) wide and 1 in (2.5 cm) tall.
Make All Pieces
- Lavender: 3 bases (66, 72 and 78 sts) and their walls (W3–W11)
- Cream: wall rounds W1–W2, the rims and bottom cords of all 3 baskets, 18 hearts and 2 straps
Hearts per basket: 6. Divide S into 6 equal segments of 11, 12 or 13 sts. Count from the join seam, which is st 1, and center the hearts in the lavender band over these stitches:
- Small: sts 6, 17, 28, 39, 50, 61
- Medium: sts 7, 19, 31, 43, 55, 67
- Large: sts 7, 20, 33, 46, 59, 72
Sew around each heart’s edge with the tail, catching only the outer layer of the wall.
Strap (make 2): Use cream held double and make a Romanian cord:
- Ch 2 and work a sc in the 2nd ch from the hook.
- Turn the work clockwise. Insert the hook into the single loop on the left side and work a sc.
- Turn clockwise again. Insert the hook under the 2 side loops on the left and work a sc.
Repeat step 3 until the cord is 22 in (55.9 cm) long. It should be about 0.5 in (1.3 cm) wide.
Layout:
        /\        peak (strap tops joined)
       /  \       8 in (20.3 cm) free strap per side
      |SMALL|     3 in (7.6 cm)
      |     |     2.5 in (6.4 cm) gap
     |MEDIUM|     3 in (7.6 cm)
     |      |     2.5 in (6.4 cm) gap
    | LARGE |     3 in (7.6 cm)
Joining
Finish the rims (see Border) and block the baskets before you join anything.
Stitch-to-stitch logic: Each strap covers one vertical column of stitches. Strap A sits over st 1, which hides the round-join seam. Strap B sits directly opposite it:
- Small: st 34
- Medium: st 37
- Large: st 40
Each pair of straps is exactly S/2 sts apart, so three hearts show between the straps on each side.
Method:
- Lay the large basket on its side. Align the bottom end of Strap A with W1 at st 1 and whipstitch both edges of the cord to the wall, one stitch per wall round, up to the top of the rim.
- Measure a 2.5 in (6.4 cm) gap, then sew the strap up the medium basket over st 1 in the same way.
- Leave another 2.5 in (6.4 cm) gap and sew it up the small basket over st 1. About 8 in (20.3 cm) of strap remains free.
- Repeat steps 1–3 with Strap B over the opposite stitches.
- Bring the free ends together, overlap them by 0.5 in (1.3 cm), and sew them firmly through all layers to form the peak.
Tension: Sew snugly but don’t pull hard, or the wall will pucker. Check that every gap between baskets is level by hanging the piece before you weave in the ends.
Size checkpoint: The hanging height should be about 21.5 in (54.6 cm).
Border (Top Rim and Bottom Cord)
Border gauge: The rim uses the same 16 sts per 4 in (10.2 cm) as the wall. The three rim rounds add about 0.5 in (1.3 cm) of height.
- W12: Join cream. Work sc in each st. (S)
- W13: Sc in each st. (S)
- W14: Ch 1 and work rev sc in each st. (S) Fasten off.
- Bottom cord: Turn the basket upside down. Join cream in any free front loop left on the last base round. Ch 1 and work rev sc FLO in each loop. (S) Fasten off.
Final counts: 66, 66, 66 and 66 for the small basket; 72 for each round of the medium; 78 for each round of the large.
Why the math works: The rim is worked 1 st per st over a wall with no increases, so it stands straight instead of flaring or pulling in. The bottom cord uses the S front loops left free by W1, so it fits the base edge exactly, with no stitches to skip or add.
Final Blocking
- Weave in all ends, except the strap tails you still need for adjustments.
- Dampen each basket with a spray bottle until it is evenly moist.
- Slide the basket over a jar or can about 5 in (12.7 cm) wide. For the larger baskets, stuff around the jar with a towel.
- Press the base flat against a table and pinch the rims round.
- Leave it to dry completely, which takes about 12 hours.
- Steam the straps lightly and smooth them straight.
Final Quality-Control Checklist
- The bases have exactly 66, 72 and 78 sts.
- Every wall round matches its base count.
- The hearts are centered in the lavender band, with about 0.5 in (1.3 cm) above and below.
- Each basket shows three hearts between its straps on both sides.
- The straps sit over the seam stitch and its opposite stitch.
- The gaps between baskets are 2.5 in (6.4 cm) and level.
- The peak is sewn securely through all layers.
- The total hanging height is about 21.5 in (54.6 cm).
Troubleshooting
- Base ruffles: Your tension on increases is too loose. Go down a hook size, or check your increase count.
- Base cups: You missed increases. Recount against the round totals.
- Wall flares: Your waistcoat stitch is too loose. Go down half a hook size for W3–W11.
- Waistcoat stitch is hard to insert into: Loosen the previous round, or use a pointed hook.
- Hearts look flat: Pull the magic ring tighter and keep the puffs plump.
- Baskets tilt: The straps are sewn off-center. Re-sew them over exactly opposite stitches.
- Rim waves: You added stitches. Rim rounds must equal S.
Care
Hand wash in cool water, reshape over a jar and lay flat to dry. Avoid hot dryers, which can shrink cotton and distort the bases.

Final Notes
Everything in this pattern follows one measurement chain. First, a 16-stitch gauge gives bases of 5.25 in (13.3 cm), 5.75 in (14.6 cm) and 6.25 in (15.9 cm). Next, the walls are worked straight on 66, 72 and 78 sts to about 3 in (7.6 cm), and the hearts are spaced on six equal segments. Last, the 22 in (55.9 cm) straps take up three walls and two gaps and leave 8 in (20.3 cm) for the peak, for a finished height of about 21.5 in (54.6 cm). Check your gauge early and count every round, and the organizer will hang straight.
Happy crocheting!