

The Rosy Bowtie Lace Door Panel is a light, airy curtain for a door window or a narrow sidelight. Two columns of stacked bowtie motifs run down the panel, separated by clean filet mesh strips. Daylight shows through the fans and makes the stitch pattern stand out.
It is worked in one solid dusty rose cotton, which gives a soft vintage look that suits farmhouse, cottage and romantic rooms. One color also means there are no ends to carry and no color changes to manage.
The pattern uses US crochet terms. The finished panel measures 13.25 in x 31 in (33.7 cm x 78.7 cm) before the bottom loop edging. With the edging it is 31.25 in (79.4 cm) long. The rod tabs are extra.
You work the whole panel flat in rows from the bottom up as one piece. A two-round single crochet border goes around it, and then you add five tabs at the top, five at the bottom, and a small chain-loop edging along the bottom. Nothing is sewn together except the tab ends.
Finished Size and Construction
- Finished size: 13.25 in x 31 in (33.7 cm x 78.7 cm); 31.25 in (79.4 cm) long with the bottom edging
- Skill level: Intermediate (clusters, fans, filet mesh)
- Terminology: US
- Yarn weight: #4 worsted, cotton or cotton blend
- Hook: 5.0 mm (H-8)
- Number of pieces: 1 panel, worked in one piece
- Layout: 5 vertical columns: mesh / bowties / mesh / bowties / mesh
- Piece size before border: 12.25 in x 30 in (31.1 cm x 76.2 cm)
- Border depth: 0.5 in (1.3 cm) on each side
- Tabs: 1.25 in (3.2 cm) wide, folded loops 1.25 in (3.2 cm) deep
Materials
Yarn: Use a smooth worsted-weight cotton or cotton blend. Cotton keeps the fans crisp, blocks well and stands up to sunlight on a door. Avoid fuzzy or very stretchy acrylic, because it blurs the lace and lets the panel sag.
- Dusty rose: 260 g, about 490 m (536 yd), based on a yarn of 100 g / 188 m (205 yd)
These quantities include a margin of roughly 10% plus enough for the gauge swatch.
Tools:
– 5.0 mm (H-8) crochet hook
– Tapestry needle
– Stitch markers (4)
– Measuring tape
– Blocking mat and rust-proof pins
– Spray bottle
– Two sash or café rods, 0.5 in (1.3 cm) in diameter, to fit your door
Abbreviations (US Terms)
- ch – chain
- sc – single crochet
- dc – double crochet
- tr – treble crochet
- sk – skip
- sp – space
- st(s) – stitch(es)
- FLO / BLO – front loop only / back loop only
- RS / WS – right side / wrong side
Special stitch – tr9tog (9-treble cluster across 17 stitches): *Yo twice, insert hook in the next st, yo and pull up a loop, (yo, draw through 2 loops) twice; sk the next st and repeat from * 8 more times. The legs go into the 1st, 3rd, 5th, 7th, 9th, 11th, 13th, 15th and 17th stitches, leaving 10 loops on the hook. Yo and draw through all 10 loops. The 9 spread legs gather into one top, which makes the narrowing half of the bowtie.
Stitch counting: Every chain-1 space and every chain inside a ch-8 counts as 1 stitch.
Gauge and Checkpoints
Gauge: 16 dc and 8 dc rows = 4 in (10.2 cm). Each dc row is 0.5 in (1.3 cm) tall and each tr row is 0.75 in (1.9 cm) tall.
Test one swatch first. The swatch is a one-bowtie sample:
– Ch 29.
– Work Rows 1–10 below over 27 stitches: 5 mesh, 17 motif, 5 mesh. Use the same instructions, but skip the center column and the second motif.
– After light blocking it should measure 6.75 in x 5.5 in (17.1 cm x 14.0 cm).
If the swatch is too big, go down one hook size. If it is too small, go up one hook size. If only the height is off, adjust how far you pull up the loops on your trebles before changing hooks.
Checkpoints on the panel:
– After Row 3: 12.25 in (31.1 cm) wide, 1.5 in (3.8 cm) tall
– After Row 9 (first bowtie): 5 in (12.7 cm) tall
– After Row 27 (four bowties): 15.5 in (39.4 cm) tall
– After Row 52: 30 in (76.2 cm) tall
– After the border: 13.25 in x 31 in (33.7 cm x 78.7 cm)
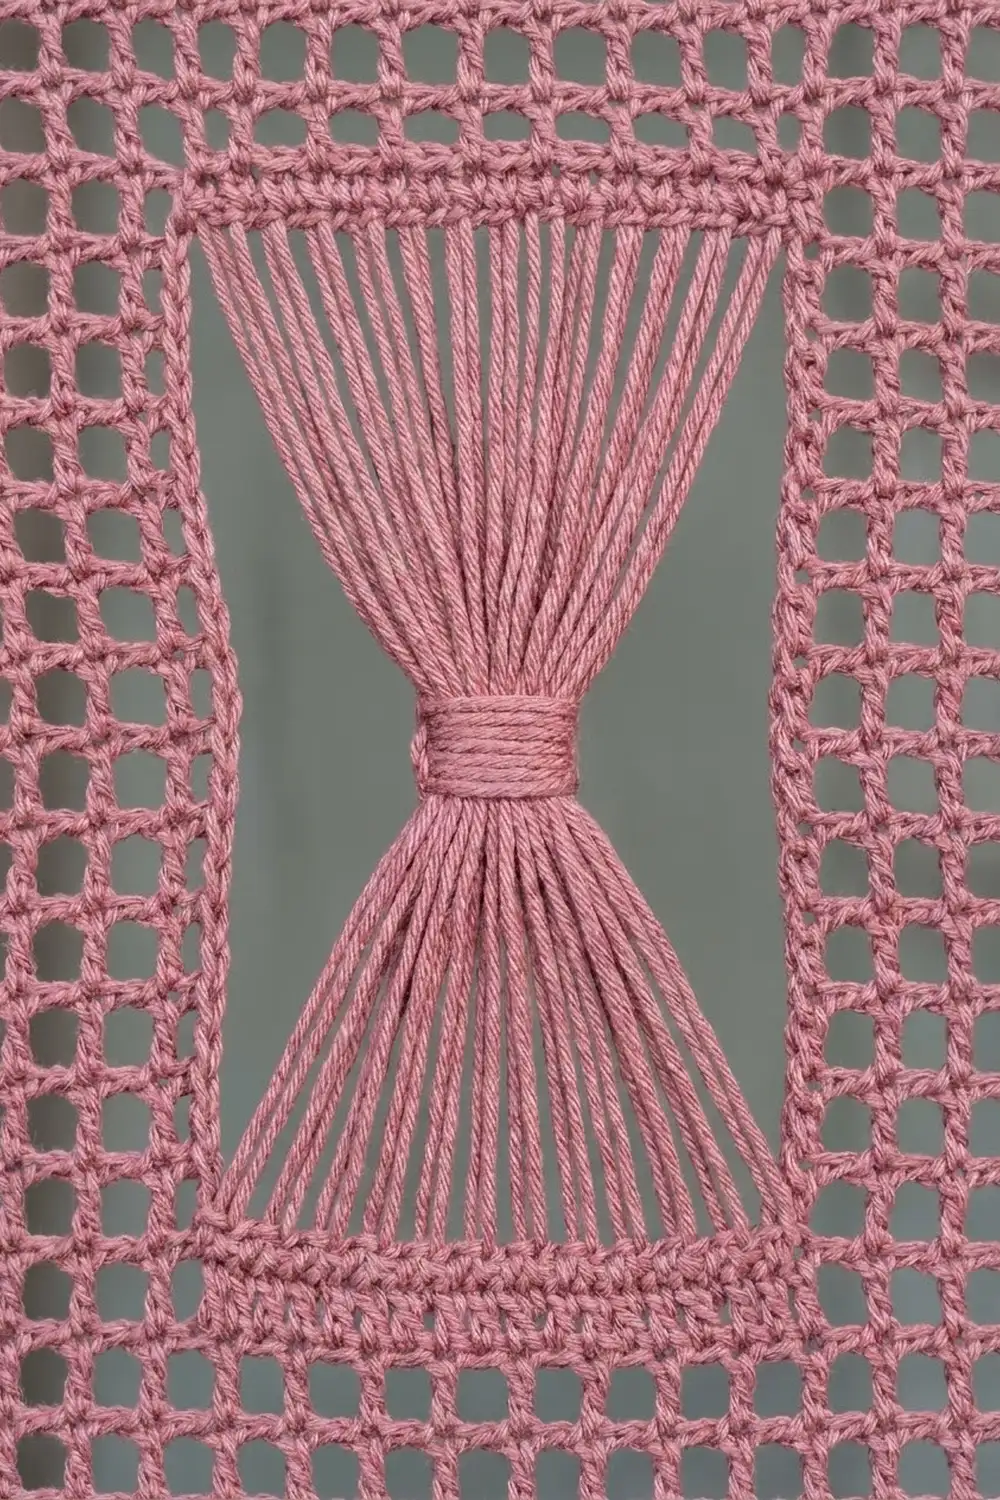
Panel Layout by Stitch
Each row has 49 stitches:
– Sts 1–5: left mesh (dc posts at 1, 3, 5)
– Sts 6–22: Motif A (17 sts)
– Sts 23–27: center mesh (dc posts at 23, 25, 27)
– Sts 28–44: Motif B (17 sts)
– Sts 45–49: right mesh (dc posts at 45, 47, 49)
The posts stay in the same positions on every row. That is what forms the straight vertical lines on either side of each bowtie column.
Panel
Ch 51.
Row 1 (RS): Dc in the 4th ch from the hook (the skipped ch counts as a dc), then dc in each ch across. (49 dc)
Row 2: Ch 3 (counts as dc throughout), turn. Ch 1, sk next st, dc in next st; repeat from * across, ending with a dc in the top of the turning ch. (25 dc + 24 ch-1 sps = 49 sts)*
Row 3: Ch 3, turn. Ch 1, sk ch-1 sp, dc in next dc; repeat from * across. (49 sts)*
Bowtie Repeat (Rows A–F)
Row A (bottom bar):
– Ch 3, turn. (Ch 1, sk sp, dc in next dc) twice. You are now at post 5.
– Dc in each of the next 17 sts (ch-sps and dc).
– Dc in next dc (post 23), then (ch 1, sk sp, dc in next dc) twice.
– Dc in each of the next 17 sts.
– Dc in next dc (post 45), then (ch 1, sk sp, dc in next dc) twice.
(43 dc + 6 ch-1 sps = 49 sts)
Row B (narrowing fans):
– Ch 4 (counts as tr throughout), turn. (Ch 1, sk next st, tr in next st) twice.
– Ch 8, tr9tog across the next 17 sts, ch 8, tr in the next st (post 23).
– (Ch 1, sk next st, tr in next st) twice.
– Ch 8, tr9tog across the next 17 sts, ch 8, tr in the next st (post 45).
– (Ch 1, sk next st, tr in next st) twice, finishing in the top of the turning ch.
(9 tr + 2 clusters + 32 ch in the four ch-8 arms + 6 ch-1 sps = 49 sts)
Each motif section counts as 8 + 1 + 8 = 17.
Row C (opening fans):
– Ch 4, turn. (Ch 1, sk sp, tr in next tr) twice.
– Sk the ch-8. In the top of the cluster work (tr, ch 1) 8 times, then tr. Sk the ch-8 and tr in the next tr (post 23).
– (Ch 1, sk sp, tr in next tr) twice.
– Work the same fan into the second cluster, then tr in post 45.
– (Ch 1, sk sp, tr in next st) twice.
(27 tr + 22 ch-1 sps = 49 sts)
Each fan is 9 tr + 8 ch = 17 sts. All 9 trebles sit in one point and spread up to the full motif width.
Row D (top bar): Work as Row A. In each motif, place 1 dc in each tr and each ch-1 sp. (43 dc + 6 ch-1 sps = 49 sts)
Rows E–F (mesh band): Work each row as Row 2, keeping a dc on top of every odd-numbered stitch. (25 dc + 24 ch-1 sps = 49 sts each)
Rows 4–51: Work Rows A–F a total of 8 times. (8 bowties per column)
Row 52: Ch 3, turn. Dc in each st and ch-1 sp across. (49 dc)
Do not fasten off. Check the size against the checkpoint: 12.25 in x 30 in (31.1 cm x 76.2 cm).
Row-height check:
– Row 1, Rows 2–3, 32 repeat dc rows and Row 52 = 36 dc rows x 0.5 in = 18 in (45.7 cm)
– 16 tr rows x 0.75 in = 12 in (30.5 cm)
– Total: 30 in (76.2 cm)
Border
Border gauge: 16 sc = 4 in (10.2 cm), and each sc round adds 0.25 in (0.6 cm).
Side counts: Work 2 sc into the end of every dc row and 3 sc into the end of every tr row. A dc row is 0.5 in tall, so 2 sc = 4 sc per inch. A tr row is 0.75 in tall, so 3 sc = 4 sc per inch. Both match the border gauge, so the sides lie flat without ruffling or pulling in.
Round 1: Ch 1. Do not turn.
– Top edge: 3 sc in the first st (corner), sc in each of the next 47 sts, 3 sc in the last st (corner).
– Left side: 120 sc along the row ends (36 dc rows x 2 = 72, plus 16 tr rows x 3 = 48).
– Bottom edge: work into the free loops of the foundation chain in the same way: 3 sc in the first, 47 sc, 3 sc in the last.
– Right side: 120 sc along the row ends.
– Join with a sl st to the first sc.
Per-side counts include both corner sc:
– Top and bottom: 1 corner + 49 + 1 corner = 51
– Each side: 1 corner + 122 + 1 corner = 124
– Total: 346 sts (4 corner groups of 3 = 12, + 47 + 47 + 120 + 120)
Round 2: Ch 1. Work 1 sc in each st and 3 sc in each corner sc. Join.
– Top and bottom: 53 each
– Sides: 126 each
– Total: 346 (worked one per stitch) + 8 (two extra at each corner) = 354 sts
Do not fasten off yet. The border is now 0.5 in (1.3 cm) deep on every side.
Top Tabs
Number the 53 top-edge stitches from corner to corner. The tabs go on sts 1–5, 13–17, 25–29, 37–41 and 49–53, which leaves even gaps of 7 sts. Check: 5 tabs x 5 + 4 gaps x 7 = 53.
For each tab:
1. Join yarn to the first st of the tab with RS facing.
2. Row 1: ch 1, sc in each of the 5 sts.
3. Rows 2–10: ch 1, turn, 5 sc.
4. Fasten off, leaving a 10 in (25.4 cm) tail.
5. Fold the tab to the WS and whipstitch the last row to the back of Round 1.
The tab is 2.5 in (6.4 cm) long before folding, which gives a loop 1.25 in (3.2 cm) deep. That fits a 0.5 in (1.3 cm) rod.
Bottom Tabs and Loop Edging
Bottom tabs: Number the 53 bottom stitches the same way. Work 5 tabs over the same stitch positions, but work Row 1 in the FLO. Finish and fold each tab exactly like the top tabs.
Edging (Round 3, bottom edge only): Join yarn at bottom st 1 and work across the bottom in the BLO:
– Sc in st 1, ch 3, sk next st, sc in next st; repeat from * 25 more times, ending in st 53.
– (27 sc + 26 ch-3 loops)*
– Fasten off.
The edging works because the tabs used only the front loops, so the back loops of all 53 stitches are still free. That means the loops run straight across the whole bottom without interruption.
Final Blocking
- Weave in all ends along solid dc bars or inside the border, never across the mesh.
- Pin the panel to 13.25 in x 31 in (33.7 cm x 78.7 cm), starting at the four corners.
- Pin along the sides every 2 in (5.1 cm), keeping the post columns perfectly straight.
- Place a pin at the top of each fan and at each end of each solid bar so every bowtie opens out evenly.
- Pin each bottom chain loop into a soft point.
- Spray until damp, not soaked. Pat gently.
- Let it dry completely. Check that it is square by measuring both diagonals; they should match.
Final Quality-Control Checklist
- Every row has 49 stitches. The posts sit at positions 5, 23, 27 and 45 all the way up.
- There are 8 bowties in each column, and the fans are centered between the posts.
- Every cluster has 9 legs in alternating stitches.
- Border Round 2 has 53 sts on the top and bottom and 126 on each side.
- There are 10 tabs (5 at the top, 5 at the bottom), all the same length and evenly spaced.
- The bottom edge has 26 chain loops.
- The blocked size is 13.25 in x 31 in (33.7 cm x 78.7 cm).
Troubleshooting
- Fans cup or ripple: Your trebles are too short. Pull up taller loops, or go up a hook size for Row C only.
- Bowties pucker at the waist: The ch-8 arms are too tight. Chain more loosely, or block more firmly.
- Panel leans or bias-twists: You may be missing the turning-chain stitch. Count to 49 on every row.
- Sides ruffle: Check that you worked 2 sc per dc row end and 3 per tr row end, with no extras.
- Sides pull in: Your border is too tight. Work Round 1 with a hook 0.5 mm larger.
- Tabs flare: Count 5 sc on every tab row.
Care
Hand wash in cool water with mild soap, roll it in a towel to remove water, and dry it flat in the blocked shape. Rotate the panel on the door now and then so it fades evenly in sunlight.
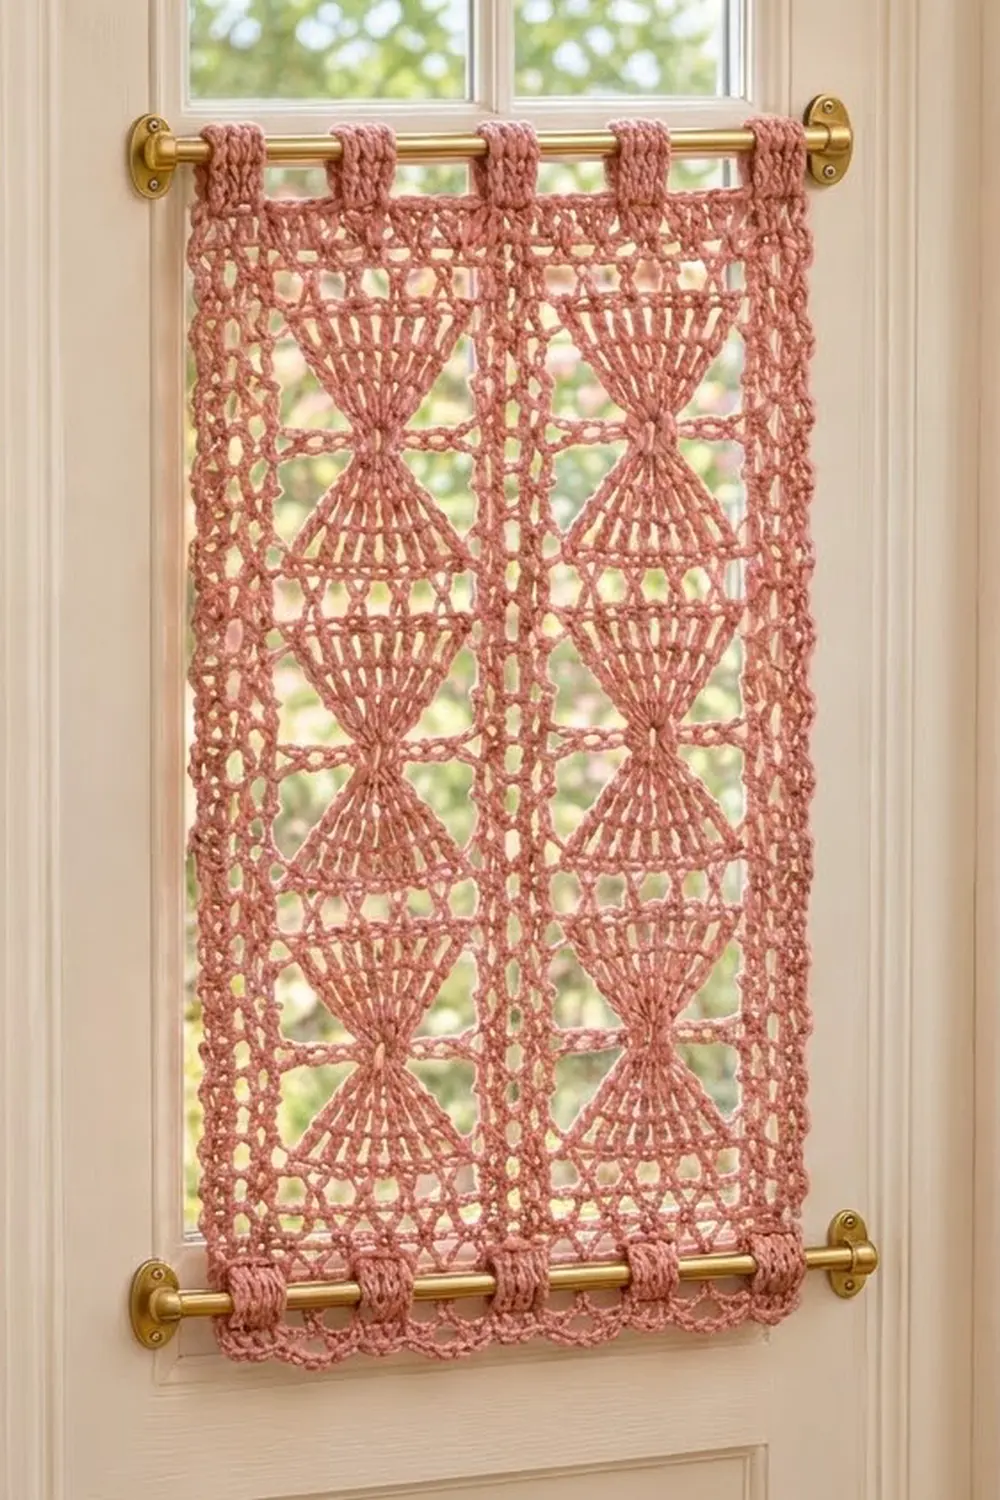
Final Notes
The measurements build on each other in a simple chain:
– 49 stitches at 4 per inch give a 12.25 in (31.1 cm) width.
– 36 dc rows plus 16 tr rows give 30 in (76.2 cm) of height.
– Two sc rounds at 0.25 in (0.6 cm) each frame it to 13.25 in x 31 in (33.7 cm x 78.7 cm).
– The tabs and the loop edging finish it for hanging.
If your swatch is right, the panel will be right. For a pair of French doors, make a second identical panel.
Happy crocheting!