

This valance is one open filet-mesh panel in cream cotton. Three dark teal hummingbirds with layered denim-blue wings fly among coral and mustard honeysuckle on climbing sage-green vines. A scalloped fan border finishes the bottom, and tab loops slide onto a curtain rod.
The style is cottage-garden lace. The mesh keeps the window bright, and the dimensional appliqués add color. The colors are cream, dark teal, denim blue, charcoal, coral, mustard and sage green.
The pattern uses US crochet terms. The finished valance measures 36¼ in (92.1 cm) wide and 18¼ in (46.4 cm) deep from the top edge to the scallop tips. The tabs add 2 in (5.1 cm) above that.
You work the mesh body flat from the top down. Then you add a single crochet round, a four-row scalloped band along the bottom, and eleven tabs. Last, you crochet the birds, flowers, leaves and vines and sew them to the mesh.
Finished Size and Construction
- Finished size: 36¼ in × 18¼ in (92.1 cm × 46.4 cm), plus 2 in (5.1 cm) tabs
- Skill level: Intermediate
- Terminology: US
- Yarn weight: Fingering (#1 super fine) mercerized cotton
- Hooks: 2.75 mm (US C-2) for the panel, 2.25 mm (US B-1) for the appliqués
- Number of pieces: 1 mesh panel, plus sewn-on appliqués
- Layout: Single panel, 90 mesh wide × 40 rows deep
- Panel size before border: 36 in × 16 in (91.4 cm × 40.6 cm)
- Border depth: ⅛ in (0.3 cm) on the top and sides; 2⅛ in (5.4 cm) on the bottom, including the scallops
Materials
Use a smooth, mercerized 100% cotton in fingering weight, about 170 m per 50 g. Cotton gives crisp mesh and washes well.
- Cream (panel, border, tabs): 200 g, 680 m
- Dark Teal (bird bodies and tails): 25 g, 85 m
- Denim Blue (wings): 25 g, 85 m
- Charcoal (beaks and eyes): 5 g, 17 m
- Coral (6 flowers): 20 g, 68 m
- Mustard (5 flowers and all stamens): 15 g, 51 m
- Sage Green (leaves and vines): 40 g, 136 m
All quantities include a margin of about 15%.
Tools: 2.75 mm and 2.25 mm hooks, tapestry needle, rustproof pins, stitch markers, blocking mats, measuring tape and spray bottle.
Abbreviations (US Terms)
- ch – chain
- sl st – slip stitch
- sc – single crochet
- hdc – half double crochet
- dc – double crochet
- sp(s) – space(s)
- st(s) – stitch(es)
- sk – skip
- rep – repeat
- RS / WS – right side / wrong side
Special stitches
- Mesh: dc, ch 2, sk 2. Each mesh is one dc post plus one ch-2 sp, which makes it 3 sts wide.
- Picot: ch 3, sl st in 3rd ch from hook.
- 3-dc bobble: (yarn over, insert hook, pull up a loop, yarn over, pull through 2 loops) 3 times in the same st, then yarn over and pull through all 4 loops.
- Sl st cord: chain the stated number, then sl st in the back bump of the 2nd ch from hook and of each ch across.
- French knot: an embroidery knot made by wrapping the yarn around the needle 3 times.
Gauge and Checkpoints
Panel gauge: 10 mesh and 10 rows = 4 in (10.2 cm) with the 2.75 mm hook. One mesh is 0.4 in (1.0 cm) square. Single crochet along any edge works out to 7.5 sts per inch.
Appliqué gauge: 7 sc = 1 in (2.5 cm) with the 2.25 mm hook.
Test one piece first. Ch 35 and work the mesh pattern for 10 rows (10 mesh wide). Then make one complete hummingbird and measure both.
Checkpoints:
- Row 1: 36 in (91.4 cm) wide
- Row 10: 4 in (10.2 cm) deep
- Row 20: 8 in (20.3 cm) deep
- Row 30: 12 in (30.5 cm) deep
- Row 40: 16 in (40.6 cm) deep
- Each scallop: 2.4 in (6.1 cm) wide
If your swatch is too big, go down 0.25 mm. If it is too small, go up 0.25 mm. Change the hook, not the stitch counts: the border and tab math depend on exactly 90 mesh and 40 rows.
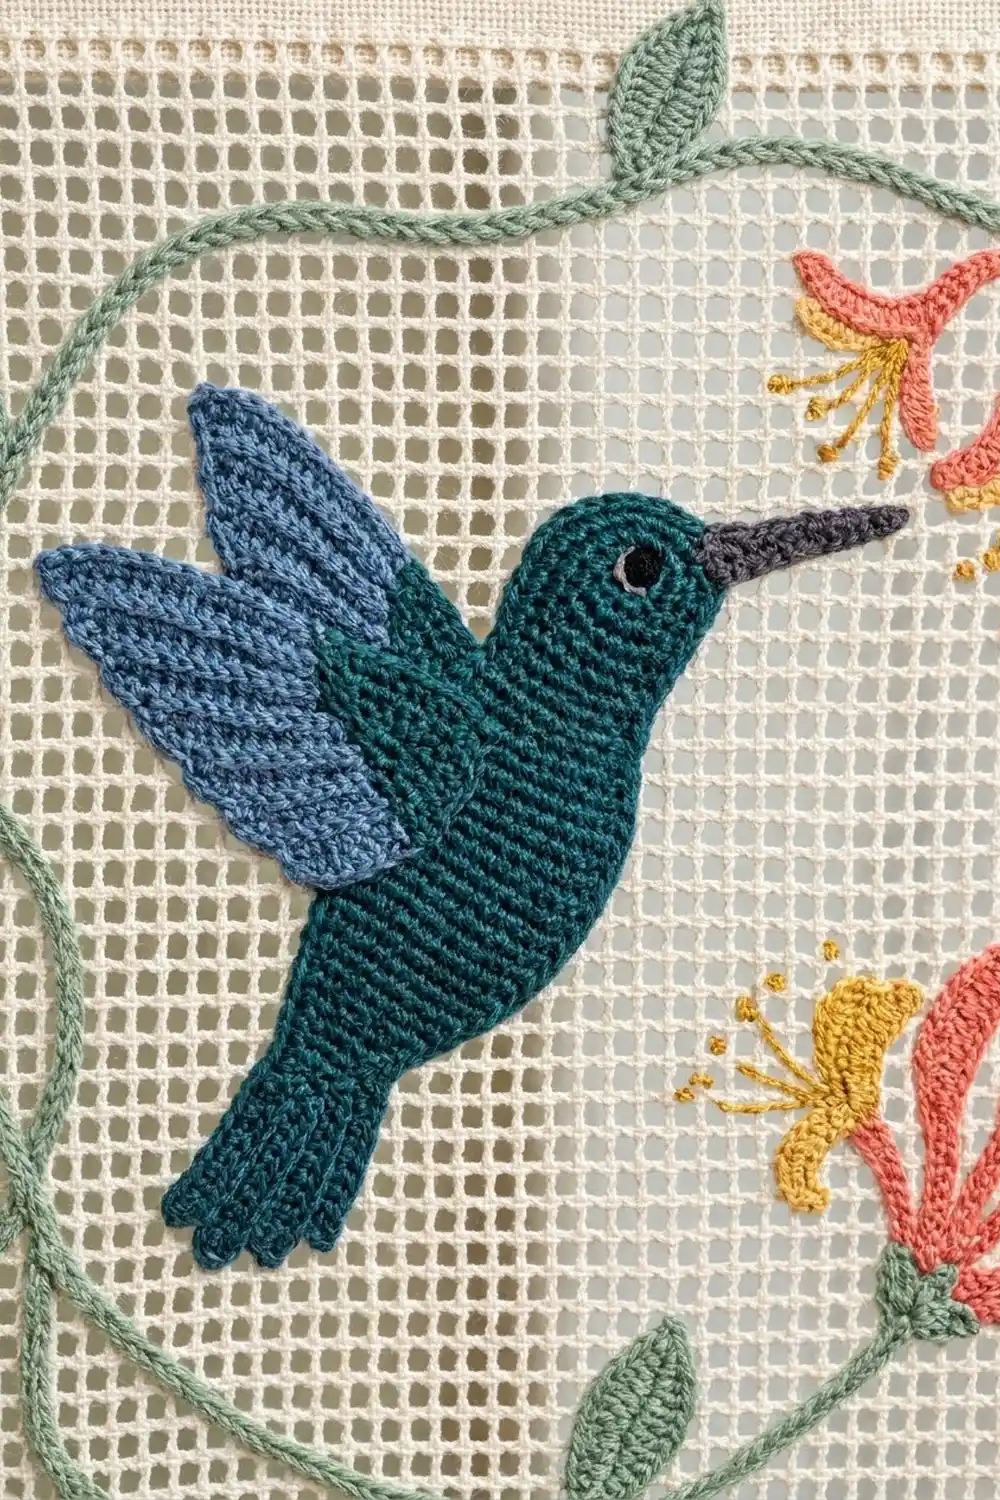
Mesh Panel
The panel is worked from the top down. After Row 2, choose the neater side as the RS.
Foundation: With Cream and the 2.75 mm hook, ch 275.
Row 1: Dc in 8th ch from hook (the skipped 7 ch count as dc + ch-2 sp). *Ch 2, sk 2 ch, dc in next ch; rep from * across. Turn. You have 90 mesh (91 dc).
Row 2: Ch 5 (counts as dc + ch 2). Sk the first ch-2 sp, dc in next dc. *Ch 2, dc in next dc; rep from * across, working the last dc in the top of the turning ch. Turn. You still have 90 mesh (91 dc).
Rows 3–40: Rep Row 2. The panel should measure 36 in × 16 in (91.4 cm × 40.6 cm). Do not fasten off.
Keep every dc post the same height. Uneven posts make the squares look crooked under the appliqués.
Hummingbird Appliqués (make 3)
Use the 2.25 mm hook for all appliqués. Leave 12 in (30.5 cm) tails for sewing.
Body (Dark Teal): Ch 15.
- Rnd 1: Start at the tail end with sc in 2nd ch from hook. Sc in next 2 ch, hdc in next 3, dc in next 6 and hdc in next ch. Work 5 hdc in the last ch (head). Working along the underside of the chain, hdc in next ch, dc in next 6, hdc in next 3 and sc in next 2. Work 2 more sc in the same ch as the first sc. Join. You have 32 sts.
- Rnd 2: Ch 1. Sc in the next 13 sts, then 2 sc in each of the next 5 sts (head). Sc in the next 12 sts, then 2 sc in each of the last 2 sts (tail end). Join. You have 39 sts.
Tail: Sl st in the first of the 4 tail-end sts. Ch 10, sc in 2nd ch from hook, hdc in next 3 ch, dc in next 5 ch (9 sts). Sl st in the same st and in the next st. Rep from * to * once more, then fasten off. The two feathers form the forked tail.
Beak (Charcoal): Join in the 5th of the 10 head sts. Ch 9, then sl st in the back bump of each ch back to the head (8 sl st). Sl st in the head and fasten off. The beak is about 1 in (2.5 cm) long.
Eye: With Charcoal, work a French knot 3 sts behind the base of the beak.
Checkpoint: The body is 2½ in (6.4 cm) long. The whole bird measures about 4¾ in (12.1 cm) from beak to tail tip.
Wings (Denim Blue, make 2 per bird, 6 total): Ch 5 for the base. Each feather grows from the base chain.
- Feather 1: Ch 17. Sc in 2nd ch from hook, hdc in next 3, dc in next 8, hdc in next 3, sc in next 1 (16 sts). Sl st in the base ch this feather grew from and in the next base ch.
- Feather 2: Ch 15. Sc in 2nd ch from hook, hdc 3, dc 6, hdc 3, sc 1 (14 sts). Sl st in next base ch.
- Feather 3: Ch 13. Sc in 2nd ch from hook, hdc 3, dc 4, hdc 3, sc 1 (12 sts). Sl st in next base ch.
- Feather 4: Ch 11. Sc in 2nd ch from hook, hdc 3, dc 2, hdc 3, sc 1 (10 sts). Sl st in next base ch.
- Outline: Ch 1. Sl st loosely around the whole wing, working into every st and every free foundation loop. This raised line gives each feather its ridged edge.
The longest feather measures 2¼ in (5.7 cm).
Honeysuckle, Leaves and Vines
Flower (make 6 in Coral and 5 in Mustard): Ch 4 and join into a ring.
- Rnd 1: Ch 1, work 10 sc in the ring and join. You have 10 sc.
- Rnd 2 (petals): Ch 13. Sc in 2nd ch from hook, sc in next 2, hdc in next 4, dc in next 5 (12 sts). Sk next sc and sl st in the following sc. Rep from * 4 more times for 5 petals. Fasten off.
- Stamens (Mustard): Join in the front loop of any Rnd 1 sc. Ch 12, work a 3-dc bobble in 4th ch from hook, then sl st in each of the next 8 ch. Sl st in the front loop of the next Rnd 1 sc. Rep from * 3 more times for 4 stamens. Fasten off.
When the petals are fanned out, each flower spans 3½ in (8.9 cm).
Leaf (Sage, make 28): Ch 11. Sc in 2nd ch from hook, hdc in next 2, dc in next 4, hdc in next 2. Work 3 sc in the last ch. Along the underside, work hdc 2, dc 4, hdc 2 and sc 1, then join. You have 21 sts. The foundation chain forms the center vein. Each leaf is 1½ in (3.8 cm) long.
Vines (Sage, sl st cord):
- 2 side vines, 20 in (50.8 cm) each: ch 141 (140 sl st)
- 1 center vine, 30 in (76.2 cm): ch 211 (210 sl st)
- 6 branches, 4 in (10.2 cm) each: ch 29 (28 sl st)
Attaching the appliqués: Sew these on only after the border is finished and the panel has had a first blocking. Lay the panel RS up and use the mesh as a grid. Count columns 1–90 from the left and rows 1–40 from the top.
- Side vines: pin them from the lower corners (columns 3 and 88, row 38) up toward row 4, curling inward.
- Center vine: pin it in a wave from column 8, row 36, through column 45, row 24, to column 82, row 34.
- Branches, leaves and flowers: add the branches, then leaves in pairs along the vines and flowers at the vine tips.
- Birds: place Bird 1 facing right at column 22, row 10. Place Bird 2 facing left at column 62, row 16. Place Bird 3 facing right at column 30, row 28. Put a flower near each beak.
For each bird, sew the body first, then the back wing. Sew the front wing over it, ½ in (1.3 cm) lower and angled toward the tail. Tack every piece with small stitches through the mesh posts, never across open spaces.
Border
Border gauge: 7.5 sc per inch on all four sides. That is 3 sts per mesh across the width and 3 sc per row-end down the sides.
Round 1: Continue from Row 40 along the bottom edge. Ch 1, then sc in each dc and 2 sc in each ch-2 sp (271 sc). Ch 2 for the corner.
Work 3 sc in each row-end down the side (120 sc), then ch 2. Along the foundation edge, work 1 sc at the base of each dc and 2 sc in each ch-2 sp (271 sc), then ch 2. Work the second side (120 sc), ch 2 and join.
Round 1 has 782 sc plus 4 corner ch-2 sps. In this pattern the corners are spaces, not stitches, so the side counts contain no corner sts. Do not fasten off.
Scallop band (bottom edge only, worked in rows):
- Row A: Ch 4 (counts as dc + ch 1). Sk next sc, dc in next sc. *Ch 1, sk 1, dc in next sc; rep from * across the bottom. Turn. You have 136 dc and 135 ch-1 sps.
- Row B: Ch 1, sc in first dc. Ch 4, sk next 4 ch-1 sps. In the next ch-1 sp, work (dc, ch 2) 3 times, then dc. Ch 4, sk next 4 ch-1 sps, sc in next dc. Rep from * 14 more times; the last sc goes in the 3rd ch of the turning ch. Turn. You have 15 shells and 16 sc.
- Row C: Ch 1, sc in first sc. Ch 3, sk ch-4 sp. Work 5 dc in each of the next 3 ch-2 sps. Ch 3, sk ch-4 sp, sc in next sc. Rep from * 14 more times. Turn. You have 15 fans of 15 dc each.
- Row D: Ch 1, sc in first sc. Work 3 sc in ch-3 sp. Sc in each of the next 15 dc, adding a picot after the 3rd, 6th, 9th and 12th sc. Work 3 sc in next ch-3 sp, then sc in next sc. Rep from * across. You have 331 sc and 60 picots. Fasten off.
Top tabs (make 11): Count the 271 top sc of Round 1. Start a tab at sc 1, 27, 53, 79, 105, 131, 157, 183, 209, 235 and 261.
- Row 1: With RS facing, join Cream and sc in 11 sts.
- Rows 2–28: Ch 1, turn, sc across (11 sc). Each tab is about 4 in (10.2 cm) long.
Fold each tab to the WS and whipstitch it behind its own 11 sts. This leaves a 2 in (5.1 cm) loop.
Why the math works:
- Bottom: 271 sts = 1 + (15 scallops × 18 sts), so the scallops end evenly at both corners. Each scallop covers 9 ch-1 sps of Row A, and Row B skips 4 sps on each side of the center sp.
- Top: 271 sts = (11 tabs × 11 sts) + (10 gaps × 15 sts), so the end tabs sit flush with the corners.
- Sides: a mesh row is as tall as a mesh is wide, so 3 sc per row matches the 3 sts per mesh along the top and bottom. All four edges have the same density.
Final Blocking
- Soak the valance in cool water for 15 minutes, then roll it in a towel to remove water.
- Lay it RS up on the mats and pin the top edge straight to 36¼ in (92.1 cm).
- Pin both sides square, so that the depth to the scallop tips is 18¼ in (46.4 cm).
- Pin each scallop into a smooth arc, and pin out every picot.
- Check with a long ruler that the mesh columns run straight up and down.
- Let it dry fully, then unpin. Lightly steam the appliqués from the WS without letting the iron touch the yarn.
Final Quality-Control Checklist
- [ ] 90 mesh × 40 rows, with none extra or missing
- [ ] Round 1: 271 / 120 / 271 / 120 sc, plus 4 corner sps
- [ ] 15 matching scallops, each 2.4 in (6.1 cm) wide
- [ ] 11 tabs, evenly spaced and folded to the same depth
- [ ] 3 birds, 6 wings, 11 flowers, 28 leaves and 9 vine pieces, all secured
- [ ] Ends woven into solid stitches, not mesh chains
- [ ] Valance measures 36¼ in × 18¼ in (92.1 cm × 46.4 cm)
Troubleshooting
- Panel slants: The turning chains are uneven. Use ch 5 every time and work the last dc into the top of the turning ch.
- Panel is narrower than 36 in (91.4 cm): The foundation chain is too tight. Chain it with a hook one size larger.
- Scallops ruffle: Change the ch-3 in Row C to ch 2, and keep the Row D sc snug.
- Scallops cup: Work the Row D sc more loosely, or block more firmly.
- Mesh puckers behind appliqués: The stitches cross open spaces. Re-tack through the dc posts only.
- Beak droops: Weave the beak tail back through its sl sts to stiffen it.
- Wings look flat: Tack only the base and center of the front wing so the feather tips can lift.
Care
Hand wash in cool water with mild soap. Lay flat to dry, and re-pin the scallops if needed.
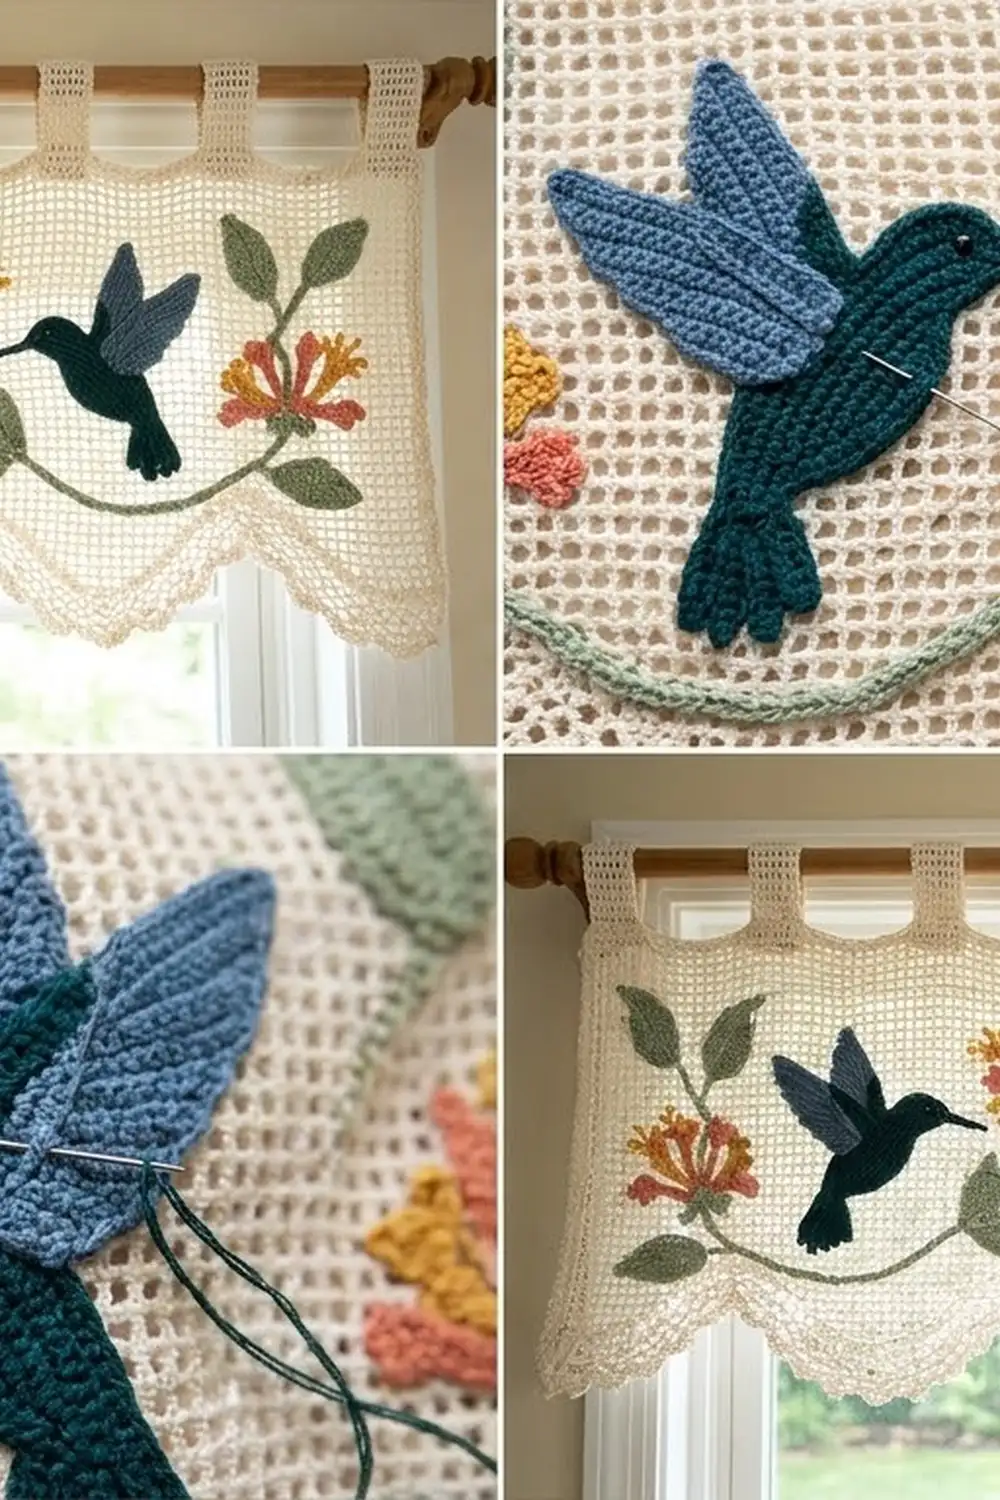
Final Notes
The measurement chain:
- A gauge of 10 mesh = 4 in (10.2 cm) gives a 90 × 40 mesh panel of 36 in × 16 in (91.4 cm × 40.6 cm).
- Round 1 adds ⅛ in (0.3 cm) to each edge.
- The scallop band adds 2 in (5.1 cm), for a finished size of 36¼ in × 18¼ in (92.1 cm × 46.4 cm).
- The tabs add a 2 in (5.1 cm) rod loop.
If your work matches each checkpoint, the border, scallops and tabs will fit exactly. Happy crocheting!