

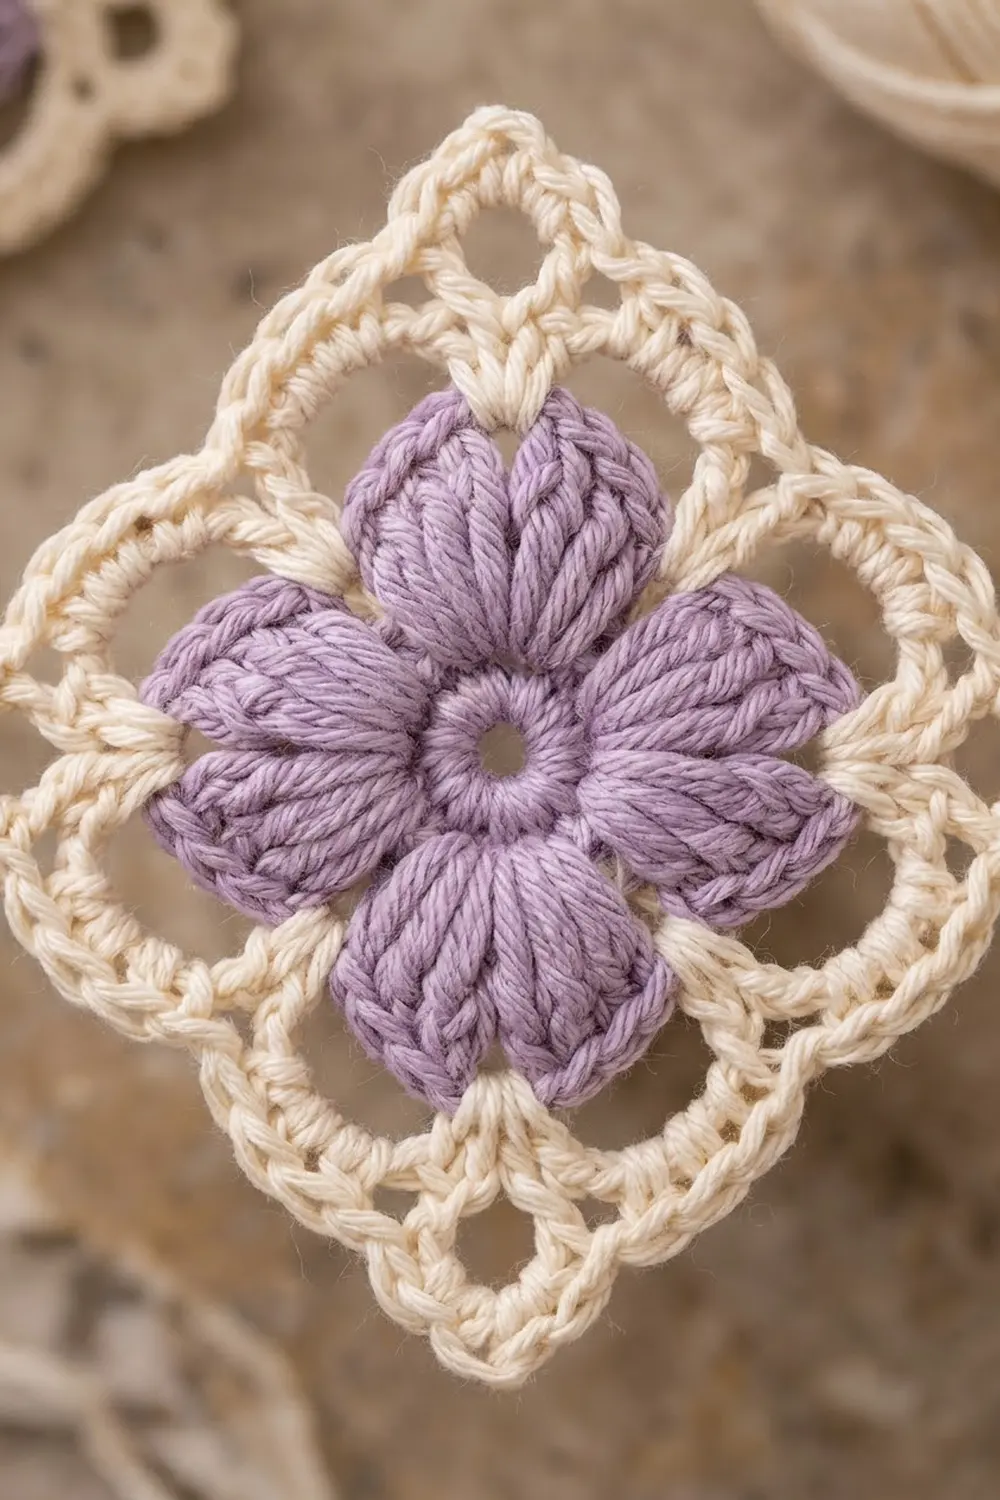
The Lavender Lattice Flower Square is a soft, airy motif. A four-petal lavender flower sits inside an open cream frame. The petals are full and rounded, the center keeps a small open ring, and the cream rounds become a light lattice with looped corners and tiny picots along every edge.
The palette is just two colors: dusty lavender for the flower and warm cream for the frame. The look is gentle and vintage, and the square works just as well on point (as a diamond) as it does sitting square.
This pattern uses US crochet terms. The finished square measures 5 in (12.7 cm) per side, or about 7 in (17.8 cm) from corner to corner when shown on point.
You work in the round from the center out. Rounds 1 and 2 make the lavender flower. Rounds 3 and 4 square it off in cream. Rounds 5 and 6 form the lacy border with corner loops and picots. There is no sewing, only weaving in ends.
Finished Size and Construction
- Finished size: 5 in (12.7 cm) per side; about 7 in (17.8 cm) corner to corner
- Skill level: Easy-intermediate
- Terminology: US terms
- Yarn weight: DK (light worsted, #3) cotton or cotton blend
- Hook: 4.0 mm (G-6)
- Number of pieces: 1 single motif
- Layout: One square worked in the round, shown on point
- Piece size: 5 in (12.7 cm) per side
- Size before border (after Round 4): 3.5 in (8.9 cm) per side
- Border depth: 0.75 in (1.9 cm) on each side (Rounds 5 and 6)
Materials
Choose a smooth DK-weight cotton, either mercerized or soft matte. Cotton shows the petal texture and the lattice clearly, and it blocks crisply. Avoid fuzzy yarns, because they blur the open spaces.
- Color A, Lavender: 5 g, about 12 m (Rounds 1–2)
- Color B, Cream: 8 g, about 19 m (Rounds 3–6)
These amounts are based on a DK cotton of about 120 m per 50 g. They include a margin for joins, differences in tension, and weaving in ends.
Tools:
- 4.0 mm (G-6) crochet hook
- Tapestry needle
- Scissors
- Stitch marker
- Ruler or tape measure
- Blocking mat and rust-proof pins
- Spray bottle with water
Abbreviations (US Terms)
- ch – chain
- sl st – slip stitch
- sc – single crochet
- dc – double crochet
- tr – treble crochet
- dtr – double treble crochet (yarn over 3 times, insert hook, pull up a loop, [yarn over, pull through 2 loops] 4 times)
- sp – space
- st(s) – stitch(es)
- rep – repeat
- MR – magic ring
Special stitch – picot: ch 3, then sl st into the front loop and left leg of the sc just made.
Standing sc: with a slip knot on the hook, insert the hook into the stitch, yarn over, pull up a loop, yarn over, and pull through both loops.
Gauge and Checkpoints
You check gauge on the motif itself. Make one complete square and measure it before you plan any other use for the yarn.
Checkpoints:
- After Round 1: the dc ring measures 1.75 in (4.4 cm) across.
- After Round 2: the flower measures 3.25 in (8.3 cm) from one petal tip to the opposite tip.
- After Round 4: the square measures 3.5 in (8.9 cm) per side.
- After Round 5: the square measures 4.5 in (11.4 cm) per side.
- After Round 6: the square measures 5 in (12.7 cm) per side, measured along the sc edge. The picots stand just beyond this line.
If your square is too big: go down to a 3.5 mm (E-4) hook, or check that you are not pulling your tr and dtr loops too tall.
If your square is too small: go up to a 4.5 mm (7) hook. Tight chain spaces in Rounds 3 and 5 are the most common cause, so keep your chains relaxed.
Measure on a flat surface. Pat the square lightly into shape, but don’t stretch it.
The Flower (Color A, Lavender)
Round 1
Make a MR. Ch 3 (counts as dc), then work 15 dc into the ring. Pull the ring snug but leave a small open center. Sl st to the top of the beginning ch-3.
Count: 16 dc.
Checkpoint: 1.75 in (4.4 cm) across.
Round 2 (Petals)
Ch 1, sc in the same st as the join. Skip 1 st, 9 tr in the next st, skip 1 st, sc in the next st. Rep from * 3 more times, leaving out the final sc on the last repeat. Sl st to the first sc.
Each petal uses 4 sts of Round 1 (sc, skip, 9-tr shell, skip). Since 4 petals × 4 sts = 16 sts, the round fits exactly.
Count: 36 tr and 4 sc (4 petals of 9 tr each, separated by 1 sc).
The 9-tr shells fan out into full, rounded petals. The 5th tr of each petal is its tip, and these 4 tips become the corners of the square.
Checkpoint: 3.25 in (8.3 cm) tip to tip. Fasten off Color A and weave in the tail on the back.
Squaring Off (Color B, Cream)
Round 3 (Frame)
With Color B, make a standing sc in the 5th tr of any petal. Ch 3, then sc in the same st (first corner made).
Ch 4, skip the next 4 tr, dtr in the sc between petals (work it behind the petals so it sits low), ch 4, skip the next 4 tr, (sc, ch 3, sc) in the 5th tr of the next petal. Rep from * 2 more times. Ch 4, skip 4 tr, dtr in the last sc between petals, ch 4, skip 4 tr, sl st to the first sc.
Count: 8 sc, 4 dtr, 4 corner ch-3 sps, 8 ch-4 sps.
The dtr anchors pull the frame in between the petals, so each petal tip pushes out into a corner.
Round 4 (Solid Square)
Sl st into the first corner ch-3 sp. Ch 3 (counts as dc), ch 3, then dc in the same sp (first corner).
Dc in the next sc, 4 dc in the ch-4 sp, dc in the dtr, 4 dc in the next ch-4 sp, dc in the next sc, (dc, ch 3, dc) in the corner ch-3 sp. Rep from * 2 more times. Dc in the next sc, 4 dc in the ch-4 sp, dc in the dtr, 4 dc in the next ch-4 sp, dc in the next sc, sl st to the top of the beginning ch-3.
Count per side: 13 dc (1 corner dc + 1 + 4 + 1 + 4 + 1 + 1 corner dc).
Total: 52 dc and 4 corner ch-3 sps.
Checkpoint: 3.5 in (8.9 cm) per side. This is the size before the border.
Border (Color B, Cream)
Border Gauge
The border adds 0.75 in (1.9 cm) to each side: about 0.5 in (1.3 cm) from Round 5 and about 0.25 in (0.6 cm) from Round 6. That gives 3.5 in + 0.75 in + 0.75 in = 5 in (8.9 cm + 1.9 cm + 1.9 cm = 12.7 cm).
Round 5 (Lattice and Corner Loops)
Sl st into the first corner ch-3 sp. Ch 8 (counts as dc and ch 5), then dc in the same sp (first corner loop).
Ch 1, skip the next dc, dc in the next dc. [Ch 1, skip 1 dc, dc in the next dc] 5 times. Ch 1, skip the last dc of the side, (dc, ch 5, dc) in the corner ch-3 sp. Rep from * 2 more times. Work the side sequence once more without the final corner, then sl st to the 3rd ch of the beginning ch-8.
Number the 13 dc of Round 4 on each side from 1 to 13. Place a dc in sts 2, 4, 6, 8, 10, and 12, and a ch 1 over sts 1, 3, 5, 7, 9, 11, and 13.
Count per side: 15 sts (1 corner dc + 7 ch-1 sps + 6 dc + 1 corner dc).
Total: 32 dc (24 side dc + 8 corner dc), 28 ch-1 sps, and 4 corner ch-5 loops.
The ch-5 loops make the open, rounded corners, and the ch-1 mesh makes the light lattice.
Checkpoint: 4.5 in (11.4 cm) per side.
Round 6 (Picot Edge)
Sl st into the first corner ch-5 loop. Ch 1, then (2 sc, ch 3, 2 sc) in the same loop.
Along the side, sc in each of the 15 sts (corner dc, each ch-1 sp and dc, corner dc), adding a picot after the 4th, 8th, and 12th sc. (2 sc, ch 3, 2 sc) in the next corner ch-5 loop. Rep from * 2 more times. Work the last side the same way, then sl st to the first sc. Fasten off.
Count: (60 sc worked 1 per existing st, 15 per side) + (16 sc added in corners, 4 per corner) = 76 sc, plus 12 picots (3 per side) and 4 corner ch-3 loops.
Why the Border Math Works
Round 4 has 13 dc per side, including its 2 corner dc. Round 5 turns those 13 sts into 13 mesh positions (one ch or dc for each st) and adds 1 new dc at each end from the corner space, for a total of 15. Round 6 puts exactly 1 sc into each of those 15 positions, so the side length stays the same and the edge lies flat. All the extra fullness goes into the corner spaces, where the square needs it to turn.
The picots sit on sc 4, 8, and 12. Sc 8 is the exact middle of 15, and sc 4 and sc 12 are each 4 sts away from it, so the picots are symmetric on every side.
Final Blocking
- Weave in all ends on the back, following the stitch direction, before you block.
- Pin the square to a blocking mat at 5 in (12.7 cm) per side. Pin each corner loop first.
- Check that both diagonals measure about 7 in (17.8 cm). Adjust until they match.
- Pin each side straight, with a pin in each picot to open it.
- Shape each petal gently with your fingers so it sits rounded and full. Don’t flatten the petals.
- Mist with water until damp but not soaked.
- Let the square dry completely before you unpin it.
Final Quality-Control Checklist
- The center ring is small and tightly closed, with no gaps between dc.
- All 4 petals are the same size, each with 9 tr.
- Each petal tip points straight into a corner.
- Round 4 has 13 dc per side.
- Round 5 has 6 side dc and 7 ch-1 sps per side, with a ch-5 loop at each corner.
- Round 6 has 15 sc per side, plus 2 sc on each side of every corner loop.
- There are 3 evenly spaced picots per side.
- The square measures 5 in (12.7 cm) per side and lies flat.
- All ends are woven in securely and out of sight.
Troubleshooting
Petals cup or ruffle. Your tr may be too loose for the space. Tighten your tension slightly on Round 2, or go down half a hook size for the flower only.
Petals look flat and thin. Check that you skipped 1 st on each side of every shell. Without the skips, the shells have no room to fan out.
Round 3 pulls the flower out of shape. The ch-4 sps are too tight. Chain loosely, or work ch 5 instead and keep all the counts the same.
The square isn’t square. Recount Round 4. Each side must have exactly 13 dc between corner spaces.
The edge waves. Round 6 has extra stitches on a side. Each side should have 15 sc, not counting the corner sc.
The edge curls. The corner loops are too tight. Make sure you chained 5 at each corner of Round 5.
Picots lean to one side. Close each picot into the front loop and left leg of the sc so it sits straight and centered.
Care
Hand wash in cool water with mild soap, press the water out in a towel, and dry flat, reshaping to 5 in (12.7 cm) per side. Don’t wring the square, because wringing distorts the petals and lattice.
Final Notes
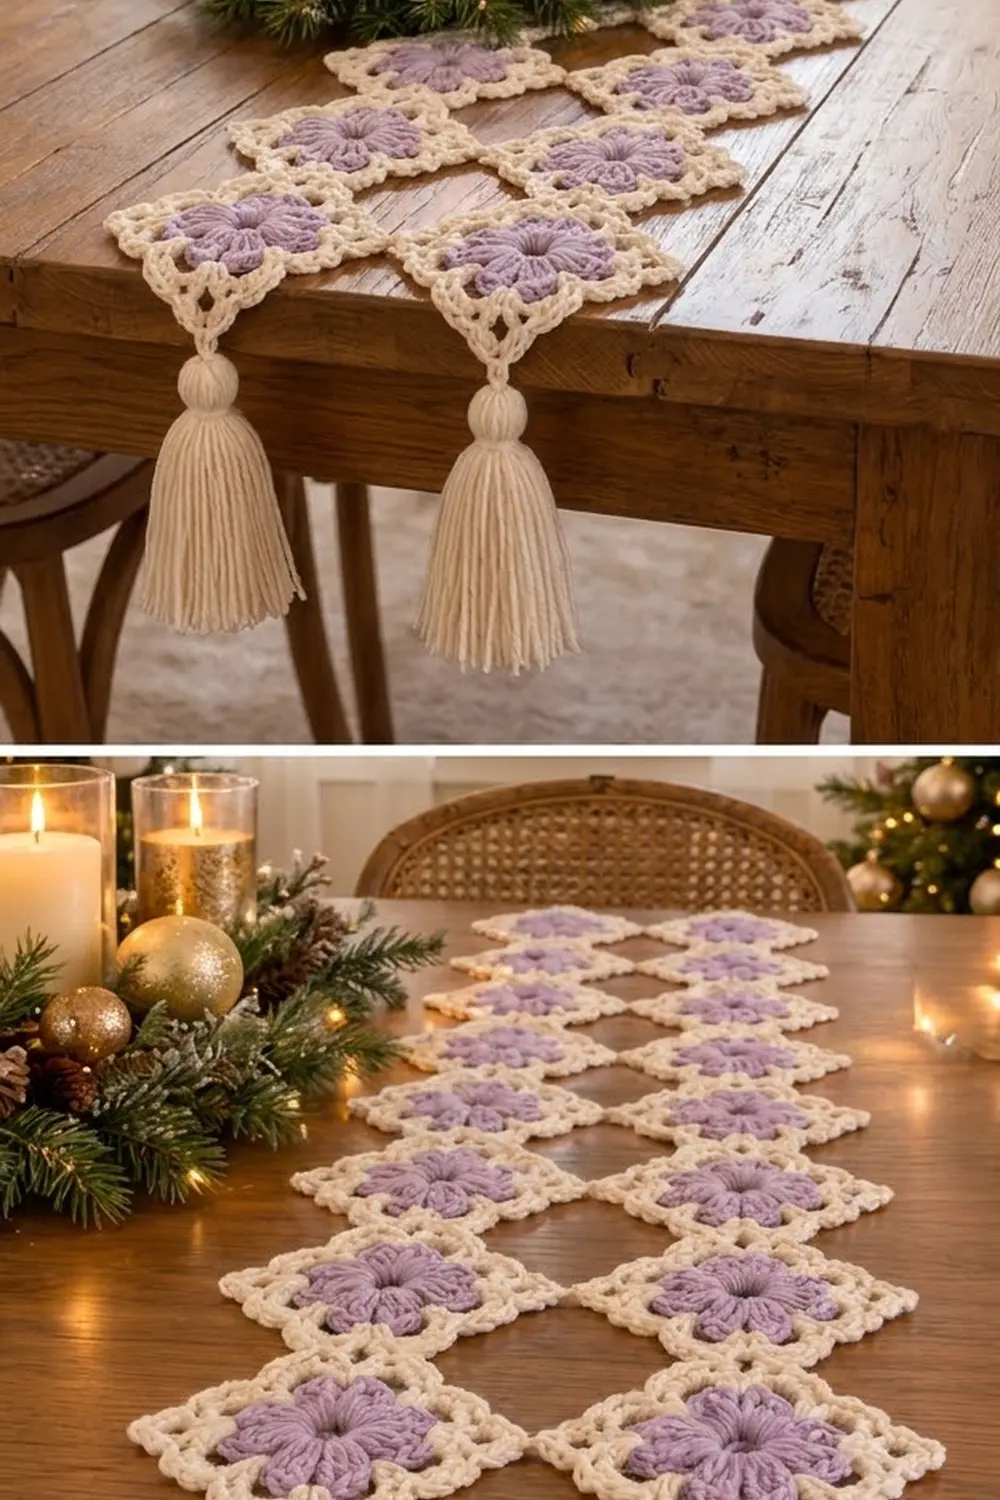
Here is the full measurement chain. The 16-dc center measures 1.75 in (4.4 cm). The 4-petal flower grows to 3.25 in (8.3 cm) tip to tip. The cream frame squares it to 3.5 in (8.9 cm), with 13 dc per side. The lattice round brings it to 4.5 in (11.4 cm), with 15 sts per side. The picot edge finishes it at 5 in (12.7 cm) and keeps those same 15 sts per side.
If each checkpoint matches, your finished square will match too. Take your time with the petals, keep your chains relaxed, and let blocking do the final shaping.
Happy crocheting!