

This hanging holder keeps three spare toilet paper rolls off the floor. Three lacy baskets with scalloped rims are sewn onto a long diamond-mesh panel. The top of the panel narrows into a strap that wraps around a wooden ring, so it hangs from one hook on a wall or door.
The sample is in soft lavender cotton, a calm color for a bathroom. Cream works just as well for a farmhouse or neutral room. The open lattice lets the rolls show through, and the solid bases and wall bands keep the baskets sturdy.
This pattern uses US crochet terms. The finished panel is 7.0 in (17.8 cm) wide and 28.7 in (72.9 cm) long, not counting the ring. Each basket is about 5.5 in (14.0 cm) across and 5.8 in (14.7 cm) tall.
You make the three baskets in the round from the base up. Then you work the panel flat from the bottom up, sew the baskets onto it, and add a two-row border to the panel’s sides and bottom edge. Last, you fold the strap through the ring and sew it down.
Finished Size and Construction
- Finished size: 7.0 x 28.7 in (17.8 x 72.9 cm), plus the ring
- Skill level: Intermediate
- Terminology: US
- Yarn weight: Worsted (#4) cotton
- Hook: 5.0 mm (H-8)
- Number of pieces: 4 crocheted pieces (3 baskets, 1 panel) and 1 wooden ring
- Layout: 1 column x 3 baskets, stacked vertically on the panel
- Basket size: 5.5 in (14.0 cm) across, 5.8 in (14.7 cm) tall
- Panel size before border: 6.0 x 28.2 in (15.2 x 71.6 cm)
- Border depth: 0.5 in (1.3 cm), on the sides and bottom
Materials
Use a smooth, firm cotton or cotton blend. Acrylic stretches when the baskets are loaded, but cotton holds its shape. A tightly plied yarn shows the diamond mesh most clearly.
- Lavender (main color): 250 g, about 425 m (465 yd). That is about 45 g per basket, 80 g for the panel, and 10 g for the border, plus a margin.
- Optional colorway: cream, in the same amount.
Tools:
– 5.0 mm (H-8) crochet hook
– Wooden ring, 2 in (5.1 cm)
– Tapestry needle
– Stitch markers
– Measuring tape
– Rust-proof pins and a blocking mat
– Scissors
All quantities include roughly a 15% margin for your gauge swatch and tension differences.
Abbreviations (US Terms)
- ch: chain
- sl st: slip stitch
- sc: single crochet
- hdc: half double crochet
- dc: double crochet
- BLO: back loop only
- sk: skip
- sp: space
- st(s): stitch(es)
- rnd: round
Special stitch: ch-5 mesh loop. Ch 5, then sc into the next loop or the stitch named. Rows or rounds of these loops stack into a diamond lattice.
Gauge and Checkpoints
Sc gauge: 14 sc x 15 rows = 4 in (10.2 cm).
Mesh gauge: 1 ch-5 loop spans 4 sts, about 1.14 in (2.9 cm). 10 mesh rows = 6.0 in (15.2 cm), or 0.6 in (1.5 cm) per row.
Make one basket before anything else. It is your gauge test.
- After Rnd 10: the base should measure 5.5 in (14.0 cm) across, with 60 sts. That is a circumference of about 17.1 in (43.4 cm).
- After Rnd 15: the sc wall band should be 1.3 in (3.3 cm) tall.
- After Rnd 20: the mesh section should add about 3.0 in (7.6 cm).
- After Rnd 23: the scallop rim should add about 1.5 in (3.8 cm), for a total height of 5.8 in (14.7 cm).
If the base is wider than 5.75 in (14.6 cm), go down half a hook size. If it is narrower than 5.25 in (13.3 cm), go up half a size. A standard roll is about 4.5 in (11.4 cm) wide and 4.25 in (10.8 cm) tall, so check that one drops into your test basket easily.
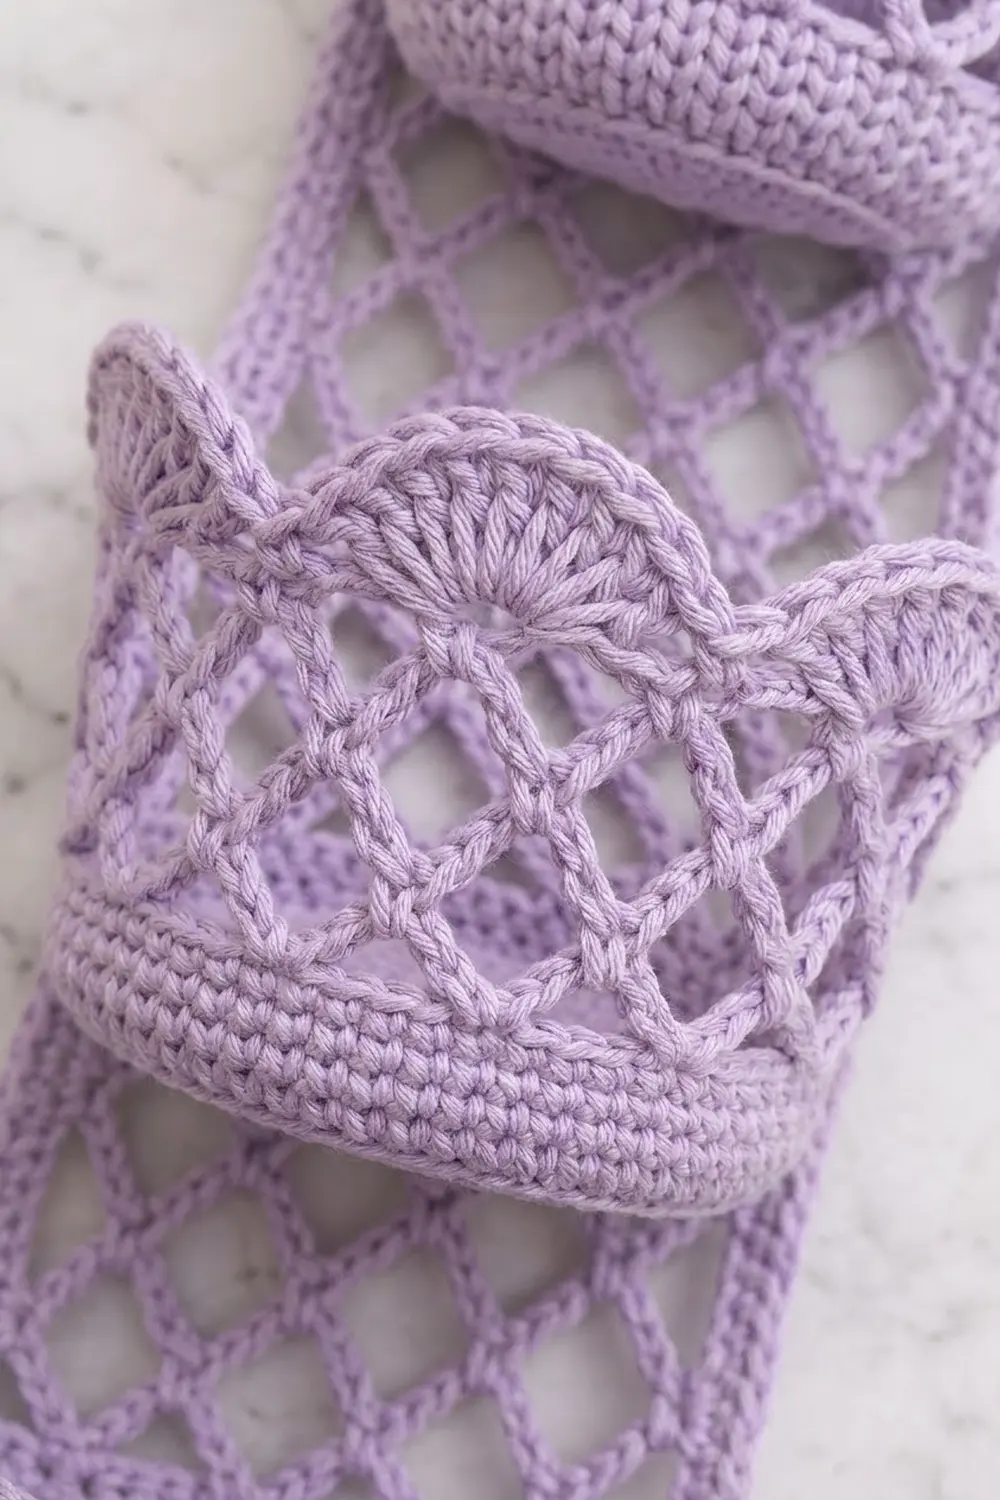
Basket (Make 3)
Base
Worked in continuous joined rounds. Join each round with a sl st to the first sc, and do not turn.
Rnd 1: Make a magic ring, ch 1, 6 sc in the ring. Join. (6 sts)
Rnd 2: Ch 1, 2 sc in each st around. Join. (12 sts)
Rnd 3: Ch 1, sc in next st, 2 sc in next st; repeat around. Join. (18 sts)
Rnd 4: Ch 1, sc in next 2 sts, 2 sc in next st; repeat. Join. (24 sts)
Rnd 5: Ch 1, sc in next 3 sts, 2 sc in next st; repeat. Join. (30 sts)
Rnd 6: Ch 1, sc in next 4 sts, 2 sc in next st; repeat. Join. (36 sts)
Rnd 7: Ch 1, sc in next 5 sts, 2 sc in next st; repeat. Join. (42 sts)
Rnd 8: Ch 1, sc in next 6 sts, 2 sc in next st; repeat. Join. (48 sts)
Rnd 9: Ch 1, sc in next 7 sts, 2 sc in next st; repeat. Join. (54 sts)
Rnd 10: Ch 1, sc in next 8 sts, 2 sc in next st; repeat. Join. (60 sts)
Checkpoint: the base lies flat and measures 5.5 in (14.0 cm) across.
Wall Band
Rnd 11: Ch 1, sc in BLO of each st around. Join. (60 sts) The unused front loops form a ridge that turns the base into a wall.
Rnds 12–15: Ch 1, sc in each st around. Join. (60 sts)
Checkpoint: the band stands 1.3 in (3.3 cm) tall.
Lattice
Rnd 16: Ch 1, sc in first st. Ch 5, sk 3 sts, sc in next st; repeat 13 more times. Then ch 5, sk 3 sts, and sl st to the first sc. (15 ch-5 loops)
Rnds 17–20: Sl st in the next 2 ch, then sl st into the ch-5 sp. Ch 1, sc in the same sp. Ch 5, sc in next ch-5 sp; repeat 13 more times. Ch 5, sl st to the first sc. (15 ch-5 loops each round)
Each round’s sc lands in the middle of the loop below it. That offset is what builds the diamond lattice.
Scallop Rim
Rnd 21 (conversion): Sl st into the first ch-5 sp, ch 1, 4 sc in each ch-5 sp around. Join. (15 loops x 4 sc = 60 sts)
Rnd 22 (shell): Ch 1, sc in next st, sk 5 sts, 11 dc in next st, sk 5 sts; repeat 4 more times. Join to the first sc. (5 sc + 55 dc = 60 sts, 5 shells) Each repeat uses exactly 12 sts, and 5 x 12 = 60.
Rnd 23 (trim): Work each repeat over 1 sc + 11 dc as follows: sl st in the sc, hdc in next 2 dc, dc in next 2 dc, 2 dc in each of next 3 dc, dc in next 2 dc, hdc in next 2 dc; repeat 4 more times. Sl st to the first sl st and fasten off. (60 sts worked one per stitch + 15 added = 75 sts) That is 15 sts per scallop. The 3 increases at the top of each scallop round it off, and the sl st in each sc pulls the rim into a pointed dip between scallops.
Weave in the ends.
Back Panel
The panel is worked flat in rows, from the bottom edge up.
Row 1: Ch 22, sc in the 2nd ch from the hook and in each ch across. (21 sc)
Rows 2–3: Ch 1, turn, sc in each st across. (21 sc)
Checkpoint: the panel is 6.0 in (15.2 cm) wide and 0.8 in (2.0 cm) tall.
Row 4 (Mesh Row A): Ch 1, turn, sc in the first st. Ch 5, sk 3 sts, sc in next st; repeat 4 more times. (6 sc, 5 loops) This uses 1 + (5 x 4) = 21 sts.
Row 5 (Mesh Row B): Ch 5 (counts as dc + ch 2), turn, sc in the first loop. Ch 5, sc in next loop; repeat 3 more times. Ch 2, dc in the last sc. (4 full loops + 2 half loops)
Row 6 (Mesh Row A): Ch 1, turn, sc in the dc. Ch 5, sc in next ch-5 loop; repeat 3 more times. Ch 5, sc in the 3rd ch of the turning ch. (6 sc, 5 loops)
Rows 7–42: Repeat Rows 5 and 6, ending with a Row A on Row 42. Including Row 4, that makes 39 mesh rows.
Checkpoint: the mesh section measures 23.4 in (59.4 cm), and the panel is 24.2 in (61.5 cm) long in total.
Taper
Row 43: Turn. Sl st in the first sc and the next 2 ch, ch 1, sc in the same loop. Ch 5, sc in next loop; repeat 3 more times. (4 loops)
Row 44: Repeat Row 43, making the repeat 2 more times instead of 3. (3 loops)
Row 45: Repeat Row 43, making the repeat 1 more time. (2 loops)
Row 46: Repeat Row 43 with no extra repeats. (1 loop)
Each row skips the first and last loops, so the panel loses exactly one loop per row and narrows into a triangle 2.4 in (6.1 cm) tall.
Strap
Row 47: Turn, sl st in the first 2 ch, ch 1, 5 sc in the loop. (5 sc)
Rows 48–58: Ch 1, turn, sc in each st across. (5 sc)
Fasten off and leave a 12 in (30.5 cm) tail. The strap is 1.4 in (3.6 cm) wide and 3.2 in (8.1 cm) long. Leave it unfolded for now.
Make All Pieces
- Lavender: 3 baskets, about 45 g each
- Lavender: 1 panel, about 80 g
Layout (front view, top to bottom):
      [ring]
      [strap]
     /taper\
   | Basket 3 |   base at 18.8 in (47.8 cm)
   |  mesh    |
   | Basket 2 |   base at 9.8 in (24.9 cm)
   |  mesh    |
   | Basket 1 |   base at 0.8 in (2.0 cm)
   [sc band  ]
Joining
Lay the panel flat, right side up. All heights are measured from the panel’s bottom edge.
Placement:
– Basket 1: base along the top of Row 3, at 0.8 in (2.0 cm).
– Basket 2: base along the top of Row 18, at 9.8 in (24.9 cm).
– Basket 3: base along the top of Row 33, at 18.8 in (47.8 cm).
The bases are spaced 15 mesh rows, or 9.0 in (22.9 cm), apart. That leaves a 3.25 in (8.3 cm) mesh gap between one basket’s rim and the next basket’s base. The top basket’s rim ends at 24.6 in (62.5 cm), just where the taper begins.
Stitch-to-stitch logic: Mark 15 consecutive sts on Rnd 11 (the ridge) as the basket’s back. This is one quarter of the 60 sts, about 4.3 in (10.9 cm). Center it on the panel’s 21-st width, leaving 3 sts of panel showing on each side.
- Whipstitch the 15 ridge sts to the panel row, one stitch per stitch. Across mesh rows, pass the needle around the sc and the chain loops.
- Whipstitch the same 15 sts on Rnd 15 to the panel, about 1.3 in (3.3 cm) higher.
- Tack the two back sc of Rnd 20 to the mesh behind them, about 4.3 in (10.9 cm) above the base.
Tension: Pull each stitch just snug. If you sew too tightly, the panel puckers and the basket tilts forward. If you sew too loosely, the basket sags when loaded.
Size checkpoint: The panel should still lie flat at 6.0 in (15.2 cm) wide, with each basket’s back flat against it.
Border
Border gauge: 2 sc per mesh row end and 1 sc per sc row end. A mesh row is 0.6 in (1.5 cm) tall, so 2 sc in that height works out to about 3.3 sc per inch. That is close to the fabric’s own gauge of 3.5 sc per inch, so the edge neither ruffles nor pulls in.
The border is worked in rows around three sides: down the left side, across the bottom, and up the right side. The strap stays unbordered.
Border Row 1: Join yarn at the left side where the taper meets the strap (the end of Row 46).
– Left side: 2 sc in each of the 4 taper row ends, 2 sc in each of the 39 mesh row ends, and 1 sc in each of the 3 sc row ends, for 8 + 78 + 3 = 89 sc.
– Corner: ch 1.
– Bottom: 21 sc in the foundation chains.
– Corner: ch 1.
– Right side: 89 sc, mirroring the left side.
Total: 199 sc + 2 corner ch-1 sps.
Border Row 2 (trim): Ch 1, turn, sc in each sc, and work (sc, ch 1, sc) in each corner ch-1 sp. (199 sts worked one per stitch + 4 corner sc added = 203 sc)
Per side, with each corner sc counted on the side it sits on:
– Right: 89 + 1 = 90
– Bottom: 1 + 21 + 1 = 23
– Left: 90
Fasten off.
Why the math works: The bottom starts with exactly the panel’s own 21 sts, and each side’s count is taken straight from the row structure. No extra stitches are added except at the corners. The two border rows add 0.5 in (1.3 cm) to each side and to the bottom. That gives 6.0 + 0.5 + 0.5 = 7.0 in (17.8 cm) wide and 28.2 + 0.5 = 28.7 in (72.9 cm) long.
Ring: Pass the strap through the wooden ring from front to back. Fold it in half, leaving 1.6 in (4.1 cm) showing, and whipstitch the end to the base of the strap.
Final Blocking
- Lightly mist the whole holder with water, or soak it and press out the excess in a towel.
- Pin the panel flat at 7.0 x 28.7 in (17.8 x 72.9 cm) and open each diamond with your fingers.
- Stuff each basket with a toilet roll or a towel wrapped in plastic so it dries round.
- Pin each scallop up and out, with a pin in each dip between scallops.
- Let it dry completely, at least 24 hours for cotton.
- Unpin and hang.
Final Quality-Control Checklist
- [ ] Each basket base measures 5.5 in (14.0 cm) and has 60 sts.
- [ ] Each basket has 15 mesh loops per round and 5 even scallops (75 sts on Rnd 23).
- [ ] The panel has 39 mesh rows, 4 taper rows, and a 5-st strap.
- [ ] The basket bases sit 9.0 in (22.9 cm) apart and are centered.
- [ ] The border counts are 90 / 23 / 90 sc.
- [ ] The finished size is 7.0 x 28.7 in (17.8 x 72.9 cm).
- [ ] The strap seam is secure, and all ends are woven in.
Troubleshooting
- Base cups or ruffles: Check that you increased 6 sts in every round, and recheck your hook size.
- Mesh skews diagonally: Make sure each sc goes into the center of a loop, not its edge.
- Scallops are uneven: Recount Rnd 21. It must have exactly 60 sts for the 12-st repeat to fit.
- Panel edge waves: Use 2 sc per mesh row, not 3.
- Basket leans forward: Add the Rnd 20 tack stitches, or sew the Rnd 15 band more firmly.
- Panel twists when hung: Block it again and check that the strap is folded straight through the ring.
Care
Hand wash in cool water, press out the water, and dry flat with the baskets stuffed so they keep their shape. Remove the wooden ring before washing.

Final Notes
The measurements build on each other:
– Gauge: 14 sc = 4 in (10.2 cm).
– Basket base: 60 sts = 5.5 in (14.0 cm).
– Basket height: a 1.3 in (3.3 cm) band, 3.0 in (7.6 cm) of mesh, and a 1.5 in (3.8 cm) rim make 5.8 in (14.7 cm).
– Panel: 21 sts = 6.0 in (15.2 cm) wide, and 28.2 in (71.6 cm) long after folding.
– Border: adds 0.5 in (1.3 cm) to the sides and bottom, for a finished size of 7.0 x 28.7 in (17.8 x 72.9 cm).
Check each stage and the next one will fit. Happy crocheting!