

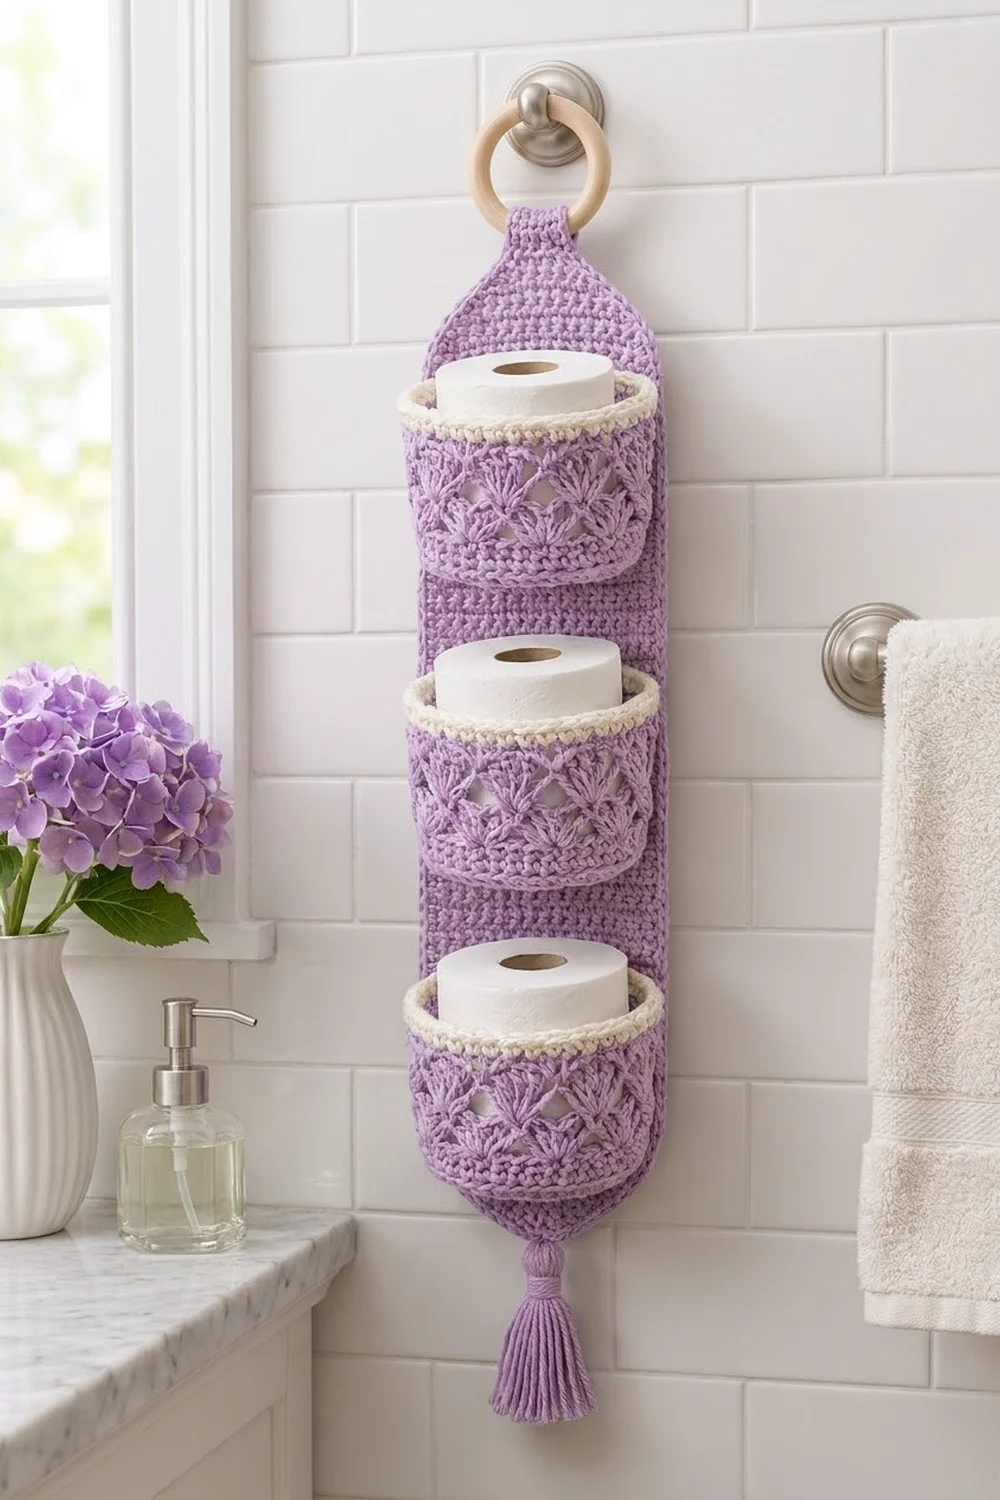
This hanging holder stores three toilet paper rolls in a neat column on the wall. Three round baskets with lacy shell walls are sewn to a long back panel, and a wooden ring at the top hangs on a towel hook or knob.
The palette is soft and simple. Lavender is used for the panel, baskets, and tassel, and cream for the rolled basket rims. The shell lattice looks like rows of small fans, so the piece looks delicate even though the base and panel are firm single crochet.
The pattern uses US crochet terms. The finished back panel measures 5 in × 20.5 in (12.7 cm × 52.1 cm). Each basket is 5.25 in (13.3 cm) across and 4 in (10.2 cm) tall. From the top of the ring to the tip of the tassel, the holder hangs about 27 in (68.6 cm).
Each basket is worked from the bottom up: first a flat circle, then lace walls in joined rounds. The back panel is worked flat in rows with tapered ends and finished with one border round. A small tab holds the ring, and a tassel hangs from the bottom point.
Finished Size and Construction
- Finished size: panel 5 in × 20.5 in (12.7 cm × 52.1 cm); hanging length about 27 in (68.6 cm)
- Skill level: Intermediate
- Terminology: US
- Yarn weight: worsted (#4) cotton
- Hook: 4.0 mm (US G-6)
- Number of pieces: 6 (3 baskets, 1 back panel, 1 hanging tab, 1 tassel), plus 1 wooden ring
- Layout: 1 column × 3 baskets on one panel
- Basket size: 5.25 in (13.3 cm) diameter × 4 in (10.2 cm) tall
- Panel size before border: 4.5 in × 20 in (11.4 cm × 50.8 cm)
- Border depth: 1 round of sc, 0.25 in (0.6 cm)
Materials
Use a smooth, worsted-weight cotton. Cotton holds its shape, so the baskets stay open and the panel won’t stretch under the rolls.
- Lavender (main color): 200 g, about 340 m
- Cream (contrast color): 30 g, about 51 m
Tools:
- 4.0 mm (US G-6) hook
- Wooden ring, 2.75 in (7.0 cm) outside diameter
- 4 stitch markers
- Tapestry needle and scissors
- Measuring tape
- Cardboard, 4 in (10.2 cm) tall, for the tassel
- Pins and a blocking mat
The yarn quantities include a 10–15 percent margin for swatching, seaming, and the tassel.
Abbreviations (US Terms)
- ch: chain
- sl st: slip stitch
- sc: single crochet
- dc: double crochet
- inc: 2 sc in the same stitch
- sc2tog: single crochet 2 together
- BLO: back loop only
- MR: magic ring
- sp: space
- st(s): stitch(es)
- rep: repeat
- rev sc: reverse single crochet (crab stitch)
Shell: 5 dc in the same stitch.
Rev sc: Work from left to right (if you’re right-handed). Insert the hook into the next stitch to the right, yarn over, pull up a loop, then yarn over and pull through both loops. This makes the beaded rim edge.
Gauge and Checkpoints
Gauge: 16 sc and 16 rows = 4 in (10.2 cm), worked in rows.
Make a swatch 20 sc wide and 20 rows tall; it should measure 5 in (12.7 cm) square. This square gauge is important because the panel border uses 1 sc per row end.
Make one full basket before you start the others. Check these measurements as you go:
- Base, after Rnd 5 (30 sts): about 2.4 in (6.1 cm) across
- Base, after Rnd 11 (66 sts): 5.25 in (13.3 cm) across, lying flat
- Wall, after Rnd 19: 3 in (7.6 cm) tall above the BLO ridge
- Finished basket: 4 in (10.2 cm) tall
- Panel, after Row 7: 4.5 in (11.4 cm) wide
- Panel, after Row 40: 10 in (25.4 cm) long
If your piece is too big, go down 0.5 mm in hook size. If it is too small, go up 0.5 mm. A standard roll, about 4.5 in (11.4 cm) wide, should slide easily into your test basket.
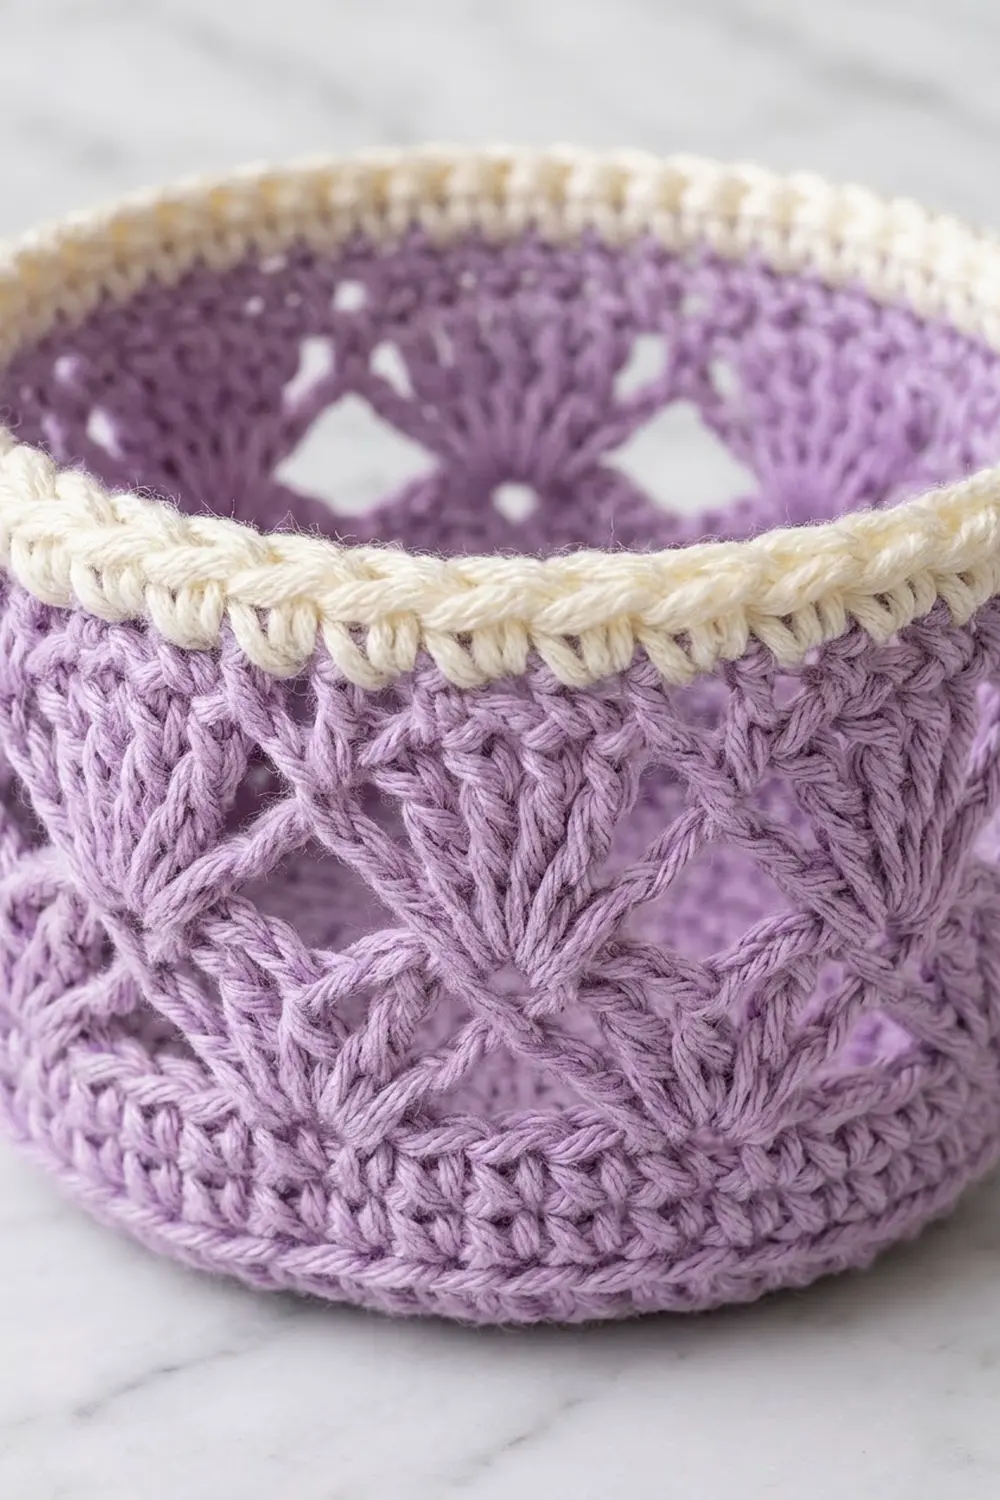
Basket (Make 3)
Work in joined rounds without turning. Join each round with a sl st to the first stitch.
Base
With lavender, make a MR.
- Rnd 1: ch 1, 6 sc in ring, join. (6 sts)
- Rnd 2: ch 1, inc in each st around, join. (12 sts)
- Rnd 3: ch 1, sc 1, inc; rep around, join. (18 sts)
- Rnd 4: ch 1, sc 2, inc; rep around, join. (24 sts)
- Rnd 5: ch 1, sc 3, inc; rep around, join. (30 sts)
- Rnd 6: ch 1, sc 4, inc; rep around, join. (36 sts)
- Rnd 7: ch 1, sc 5, inc; rep around, join. (42 sts)
- Rnd 8: ch 1, sc 6, inc; rep around, join. (48 sts)
- Rnd 9: ch 1, sc 7, inc; rep around, join. (54 sts)
- Rnd 10: ch 1, sc 8, inc; rep around, join. (60 sts)
- Rnd 11: ch 1, sc 9, inc; rep around, join. (66 sts)
The 66 stitches divide into 11 lace repeats of 6 stitches each.
Walls
- Rnd 12: ch 1, sc in BLO of each st around, join. (66 sts) This makes the ridge where the base turns up into the wall.
- Rnd 13: ch 1, sc in each st around, join. (66 sts)
- Rnd 14 (shells): ch 1, sc in first st, skip 2 sts, shell in next st, skip 2 sts, sc in next st; rep 9 more times, skip 2, shell in next st, skip 2, join to first sc. (11 shells + 11 sc = 66 sts)
- Rnd 15 (lattice): ch 5 (counts as dc + ch 2), sc in center dc of next shell, ch 2, dc in next sc, ch 2, sc in center dc of next shell, ch 2; rep 9 more times, join to 3rd ch of beg ch-5. (11 dc, 11 sc, 22 ch-2 sps)
- Rnd 16 (offset shells): ch 3 (counts as dc), 2 dc in same st, sc in next sc, shell in next dc; rep 9 more times, sc in last sc, 2 dc in first st, join to top of beg ch-3. (11 shells + 11 sc; skip the ch-2 sps) The two half-shells at the start and end form one full shell, and the join lands at its center.
- Rnd 17 (lattice): ch 1, sc in same st, ch 2, dc in next sc, ch 2, sc in center dc of next shell, ch 2, dc in next sc, ch 2; rep 9 more times, join to first sc. (11 sc, 11 dc, 22 ch-2 sps)
- Rnd 18 (shells): ch 1, sc in first sc, shell in next dc, sc in next sc; rep 9 more times, shell in last dc, join. (11 shells + 11 sc = 66 sts)
- Rnd 19 (lattice): Rep Rnd 15. (11 dc, 11 sc, 22 ch-2 sps)
The shells shift position every two rounds, so each fan sits between the two fans below it. That creates the diamond lattice.
- Rnd 20 (conversion): ch 1, sc in same st, 2 sc in next ch-2 sp, sc in next sc, 2 sc in next ch-2 sp, sc in next dc, 2 sc in next sp, sc in next sc, 2 sc in next sp; rep 9 more times, join. (22 sts worked 1 per existing st + 44 sts added in sps = 66 sts) Fasten off lavender.
Cream Rim
- Rnd 21: Join cream, ch 1, sc in each st around, join. (66 sts)
- Rnd 22: ch 1, sc in each st around, join. (66 sts)
- Rnd 23: ch 1, rev sc in each st around, join. (66 sts) Fasten off and weave in ends.
Back Panel
With lavender, ch 7.
- Row 1: sc in 2nd ch from hook and in each ch across, turn. (6 sts)
- Row 2: ch 1, inc in first st, sc across to last st, inc in last st, turn. (8 sts)
- Rows 3–7: Rep Row 2. (Row 3: 10 sts, Row 4: 12, Row 5: 14, Row 6: 16, Row 7: 18)
- Rows 8–73: ch 1, sc in each st across, turn. (18 sts per row) After Row 73, the panel measures 18.25 in (46.4 cm).
- Row 74: ch 1, sc2tog, sc across to last 2 sts, sc2tog, turn. (16 sts)
- Rows 75–80: Rep Row 74. (Row 75: 14 sts, Row 76: 12, Row 77: 10, Row 78: 8, Row 79: 6, Row 80: 4)
Don’t fasten off; go straight on to the Border. Before the border, the panel measures 4.5 in × 20 in (11.4 cm × 50.8 cm).
Hanging Tab
With lavender, ch 5.
- Row 1: sc in 2nd ch from hook and in each ch across, turn. (4 sts)
- Rows 2–14: ch 1, sc in each st across, turn. (4 sts per row)
Fasten off, leaving a 12 in (30.5 cm) tail. The tab measures 1 in × 3.5 in (2.5 cm × 8.9 cm).
Tassel
- Wrap lavender yarn 30 times around the 4 in (10.2 cm) cardboard.
- Tie the top of the bundle with a strand, then cut the loops at the bottom.
- Wrap another strand tightly 0.75 in (1.9 cm) below the top.
- Trim the ends evenly so the tassel is 4 in (10.2 cm) long.
Make All Pieces
Before you start assembly, you should have:
- 3 baskets (lavender with cream rims)
- 1 bordered lavender panel
- 1 lavender tab
- 1 lavender tassel
- 1 wooden ring
The diagram below shows the front of the panel, with rows counted from the bottom:
        [ ring ]
        [ tab  ]
  Rows 74-80: top taper
  Rows 65-73: plain panel
  Rows 48-64: Basket 3
  Rows 45-47: gap
  Rows 29-45: Basket 2
  Rows 26-28: gap
  Rows 10-26: Basket 1
  Rows 1-9:   bottom taper + plain
        [tassel]
Each basket covers 16 rows, which is 4 in (10.2 cm). Its base sits on the lower row number and its rim on the upper one. The gaps between baskets are 0.75 in (1.9 cm).
Joining
Work the border first (see the next section). Then whipstitch the baskets on with lavender yarn.
How the stitches match: each basket attaches along two 12-stitch seams, one at the base and one at the rim. Twelve stitches is 3 in (7.6 cm) on both the basket and the panel, so you sew one basket stitch to one panel stitch.
- On the panel’s base row, place markers at stitches 4 and 15 (counting the 18 panel stitches, not the border). Mark the rim row the same way. This leaves 3 stitches free on each side and 12 between the markers.
- Whipstitch 12 stitches of the basket’s Rnd 12 ridge to the 12 marked stitches on the base row.
- Whipstitch the 12 stitches of Rnd 22 directly above them to the marked stitches on the rim row.
- Tack the middle of the back wall to the panel at Rnd 17 with 3 small stitches.
Basket positions:
- Basket 1: Rows 10 and 26
- Basket 2: Rows 29 and 45
- Basket 3: Rows 48 and 64
Tension: Keep your stitches snug but not tight, so the panel doesn’t pucker.
Size check: After joining, the panel should still be 5 in (12.7 cm) wide.
Attaching the ring and tassel:
- Thread the tab through the ring and fold it so the two ends meet. Sew both ends to the back of the panel over Rows 79–80, centered left to right.
- Sew the tassel to the center of the bottom border.
Border
Border gauge: 4 sc per inch (2.5 cm), along both stitches and row ends.
Pick up where Row 80 ended:
- Rnd 1: ch 1, then:
- Top edge: 3 sc in first st, sc in next 2 sts, 3 sc in last st. (8 sts)
- First long side: 1 sc in each row end, Rows 79 to 2. (78 sts)
- Bottom edge: working into the foundation chain, 3 sc in first ch, sc in next 4 ch, 3 sc in last ch. (10 sts)
- Second long side: 1 sc in each row end, Rows 2 to 79. (78 sts)
- Join to first sc. (174 sts)
Fasten off and weave in ends.
Why the math works:
- Each side count already includes its corner stitches: 8 + 78 + 10 + 78 = 174.
- Rows 1 and 80 are covered by the 3-sc corner groups, so their row ends are not counted again on the long sides.
- At this gauge, one sc row is as tall as one sc is wide, so working 1 sc per row end lies flat. Work slightly looser along the tapered edges.
- The border adds 0.25 in (0.6 cm) on every edge. That takes the panel from 4.5 in × 20 in (11.4 cm × 50.8 cm) to 5 in × 20.5 in (12.7 cm × 52.1 cm).
Final Blocking
- Before joining, soak the panel and the baskets in cool water for 10 minutes.
- Roll them in a towel and press out the water. Don’t wring.
- Pin the panel to 5 in × 20.5 in (12.7 cm × 52.1 cm), keeping the long sides straight.
- Put a roll wrapped in a plastic bag inside each basket so the walls dry upright.
- Use your fingers to spread each shell evenly.
- Let everything dry for about 24 hours.
- After joining, lightly steam the seams from the back.
Final Quality-Control Checklist
- Each base lies flat and measures 5.25 in (13.3 cm) across.
- Each shell round has 11 shells.
- The cream rims are even, with a neat crab-stitch edge.
- The border has 174 stitches, and the panel measures 5 in × 20.5 in (12.7 cm × 52.1 cm).
- Each basket is centered, with 3 stitches free on each side.
- The gaps between baskets are 0.75 in (1.9 cm).
- The tab holds the ring firmly, and all ends are woven in.
Troubleshooting
- The base cups: Your tension is too tight. Go up a hook size.
- The base ruffles: Your tension is too loose. Go down a hook size.
- The shells don’t line up: Make sure you have 66 stitches before Rnd 14, and that each lattice sc goes into the center dc of a shell.
- The rolls don’t fit: Check your gauge, then remake the base at the correct size.
- The rim flares: Work Rnd 23 with a hook 0.5 mm smaller.
- The panel puckers at the seams: Unpick the seam and sew it again with looser, even tension.
- The border waves: Your rows are shorter than your stitches are wide. Skip 1 row end in every 10.
Care
Hand wash in cool water with mild soap. Reshape and dry flat, propping the baskets open with rolls. Don’t tumble dry.
Final Notes
Here is how the measurements build on each other:
- The gauge of 16 × 16 gives 4 stitches and 4 rows per inch.
- The 66-stitch base measures 5.25 in (13.3 cm) across and holds 11 shell repeats.
- Each basket wall is 4 in (10.2 cm) tall.
- The 18-stitch panel measures 4.5 in × 20 in (11.4 cm × 50.8 cm).
- The 174-stitch border brings the panel to 5 in × 20.5 in (12.7 cm × 52.1 cm).
If you check each of these as you go, the three baskets will line up neatly.
Happy crocheting!