

This three-tier hanging basket holds three standard toilet rolls in a column of open lattice cups. It hangs from a wooden ring on a door or wall hook. Each basket has a solid base, an airy diamond-net wall and a crown-shaped rim of rounded fan domes and flared points.
The whole piece is worked in one soft lavender cotton. The braided-looking edge on every rim and along the hanger strip is plain reverse single crochet. The pattern uses US crochet terms throughout.
The finished organizer is about 6.5 in (16.5 cm) wide across the basket points. It hangs about 27.75 in (70.5 cm) from the top of the ring to the bottom of the lowest basket.
You make three identical baskets in the round and one flat net strip worked in rows. Then you edge the strip, sew the back of each basket to it, and wrap the top tab around the ring.
Finished Size and Construction
- Finished size: 6.5 in (16.5 cm) wide x 27.75 in (70.5 cm) long, including the ring
- Skill level: Intermediate
- Terminology: US crochet terms
- Yarn weight: Worsted (#4) cotton
- Hook: 5.0 mm (US H-8)
- Number of pieces: 4 (3 baskets + 1 hanger strip), plus 1 wooden ring
- Layout: 3 baskets stacked vertically on one strip, 1 column x 3 rows
- Basket size: 4.75 in (12.1 cm) base diameter x 5.5 in (14.0 cm) tall at the points
- Strip size before border: 4 in (10.2 cm) wide x 25.75 in (65.4 cm) long
- Border depth: 0.25 in (0.6 cm) (2 rows, strip sides and bottom)
Materials
Yarn: Use a smooth worsted-weight cotton or cotton blend. Cotton holds the basket shape and doesn’t stretch much under the weight of the rolls. Acrylic works, but the baskets will be softer.
- Lavender: 200 g, about 360 m (394 yd), based on a cotton with about 90 m (98 yd) per 50 g
Each basket uses about 45 g. The strip and its border use about 40 g. The total above includes a margin of about 25 g for your gauge swatch and seaming.
Tools:
- 5.0 mm (US H-8) crochet hook
- 1 wooden ring, 2.75 in (7.0 cm) outer diameter
- Stitch markers
- Tapestry needle
- Scissors and measuring tape
- Blocking mat, rust-proof pins and a spray bottle
Abbreviations (US Terms)
- ch – chain
- sl st – slip stitch
- sc – single crochet
- hdc – half double crochet
- dc – double crochet
- tr – treble crochet
- BLO – back loop only
- rev sc – reverse single crochet
- sk – skip
- sp – space
- st(s) – stitch(es)
- rep – repeat
- rnd – round
Reverse single crochet (rev sc): Work from left to right (right to left if you’re left-handed). Insert the hook into the next stitch to the right, yarn over, pull up a loop, yarn over and draw through both loops. This makes the twisted, braided edge.
Net loop: A ch-5 or ch-7 arch anchored with sc. Stacking offset loops round after round makes the diamond lattice.
Gauge and Checkpoints
Gauge: 16 sc and 16 sc rnds = 4 in (10.2 cm) with a 5.0 mm hook.
Test one piece first. Make the base of one basket (Rnds 1–10) before you start the other pieces. It’s the best gauge swatch for this project.
Checkpoints:
- After Rnd 10 (base): 60 sts, 4.75 in (12.1 cm) across, lying flat.
- After Rnd 14 (solid band): The band is 1 in (2.5 cm) tall. A standard roll, up to 4.5 in (11.4 cm) across, should slip in easily.
- After Rnd 18 (net): The 4 net rnds measure 3 in (7.6 cm), or 0.75 in (1.9 cm) per rnd.
- After Rnd 21 (rim): The basket is 5.5 in (14.0 cm) tall at the points.
- Strip, after Row 4: It’s 4 in (10.2 cm) wide, and 4 net rows = 2.5 in (6.4 cm).
If your base is too big or ruffles, go down to a 4.5 mm hook. If it’s too small or cups upward, go up to a 5.5 mm hook.
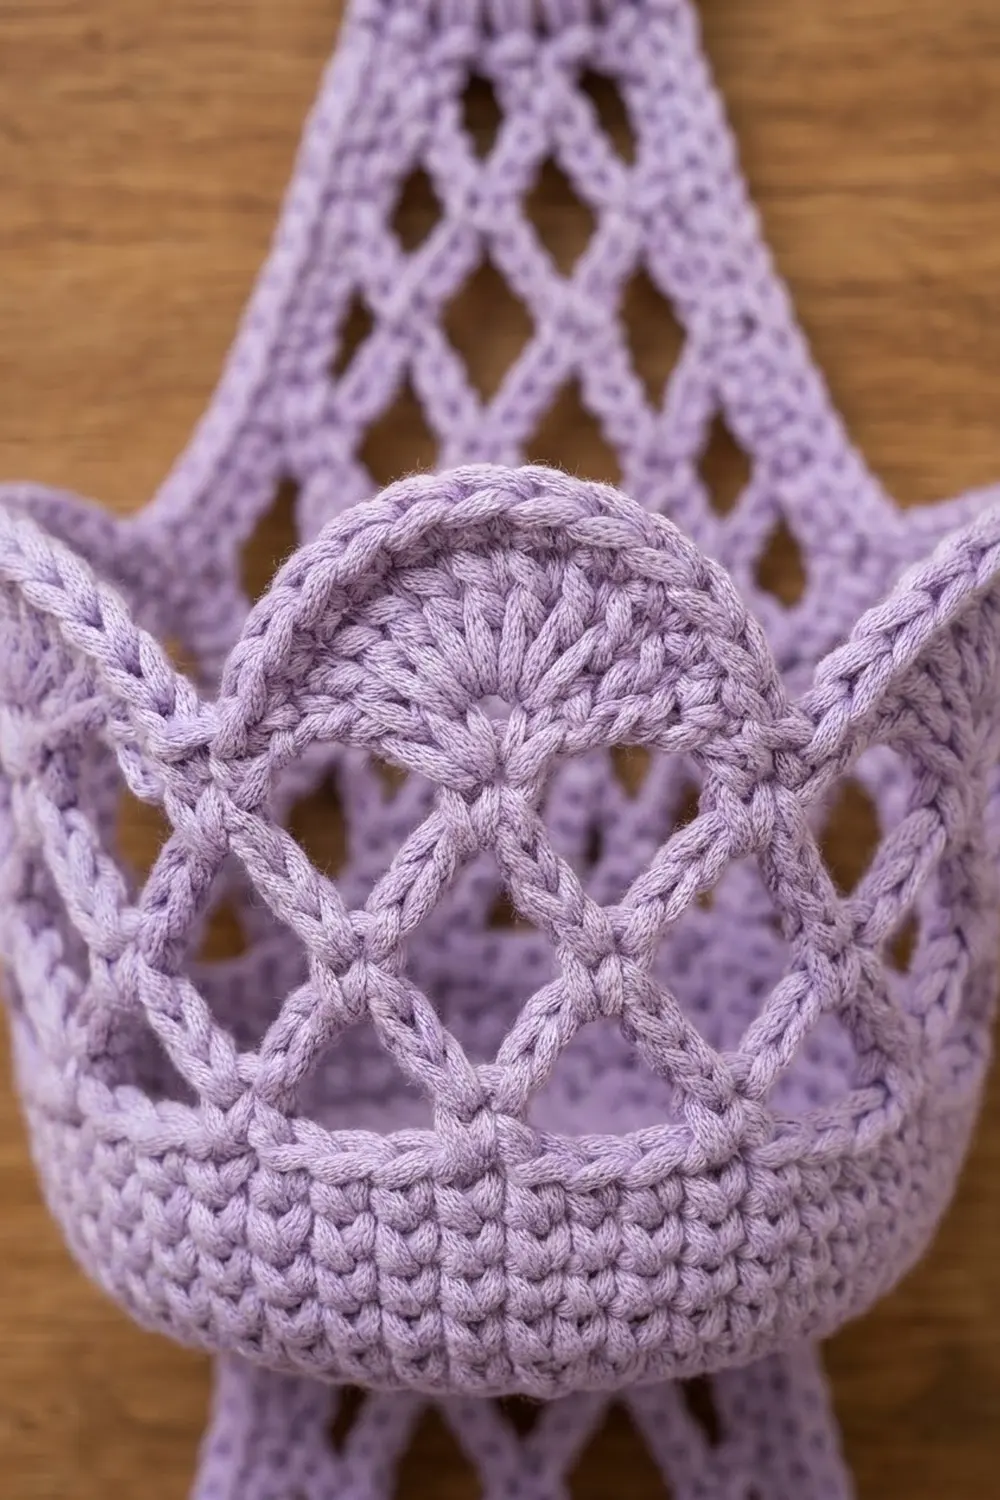
Basket (Make 3)
Base
Work in joined rnds. Join each rnd with a sl st to the first sc. The ch 1 at the start of each rnd does not count as a stitch.
Rnd 1: Magic ring, ch 1, 6 sc in ring, join. (6 sts)
Rnd 2: Ch 1, 2 sc in each st around, join. (12 sts)
Rnd 3: Ch 1, sc in next st, 2 sc in next st; rep from * 6 times total, join. (18 sts)
Rnd 4: Ch 1, sc in next 2 sts, 2 sc in next st; rep 6 times total, join. (24 sts)
Rnds 5–10: Keep increasing 6 sts per rnd, working 1 more sc between increases each rnd. Rnd 5 (30 sts), Rnd 6 (36 sts), Rnd 7 (42 sts), Rnd 8 (48 sts), Rnd 9 (54 sts), Rnd 10 (60 sts).
Solid Band
Rnd 11 (turning ridge): Ch 1, sc in BLO of each st around, join. (60 sts) The unused front loops form the raised ridge at the bottom edge, and the wall starts to rise.
Rnds 12–14: Ch 1, sc in each st around, join. (60 sts)
Lattice Wall
Rnd 15 (set-up): Ch 1, sc in first st, ch 7, sk 5 sts, sc in next st; rep from * 8 more times, ch 7, sk last 5 sts, join to first sc. (10 sc, 10 ch-7 loops)
Check: 1 + (9 x 6) + 5 = 60 sts used.
Rnd 16: Sl st in next 3 ch, ch 1, sc around the same ch-7 loop, ch 7, sc in next ch-7 loop; rep from * 8 more times, ch 7, join to first sc. (10 sc, 10 ch-7 loops)
Rnds 17–18: Rep Rnd 16. (10 sc, 10 ch-7 loops each rnd)
Each sc sits at the center of the loop below it. That shifts the loops by half a loop every rnd, which forms the diamonds.
Rnd 19 (conversion): Ch 1, sc in first sc, 5 sc in next ch-7 loop, sc in next sc, 5 sc in next ch-7 loop; rep from * 8 more times, join. (10 sc worked 1 per existing sc + 50 sc worked into loops = 60 sts)
Crown Rim
Each of the 5 repeats uses 12 sts.
Rnd 20: Ch 4 (counts as tr), (ch 2, tr) in same st as join, sk 2 sts, sc in next st, sk 2 sts, 9 dc in next st, sk 2 sts, sc in next st, sk 2 sts, (tr, ch 2, tr) in next st; rep from * 4 more times, ending the last rep at **. Join to top of beginning ch-4. (5 repeats of 2 tr + 1 sc + 9 dc + 1 sc = 65 sts, plus 5 ch-2 sps)
Rnd 21: Sl st into ch-2 sp, ch 3 (counts as dc), (dc, ch 3, 2 dc) in same sp, sk next tr and sc, hdc in first dc of fan, 2 hdc in each of next 7 dc, hdc in last dc of fan, sk next sc and tr, (2 dc, ch 3, 2 dc) in next ch-2 sp; rep from * 4 more times, ending the last rep at **. Join to top of beginning ch-3. (5 repeats of 4 dc + 16 hdc = 100 sts, plus 5 ch-3 sps)
Skipping the tr and sc on each side of every fan drops the edge into a valley. That separates each rounded dome from the flared points beside it. Don’t fasten off yet; the rim edging continues in the Border section.
Hanger Strip (Make 1)
Work flat in rows from the bottom up.
Foundation: Ch 17.
Row 1: Sc in 2nd ch from hook, ch 5, sk 3 ch, sc in next ch; rep from * 3 more times. (5 sc, 4 ch-5 loops)
Row 2: Ch 5 (counts as dc + ch 2), turn, sc in first ch-5 loop, ch 5, sc in next ch-5 loop; rep from * 2 more times, ch 2, dc in last sc. (3 ch-5 loops + 2 half loops)
Row 3: Ch 1, turn, sc in dc, ch 5, sc in next ch-5 loop; rep from * 2 more times, ch 5, sc in 3rd ch of turning ch-5. (4 ch-5 loops)
Rows 4–35: Rep Rows 2–3 sixteen times, ending with a Row 3.
Check: The strip should be 4 in (10.2 cm) wide and 21.875 in (55.6 cm) long, with each row about 0.625 in (1.6 cm). The open sides relax into a gentle wave.
Top Taper
Row 36: Ch 1, turn, sc in first ch-5 loop, ch 5, sc in next loop; rep from * 2 more times. (3 loops)
Row 37: Ch 1, turn, sc in first loop, ch 5, sc in next loop; rep from * once more. (2 loops)
Row 38: Ch 1, turn, sc in first loop, ch 5, sc in next loop. (1 loop)
Row 39: Ch 1, turn, 7 sc in ch-5 loop. (7 sts)
Rows 36–38 add 1.875 in (4.8 cm).
Ring Tab
Rows 40–46: Ch 1, turn, sc in each st across. (7 sts)
The tab (Rows 39–46) is 2 in (5.1 cm) long, so the full strip measures 25.75 in (65.4 cm). Fasten off, leaving a 12-in (30.5-cm) tail.
Make All Pieces
Every piece uses Lavender:
- Baskets: 3, about 45 g each (135 g total)
- Hanger strip: 1, about 40 g including the border
Layout (back view, top to bottom):
          [ RING ]
          [ TAB  ]
        [ TAPER  ]
    [ net Rows 32-35 ]
    [ BASKET 3: Rows 23-31 ]
    [ gap: Rows 21-22 ]
    [ BASKET 2: Rows 12-20 ]
    [ gap: Rows 10-11 ]
    [ BASKET 1: Rows 1-9 ]
Each basket covers 9 strip rows, about 5.625 in (14.3 cm), which matches its 5.5 in (14.0 cm) height. Each gap is 2 rows, or 1.25 in (3.2 cm), of open net.
Border
Do the borders before joining.
Border gauge: 4 sc per 1 in (2.5 cm), the same as the main gauge.
Basket Rim Edging (each basket)
Rnd 22: Ch 1, rev sc in each dc and hdc around, working 3 rev sc in each ch-3 point sp. Join and fasten off. (100 sts worked 1 per existing st + 15 sts added at the points = 115 rev sc, 23 per repeat)
The 3 stitches in each point keep the tips from pulling inward, so they stay sharp and flared.
Strip Border
Leave the taper and tab unedged so they stay narrow at the ring.
Border Row 1: With the right side facing, join yarn at the right edge of Row 35.
- Right side: Working down the row ends, work 2 sc in each sc row end (odd rows) and 3 sc in each dc row end (even rows): 18 x 2 + 17 x 3 = 87 sc.
- Bottom: Working into the 17 foundation chains, work 3 sc in the first ch, 1 sc in each of the next 15 ch and 3 sc in the last ch. That’s 21 sc, including both corner groups.
- Left side: Working up the row ends to Row 35, work 87 sc as for the right side.
Total: 87 + 21 + 87 = 195 sc.
Border Row 2: Ch 1, do not turn, rev sc in each sc back across. (195 rev sc) Fasten off.
Why the math works: Each side is 21.875 in (55.6 cm) long. At 4 sc per inch, it needs 87.5 sts, and 87 is the nearest whole number. That’s 21.75 in (55.2 cm), close enough to lie flat without flaring or puckering. The bottom has 17 sts across the 4.25 in (10.8 cm) foundation, plus 1 extra stitch at each corner to turn it. The border brings the strip to 4.5 in (11.4 cm) wide and 26 in (66.0 cm) long.
Joining
Method: Whipstitch with a tapestry needle and a 24-in (61.0-cm) length of Lavender.
- Lay the strip flat, right side down. Place Basket 1 on top with one rim point at center back, and line up its Rnd 11 ridge with Row 1.
- Sew the base first. Whipstitch the 12 ridge stitches at center back (6 on each side of the center) across the full width of Row 1. Spread them evenly so the 3 in (7.6 cm) of ridge covers the strip’s 4 in (10.2 cm) of soft net.
- Sew the same 12 stitches of Rnd 19 to the sc stitches of Row 8.
- Tack the back rim point to the center of Row 9 with 3 small stitches.
- Attach Basket 2 at Rows 12, 19 and 20, and Basket 3 at Rows 23, 30 and 31, the same way.
- Fold the tab 1 in (2.5 cm) over the ring and whipstitch the 7 sts of Row 46 to the 7 sts of Row 42.
Tension: Pull each stitch snug but don’t let it draw the net in. The strip should lie flat behind each basket.
Size checkpoint: Hang the piece. It should measure 27.75 in (70.5 cm) from the top of the ring to the bottom of Basket 1. That’s 2.75 in (7.0 cm) of ring plus 25 in (63.5 cm) of strip below the fold.
Final Blocking
- Mist all three baskets and the strip until damp, not soaked.
- Fill each basket with a roll wrapped in a plastic bag, or with a rolled towel, so the walls stand straight.
- Pin each rim point outward and shape the fan domes into smooth arches.
- Pin the strip flat at 4.5 in (11.4 cm) wide, keeping the wavy sides even.
- Let everything dry completely, usually about 24 hours.
- Remove the pins and hang the piece to check that it falls straight.
Final Quality-Control Checklist
- Every basket has 60 sts in Rnds 10–14 and 10 loops in each net rnd.
- Each rim has 5 domes, 5 points and 115 rev sc.
- All three baskets measure 4.75 in (12.1 cm) across and 5.5 in (14.0 cm) tall.
- The strip border has 87 sc on each side and 21 sc across the bottom.
- The baskets are centered and level, with 1.25 in (3.2 cm) gaps between them.
- The ring tab is sewn securely and all ends are woven in.
Troubleshooting
- The base ruffles or cups: Change the hook size as described in the gauge section.
- The net twists into a spiral: Start each rnd with sl sts to the center of the first loop.
- Rnd 20 doesn’t come out to 5 even repeats: Recount Rnd 19. It must have exactly 60 sts.
- The points curl inward: Check that each point has 3 rev sc, then block again.
- The strip edge ripples: Recount the row-end stitches: 2 per sc row and 3 per dc row.
- The baskets tip forward: Add more tacking stitches at the base ridge.
Care
Hand wash in cool water with mild soap, roll in a towel to remove water, and dry flat while reshaping the baskets. Don’t tumble dry.

Final Notes
Each measurement sets up the next. The 4.75 in (12.1 cm) base gives a 60-stitch wall. Those 60 stitches divide into 10 net loops and then 5 crown repeats. The 4 in (10.2 cm) strip borders out to 4.5 in (11.4 cm), and every 9 strip rows match one 5.5 in (14.0 cm) basket. Check your gauge at each stage and the finished organizer will hang straight at 27.75 in (70.5 cm).
Happy crocheting!