

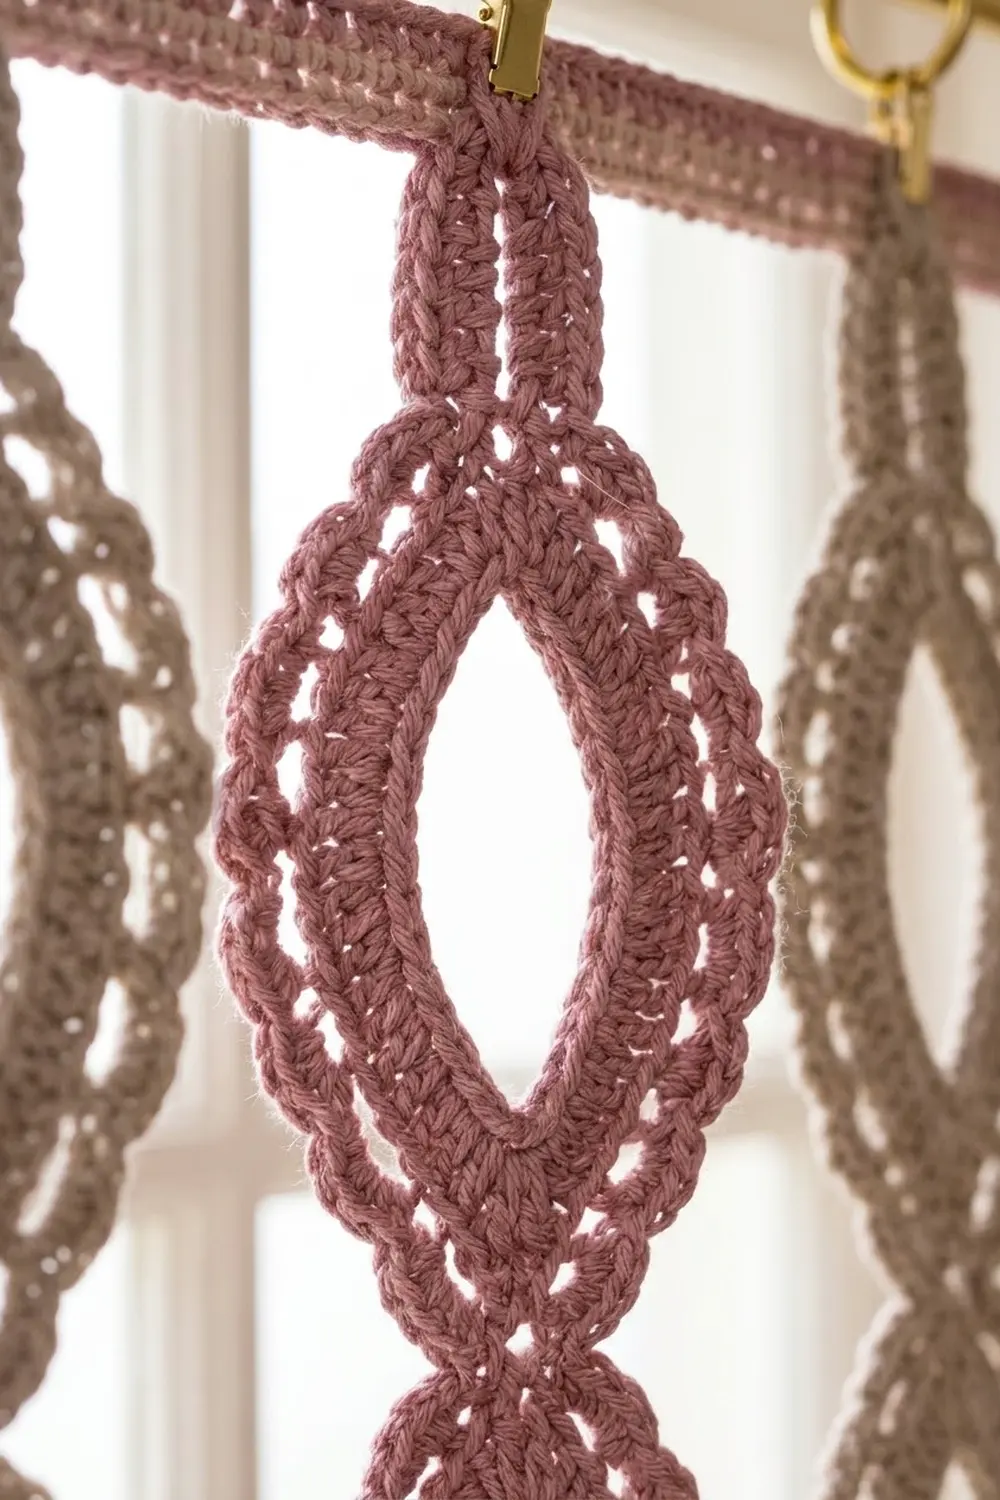
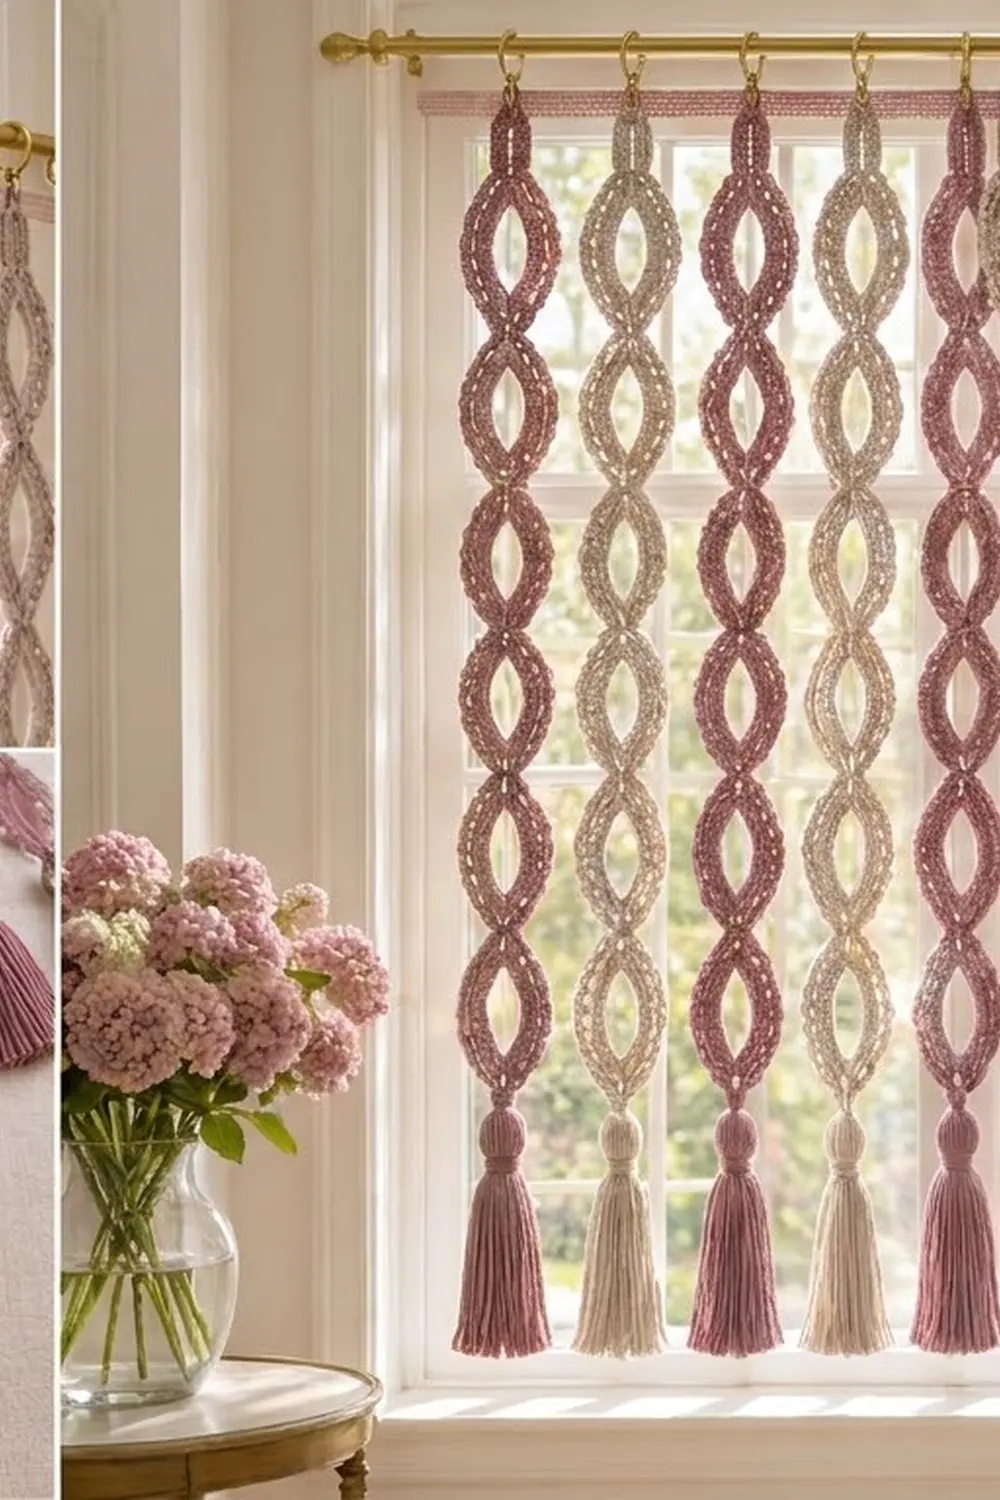
This curtain is made of slim columns of almond-shaped motifs. Each motif has an open, pointed centre, a corded inner ring, a round of double crochet and a scalloped outer edge. Six motifs link tip to tip to make a strand, and each strand ends in a full tassel. Ten strands hang from a narrow header band, so light comes through every opening.
The colours are dusty rose and warm taupe, alternating strand by strand. The look is soft boho: lacy enough to let daylight in, but with enough structure to keep the almond shapes crisp after blocking.
The finished curtain measures about 35 in (88.9 cm) wide and 43.5 in (110.5 cm) long, including the header band and tassels. The pattern uses US crochet terms throughout.
To make it, you crochet 60 three-round motifs and join them as you go into 10 strands. Then you work a 140-stitch header band and catch each strand’s hanging loop into Row 1 of the band. Last, you add the tassels, block and hang the curtain.
Finished Size and Construction
- Finished size: 35 in (88.9 cm) wide × 43.5 in (110.5 cm) long
- Skill level: Easy-Intermediate
- Terminology: US
- Yarn weight: Worsted (#4) cotton or cotton blend
- Hook: US H-8 (5 mm)
- Number of pieces: 60 motifs in 10 strands, plus 1 header band and 10 tassels
- Layout: 10 strands across × 6 motifs down
- Motif size (blocked): 6 in (15.2 cm) long × 3 in (7.6 cm) wide
- Strand of motifs: 36 in (91.4 cm) long
- Size before border: 10 strands spaced 3.5 in (8.9 cm) apart, centre to centre
- Border (header band) depth: 1.75 in (4.4 cm)
- Hanging loop below the band: 0.75 in (1.9 cm)
- Tassel length: 5 in (12.7 cm)
Materials
Choose a smooth worsted-weight cotton or cotton blend so the stitches are clear and the points stay sharp. Acrylic works, but it relaxes more when blocked and the tips will look softer.
- Color A – Dusty Rose: 200 g / 380 m (5 strands, 5 tassels, header band)
- Color B – Taupe: 200 g / 380 m (5 strands, 5 tassels)
Each 30-motif colour set uses about 43 m, the tassels about 63 m and the band about 33 m. The quantities above include a safety margin and are rounded up to full 50 g balls.
Tools:
– US H-8 (5 mm) crochet hook
– Tapestry needle
– 4 stitch markers
– A piece of cardboard 5.5 in (14.0 cm) tall, for the tassels
– Scissors
– Blocking mats and rust-proof pins
– A curtain rod with 10 clip rings
Abbreviations (US Terms)
- ch – chain
- sl st – slip stitch
- sc – single crochet
- dc – double crochet
- sk – skip
- sp – space
- st(s) – stitch(es)
- rev sc – reverse single crochet (crab stitch)
- rep – repeat
Special stitches:
– Shell: 5 dc in the same stitch.
– Tip shell: (3 dc, ch 2, 3 dc) in the same ch-2 sp.
– Rev sc: Working from left to right (right-handed), insert the hook in the next stitch to the right, yarn over, pull up a loop, yarn over and pull through both loops.
Gauge and Checkpoints
Gauge: 16 sc × 16 rows = 4 in (10.2 cm) in single crochet worked in rows.
Make one complete motif before you start production and measure it at each stage.
- After Round 1: about 4 in (10.2 cm) long × 1.25 in (3.2 cm) wide, laid flat.
- After Round 2: about 5 in (12.7 cm) long × 2 in (5.1 cm) wide.
- After Round 3: about 6 in (15.2 cm) long × 3 in (7.6 cm) wide after a light pinning.
Motif too big: Go down to a US G-6 (4 mm) hook. A motif that is 0.5 in (1.3 cm) too long makes each strand 3 in (7.6 cm) too long.
Motif too small: Go up to a US I-9 (5.5 mm) hook. Also check that your starting chain isn’t tight, because a tight ring pinches the opening closed.
Almond Motif (Make 60)
Each motif is worked in the round around an open foundation ring. The ring flattens into the almond shape because of the two tip corners.
Foundation ring: Ch 32. Sl st in the first ch to form a ring, taking care not to twist the chain.
Round 1 (corded inner edge): Ch 1. (Sc, ch 2, sc) in the same ch as the join; this is tip A. Sc in each of the next 15 ch. (Sc, ch 2, sc) in the next ch; this is tip B. Sc in each of the next 15 ch. Sl st in the first sc to join.
(34 sc + 2 ch-2 sps; 17 sc per side between the tip spaces)
Check: 1 + 15 + 1 + 15 = 32 chains used, and 2 + 15 + 2 + 15 = 34 sc. Place a marker in each ch-2 sp.
Round 2 (pointed dc round): Sl st in the ch-2 sp at tip A. Ch 3 (counts as dc). (Dc, ch 2, 2 dc) in the same sp. Dc in each of the next 17 sc. (2 dc, ch 2, 2 dc) in the ch-2 sp at tip B. Dc in each of the next 17 sc. Sl st in the top of the beginning ch-3.
(42 dc + 2 ch-2 sps; 21 dc per side, counting the 2 tip dc at each end of that side)
Check: 4 + 17 + 4 + 17 = 42, and 2 × 21 = 42.
Round 3 (scalloped edge): Sl st in the next dc and in the tip A ch-2 sp. Ch 3 (counts as dc). (2 dc, ch 2, 3 dc) in the same sp to make the first tip shell.
Sk 2 dc, sc in the next dc. [Sk 1 dc, shell in the next dc, sk 1 dc, sc in the next dc] 4 times. Sk 2 dc.
Work a tip shell in the tip B ch-2 sp. Rep from * to * once. Sl st in the top of the beginning ch-3. Fasten off.
(62 sts + 2 ch-2 sps: 4 shells and 5 sc per side, plus 2 tip shells)
Why the math works: Each side has 21 dc. You skip the 2 tip dc at each end, which leaves 17 working stitches. The sc land on stitches 1, 5, 9, 13 and 17, and the shells land on stitches 3, 7, 11 and 15. Each bracketed repeat uses 4 stitches, so 1 + (4 × 4) = 17. Each side has 5 sc + (4 × 5 dc) = 25 stitches, and each tip shell has 6 dc, so 2 × 25 + 2 × 6 = 62.
Weave in the ends on the wrong side, along the Round 2 stitches, so they don’t show through the open centre.
Make All Pieces
Only the first motif of each strand is a standalone motif. You join every later motif to the one above it in its final round (see Joining).
- Color A (Dusty Rose): 30 motifs, in 5 strands of 6
- Color B (Taupe): 30 motifs, in 5 strands of 6
- Tassels: 5 in Color A and 5 in Color B
Hanging loop (top motif of each strand only): After the first motif of a strand is finished, join the same colour in the tip A ch-2 sp. Ch 8, sl st in the same sp and fasten off. When folded, the loop is about 1 in (2.5 cm) long.
Layout grid (columns = strands, read left to right; rows = motifs, top to bottom):
Band:  [================ Color A header band, 140 sc ================]
Row 1:  A   B   A   B   A   B   A   B   A   B
Row 2:  A   B   A   B   A   B   A   B   A   B
Row 3:  A   B   A   B   A   B   A   B   A   B
Row 4:  A   B   A   B   A   B   A   B   A   B
Row 5:  A   B   A   B   A   B   A   B   A   B
Row 6:  A   B   A   B   A   B   A   B   A   B
Tassel: A   B   A   B   A   B   A   B   A   B
Joining (Join-As-You-Go, Tip to Tip)
The motifs in each strand are joined during Round 3 of the new motif. The tip A of the new motif links to the tip B of the motif above it.
Method: Work Rounds 1 and 2 of the new motif as usual. For Round 3, sl st in the next dc and in the tip A ch-2 sp, then ch 3 and work 2 dc in the sp. Now ch 1, and with right sides of both motifs facing you, sl st in the tip B ch-2 sp of the previous motif. Ch 1, then work 3 dc in the current sp. Finish Round 3 as written.
Stitch logic: The sequence ch 1, sl st, ch 1 takes the place of the ch 2 in this one tip shell. The new motif still has 62 stitches and 2 tip spaces, so its size doesn’t change. The previous motif’s tip B space now holds the join.
Tension: Keep the joining sl st snug but not tight. If it’s tight, the tips pucker and twist. If it’s loose, a visible gap opens between the motifs and the strand grows longer.
Size checkpoint: After 3 motifs, the strand should measure 18 in (45.7 cm) when gently pinned. After 6 motifs, it should measure 36 in (91.4 cm). Leave tip B of the sixth motif open for the tassel.
Border: Header Band
The header band is the curtain’s only border. It runs across the top, and the 10 hanging loops are caught into Row 1.
Border gauge: 16 sc = 4 in (10.2 cm), so 4 sc = 1 in (2.5 cm). Each strand gets its own 14-stitch section of the band, which is 3.5 in (8.9 cm) wide.
Starting count: 10 strands × 14 sts per section = 140 sc. No stitches are added between sections.
Foundation: With Color A, ch 141.
Row 1 (joining row): Lay the strands below the chain in their A-B order with the right sides facing you. Sc in the 2nd ch from the hook and in each ch across. As you work stitches 7 and 8 of each 14-stitch section, insert the hook through the chain and through that strand’s hanging loop at the same time. Each loop is caught by 2 sc at the centre of its section. Ch 1 and turn. (140 sc)
Rows 2–6: Sc in each sc across. Ch 1 and turn. (140 sc per row)
Row 7 (trim): Rev sc in each sc across. Fasten off. (140 rev sc = 140 stitches worked 1 per existing stitch + 0 extra)
Why the math works: 140 sc ÷ 4 sc per inch = 35 in (88.9 cm). The centre of each strand sits between stitches 7 and 8 of its section, so the strand centres are exactly 3.5 in (8.9 cm) apart. The 7 rows add up to 1.75 in (4.4 cm) of depth.
Tassels (Make 10)
- Wrap matching yarn 40 times around the 5.5 in (14.0 cm) cardboard.
- Slide a 12 in (30.5 cm) tie strand under the wraps at the top and knot it tightly.
- Cut the wraps along the bottom edge.
- Wrap a separate strand 6 times around the tassel, 0.75 in (1.9 cm) below the top, to form the neck. Knot it and bury the ends inside the tassel.
- Thread the top tie through the tip B ch-2 sp of the strand’s last motif, knot it securely and hide the ends in the neck.
- Trim the tassel to 5 in (12.7 cm) after blocking.
Final Blocking
- Soak the whole curtain in cool water for 15 minutes, then press the water out in a towel. Don’t wring it.
- Lay the curtain flat on blocking mats with the band at the top.
- Pin the band straight to 35 in × 1.75 in (88.9 × 4.4 cm).
- Pin each strand straight down so its 6 motifs measure 36 in (91.4 cm) from tip to tip.
- Pin each motif to 6 in × 3 in (15.2 × 7.6 cm). Put a pin in each tip shell’s ch-2 sp to sharpen the points, and one in each side scallop.
- Open each centre into an even almond shape by pinning Round 1 outward at its widest point.
- Comb the tassels straight and let everything dry completely.
- Unpin the curtain, trim the tassels to an even 5 in (12.7 cm) and clip one ring at the centre of each band section.
Final Quality-Control Checklist
- 60 motifs in total, and each has 62 stitches in Round 3
- Each strand has 6 motifs, measures 36 in (91.4 cm) and has no twists
- The colours alternate A-B across all 10 strands
- The band is 140 stitches and 35 in (88.9 cm) wide
- Each hanging loop is caught at stitches 7–8 of its section
- The points are sharp and every centre is open
- All tassels are 5 in (12.7 cm) long and firmly knotted
- All ends are woven in on the wrong side
Troubleshooting
The motif cups or curls: The Round 2 dc are too tight. Go up a hook size for Round 2 only, or check that you used exactly 17 dc per side.
Scallops ripple: You probably skipped too few stitches. Recount 4 shells and 5 sc per side.
The tips look rounded: Pin the ch-2 tip spaces firmly while the curtain is wet, and make sure every tip has its ch 2.
The strand twists: One motif was joined wrong side out. Undo that join and redo it with both right sides facing you.
The band ruffles or pulls in: Recount to 140 stitches, then adjust your hook size to match the band gauge.
Strands are uneven in length: Re-measure at the 3-motif checkpoint and block each strand to 36 in (91.4 cm).
Care
Hand wash in cool water with a mild detergent, then lay flat and pin the curtain to its blocked measurements to dry. Hang it out of strong direct sun to slow fading.
Final Notes
The measurement chain is simple. A 32-chain ring gives a motif of 6 in × 3 in (15.2 × 7.6 cm), and six of them make a 36 in (91.4 cm) strand. Each strand is centred in a 14-stitch section, ten sections make a 140-stitch band 35 in (88.9 cm) wide, and the 1.75 in (4.4 cm) band, 0.75 in (1.9 cm) loops and 5 in (12.7 cm) tassels bring the full length to 43.5 in (110.5 cm). Check each link in that chain as you go and the finished curtain will hang straight and even.
Happy crocheting!