

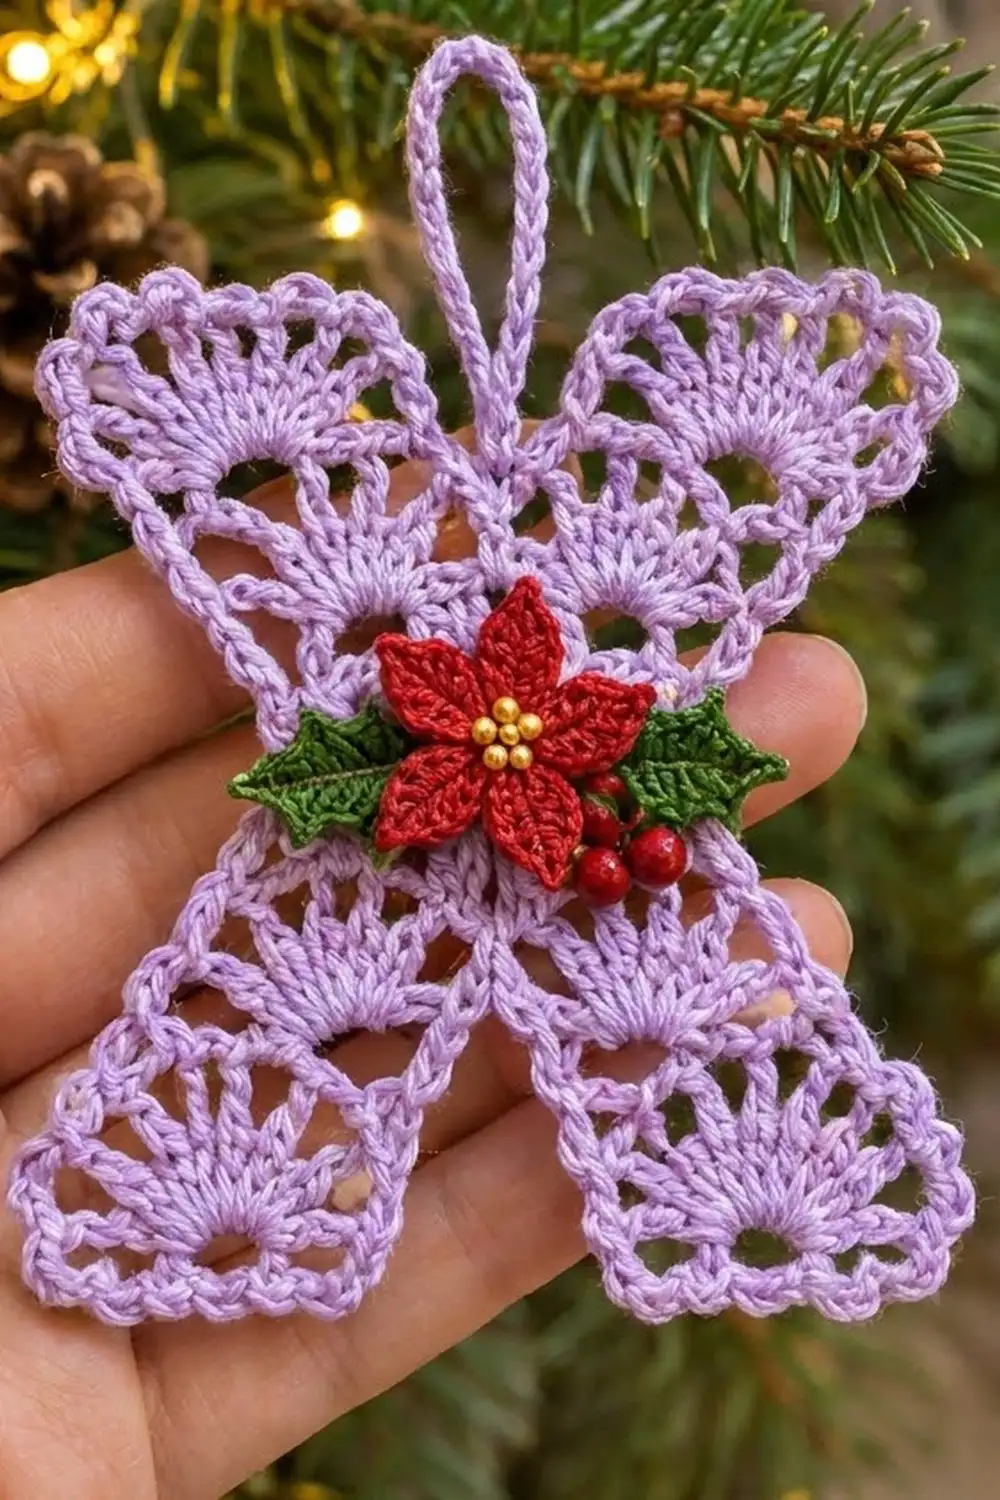
This lacy letter X makes a soft, pretty Christmas ornament. Rows of fan stitches run along all four legs, and every leg ends in a scalloped edge. A red poinsettia with gold bead “stamens,” two holly leaves and three berries sit right where the legs cross.
The lavender body gives the piece a calm, vintage look, and the red and green appliqué makes it clearly a Christmas ornament. Hang it on the tree, tie it onto a gift as a monogram tag, or make a whole set of initials.
The pattern uses US crochet terms. The finished ornament measures about 5 in (12.7 cm) tall and 5 in (12.7 cm) wide. The hanging loop adds 1.75 in (4.4 cm), for a total height of 6.75 in (17.1 cm).
Construction is simple and has no sewn seams in the lace. You crochet a small solid center square, then work four identical lace legs outward from its four sides. One outline border goes around everything, and the hanging loop is worked as part of that border. Last, you make the poinsettia, leaves and berries separately and sew them over the center.
Finished Size and Construction
- Finished size: about 5 in × 5 in (12.7 cm × 12.7 cm), not counting the loop
- Diagonal, tip to tip: 5.75 in (14.6 cm) after the border
- Skill level: Intermediate
- Terminology: US
- Yarn weight: #1 super fine (fingering) mercerized cotton, or size 3 crochet thread
- Hook: 2.25 mm (B-1)
- Number of pieces: 1 lace body, plus 6 small appliqué parts (1 flower, 2 leaves, 3 berries)
- Layout: a center square turned on point, with 4 legs worked out from it
- Center square: 1.5 in × 1.5 in (3.8 cm × 3.8 cm)
- Each leg: 2 in (5.1 cm) long and 1.5 in (3.8 cm) wide, flaring to 1.75 in (4.4 cm) at the scalloped end
- Size before border: each diagonal is 5.5 in (14 cm); the X is about 4.75 in (12.1 cm) tall and wide
- Border depth: 0.125 in (0.3 cm) on every edge
Materials
Use a smooth, mercerized cotton so the fans look crisp and the piece holds its shape after blocking. Fuzzy or very soft yarns blur the lace.
- Color A, lavender: 10 g, about 40 m
- Color B, red: 3 g, about 12 m
- Color C, green: 2 g, about 8 m
- Gold beads: 5 round beads, 4 mm
All yarn amounts include a safety margin of about 20 percent.
Tools
- 2.25 mm (B-1) crochet hook
- Tapestry needle
- Sewing needle and matching thread for the beads
- 4 stitch markers
- Blocking mat or foam board
- Rustproof pins
- Spray bottle
- Spray starch (optional)
Abbreviations (US Terms)
- ch – chain
- sl st – slip stitch
- sc – single crochet
- hdc – half double crochet
- dc – double crochet
- sc2tog – single crochet 2 together
- sk – skip
- sp – space
- st(s) – stitch(es)
- MR – magic ring
- rep – repeat
Special stitches
- Fan: 7 dc worked into the same stitch.
- Picot: ch 3, then sl st in the 3rd ch from the hook.
Gauge and Checkpoints
The center square is your gauge swatch. Make it first and measure it before you start any legs.
Gauge: 13 sc and 13 rows = 1.5 in (3.8 cm).
Checkpoints
- Center square: 1.5 in × 1.5 in (3.8 cm × 3.8 cm)
- Each leg after Row 4: 0.875 in (2.2 cm) from the square
- Each leg after Row 7: 1.625 in (4.1 cm) from the square
- Each leg after Row 8: 2 in (5.1 cm) from the square
- Each diagonal before the border: 5.5 in (14 cm)
- Each diagonal after the border: 5.75 in (14.6 cm)
If your square is too big, go down to a 2.0 mm hook. If it is too small, go up to a 2.5 mm hook. Remake the square until it measures correctly, because every later measurement depends on it.
Center Square
Work in Color A.
Row 1: Ch 14. Sc in the 2nd ch from the hook and in each ch across. (13 sc)
Rows 2–13: Ch 1, turn. Sc in each st across. (13 sc)
Do not fasten off. Check that the square measures 1.5 in × 1.5 in (3.8 cm × 3.8 cm).
The square has four sides, each 13 sts or 13 row-ends long:
- the top of Row 13
- the free loops of the foundation chain
- the row-ends on the left
- the row-ends on the right
Each leg starts with exactly 13 sc, worked into one of these sides.
Leg Pattern (Make 4)
All four legs follow the same 8 rows. Only Row 1 changes, depending on where the leg starts.
Leg 1, Row 1: Keep going from the square. Ch 1, turn, and sc in each st of Row 13. (13 sc)
Leg 2, Row 1: Join Color A with a sl st in the first free loop of the foundation chain. Ch 1, then sc in each free loop across. (13 sc)
Legs 3 and 4, Row 1: Join Color A at the corner of one side of the square. Ch 1, then work 1 sc in the end of each row. (13 sc)
Row 2 (fan row): Ch 3 (counts as dc), turn, and dc in the first st. Ch 2, sk 2 sts, sc in the next st. Sk 2 sts, make a fan in the next st. Sk 2 sts, sc in the next st. Ch 2, sk 2 sts, 2 dc in the last st.
(13 sts: 2 dc, 1 sc, 7 fan dc, 1 sc, 2 dc, plus 2 ch-2 sps)
Row 3 (arch row): Ch 1, turn. Sc in each of the first 2 dc. Ch 4, then sc in the 4th (center) dc of the fan. Ch 4 again, then sc in the last dc and in the top of the turning ch.
(5 sc and 2 ch-4 sps)
Row 4 (sc row): Ch 1, turn. Sc in each of the first 2 sc. Work 4 sc in the ch-4 sp, sc in the center sc, 4 sc in the next ch-4 sp, then sc in each of the last 2 sc.
(13 sc: 2 + 4 + 1 + 4 + 2)
Rows 5–7: Repeat Rows 2–4. (13 sc at the end of Row 7)
Row 8 (end fan row): Repeat Row 2. Fasten off.
(13 sts plus 2 ch-2 sps)
The legs alternate solid sc rows with open arches, so each fan sits over a small “window.” Ending on a fan row gives every leg its flared, scalloped tip.
When a leg is done, measure it. It should be 2 in (5.1 cm) from the square. Then turn the square on point so the legs make an X.
Border
Work in Color A.
Border gauge: about 13 sc along each 2 in (5.1 cm) leg side.
Before you start, place a marker at each of the 4 inner corners, where two legs meet at a corner of the center square. Join the yarn at the top inner corner, the V between the two upper legs.
Round 1: Ch 1. Work around the X as follows.
Inner corner: Make 1 sc2tog. For the first loop, insert the hook in the end of Row 1 of the leg you just finished. For the second loop, insert it in the end of Row 1 of the next leg.
Each leg side (12 sts): Work into the row-ends from Row 2 to Row 8 (or back from Row 8 to Row 2 on the return side):
– 2 sc in the end of each fan row (Rows 2, 5 and 8) = 6
– 2 sc in the end of each arch row (Rows 3 and 6) = 4
– 1 sc in the end of each sc row (Rows 4 and 7) = 2
Each leg end (21 sts, including its 2 corner sts):
– 3 sc in the first dc (the middle sc of the 3 is the corner)
– sc in the next dc
– 2 sc in the ch-2 sp
– sc in the sc
– sc in each of the 7 fan dc
– sc in the sc
– 2 sc in the ch-2 sp
– sc in the next dc
– 3 sc in the last dc (the middle sc is the corner)
Join with a sl st to the first sc2tog.
(184 sts: 4 legs × (12 + 21 + 12) = 180, plus 4 sc2tog)
Round 2 (outline and loop): Ch 1. Sl st loosely in the first sc2tog, then:
1. Ch 35, and sl st in the same sc2tog.
2. Work 45 sc over the ch-35 loop.
3. Sl st in the same sc2tog again.
4. Sl st loosely in each st around.
Join and fasten off.
(184 sl sts, plus the covered loop)
The loop should stand 1.75 in (4.4 cm) tall.
Why the math works:
- Leg sides: Each side has 13 row-ends, and one sc goes into the end of each sc row. The taller rows get 2 sc each, which matches their height. The edge stays flat and does not ruffle.
- Leg ends: The ends get 1 sc per stitch and 2 sc per ch-2 sp, so the scallops keep their shape. The 3-sc groups turn the outer corners, and those corners are counted once, inside the 21.
- Inner corners: Each sc2tog takes the place of the two Row 1 row-ends. This pulls each inner V sharp instead of leaving a gap.
The border adds 0.125 in (0.3 cm) on every edge. Each diagonal grows from 5.5 in (14 cm) to 5.75 in (14.6 cm), and the overall size grows from 4.75 in (12.1 cm) to 5 in (12.7 cm).
Appliqués
Poinsettia (Color B, make 1)
Round 1: MR, ch 1, 5 sc in the ring. Pull the ring closed and sl st to the first sc. (5 sc)
Round 2: Make 5 petals. For each petal:
1. Ch 7.
2. Working back down the chain: sl st in the 2nd ch from the hook, sc in the next ch, hdc in the next ch, dc in each of the next 2 ch, hdc in the last ch.
3. Sl st in the same sc of Round 1, then sl st in the next sc.
Repeat for all 5 petals and fasten off. (5 petals, each with 6 sts)
The sl st at the start of each petal makes its pointed tip. Each petal is about 0.6 in (1.5 cm) long, and the flower is about 1.5 in (3.8 cm) across.
Holly leaves (Color C, make 2)
Ch 9.
First side: Starting in the 2nd ch from the hook, work:
sc, hdc, dc, picot, dc, dc, picot, dc, hdc.
Then work 3 sc in the last ch to turn the tip.
Second side: Rotate the leaf and work into the free loops:
hdc, dc, dc, picot, dc, dc, picot, hdc, sc.
Sl st in the first ch, then fasten off.
(17 sts and 4 picots)
Each leaf is about 1 in (2.5 cm) long.
Berries (Color B, make 3)
MR, ch 2 (does not count as a stitch), 5 dc in the ring. Pull the ring tight and sl st in the top of the first dc. Fasten off and push the tails inside to round out the berry. (5 dc)
Each berry is about 0.25 in (0.6 cm) across.
Assembly
- Lay the two leaves across the center square so their tips point left and right. Overlap them by about 0.25 in (0.6 cm) in the middle. Together they should span about 3 in (7.6 cm). Sew them in place.
- Center the poinsettia on top of the leaves and stitch around its center ring.
- Sew the 5 gold beads in a tight cluster in the middle of the flower.
- Sew the 3 berries in a small group just below and to the right of the flower.
Final Blocking
- Wet the ornament, or spray it until it is damp all the way through. Gently squeeze out the extra water.
- Lay it face down on the blocking mat. Make sure the legs cross at right angles and each diagonal measures 5.75 in (14.6 cm).
- Pin the 4 inner corners first.
- Pin each leg side straight, keeping each leg 1.5 in (3.8 cm) wide.
- Pin each fan scallop at the leg ends, so each end opens to about 1.75 in (4.4 cm).
- Pin the loop straight up.
- Spray with starch if you want a stiffer ornament. Let it dry completely before you unpin it.
If the appliqué was already sewn on, block face down and keep the pins away from the flower.
Final Quality-Control Checklist
- [ ] Center square is 1.5 in (3.8 cm), with 13 sc and 13 rows
- [ ] All 4 legs have 8 rows and measure 2 in (5.1 cm)
- [ ] Every fan has 7 dc
- [ ] Round 1 of the border has 184 sts: 12 on each leg side, 21 on each leg end, and 4 sc2tog
- [ ] Both diagonals measure 5.75 in (14.6 cm)
- [ ] Loop is 1.75 in (4.4 cm) tall and firmly attached
- [ ] Appliqué is centered, the leaves are level, and the beads are secure
- [ ] All tails are woven in
Troubleshooting
- Fans cup or ripple: Your tension is too loose on the fan rows. Go down a hook size for Rows 2, 5 and 8 only.
- A leg is shorter than the others: Count its rows. Each leg needs exactly 8, ending on a fan row.
- Leg sides wave: You added extra sc into the row-ends. Use exactly 12 per side.
- Gap at an inner V: Redo that corner, making sure the sc2tog goes into both Row 1 row-ends.
- Loop flops over: Pack the 45 sc tightly along the chain, then starch the loop.
Care
Hand wash in cool water, press out the water in a towel, and reblock flat. Store flat, or hang the ornament by its loop, away from direct sunlight.

Final Notes
Each measurement leads to the next, so checking them in order keeps the ornament true:
- A 1.5 in (3.8 cm) square sets the gauge.
- Four legs of 2 in (5.1 cm) each make diagonals of 5.5 in (14 cm).
- The 0.125 in (0.3 cm) border brings each diagonal to 5.75 in (14.6 cm) and the whole X to 5 in (12.7 cm) square.
- The 1.75 in (4.4 cm) loop makes the total height 6.75 in (17.1 cm).
Check each number as you go, and every X you make will come out the same size.
Happy crocheting!