

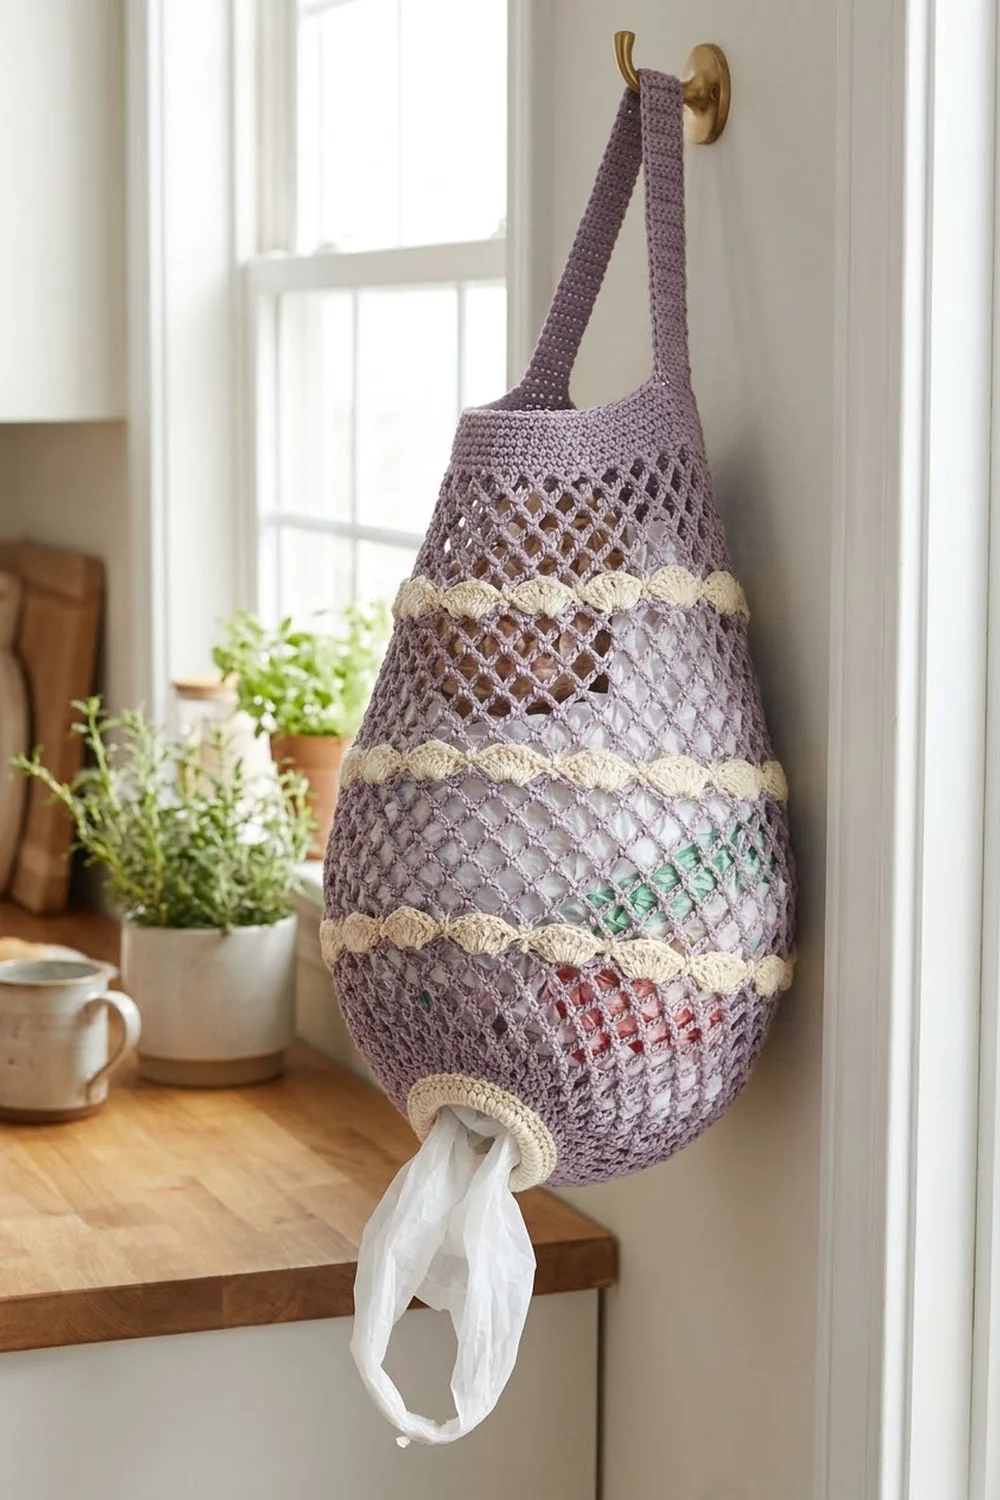
This hanging plastic bag holder is a soft, egg-shaped pouch worked in an open lavender mesh. Four bands of cream shell scallops cross the mesh and hang down over it like little frills. You stuff bags in through the wide top and pull them out one at a time through a small cream-trimmed opening at the bottom.
The colors are calm and suit a kitchen: a dusty lavender body, creamy ivory scallops and a matching cream ring around the hole at the bottom. A single lavender strap loops over a wall hook or cabinet knob.
The pattern uses US crochet terms. Laid flat, the finished body measures about 10.25 in (26.0 cm) wide at its widest point and 12 in (30.5 cm) tall. The strap is 16 in (40.6 cm) long.
The holder is one continuous piece worked top-down in joined rounds. You start with a lavender sc rim, then alternate V-stitch mesh sections with cream scallop bands, then taper the bottom. Each set of scallops is worked into the front loops of a cream sc round, so the scallops hang freely over the next section. To finish, you add a top edge round, the strap and the cream border around the bottom opening.
Finished Size and Construction
- Finished size: 10.25 in (26.0 cm) wide flat x 12 in (30.5 cm) tall, plus strap
- Skill level: Easy+ (V-stitches, front/back loop work, reverse sc)
- Terminology: US
- Yarn weight: Worsted (#4) cotton or cotton blend
- Hook: 5.0 mm (H-8)
- Number of pieces: 1 (the strap is worked directly onto the body)
- Layout: one tube worked top-down in joined rounds, with the right side always facing
- Piece size: top rim 8.5 in (21.6 cm) flat; widest point 10.25 in (26.0 cm) flat
- Size before border: 10.25 in (26.0 cm) x 11.25 in (28.6 cm)
- Border depth: 0.75 in (1.9 cm), around the bottom opening only
Materials
Choose a smooth worsted-weight cotton or cotton blend. Cotton holds its shape when the pouch is full and doesn’t stretch out over time the way acrylic can. The amounts below assume about 170 m per 100 g.
- Color A, Lavender: 130 g (about 221 m)
- Color B, Cream: 50 g (about 85 m)
These amounts include a margin of about 20% for gauge swatches and differences in tension.
Tools:
- 5.0 mm (H-8) crochet hook
- 4 stitch markers
- Tapestry needle
- Scissors
- Measuring tape
- Rust-proof pins and a spray bottle for blocking
Abbreviations (US Terms)
- ch – chain
- sl st – slip stitch
- sc – single crochet
- dc – double crochet
- sc2tog – single crochet 2 together
- inc – 2 sc in the same stitch
- FLO / BLO – front loop only / back loop only
- rev sc – reverse single crochet (crab stitch)
- st(s) – stitch(es)
- sp – space
- rnd – round
- RS – right side
Special stitches:
- V-st: (dc, ch 1, dc) in the same stitch or space.
- Beginning V-st: ch 4 (counts as dc + ch 1), then dc in the same stitch or space.
- Shell: 5 dc in the same stitch.
- Gap: the space between two neighboring V-sts, between the last dc of one V-st and the first dc of the next.
Gauge and Checkpoints
- Sc gauge: 14 sc and 16 rnds = 4 in (10.2 cm)
- Mesh gauge: 7 V-sts = 6 in (15.2 cm); 8 rnds of V-st mesh = 5 in (12.7 cm)
Work a small sc swatch first. Then test the real piece: crochet Rnds 1–3 and measure before going further. Gauge matters most at the bottom opening, which has to grip the bags.
Checkpoints (measured flat, not stretched):
- After Rnd 3: 8.5 in (21.6 cm) wide, 0.75 in (1.9 cm) tall
- After Rnd 12: 10.25 in (26.0 cm) wide, 3.25 in (8.3 cm) tall
- After Rnd 23: 10.25 in (26.0 cm) wide, 8 in (20.3 cm) tall
- After Rnd 32: 11 in (27.9 cm) tall; 11.25 in (28.6 cm) tall after the Top Edge round
If your piece is too big, go down one hook size (4.5 mm). If it’s too small, go up one size (5.5 mm). Change hooks rather than stitch counts, because every scallop band needs a stitch count that is a multiple of 6.
Body
Work in joined rounds with the RS facing, and don’t turn. Place a marker in the first stitch of each round. The beginning ch 1 of a sc round never counts as a stitch. Unless a round says otherwise, start it in the same stitch as the join.
Rim and Band 1
With Color A, ch 60. Join with a sl st to the first ch, taking care not to twist the chain.
Rnd 1: Ch 1, sc in each ch around, join. (60 sc)
Rnds 2–3: Ch 1, sc in each st around, join. (60 sc)
Change to Color B.
Rnd 4 (B): Ch 1, sc in next 9 sts, inc in next st; repeat from * 5 more times, join. (66 sc)
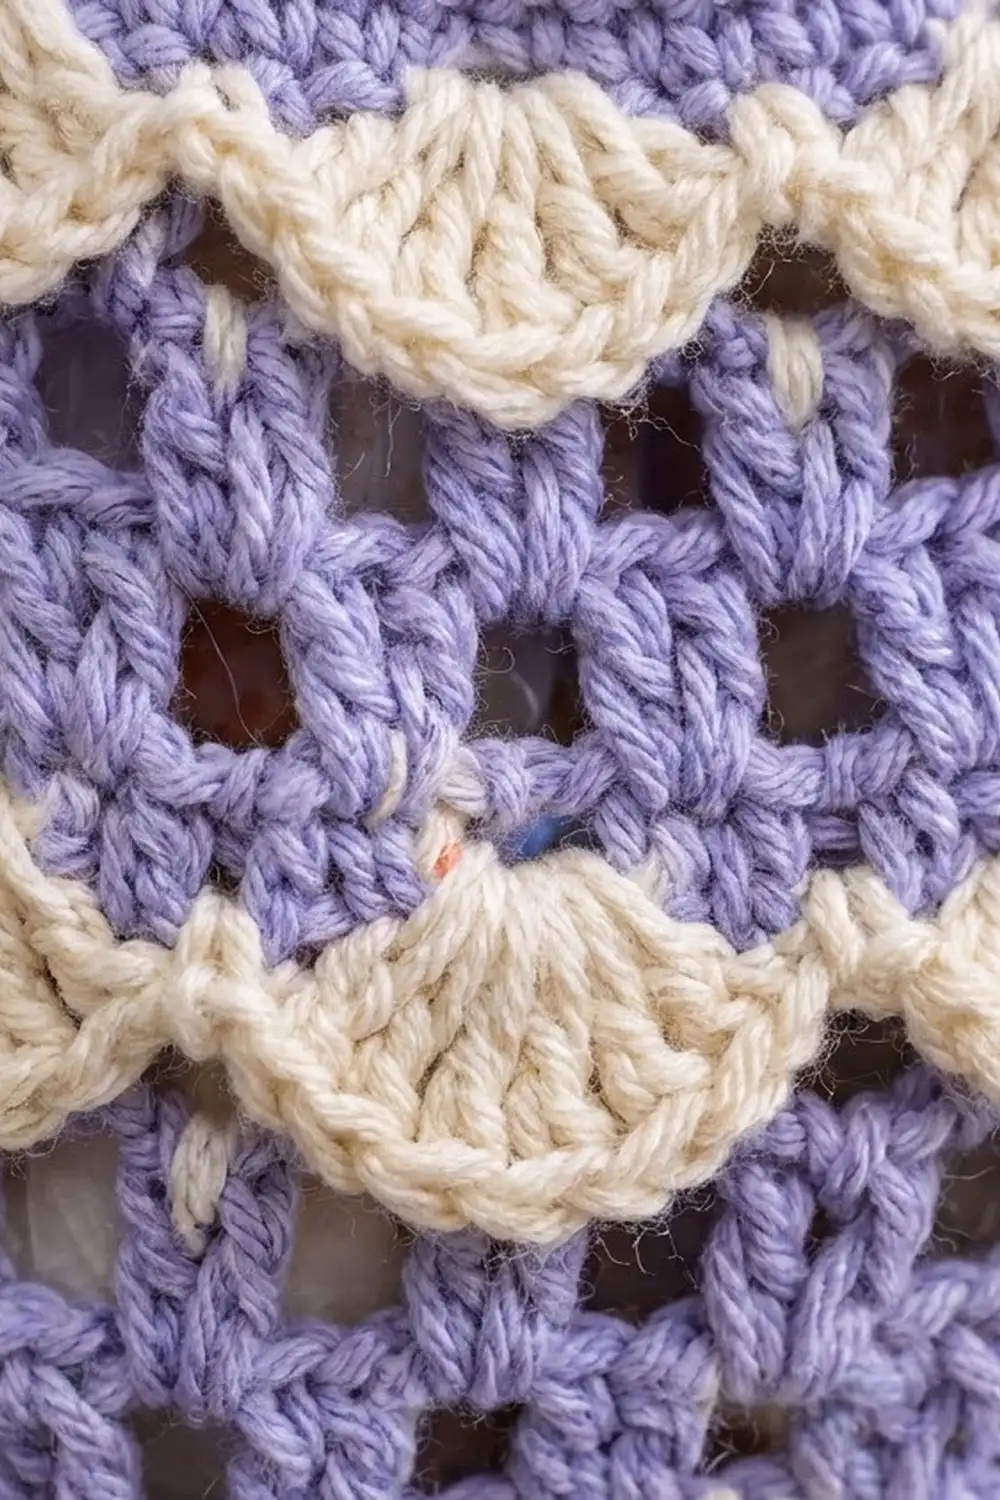
Rnd 5 (B, scallop frill): Work in the FLO of Rnd 4 only. Ch 1, sc in first st, skip 2 sts, shell in next st, skip 2 sts, sc in next st; repeat from * around, ending the last repeat with skip 2 sts. Join to the first sc. (11 shells, 11 sc) Fasten off B.
The shells grow downward and lie over the outside of the pouch, with the scalloped edge facing the bottom.
Rnd 6 (A): Fold the frill down out of the way. Join A in the BLO of any st of Rnd 4. Ch 1, sc in the BLO of each st of Rnd 4 around, join. (66 sc)
Mesh 1 and Band 2
Rnd 7: Beginning V-st in first st, skip 2 sts, V-st in next st; repeat from * 20 more times, skip 2 sts. Join to the 3rd ch of the beginning ch-4. (22 V-sts)
Rnd 8: Sl st in ch-1 sp, sl st in next dc, sl st in next gap. Beginning V-st in same gap, then V-st in each gap around, join. (22 V-sts)
Working the V-sts into the gaps shifts each round by half a repeat. This offset is what makes the open diamond mesh.
Rnd 9 (conversion): Ch 1. Starting in the same dc as the join, sc in dc, sc in ch-1 sp, sc in next dc; repeat around. Work nothing in the gaps. Join. (22 V-sts x 3 sc = 66 sc) Fasten off A.
Rnd 10 (B): Join B, ch 1, sc in next 10 sts, inc in next st; repeat from * 5 more times, join. (72 sc)
Rnd 11 (B, frill): Work as Rnd 5, in the FLO of Rnd 10. (12 shells, 12 sc) Fasten off B.
Rnd 12 (A): Join A, ch 1, sc in the BLO of each st of Rnd 10, join. (72 sc)
Mesh 2 and Band 3
Rnd 13: Beginning V-st in first st, skip 2 sts, V-st in next st; repeat from * 22 more times, skip 2 sts, join. (24 V-sts)
Rnds 14–15: Work as Rnd 8. (24 V-sts)
Rnd 16 (conversion): Work as Rnd 9. (24 V-sts x 3 sc = 72 sc) Fasten off A.
Rnd 17 (B): Join B, ch 1, sc in each st around, join. (72 sc)
Rnd 18 (B, frill): Work as Rnd 5, in the FLO of Rnd 17. (12 shells, 12 sc) Fasten off B.
Rnd 19 (A): Join A, ch 1, sc in the BLO of each st of Rnd 17, join. (72 sc)
Mesh 3 and Band 4
Rnds 20–22: Work as Rnds 13–15. (24 V-sts in each round)
Rnd 23 (conversion): Work as Rnd 9. (24 V-sts x 3 sc = 72 sc) Fasten off A.
Rnd 24 (B): Join B, ch 1, sc in next 10 sts, sc2tog; repeat from * 5 more times, join. (66 sc)
Rnd 25 (B, frill): Work as Rnd 5, in the FLO of Rnd 24. (11 shells, 11 sc) Fasten off B.
Rnd 26 (A): Join A, ch 1, sc in the BLO of each st of Rnd 24, join. (66 sc)
Bottom Shaping
Rnd 27: Work as Rnd 7. (22 V-sts)
Rnd 28: Work as Rnd 8. (22 V-sts)
Rnd 29 (conversion with decreases): Ch 1. Starting in the same dc as the join, sc in dc, sc2tog over ch-1 sp and next dc; repeat around, join. (22 V-sts x 2 sc = 44 sc)
Rnd 30: Ch 4 (counts as dc + ch 1), skip next st, dc in next st, ch 1, skip next st; repeat from * around. Join to the 3rd ch. (22 dc, 22 ch-1 sps)
Rnd 31: Ch 1. Starting in the same dc as the join, sc in dc, sc in next ch-1 sp, sc2tog over next dc and next ch-1 sp; repeat from * 10 more times, join. (11 repeats x 3 sc = 33 sc)
Rnd 32: Ch 1, sc in next 9 sts, sc2tog; repeat from * 2 more times, join. (30 sc) Fasten off A.
The quick reduction from 66 to 30 stitches over these last six rounds pulls the bottom into its rounded egg shape.
Top Edge Round
Turn the pouch upside down. Join A in any unused loop of the foundation chain.
Top Edge Rnd: Ch 1, sc in each foundation loop around, join. (60 sc) Don’t fasten off.
Strap
Row 1: Ch 1, sc in same st and next 4 sts, turn. (5 sc)
Rows 2–64: Ch 1, sc in each st across, turn. (5 sc)
The strap is 16 in (40.6 cm) long and 1.4 in (3.6 cm) wide. Fasten off, leaving a 12 in (30.5 cm) tail.
Count 30 sts from the strap’s first stitch. The strap end attaches to sts 31–35 of the Top Edge round, which leaves 25 free sts on each side. Check that the strap isn’t twisted, then whipstitch Row 64 to those 5 stitches through both loops.
Border
The border is the cream ring around the bottom opening. It uses sc gauge: 14 sc = 4 in (10.2 cm). The ring is round, so it has no sides or corners. Every count below is for the full round.
Border Rnd 1: Join B in any st of Rnd 32. Ch 1, sc in each st around, join. (30 sc)
Border Rnd 2: Ch 1, sc in each st around, join. (30 sc)
Border Rnd 3: Ch 1, rev sc in each st around, join. (30 rev sc) Fasten off and weave in.
Why the math works: Rnd 32 has 30 sts, so the border starts at 30 and stays at 30. With no increases, the ring can’t flare. At 3.5 sc per inch, 30 sc makes an opening about 2.75 in (7.0 cm) across. That is tight enough to hold the bags but loose enough to pull one out. The rev sc round rolls slightly, which gives the ring its padded, corded look.
Final Blocking
- Weave in all ends along stitches of the same color, never across the open mesh.
- Turn the pouch RS out and fill it loosely with a towel or plastic bags to form the egg shape.
- Spray it evenly until damp, not soaked.
- Smooth each scallop frill downward with your fingers so the shells lie flat over the mesh below.
- Open the diamonds of the mesh by pulling gently sideways.
- Measure: 10.25 in (26.0 cm) wide flat and 12 in (30.5 cm) tall.
- Lay the strap flat and pin it straight to 16 in (40.6 cm).
- Let everything dry completely before removing the filling.
Final Quality-Control Checklist
- Rim: 60 sc, flat, not twisted.
- Four cream scallop bands, each hanging down on the outside.
- Shell counts by band: 11, 12, 12, 11.
- Mesh rounds: 22 or 24 V-sts, all offset into diamonds.
- Bottom opening: 30 sts with a 3-round cream border.
- Strap attached directly opposite its start, with 25 free sts on each side.
- Body: 10.25 in (26.0 cm) x 12 in (30.5 cm).
- All ends secured on the inside.
Troubleshooting
Scallops stand up instead of hanging down: They were worked in the BLO. Rework the frill in the FLO, then steam it downward.
Shells don’t fit evenly: The cream sc round isn’t a multiple of 6. Recount it (66 or 72) before starting the frill.
Mesh looks like straight columns: The V-sts went into the previous ch-1 sps instead of the gaps. Every round after the first mesh round goes into the gaps.
Bottom opening too loose: Bags will fall out. Redo the border with a hook one size smaller, or work Border Rnd 2 as (sc 8, sc2tog) x 3 for 27 sc.
Pouch leans to one side: The strap is off center. Recount the 25 free stitches on each side and sew it again.
Rim ruffles or pulls in: The foundation chain doesn’t match Rnd 1. Redo it with a hook one size larger or smaller.
Care
Machine wash cold on a gentle cycle inside a mesh laundry bag. Reshape while damp, then lay flat or hang to dry, and avoid hot dryers, which can shrink cotton and tighten the bottom opening.
Final Notes
Every measurement in this pattern builds on the one before it. A gauge of 14 sc = 4 in (10.2 cm) gives a 60-stitch rim that is 8.5 in (21.6 cm) wide flat. The band increases take it to 72 stitches and 10.25 in (26.0 cm). The mesh keeps that width while the body grows to 8 in (20.3 cm) tall by Rnd 23. The bottom shaping reduces to 30 stitches for an opening of 2.75 in (7.0 cm). Finally, the 0.75 in (1.9 cm) border brings the body to 12 in (30.5 cm) tall. Check each stage as you go, and the holder will hang neatly and give out one bag at a time.
Happy crocheting!