

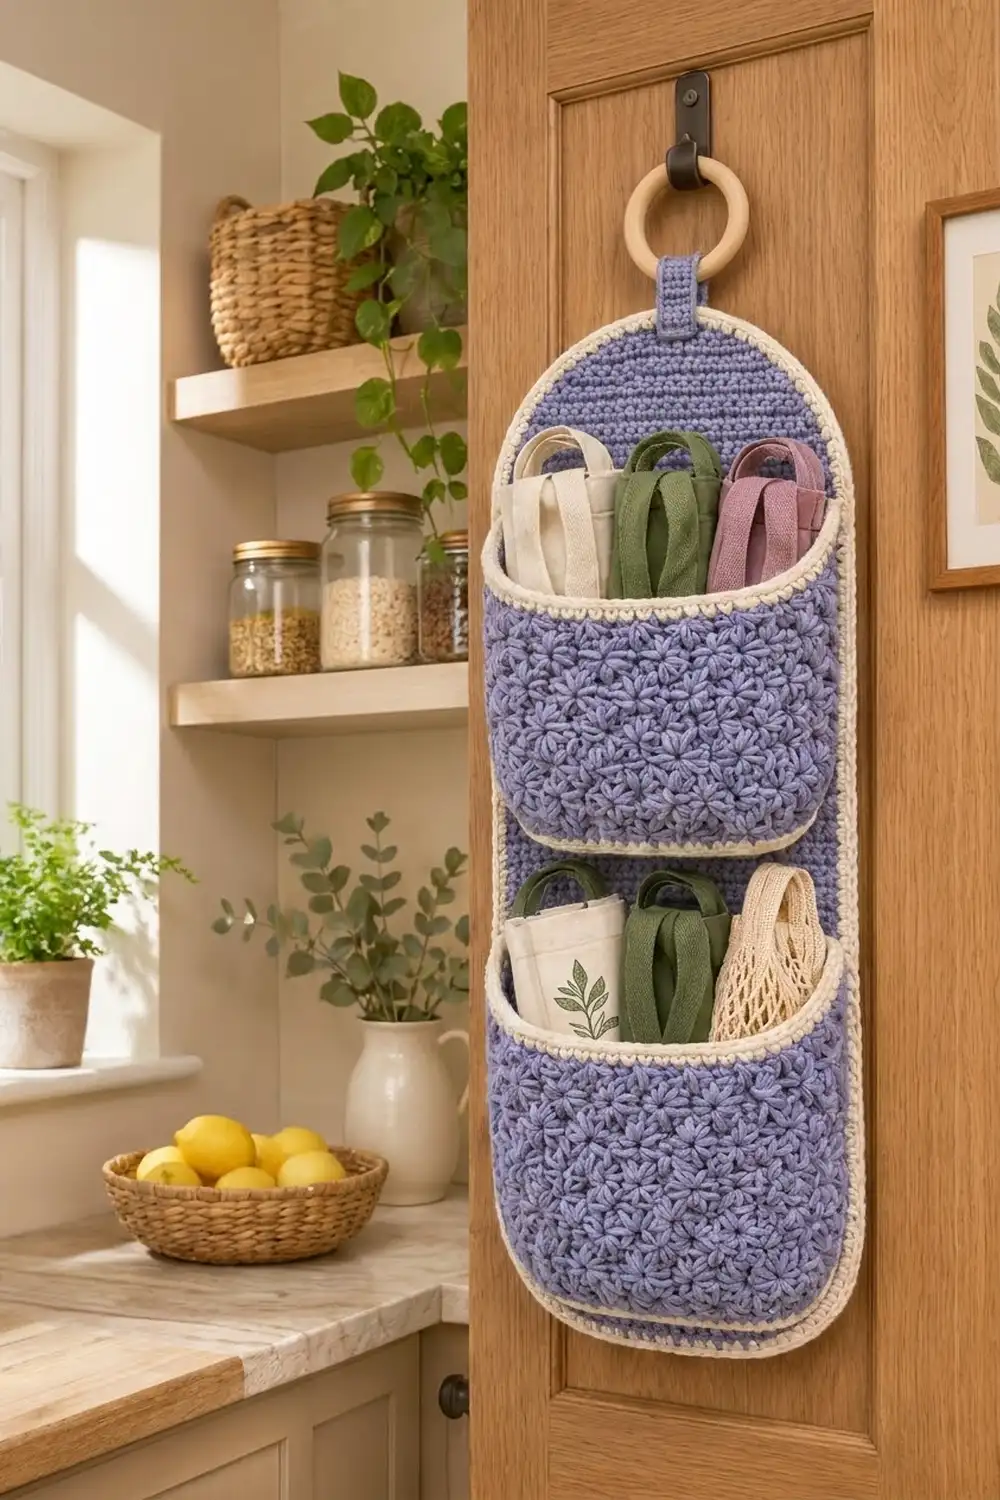
This hanging organizer has a soft lavender backing panel with two star-stitch pockets stacked on it. A beaded cream edging runs around every edge, and a wooden ring at the top lets it hang from a door hook, a peg or a nail.
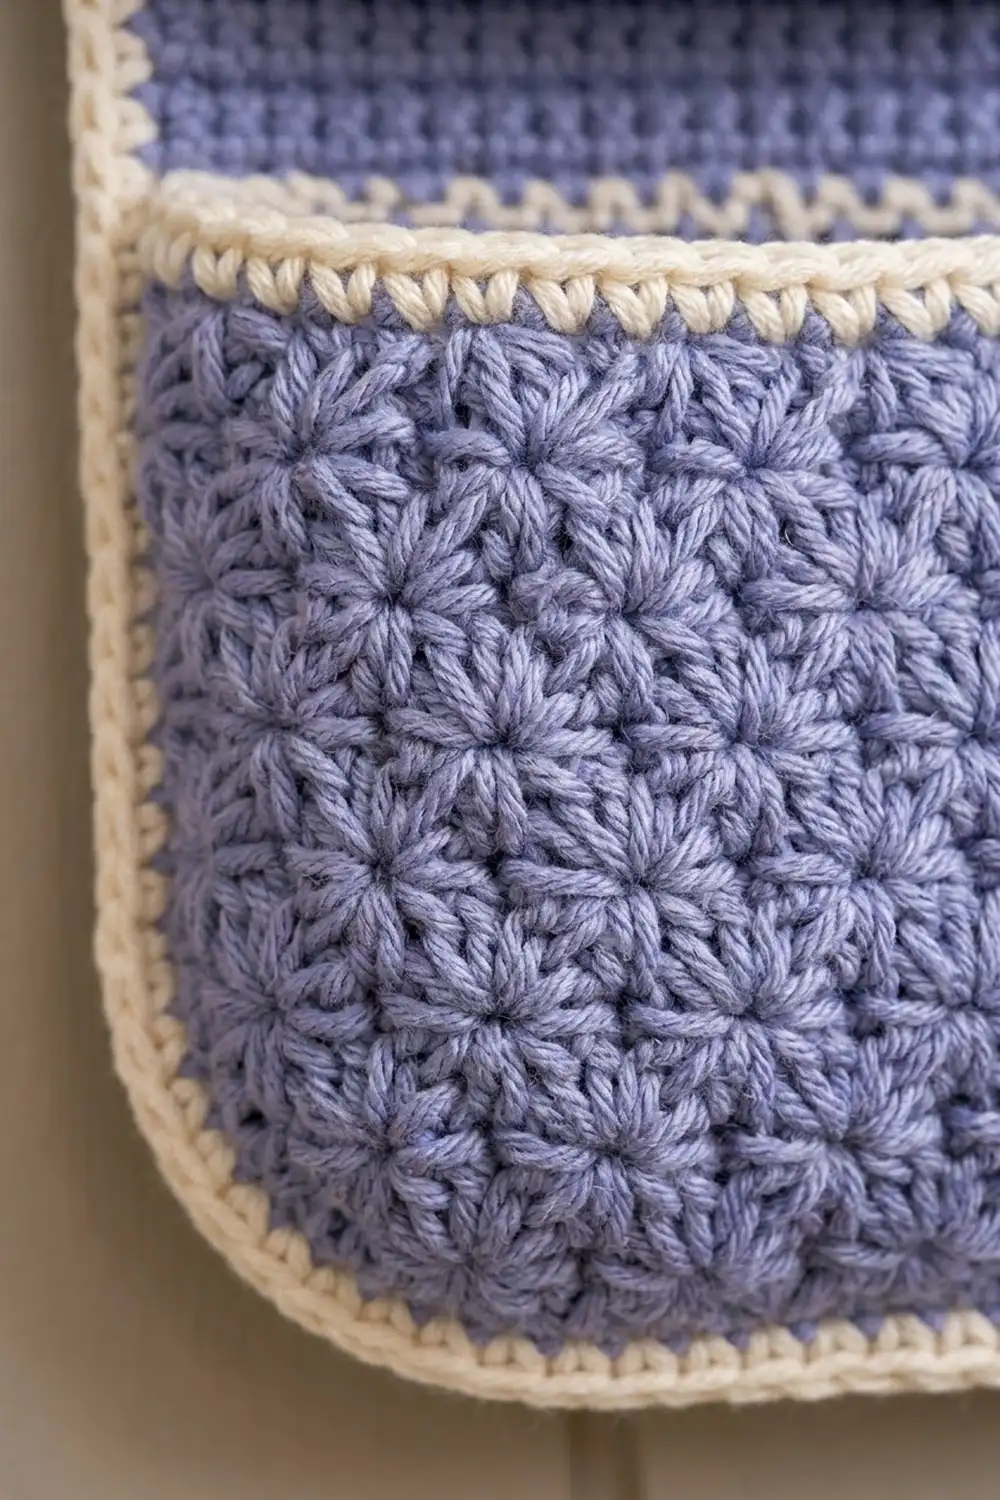
The palette is calm: lavender-periwinkle for the body and cream for the trim. The backing panel and pocket backs are in plain single crochet. The pocket fronts are in star stitch, which adds texture and makes the fronts thick enough to hold their shape when the pockets are full.
This pattern uses US crochet terms. The finished panel measures 8.5 x 22.8 in (21.6 x 57.9 cm) including the border. With the tab and ring, it hangs about 26.3 in (66.8 cm) tall. Each pocket is 7.5 in (19.1 cm) wide, 8.5 in (21.6 cm) tall with its rim, and about 1.1 in (2.8 cm) deep.
You’ll make the panel in rows and then add the border. Next you’ll make two pocket backs, each with a short wall, and sew them to the panel. After that, you’ll join a star-stitch front to each wall and finish each pocket with a cream rim.
Finished Size and Construction
- Finished panel: 8.5 x 22.8 in (21.6 x 57.9 cm)
- Overall height with ring: about 26.3 in (66.8 cm)
- Skill level: Intermediate
- Terminology: US
- Yarn weight: Worsted (#4)
- Hook: 5.0 mm (H-8)
- Number of pieces: 6 (1 panel, 1 tab, 2 pocket backs with walls, 2 pocket fronts)
- Layout: Two pockets stacked vertically on one panel
- Panel size before border: 7.5 x 21.8 in (19.1 x 55.4 cm)
- Pocket front size: 7.5 x 8 in (19.1 x 20.3 cm)
- Border depth: 0.5 in (1.3 cm)
Materials
Use a smooth, firm worsted-weight yarn. Cotton or a cotton blend holds its shape best when the pockets are loaded. Avoid fuzzy yarns, because they hide the star texture.
- Color A, lavender: 400 g (about 800 m)
- Color B, cream: 60 g (about 120 m)
- 5.0 mm (H-8) crochet hook
- One 2.5 in (6.4 cm) wooden ring
- Tapestry needle
- Stitch markers
- Scissors and a measuring tape
All quantities include roughly a 10% margin.
Abbreviations (US Terms)
- ch: chain
- sc: single crochet
- hdc: half double crochet
- sc2tog: single crochet 2 together
- BLO: back loop only
- rev sc: reverse single crochet (crab stitch)
- sl st: slip stitch
- st(s): stitch(es)
- RS / WS: right side / wrong side
Star: Pull up a loop in each of the 4 places given, so you have 5 loops on the hook. Yarn over, draw through all 5 loops, then ch 1 to close. That ch-1 is the star’s eye.
- For the first star of a row, the 4 places are the 2nd ch from hook, the 3rd ch from hook, the 1st hdc and the 2nd hdc.
- For each following star, the 4 places are the eye of the previous star, the same st as the last loop of the previous star, and the next 2 sts.
Rev sc: Work sc from left to right (right-handed) into each st. This makes a beaded, corded edge.
Gauge and Checkpoints
- Sc: 16 sts and 18 rows = 4 x 4 in (10.2 x 10.2 cm)
- Star stitch: 16 sts and 12 rows = 4 x 4 in (10.2 x 10.2 cm)
Make one pocket front first. It’s the smallest textured piece, so it’s the best way to check both your tension and your yarn. It should measure 7.5 x 8 in (19.1 x 20.3 cm) before edging.
Checkpoints:
- Panel after Row 5: 7.5 in (19.1 cm) wide
- Panel after Row 36: 8 in (20.3 cm) tall
- Panel after Row 87: 19.3 in (49.0 cm) tall
- Panel after Row 98: 21.8 in (55.4 cm) tall
- Panel after border: 8.5 x 22.8 in (21.6 x 57.9 cm)
If your pieces come out too big, go down one hook size. If they’re too small, go up one hook size. Because the pocket fronts must line up with the panel, adjust the hook rather than the stitch counts.
Backing Panel
Use Color A.
Row 1 (RS): Ch 23. Sc in 2nd ch from hook and in each ch across. Turn. (22 sc)
Row 2: Ch 1, 2 sc in first st, sc across to last st, 2 sc in last st. Turn. (24 sc)
Rows 3–5: Repeat Row 2. (26, 28, then 30 sc)
These four increase rows make the rounded bottom corners.
Rows 6–87: Ch 1, sc in each st across. Turn. (30 sc)
Dome shaping:
- Row 88: Ch 1, sc2tog, sc to last 2 sts, sc2tog. (28 sc)
- Row 89: Ch 1, sc across. (28 sc)
- Row 90: Repeat Row 88. (26 sc)
- Row 91: Ch 1, sc across. (26 sc)
- Rows 92–98: Repeat Row 88 on every row. (24, 22, 20, 18, 16, 14, then 12 sc)
Fasten off. The panel now measures 7.5 x 21.8 in (19.1 x 55.4 cm).
Hanging Tab
Use Color A.
Row 1: Ch 7. Sc in 2nd ch from hook and in each ch across. (6 sc)
Rows 2–16: Ch 1, sc across. Turn. (6 sc)
The tab measures 1.5 x 3.6 in (3.8 x 9.1 cm). Fasten off and leave a long tail.
Pocket Back with Wall (Make 2)
Use Color A.
Rows 1–5: Work exactly as Panel Rows 1–5. (30 sc after Row 5)
Rows 6–36: Ch 1, sc across. Turn. (30 sc)
The back now measures 7.5 x 8 in (19.1 x 20.3 cm). Don’t fasten off.
The wall is worked in rows along the U-shaped edge: down one side, across the bottom, and up the other side. Leave the top edge free.
Wall Row 1: Ch 1 and rotate the piece.
- Work down the first side over the 36 row-ends: [sc in each of next 8 row-ends, skip 1] 4 times. (32 sc)
- Work 1 extra sc at the corner.
- Work 1 sc in each of the 22 foundation chs.
- Work 1 extra sc at the corner.
- Work up the second side the same way as the first. (32 sc)
Turn. (88 sc)
Wall Row 2: Ch 1, sc BLO in each st. Turn. (88 sc) Working in the back loop folds the wall upward.
Wall Rows 3–5: Ch 1, sc in each st. Turn. (88 sc)
Fasten off. The wall stands about 1.1 in (2.8 cm) tall.
Pocket Front (Make 2)
Use Color A.
Row 1: Ch 32. Hdc in 3rd ch from hook and in each ch across. Turn. (30 hdc)
Row 2 (star row):
- Ch 3 and work the first star.
- Work 13 more stars.
- Hdc in each of the last 2 hdc.
Turn. (14 stars + 2 hdc)
Row 3 (hdc row): Ch 2 (doesn’t count as a st). Hdc in each of the first 2 hdc, then 2 hdc in each of the 14 eyes. Turn. (2 + 28 = 30 hdc)
Rows 4–23: Repeat Rows 2–3 ten more times. (30 hdc after Row 23)
Row 24: Ch 2, hdc in each st. (30 hdc) This plain row firms up the top edge.
The front now measures 7.5 x 8 in (19.1 x 20.3 cm). Don’t fasten off.
Edge row: Ch 1. Work along the U-shaped edge with RS facing. Leave the top edge free.
- Work down the first side over the 24 row-ends: [sc in next 2 row-ends, 2 sc in next row-end] 8 times. (32 sc)
- Work across the 30 foundation chs: sc2tog 3 times, sc in next 18 chs, sc2tog 3 times. (24 sc)
- Work up the second side the same way as the first. (32 sc)
That gives 32 + 24 + 32 = 88 sc. This matches the wall’s 88 sts, so the front and wall join 1 to 1.
The decreases at each end of the bottom edge round the lower corners. Fasten off.
Make All Pieces
Color A:
- 1 panel
- 1 tab
- 2 pocket backs with walls
- 2 pocket fronts
Color B: All seams, borders and rims.
Layout (panel rows counted from the bottom):
          ( ring )
          [ tab  ]
     /    dome    \     Rows 88–98
    |  plain panel |    Rows 77–87
    | [ Pocket A ] |    Rows 41–76
    |    gap       |    Rows 37–40
    | [ Pocket B ] |    Rows 1–36
     \____________/
Joining
1. Tab. Wrap the tab around the ring and overlap its ends behind the panel top. Sew the doubled tab to the WS of the top 1 in (2.5 cm) of the panel. Center it over the middle 6 sts of Row 98. About 1 in (2.5 cm) of tab shows above the border.
2. Pocket backs. Sew each pocket back to the panel before you join its front. At that stage you can still reach the inside of the pocket.
- Pocket B: Place its Row 1 on Panel Row 1, with its sides on the panel sides. The curved corners match because both pieces were shaped with the same increases.
- Pocket A: Place its Row 1 on Panel Row 41.
Use Color A and whipstitch through the unused front loops of Wall Row 1, all the way around the U. Then sew the top row of each pocket back to the panel row beneath it: Panel Row 36 for Pocket B and Panel Row 76 for Pocket A. Pocket A’s top lands 16.9 in (42.9 cm) above the bottom edge.
3. Front to wall. Hold the pocket front RS out against Wall Row 5. Join Color B at the top of one side. Sc through 1 front edge st and 1 wall st at a time until you have 88 sc. Fasten off.
The seam forms a cream ridge on the outside. Keep the tension even so the seam doesn’t pucker.
4. Pocket rim. Join Color B at the top of one side seam.
- Rnd 1: Sc in each of the 30 front sts, 1 sc in each of the 5 wall row-ends, 30 sc across the back’s top row, and 1 sc in each of the 5 row-ends on the other side. Sl st to join. (30 + 5 + 30 + 5 = 70 sc)
- Rnd 2: Ch 1, rev sc in each st. Sl st to join. (70 rev sc)
Size checkpoint: Each pocket should measure 8.5 in (21.6 cm) from its bottom seam to the top of its rim.
Border (Backing Panel)
Work the border before you sew on the pockets.
The panel has 18 sc rows per 4 in but only 16 sc per 4 in. Working 8 sc for every 9 row-ends matches that ratio, so the edges lie flat.
Rnd 1: With RS facing, join Color B at the top right of the panel.
- Work down the first side over the 98 row-ends: [sc in each of next 8 row-ends, skip 1] 10 times, then sc in each of the last 8 row-ends. (80 + 8 = 88 sc)
- Work 1 extra sc at the corner.
- Work 1 sc in each of the 22 foundation chs.
- Work 1 extra sc at the corner.
- Work up the second side the same way as the first. (88 sc)
- Work 1 extra sc at the corner.
- Work 1 sc in each of the 12 sts of Row 98.
- Work 1 extra sc at the last corner.
Sl st to join. (88 + 88 + 22 + 12 + 4 = 214 sc)
Rnd 2: Ch 1, rev sc in each st. Sl st to join. (214 rev sc)
The extra corner stitches keep the curves from cupping. The two rounds add 0.5 in (1.3 cm) to every edge, which takes the panel to 8.5 x 22.8 in (21.6 x 57.9 cm).
Final Blocking
- Weave in all ends inside the seams.
- Lightly mist the panel, or steam it from about 1 in (2.5 cm) above the surface. Don’t press it.
- Pin it flat to 8.5 x 22.8 in (21.6 x 57.9 cm) and keep the dome even.
- Stuff each pocket with a folded towel so it holds a 1.1 in (2.8 cm) depth.
- Let everything dry completely before you hang it.
Final Quality-Control Checklist
- The panel measures 8.5 x 22.8 in (21.6 x 57.9 cm).
- Pocket B’s bottom lines up with the panel’s bottom curve.
- Both pockets are level and centered.
- Each front-to-wall seam has 88 sc.
- Each pocket rim has 70 sts.
- The panel border has 214 sts.
- The tab is securely sewn with a double layer of stitches.
- No ends show on the RS.
Troubleshooting
- Panel edges ripple: You’ve worked too many sc along the sides. Recheck the 8-sc, skip-1 repeat.
- Edges pull in: You’ve skipped too many row-ends. Recount 88 sts per side.
- Front is wider than 7.5 in (19.1 cm): Your stars are too loose. Go down a hook size for the front only.
- Pocket gapes at the top: Tighten the rim tension, or work Rnd 1 with a hook one size smaller.
- Panel sags when loaded: Add a second line of sewing across the top row of each pocket back.
Care
Hand wash in cool water and lay flat to dry. Reshape the pockets while damp.
Final Notes
The measurements build on each other:
- Gauge of 16 sts = 4 in (10.2 cm) gives a 7.5 in (19.1 cm) wide panel.
- 98 rows give 21.8 in (55.4 cm) of height.
- The 0.5 in (1.3 cm) border brings it to 8.5 x 22.8 in (21.6 x 57.9 cm).
- Each pocket front of 7.5 x 8 in (19.1 x 20.3 cm) meets an 88-stitch wall exactly.
If those numbers hold at each checkpoint, the organizer comes out flat, even and sturdy.
Happy crocheting!