

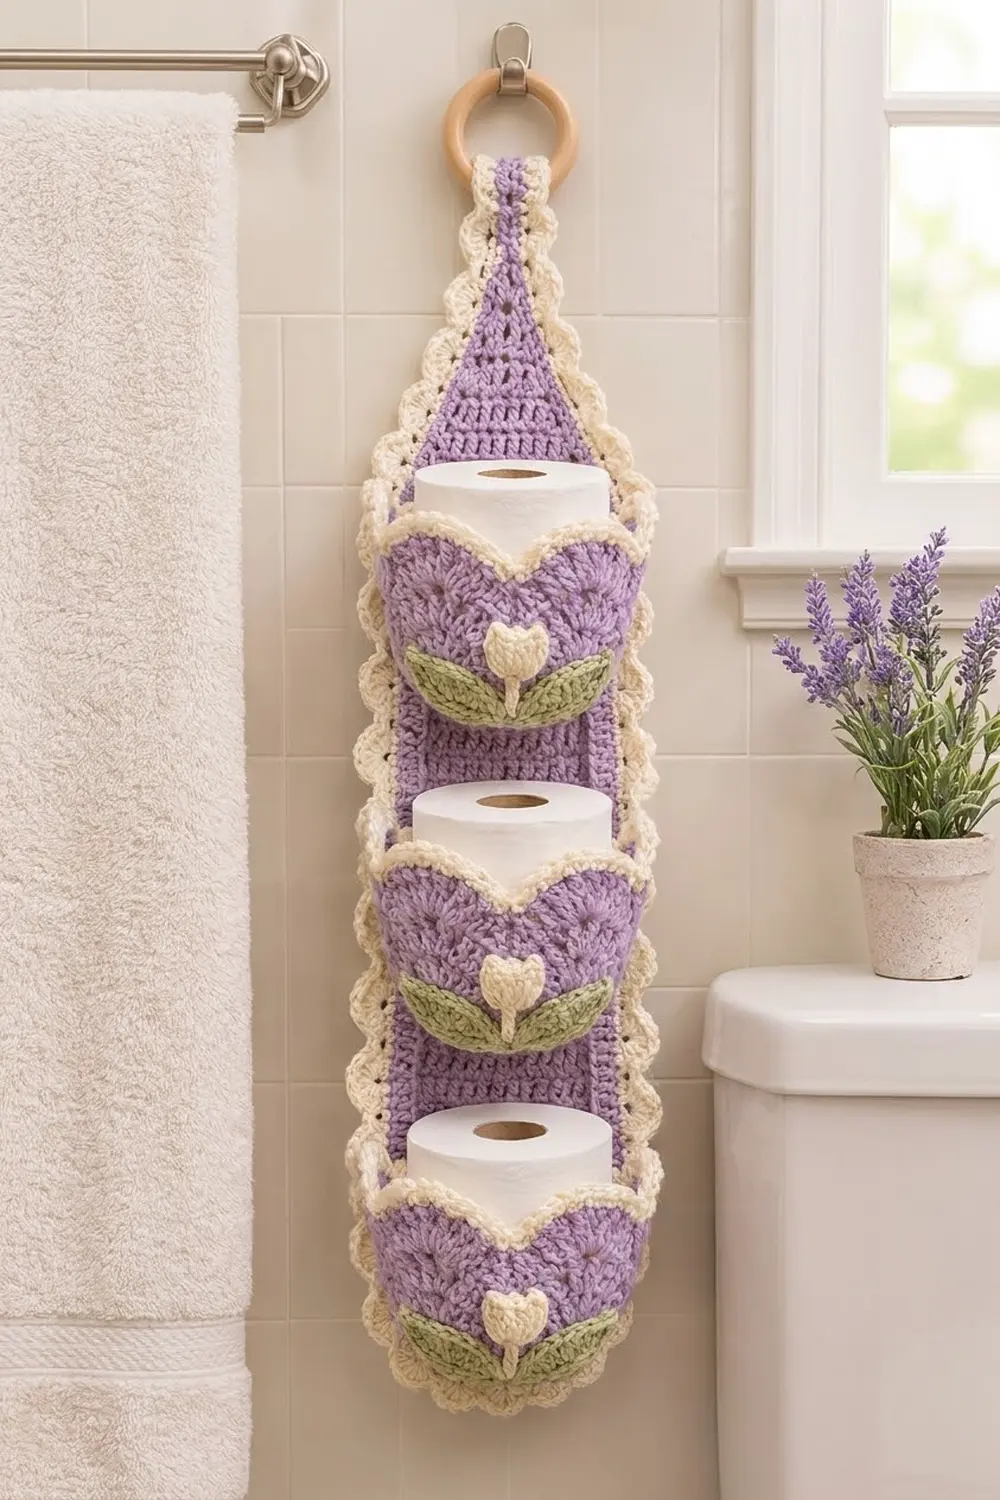
This hanging toilet paper holder keeps three spare rolls tidy on the wall. It has a tall lavender back panel with a pointed top, three scalloped tulip cups and a soft cream shell border. A wooden ring at the top lets it hang from a hook or towel bar.
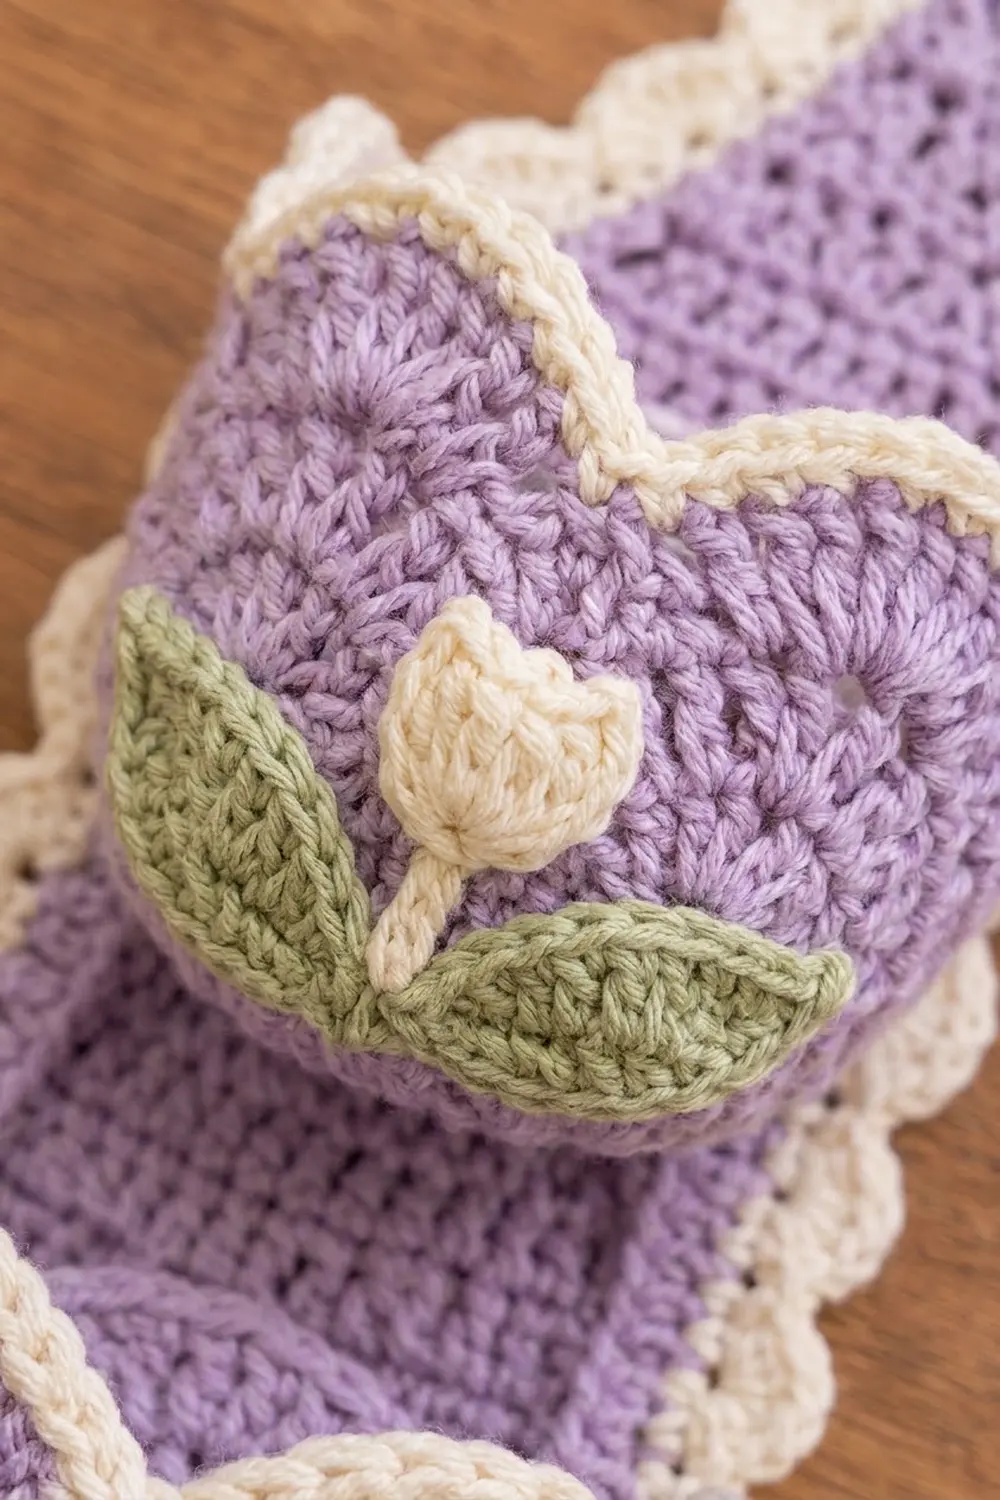
The palette is lavender, cream and sage green. Each cup has a cream rope edge along its scalloped rim and a small cream tulip appliqué with two green leaves on the front. The style is cottage-bathroom: soft, practical and a little floral.
The pattern uses US crochet terms. The finished holder measures 7.5 in (19.1 cm) wide and 27.75 in (70.5 cm) from the bottom border to the top of the point. With the tab and ring, it hangs about 30 in (76.2 cm) long. Each cup holds a standard roll up to about 4.5 in (11.4 cm) across.
Construction is simple. You crochet one flat back panel in double crochet rows. Each cup is made from three flat pieces: a round base, a scalloped front and a small back. You seam the cups, add the cream trim and appliqués, then sew the cups to the panel. The cream border goes on last, and the tab wraps around the ring.
Finished Size and Construction
- Finished size: 7.5 in (19.1 cm) wide x 27.75 in (70.5 cm) long, plus tab and ring
- Skill level: Intermediate
- Terminology: US
- Yarn weight: Worsted (#4)
- Hook: 4.5 mm (US 7)
- Number of pieces: 1 back panel, 3 cup bases, 3 cup fronts, 3 cup backs, 3 tulip heads, 3 stems, 6 leaves
- Layout: 3 cups stacked vertically on 1 panel
- Back panel before border: 6 in (15.2 cm) wide x 27 in (68.6 cm) tall, including the point
- Cup: about 5 in (12.7 cm) across, 4 in (10.2 cm) tall at the center scallop
- Border depth: 0.75 in (1.9 cm)
Materials
Choose a smooth worsted-weight cotton or cotton blend. Cotton holds its shape well in a bathroom and stands up to washing. Acrylic also works but makes slightly softer cups.
- Lavender (main): 200 g, about 380 m
- Cream (trim, border, tulips): 60 g, about 114 m
- Sage green (leaves): 15 g, about 29 m
These quantities include a margin of roughly 15% for gauge swatches and small differences in tension.
Tools:
- 4.5 mm (US 7) crochet hook
- One wooden ring, 2.5 in (6.4 cm) across
- Tapestry needle
- Stitch markers (at least 6)
- Scissors
- Rustproof pins
- Blocking mat and spray bottle
Abbreviations (US Terms)
- ch – chain
- sl st – slip stitch
- sc – single crochet
- hdc – half double crochet
- dc – double crochet
- tr – treble crochet
- dc2tog – double crochet 2 together
- MR – magic ring
- st(s) – stitch(es)
- RS / WS – right side / wrong side
Shell: 5 dc in the same stitch.
Crab stitch (reverse sc): Work sc from left to right (right-handed). Insert the hook into the next stitch to the right, yarn over, pull up a loop, yarn over and pull through both loops.
Picot: Ch 3, sl st in the 3rd ch from the hook.
Gauge and Checkpoints
- Single crochet: 16 sc x 18 rows = 4 in (10.2 cm)
- Double crochet: 14 dc x 8 rows = 4 in (10.2 cm)
Make one cup base first; it doubles as a test piece. After Round 11 it should measure 5 to 5.25 in (12.7 to 13.3 cm) across. If it is bigger, go down a hook size. If it is smaller, go up one.
Checkpoints:
- Cup front after Row 7: 10.75 in (27.3 cm) wide x about 3 in (7.6 cm) tall
- Cup back after Row 14: 5.75 in (14.6 cm) wide x about 3 in (7.6 cm) tall
- Back panel after Row 10: 6 in (15.2 cm) wide x 5 in (12.7 cm) tall
- Back panel after Row 54: 27 in (68.6 cm) tall
If the back panel is too narrow, the cup backs will overhang it. Fix this by changing hook size, not stitch count, so that the border math stays the same.
Cup Base (make 3, lavender)
Join each round with a sl st to the first sc. Ch 1 does not count as a stitch.
Rnd 1: MR, ch 1, 6 sc in ring. (6 sts)
Rnd 2: 2 sc in each st around. (12 sts)
Rnd 3: Sc in next st, 2 sc in next st 6 times. (18 sts)
Rnd 4: Sc in next 2 sts, 2 sc in next st 6 times. (24 sts)
Rnds 5–11: In each round, work one more plain sc before each increase than in the previous round. Rnd 5 = 30 sts, Rnd 6 = 36, Rnd 7 = 42, Rnd 8 = 48, Rnd 9 = 54, Rnd 10 = 60, Rnd 11 = 66 sts.
Fasten off and leave a 24 in (61.0 cm) tail. Place a marker in st 1 and another in st 44. Sts 1–43 are for the front; sts 44–66 (23 sts) are for the back.
Cup Front (make 3, lavender)
Foundation: Ch 44.
Row 1 (RS): Sc in the 2nd ch from the hook and in each ch across. Turn. (43 sts)
Row 2: Ch 1, sc in each st across. Turn. (43 sts)
Row 3: Ch 1, sc in the first st, skip 2 sts, shell in next st, skip 2 sts, sc in next st 7 times. Turn. (7 shells + 8 sc = 43 sts)
Row 4: Ch 3 (counts as dc), 2 dc in the first sc, skip 2 dc, sc in the center dc of the shell, skip 2 dc, shell in next sc 6 times, skip 2 dc, sc in the center dc of the last shell, skip 2 dc, 3 dc in the last sc. Turn. (3 + 6 x 6 + 1 + 3 = 43 sts)
Row 5: Ch 1, sc in the first dc, skip 2 dc, shell in next sc, skip 2 dc, sc in the center dc of the next shell 7 times; the last sc lands in the top of the turning ch. Turn. (43 sts)
Rows 6–7: Repeat Rows 4 and 5. (43 sts)
Row 7 now has sc at sts 1, 7, 13, 19, 25, 31, 37 and 43. Shell centers are at sts 4, 10, 16, 22, 28, 34 and 40.
Row 8 (scallops): Ch 1, sc in st 1, 9 dc in st 7, sc in st 13, 13 tr in st 22, sc in st 31, 9 dc in st 37, sc in st 43. Fasten off. (35 sts)
This row gives two side scallops and a taller center scallop, which makes the tulip silhouette.
Cup Back (make 3, lavender)
Foundation: Ch 24.
Row 1: Sc in the 2nd ch from the hook and in each ch across. Turn. (23 sts)
Rows 2–14: Ch 1, sc in each st across. Turn. (23 sts)
Fasten off.
Back Panel (make 1, lavender)
Foundation: Ch 23.
Row 1: Dc in the 4th ch from the hook and in each ch across. Turn. (21 sts; the skipped ch counts as dc)
Rows 2–45: Ch 3 (counts as dc), dc in each st across. Turn. (21 sts)
Row 46: Ch 3, dc2tog, dc across to the last 3 sts, dc2tog, dc in the last st. Turn. (19 sts)
Rows 47–53: Repeat Row 46. The counts are 17, 15, 13, 11, 9, 7 and 5 sts.
Row 54: Ch 3, dc2tog, dc2tog. Turn. (3 sts)
Rows 55–60 (tab): Ch 3, dc in the next 2 sts. Turn. (3 sts)
Fasten off and leave a 12 in (30.5 cm) tail.
The panel body is 22.5 in (57.2 cm) tall, the point adds 4.5 in (11.4 cm) and the tab adds 3 in (7.6 cm).
Tulip Appliqués (make 3 of each part)
Tulip head (cream): Ch 4.
- Row 1: 2 sc in the 2nd ch from the hook, sc in the next ch, 2 sc in the last ch. Turn. (5 sts)
- Row 2: Ch 1, 2 sc in the first st, sc in the next 3 sts, 2 sc in the last st. Turn. (7 sts)
- Row 3: Ch 1, sc in each st across. Turn. (7 sts)
- Row 4: Ch 1, sc in st 1, picot, sc in sts 2–4, picot, sc in sts 5–7, picot. Fasten off. (7 sc + 3 picots)
The three picots form the tulip tips. The head measures about 1 in (2.5 cm) wide.
Stem (cream): Ch 7. Sl st in the 2nd ch from the hook and in each ch across. (6 sl sts, about 1.25 in / 3.2 cm)
Leaf (sage green, make 6): Ch 9. Sc in the 2nd ch from the hook, hdc in the next ch, dc in the next 3 chs, hdc in the next ch, sc in the next ch, 3 sc in the last ch. Working along the opposite side of the chain: sc in the next ch, hdc in the next ch, dc in the next 3 chs, hdc in the next ch, sc in the last ch. Sl st to the first sc. (17 sts, about 2 in / 5.1 cm long)
Make All Pieces
- Lavender: 1 back panel, 3 bases, 3 fronts, 3 backs
- Cream: 3 tulip heads, 3 stems, plus the cup trims and border worked later
- Sage green: 6 leaves
Layout of the back panel (bottom to top):
[  tab + ring    ]  Rows 55-60
[  point         ]  Rows 46-54
[  open panel    ]  Rows 37-45
[  CUP 3         ]  Rows 31-36
[  open panel    ]  Rows 22-30
[  CUP 2         ]  Rows 16-21
[  open panel    ]  Rows 7-15
[  CUP 1         ]  Rows 1-6
Each cup back covers 6 dc rows, 3 in (7.6 cm). The cups repeat every 15 rows, 7.5 in (19.1 cm), which leaves 4.5 in (11.4 cm) of open panel above each cup for a roll 4.25 in (10.8 cm) tall.
Joining
1. Base to walls. Hold the cup front’s foundation edge against base sts 1–43 and whipstitch one foundation loop to one base st. Then whipstitch the cup back’s foundation edge to base sts 44–66 in the same way. That uses 43 + 23 = 66 sts, so the whole base is used once, with no extra stitches.
2. Side seams. Whipstitch each side edge of the front, up to the top of Row 7, to the matching side edge of the back. Rows 1–2 of the front meet Rows 1–2 of the back one to one. Front Rows 3–7 are taller, so ease them over back Rows 3–14: about 2 or 3 back rows for each shell row. Pin the seam before you sew.
3. Cup trim (cream). Join at the right side seam.
- Rnd 1: Ch 1, sc in each of the 35 sts of Row 8 and in each of the 23 sts along the back’s top edge. Join. (58 sts)
- Rnd 2: Ch 1, crab stitch in each st around. Join and fasten off. (58 sts)
4. Appliqué. Center the tulip head on the cup front about 1 in (2.5 cm) above the base seam. Sew the stem below it, then sew one leaf on each side of the stem, angled outward.
5. Cups to panel. Place Cup 1 with the bottom of its back on Row 1 of the panel. Center it so that the 5.75 in (14.6 cm) back sits within the 6 in (15.2 cm) panel. Whipstitch the side seams and the base edge through the panel. The base flattens slightly into a D shape, which holds the roll against the wall. Attach Cups 2 and 3 at Rows 16 and 31.
Keep your whipstitches snug but not tight. Pulled seams pucker the panel. After joining, the panel should still measure 6 in (15.2 cm) wide.
Border
Border gauge: 2 sc in each dc row-end. One dc row is 0.5 in (1.3 cm), so this works out to 4 sc per inch, which matches the sc gauge of 16 sc = 4 in (10.2 cm).
Row 1 (cream, RS): Join at the left base of the tab, where Row 54 meets Row 55. Ch 1 and work:
- 18 sc down the left side of the point (2 per row-end, Rows 54–46)
- 90 sc down the left long side (2 per row-end, Rows 45–1)
- 25 sc across the bottom: 1 sc in each of the 21 foundation sts, with 3 sc in the first and last st
- 90 sc up the right long side
- 18 sc up the right side of the point
Total: 18 + 90 + 25 + 90 + 18 = 241 sts. Fasten off.
Row 2 (cream, RS): Rejoin at the first sc of Row 1 with the RS facing. Ch 1, sc in the first st, skip 2 sts, shell in next st, skip 2 sts, sc in next st 40 times. Fasten off. (40 shells, 241 sts)
Why the math works: The shell repeat needs a multiple of 6 + 1. 241 = 6 x 40 + 1, so the border begins and ends with an sc exactly at the base of the tab. The tab stays free to wrap around the ring.
Ring: Fold the tab through the wooden ring to the WS of the panel and sew the end of Row 60 to the back of Row 54.
Final Blocking
- Spray the whole holder until it is damp, not soaked.
- Lay the panel flat and pin it to 7.5 in (19.1 cm) wide x 27.75 in (70.5 cm) long.
- Pin each border shell into an even scallop.
- Stuff each cup with a towel or a roll wrapped in plastic so it dries round.
- Pin the cup scallops upright and open the tulip picots.
- Let everything dry completely before you unpin it, usually 24 hours.
Final Quality-Control Checklist
- Panel is 6 in (15.2 cm) wide before the border and 7.5 in (19.1 cm) after
- Border Row 1 has 241 sts and Row 2 has 40 shells
- Each base used all 66 sts (43 front + 23 back)
- Each cup trim has 58 sts
- Cups start at Rows 1, 16 and 31
- Tulips are centered and the leaves are mirrored
- All ends are woven in and the ring tab is secure
Troubleshooting
- Cup flops forward: Use cotton, tighten your seams, or add a third trim round of sl sts.
- Base ruffles: Your increases are stacking or your gauge is loose. Stagger the increases or go down a hook size.
- Border waves: You worked more than 2 sc per row-end. Recount to 90 per long side.
- Border cups inward: Your tension is tight. Use a hook one size larger for Row 2.
- Panel twists when hung: Block again, and check that the cups are centered.
Care
Hand wash in cool water and lay flat to dry, reshaping the cups while damp. Remove the wooden ring before washing.
Final Notes
The measurement chain is short. A 66-st base gives a 5 in (12.7 cm) cup. 43 + 23 wall sts close that base exactly. A 21-st panel measures 6 in (15.2 cm) and takes the 5.75 in (14.6 cm) cup backs. 241 border sts give 40 even shells and a finished 7.5 in (19.1 cm) width. Check each step, and the holder will hang straight and hold its rolls neatly.
Happy crocheting!