

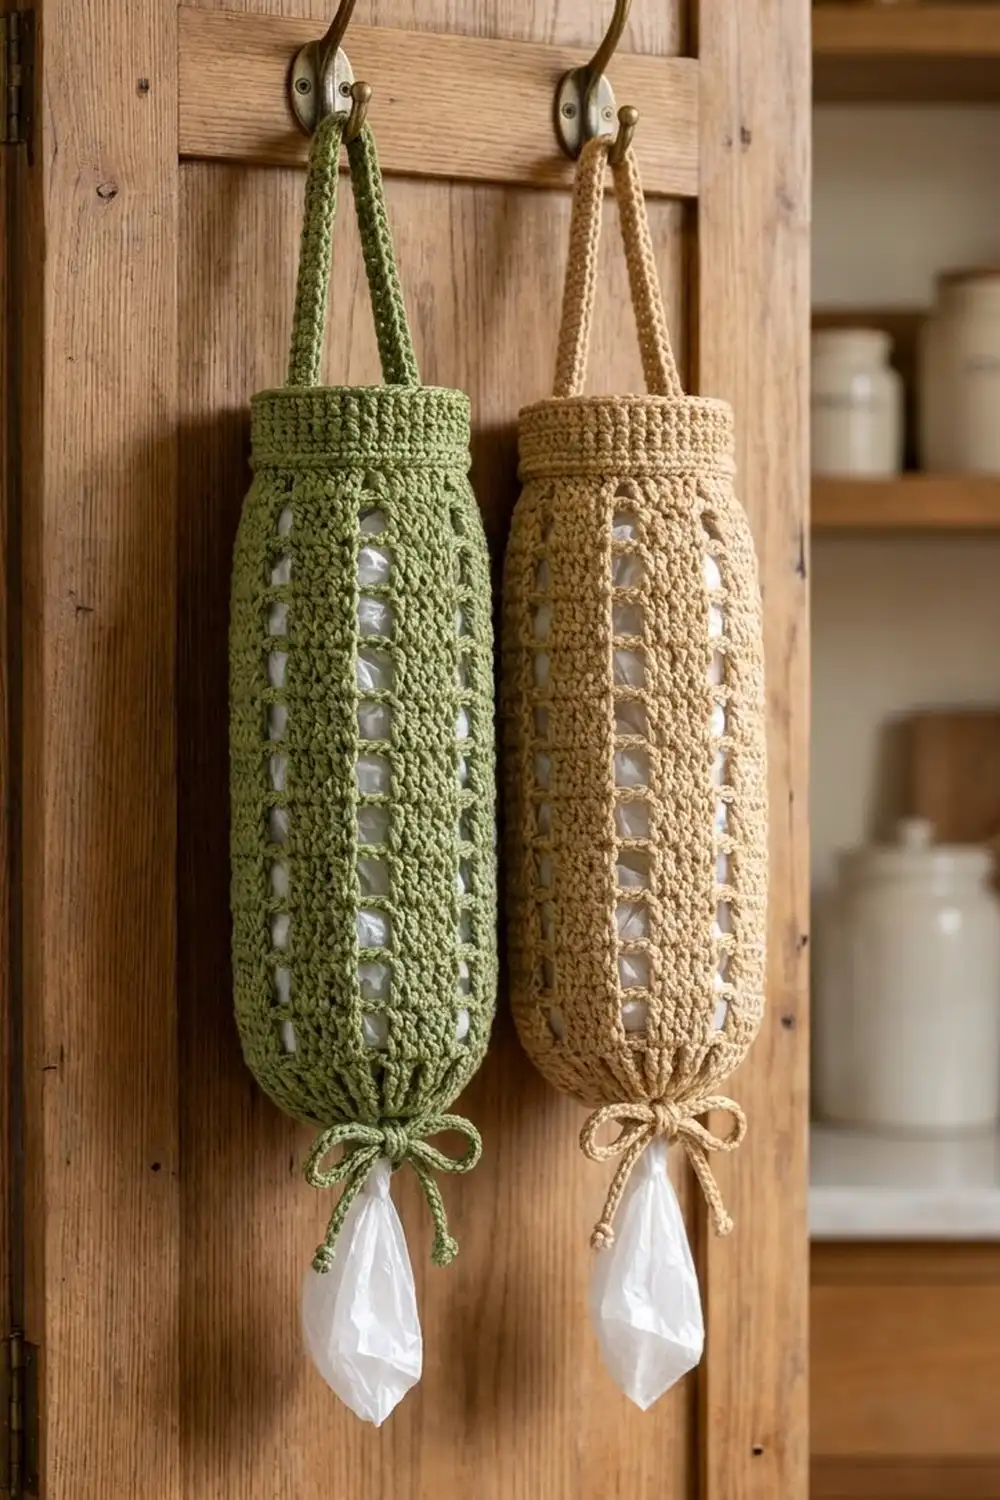
The Sage Ladder Bag Holder is a tall, slim tube that hangs from a doorknob or hook and keeps plastic shopping bags in one place. You push bags in at the top and pull them out one at a time through a small gathered opening at the bottom.
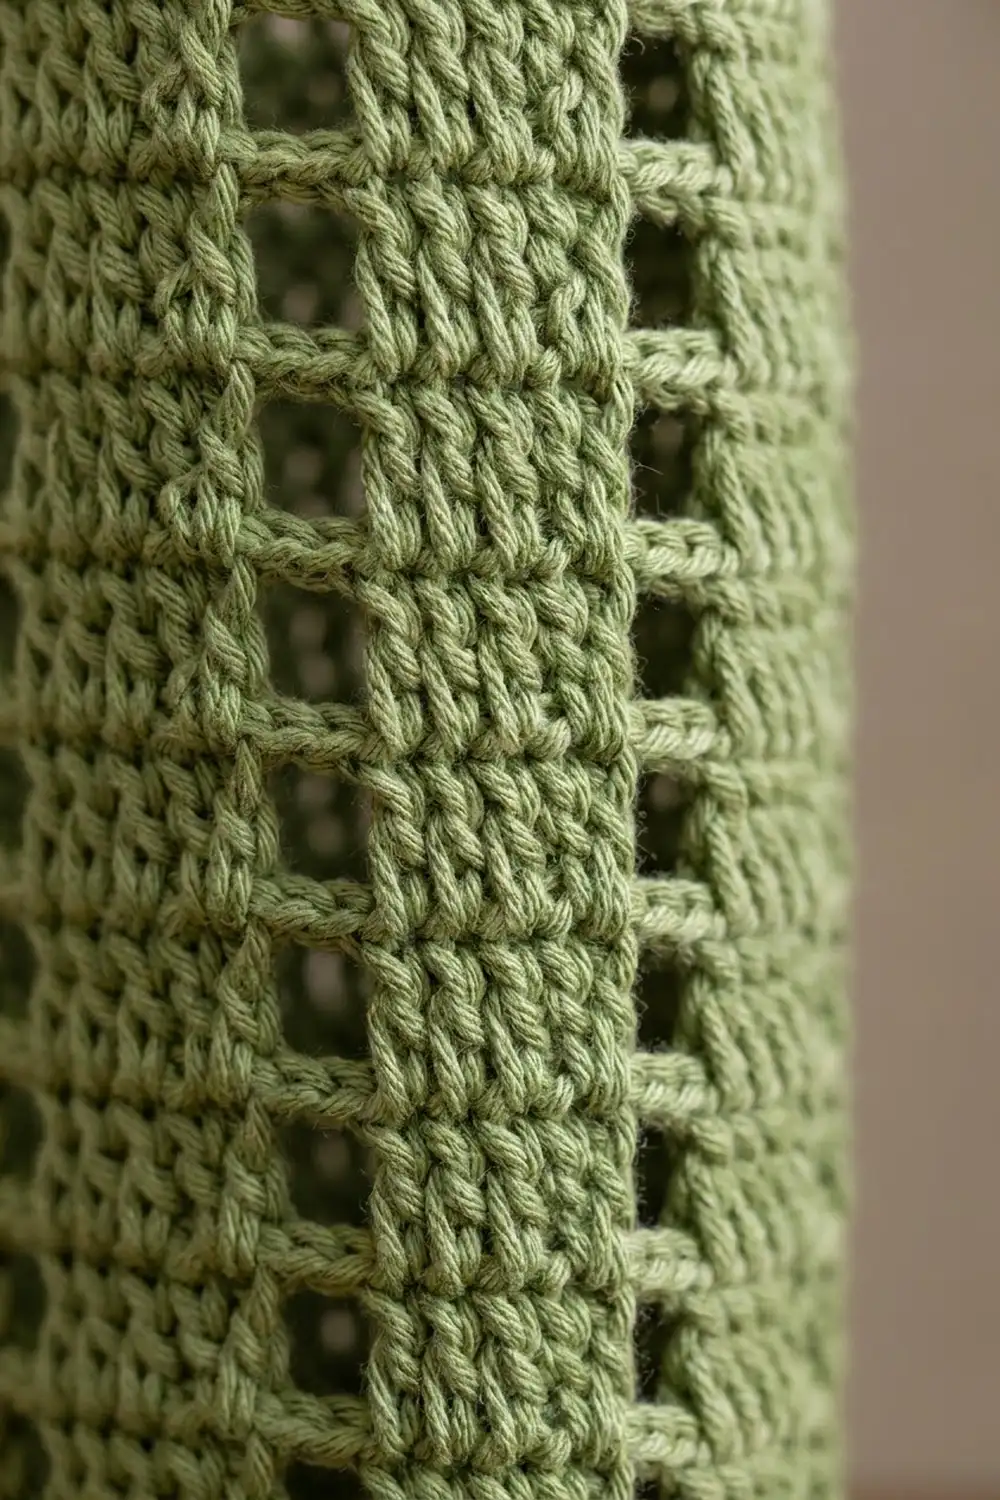
The sample is made in a soft sage green cotton. Solid columns of double crochet alternate with open “ladder” columns of chain windows, so you can see the bags inside and the holder never looks heavy. A firm half double crochet band finishes the top, a flat strap makes the hanging loop, and a chain drawstring ties in a bow at the base. A warm tan version looks just as good.
This pattern uses US crochet terms. The finished holder measures 6 in (15.2 cm) wide laid flat, 12 in (30.5 cm) around, and 16 in (40.6 cm) long from the bottom opening to the top edge, not counting the strap or drawstring.
The holder is seamless and easy to build. You start at the bottom with a chain ring, increase into a rounded cone, work an eyelet round for the drawstring, and then work the ladder body straight up in joined rounds. A sc conversion round and a hdc band finish the top. You make the strap and drawstring separately and add them at the end.
Finished Size and Construction
- Finished size: 6 in (15.2 cm) wide flat x 16 in (40.6 cm) long
- Circumference: 12 in (30.5 cm)
- Skill level: Easy
- Terminology: US crochet terms
- Yarn weight: Worsted (weight 4)
- Hook: 5.0 mm (H-8)
- Number of pieces: 1 main body, plus 1 strap and 1 drawstring
- Layout: Single seamless tube worked bottom-up in joined rounds
- Body stitch count: 42 stitches per round (21 per side when flattened)
- Size before top band: 6 in (15.2 cm) wide x 14.5 in (36.8 cm) long
- Top band depth: 1.5 in (3.8 cm)
- Strap length: 14 in (35.6 cm)
- Drawstring length: 30 in (76.2 cm)
Materials
Choose a smooth worsted cotton or cotton blend. Cotton holds its shape when the holder is stuffed full of bags, and it stands up to frequent handling. Acrylic works too, but it stretches more, so the holder may get a little longer over time.
- Color A, Sage Green: 120 g, about 216 m (236 yd), based on a cotton worsted with roughly 180 m per 100 g
- Optional second holder, Tan: the same amount as Color A
Tools:
- 5.0 mm (H-8) crochet hook
- Locking stitch markers
- Tapestry needle
- Scissors
- Measuring tape
- Spray bottle and blocking pins
The yarn amounts include a margin of about 15 percent to cover your gauge check, tails, and small differences in tension.
Abbreviations (US Terms)
- ch – chain
- sl st – slip stitch
- sc – single crochet
- hdc – half double crochet
- dc – double crochet
- sp(s) – space(s)
- st(s) – stitch(es)
- BLO – back loop only
- rnd(s) – round(s)
Special stitch – Window: ch 2, then skip the next 2 stitches (or skip the ch-2 sp below). The windows stack up to form the open ladder columns, and the chains become the rungs.
Gauge and Checkpoints
Gauge: 14 dc and 8 rnds = 4 in (10.2 cm), worked in the round with a 5.0 mm hook. That is 3.5 sts per inch and 2 rnds per inch, so each dc round is 0.5 in (1.3 cm) tall.
Because this is one piece, the bottom section works as your gauge swatch. Work Rnds 1 to 6, then measure before you go any further.
Checkpoints:
- After Rnd 1: The ring is about 6 in (15.2 cm) around and about 1.9 in (4.8 cm) across.
- After Rnd 5: The cone is 12 in (30.5 cm) around at its top edge and about 2.5 in (6.4 cm) tall.
- After Rnd 6: Flattened, the tube is 6 in (15.2 cm) wide.
- After Rnd 29: The piece is 14.5 in (36.8 cm) long.
- After Rnd 34: The piece is 16 in (40.6 cm) long.
If your tube is wider than 6 in (15.2 cm), go down a hook size. If it is narrower, go up a hook size. If the width is right but your rounds are too tall, stop the body one round early. If they are too short, add one round.
Pattern
Join every round with a sl st to the top of the beginning ch. In the bottom section and the body, the beginning ch 3 counts as a dc. Put a marker in the first stitch of each round.
Bottom Cone
Foundation: Ch 21, sl st in first ch to form a ring, taking care not to twist.
Rnd 1: Ch 3, dc in next ch and in each ch around; join. (21 dc)
Work into the chains themselves, not around the ring, so the opening keeps its full size.
Rnd 2 (growth): Ch 3, dc in next st, 2 dc in next st, dc in next 2 sts, 2 dc in next st 6 times; join. (28 dc)
Rnd 3 (eyelet round): Ch 4 (counts as dc and ch 1), skip next st, dc in next st, ch 1, skip next st 13 times; join to 3rd ch of beginning ch-4. (14 dc and 14 ch-1 sps, 28 sts total)
The 14 ch-1 spaces are the eyelets for the drawstring.
Rnd 4 (growth): Count each dc and each ch-1 sp as one stitch. Ch 3, dc in next 2 sts, 2 dc in next st, dc in next 3 sts, 2 dc in next st 6 times; join. (35 dc)
Rnd 5 (growth): Ch 3, dc in next 3 sts, 2 dc in next st, dc in next 4 sts, 2 dc in next st 6 times; join. (42 dc)
Check: 12 in (30.5 cm) around, about 2.5 in (6.4 cm) tall from the foundation ring.
Ladder Body
Rnd 6 (set-up): Ch 3, dc in next 4 sts, window (ch 2, skip next 2 sts), dc in next 5 sts, window 5 times; join. (30 dc and 6 ch-2 sps, 42 sts total)
That gives 6 repeats of 7 stitches each: a 5-dc solid column and a 2-st window.
Rnds 7–29: Ch 3, dc in next 4 dc, ch 2, skip ch-2 sp, dc in next 5 dc, ch 2, skip ch-2 sp 5 times; join. (30 dc and 6 ch-2 sps, 42 sts per round)
Don’t work into the ch-2 spaces. Each new ch 2 sits over the one below it, which builds a stack of open windows separated by chain bars. The solid columns stay lined up straight.
Check after Rnd 29: 6 in (15.2 cm) wide flat and 14.5 in (36.8 cm) long. That is 24 body rounds (Rnds 6 to 29) at 0.5 in (1.3 cm) each, which adds up to 12 in (30.5 cm), plus the 2.5 in (6.4 cm) cone.
Top Band
The top band is the border. It firms up the opening so it stays round when you push bags in.
Band gauge: 42 sts around 12 in (30.5 cm), the same 3.5 sts per inch as the body. The 5 band rounds total 1.5 in (3.8 cm).
Rnd 30 (conversion): Ch 1, sc in same st, sc in next 4 dc, 2 sc in ch-2 sp, sc in next 5 dc, 2 sc in ch-2 sp 5 times; join to first sc. (30 sc worked 1 per dc + 12 sc worked 2 per ch-2 sp = 42 sc)
Rnds 31–34: Ch 2 (does not count as a st), hdc BLO in each st around; join to first hdc. (42 hdc)
Working the hdc in the back loop leaves a ridge of front loops on the outside, which gives the band its ribbed, horizontal texture.
Per side, when flattened, every band round has 21 sts on the front and 21 sts on the back. Rnd 30 adds about 0.25 in (0.6 cm), and Rnds 31 to 34 add about 1.25 in (3.2 cm).
Why the math works: Each body round has 30 dc and 6 ch-2 spaces. Working 2 sc into each space replaces exactly the 2 stitches that each window skipped, so the band starts at 42 stitches, the same as every body round. No stitches are added or lost, so the top neither flares nor pulls in, and the band stays 6 in (15.2 cm) wide flat.
Fasten off and weave in the tail.
Strap
Ch 51.
Row 1: Sc in 2nd ch from hook and in each ch across. (50 sc)
Row 2: Ch 1, turn, sl st in each sc across. (50 sl st)
Fasten off, leaving a 10 in (25.4 cm) tail. The strap should measure about 14 in (35.6 cm). To change the length, add or remove about 4 ch for each 1 in (2.5 cm).
Flatten the holder so the round joins sit at one side fold. Mark the 1st and 22nd stitches of Rnd 34. They are directly opposite each other, one at each side fold. Lay one end of the strap 1 in (2.5 cm) down the inside of the band at the first marker and whipstitch it firmly along all its edges. Attach the other end the same way at the second marker, making sure the strap isn’t twisted.
Drawstring
Ch 106.
Row 1: Sl st in back bump of 2nd ch from hook and in each ch across. (105 sl st)
Fasten off. The cord should measure about 30 in (76.2 cm). Tie an overhand knot close to each end and trim the tails to 0.5 in (1.3 cm) to make the small knotted tips.
Starting at the center front, weave the cord through the 14 ch-1 eyelets of Rnd 3, going over one dc and under the next all the way around. Both ends should come out next to each other on the front. Pull gently until the bottom opening is about 1.5 in (3.8 cm) across, then tie a bow.
Final Blocking
- Weave in all remaining ends along the solid dc columns, never across a window.
- Slide a rolled towel or a cardboard tube about 4 in (10.2 cm) across inside the holder.
- Lay it flat, front side up, and shape it to 6 in (15.2 cm) wide and 16 in (40.6 cm) long.
- Straighten the ladder columns so each window sits squarely above the one below it.
- Mist evenly with water until damp but not soaked.
- Pin the top band flat and straight across.
- Let it dry completely, about 12 to 24 hours. If needed, turn it over and lightly repeat on the back.
- Remove the towel, untie the bow, and smooth the strap straight.
Final Quality-Control Checklist
- Every body round has 30 dc and 6 ch-2 spaces, 42 stitches total.
- The 6 ladder columns run straight from Rnd 6 to Rnd 29.
- The body measures 6 in (15.2 cm) wide flat all the way from the ladder section to the top band.
- Total length is 16 in (40.6 cm).
- Every top band round has 42 sts, and the band lies flat.
- The strap ends sit directly opposite each other and are firmly sewn.
- The drawstring goes through all 14 eyelets and ties in a neat bow.
- All ends are woven in and hidden.
Troubleshooting
The tube twists into a spiral. Your joins are drifting. Always join to the top of the beginning ch 3 and start the next round in that same column.
The ladder columns slant. You may be working into a ch-2 space by mistake. Count 5 dc between every pair of windows.
The bottom ring is too tight. You worked around the chain instead of into it. Start over and work each dc into a chain.
The top band ruffles. You probably worked 3 sc into a ch-2 sp. Recount Rnd 30 for exactly 42 sc.
The top band pulls in. Loosen your tension on the hdc rounds, or go up half a hook size for Rnds 31 to 34 only.
The strap stretches too much. Work Row 2 firmly, or add a row of sl st along the other side of the foundation chain.
Bags fall out of the bottom. Pull the drawstring tighter until the opening is about 1.5 in (3.8 cm) across or smaller.
Care
Hand wash in cool water with mild soap, press out the water in a towel, and dry flat in shape. Avoid the dryer, which can shrink cotton and pull the ladder columns out of line.
Final Notes
The measurements build in a short, easy chain. Twenty-one dc open the bottom ring at 6 in (15.2 cm) around. Three growth rounds bring the count to 42 stitches at 12 in (30.5 cm) around, and 24 ladder rounds keep that count for 12 in (30.5 cm) of body. The sc conversion round replaces each skipped pair with 2 sc, so the 1.5 in (3.8 cm) band starts and stays at 42 stitches. The result is a 6 in (15.2 cm) by 16 in (40.6 cm) holder with a 14 in (35.6 cm) strap and a 30 in (76.2 cm) drawstring.
Make one in sage green, another in tan, and hang them side by side. Happy crocheting!