

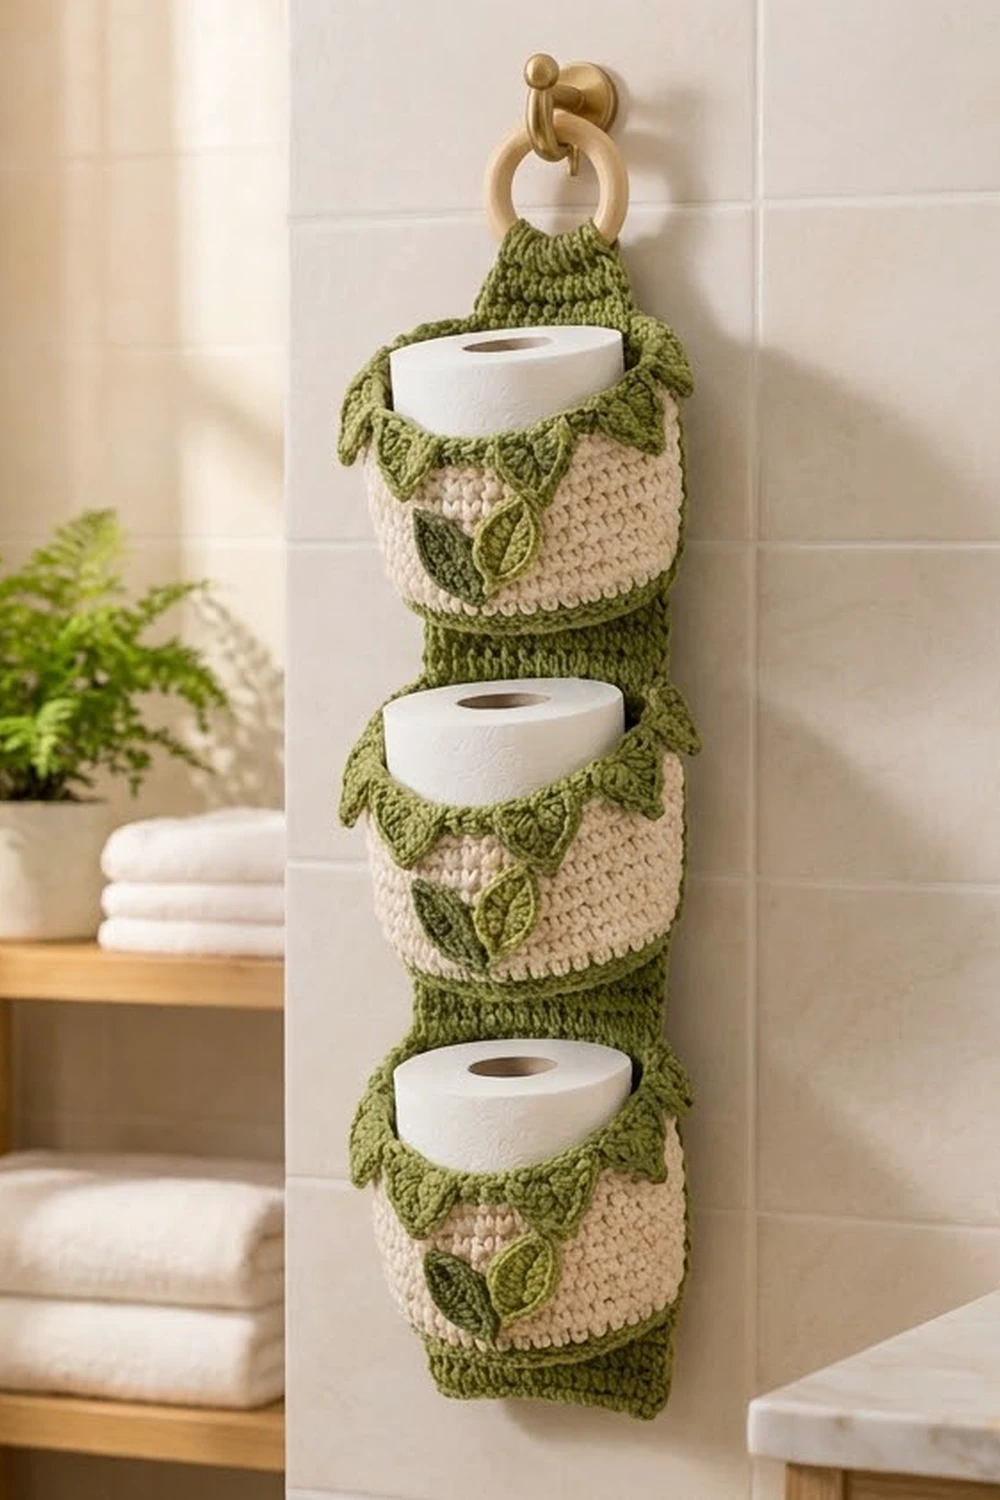
This hanging holder stores three rolls of toilet paper in a neat column. A long moss-green backing panel hangs from a wooden ring. Three round cream pockets are sewn to it, one above the other, and each holds a standard roll.
Each pocket has a moss-green base, a cream body and a green top rim. Just below the rim, a row of pointed green leaf shapes hangs down over the cream like bunting. Each pocket also gets two small leaf appliqués on the front, one moss green and one light green. The look is soft and natural, and it suits a bathroom with plants.
The pattern uses US crochet terms throughout. The finished holder is 4.5 in (11.4 cm) wide at the panel and about 22 in (55.9 cm) long from the bottom edge to the top of the ring. Each pocket is 4.9 in (12.4 cm) across and 3.5 in (8.9 cm) deep.
You crochet one flat panel in rows, three pockets in joined rounds, and six leaves. Then you sew the leaves to the pockets and the pockets to the panel. Finish with a two-round border around the panel and fold the top tab around the ring.
Finished Size and Construction
- Finished size: 4.5 in (11.4 cm) wide x about 22 in (55.9 cm) long including the ring
- Skill level: Easy to intermediate
- Terminology: US crochet terms
- Yarn weight: Worsted (#4)
- Hook: 5.0 mm (H-8)
- Number of pieces: 10 crocheted pieces (1 panel, 3 pockets, 6 leaves) plus 1 wooden ring
- Layout: 3 pockets stacked vertically on 1 panel, 1.5 in (3.8 cm) apart
- Pocket size: 4.9 in (12.4 cm) diameter x 3.5 in (8.9 cm) deep
- Panel size before border: 4 in x 20 in (10.2 cm x 50.8 cm)
- Border depth: 0.25 in (0.6 cm) on each edge
Materials
A smooth worsted cotton or cotton blend works best. Cotton holds its shape in a humid bathroom and keeps the pockets firm. Acrylic works too, but the pockets will be softer and slouch more.
- Color A, moss green: 85 g, 160 m (panel, pocket bases and rims, leaf points, 3 leaves)
- Color B, cream: 40 g, 75 m (pocket bodies)
- Color C, light green: 10 g, 18 m (3 leaves)
These quantities include about a 15 percent margin to cover gauge differences and a test piece.
Tools:
- 5.0 mm (H-8) crochet hook
- Wooden ring, 2.75 in (7.0 cm) diameter
- Tapestry needle
- Stitch markers
- Scissors
- Rust-proof pins and a blocking mat
- Spray bottle
Abbreviations (US Terms)
- ch – chain
- sl st – slip stitch
- sc – single crochet
- hdc – half double crochet
- dc – double crochet
- tr – treble crochet
- inc – 2 sc in the same stitch
- sc2tog – single crochet 2 together
- MR – magic ring
- BLO / FLO – back loop only / front loop only
- FL – front loop
- sk – skip
- sp – space
- rep – repeat
Special stitch – Leaf Point: (dc, tr, ch 2, tr, dc) all in the same stitch. This makes a pointed shell with a sharp ch-2 tip.
Gauge and Checkpoints
Gauge: 14 sc and 16 rows/rounds = 4 in (10.2 cm) with a 5.0 mm hook.
Make one pocket first. It is the best gauge test because it uses every stitch in the pattern.
Checkpoints:
- Pocket base after Round 9 (54 sts): 4.9 in (12.4 cm) across, lying flat.
- Pocket wall after Round 23: 3.5 in (8.9 cm) tall from the base edge to the top of the rim.
- Panel after Row 8: 4 in (10.2 cm) wide and 2 in (5.1 cm) tall.
- Panel after Row 80: 20 in (50.8 cm) long.
If your piece is too big, switch to a 4.5 mm hook. If it is too small, switch to a 5.5 mm hook. A roll should slide into a finished pocket with a little room to spare. If it is tight, check the base diameter first.
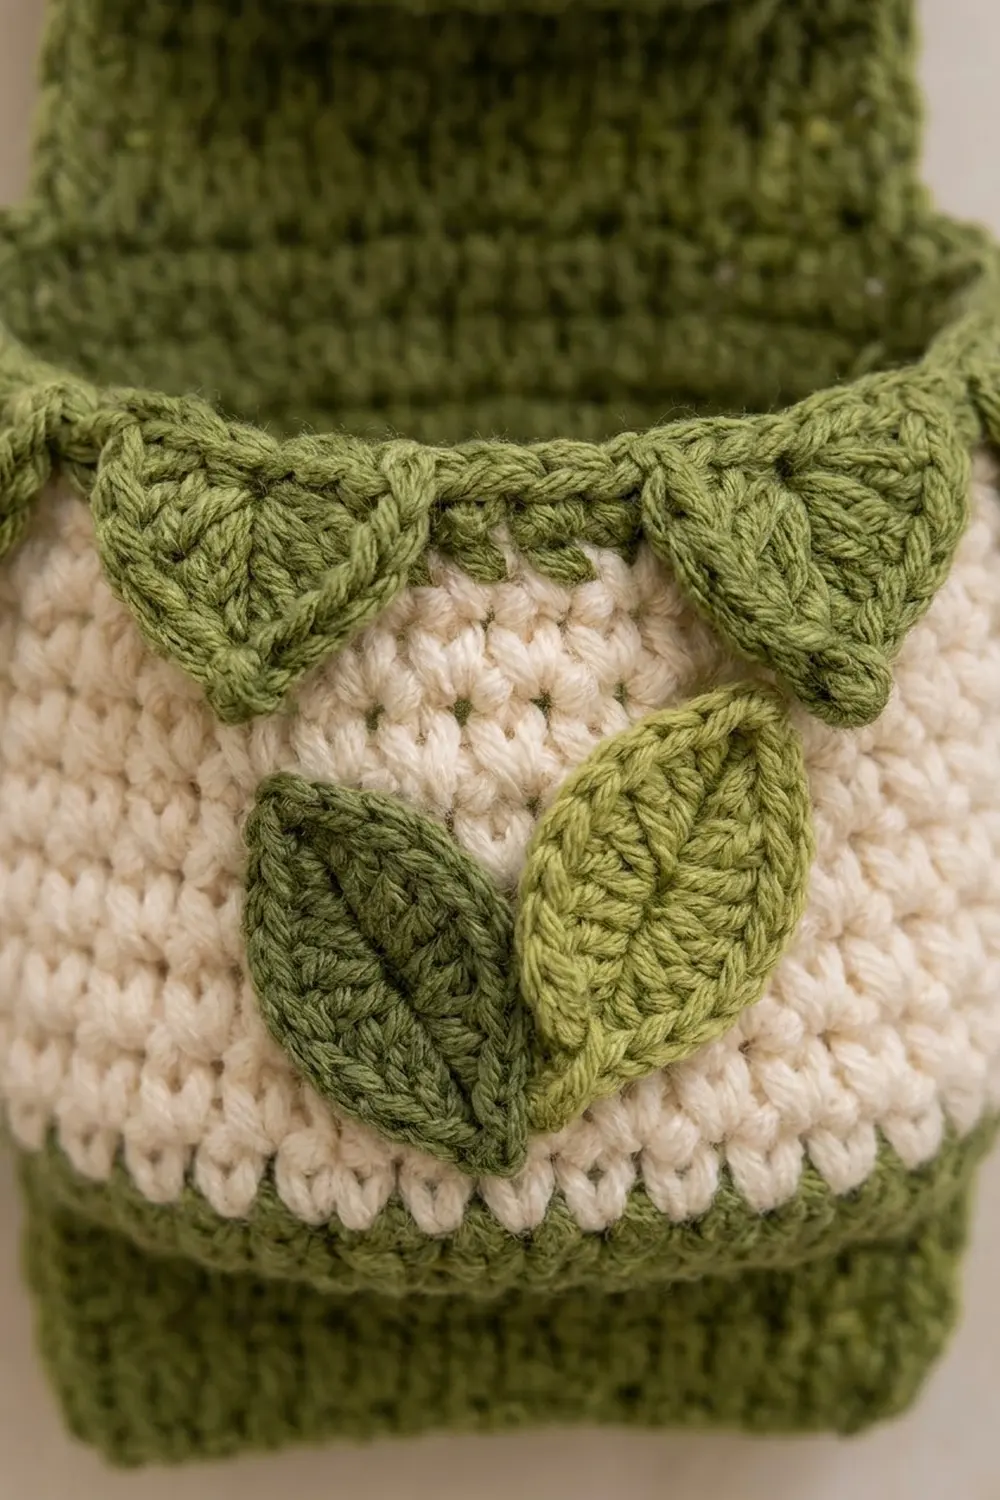
Pocket (Make 3)
Work in joined rounds. The ch 1 at the start of each round does not count as a stitch. Join each round with a sl st to the first sc. The joins line up into a seam, which will sit against the panel.
Base (Color A):
- Round 1: 6 sc in MR. (6)
- Round 2: Inc in each st around. (12)
- Round 3: (Sc in next st, inc) 6 times. (18)
- Round 4: (Sc in next 2 sts, inc) 6 times. (24)
- Round 5: (Sc in next 3 sts, inc) 6 times. (30)
- Round 6: (Sc in next 4 sts, inc) 6 times. (36)
- Round 7: (Sc in next 5 sts, inc) 6 times. (42)
- Round 8: (Sc in next 6 sts, inc) 6 times. (48)
- Round 9: (Sc in next 7 sts, inc) 6 times. (54)
Checkpoint: the base measures 4.9 in (12.4 cm) across, with a circumference of 15.4 in (39.1 cm).
Wall:
- Round 10: Sc BLO in each st around. (54) This turns the work upward and leaves a neat ridge around the base edge.
- Round 11: Sc in each st around. (54) Change to Color B on the final yarn over of the join. Cut Color A.
- Rounds 12–21 (Color B): Sc in each st around. (54) These 10 rounds make a cream band 2.5 in (6.4 cm) tall.
- Round 22: Join Color A. Sc BLO in each st around. (54) This leaves the front loops of Round 21 free for the leaf points.
- Round 23: Sc in each st around. (54) Fasten off and weave in the end.
The green rim (Rounds 22–23) is 0.5 in (1.3 cm) tall, the same as the green band at the bottom (Rounds 10–11).
Leaf-Point Edging:
Hold the pocket upside down so the free front loops of Round 21 face you.
- Join Color A with a sl st in the free FL directly below the round seam.
- *Sk 2 FL, Leaf Point in next FL, sk 2 FL, sl st in next FL; rep from * around, ending the last rep with a sl st in the joining sl st. (9 Leaf Points)
Each repeat uses 6 front loops, and 54 / 6 = 9 points. Fasten off. The points hang down over the cream and are about 0.75 in (1.9 cm) long.
Leaves (Make 6)
Make 3 leaves in Color A and 3 in Color C.
- Ch 8.
- Sc in 2nd ch from hook, hdc in next ch, dc in next 2 ch, hdc in next ch, sc in next ch, (sc, ch 2, sc) in last ch.
- Rotate the leaf and work along the opposite side of the foundation chain: sc in next ch, hdc in next ch, dc in next 2 ch, hdc in next ch, sc in next ch.
- Sl st in the first sc. (14 sts and 1 ch-2 tip)
Fasten off, leaving a 12 in (30.5 cm) tail for sewing. Each leaf is 2 in (5.1 cm) long and 1 in (2.5 cm) wide. If you like, use the tail to backstitch a center vein from the base of the leaf to the tip.
Backing Panel (Make 1)
Use Color A and work in rows. The ch 1 at the start of each row does not count as a stitch.
- Foundation: Ch 15.
- Row 1: Sc in 2nd ch from hook and in each ch across. Turn. (14)
- Rows 2–62: Ch 1, sc in each st across. Turn. (14)
Checkpoint: the panel body measures 4 in x 15.5 in (10.2 cm x 39.4 cm).
Taper:
- Row 63: Ch 1, sc2tog, sc in next 10 sts, sc2tog. Turn. (12)
- Row 64: Ch 1, sc in each st across. Turn. (12)
- Row 65: Ch 1, sc2tog, sc in next 8 sts, sc2tog. Turn. (10)
- Row 66: Ch 1, sc in each st across. Turn. (10)
- Row 67: Ch 1, sc2tog, sc in next 6 sts, sc2tog. Turn. (8)
- Row 68: Ch 1, sc in each st across. Turn. (8)
Tab:
- Rows 69–80: Ch 1, sc in each st across. Turn. (8)
The tab is 2.3 in (5.8 cm) wide and 3 in (7.6 cm) long. Fasten off. You will rejoin for the border after the pockets are attached.
Make All Pieces
- Color A: 1 panel, 3 sets of pocket bases, rims and leaf-point edgings, 3 leaves
- Color B: 3 pocket bodies
- Color C: 3 leaves
Layout (front view, top to bottom):
        [ ring ]
        [ tab  ]       rows 69–80
        [taper ]       rows 63–68
        [margin]       rows 57–62
        [POCKET C]     rows 43–56
        [ gap  ]       rows 37–42
        [POCKET B]     rows 23–36
        [ gap  ]       rows 17–22
        [POCKET A]     rows 3–16
        [margin]       rows 1–2
Joining
Leaves to pockets: Find the front center of each pocket, which is the 27th stitch from the round seam. Place one Color A leaf and one Color C leaf side by side in a slight V over Rounds 13–20, with their bases touching at the bottom center. Whipstitch around each leaf through its outer loops only.
Pockets to panel: Each pocket is flattened at the back and sewn to the panel across 14 stitches.
- Flatten each pocket so the round seam sits at the back center. In Round 23, mark 7 sts on each side of the seam, for 14 back stitches.
- Whipstitch those 14 rim stitches to the 14 stitches of the panel row listed below, one pocket stitch to one panel stitch.
- Do the same at the base edge: whipstitch the 14 back stitches of Round 10 to the 14 stitches of the lower row listed below.
- Tack the two side edges of the flattened back (sts 1 and 14) up the panel to close the sides.
Placement:
- Pocket A: base to Row 3, rim to Row 16
- Pocket B: base to Row 23, rim to Row 36
- Pocket C: base to Row 43, rim to Row 56
Each pocket wall has 14 rounds (10–23), and each placement spans 14 rows. The pocket lies flat without stretching or puckering.
Tension: Keep the whipstitches snug but not tight. If you pull too hard, the panel narrows behind the pocket.
Checkpoint: The gaps between pockets measure 1.5 in (3.8 cm), and the panel is still 4 in (10.2 cm) wide.
Border
Border gauge: 3.5 sc per inch on every edge, the same as the fabric gauge.
The pockets sit on the front of the panel, so the row ends along the sides are still free for the border. Work behind the pockets where needed.
Round 1 (Color A): Join at the top right corner of the tab.
- Top edge: Sc in each of the 8 sts of Row 80. (8)
- Corner: Ch 1.
- Left side: Work down the row ends. *Sc in each of the next 7 row ends, sk 1 row end; rep from * 10 times. (70)
- Corner: Ch 1.
- Bottom edge: Sc in each of the 14 foundation loops. (14)
- Corner: Ch 1.
- Right side: Work up the row ends the same way as the left side. (70)
- Corner: Ch 1. Sl st to the first sc.
Round 1 total: 8 + 70 + 14 + 70 = 162 sc, plus 4 ch-1 corner spaces.
Round 2: Sl st in each sc (162), plus 1 sl st in each corner ch-1 sp (4). (166) Fasten off.
Why the math works: Each side has 80 row ends. Working 7 sc for every 8 row ends gives 80 / 8 x 7 = 70 sc. Spread over 20 in (50.8 cm), that is 3.5 sc per inch, which matches the stitch gauge. The bottom (14 sc) and top (8 sc) get one stitch per stitch, so they also stay at gauge. The ch-1 corners let the border turn without pulling. The sloped edges of the taper are slightly longer than straight row ends and may ease in a little. Blocking evens this out.
The border adds 0.25 in (0.6 cm) to each edge, so the panel becomes 4.5 in x 20.5 in (11.4 cm x 52.1 cm).
Final Blocking
- Lightly mist the whole piece with water until it is damp but not wet.
- Lay it face up on a blocking mat.
- Pin the panel straight at 4.5 in (11.4 cm) wide.
- Pin each leaf point so it hangs straight down over the cream band, with a sharp ch-2 tip.
- Pin the appliqué leaves flat and shape their tips.
- Fill each pocket with a roll, or a rolled-up towel, so it dries round.
- Let it dry completely.
- Thread the tab through the wooden ring. Fold at Row 76 so Row 80 lies against the back of Row 72. Whipstitch across the 8 sts and through the border.
Final Quality-Control Checklist
- Each pocket base is 4.9 in (12.4 cm) across.
- Each pocket has 9 evenly spaced leaf points.
- The round seams are hidden against the panel.
- The leaves are centered on the front at the 27th stitch.
- The pockets are level and 1.5 in (3.8 cm) apart.
- The border lies flat with no ruffles.
- The tab is sewn securely and the ring hangs straight.
- All ends are woven in.
Troubleshooting
- The base cups or ruffles: Your gauge is off. Change hook size, redo the base and check it at Round 9.
- The leaf points stand up: Block them pointing down, or steam them lightly.
- There are gaps at the color change: Change colors on the final yarn over of the joining sl st.
- The pocket is too tight for a roll: Remake the whole pocket one hook size larger.
- The panel sags under full rolls: Use cotton yarn and crochet the panel with tighter tension.
- The border waves: Skip one extra row end in each long side.
Care
Hand wash in cool water and lay flat to dry. While it is damp, put rolls in the pockets to reshape them.
Final Notes
Every measurement follows from the gauge. A 4.9 in (12.4 cm) base gives 54 stitches. Fourteen wall rounds make a pocket 3.5 in (8.9 cm) deep, and the 9 leaf points divide evenly into the 54 front loops. Each pocket’s 14 back stitches match the panel’s 14 stitches. The 70-stitch long sides of the border keep the panel at gauge. The result is a holder 4.5 in (11.4 cm) wide and about 22 in (55.9 cm) long including the ring.
Happy crocheting!