

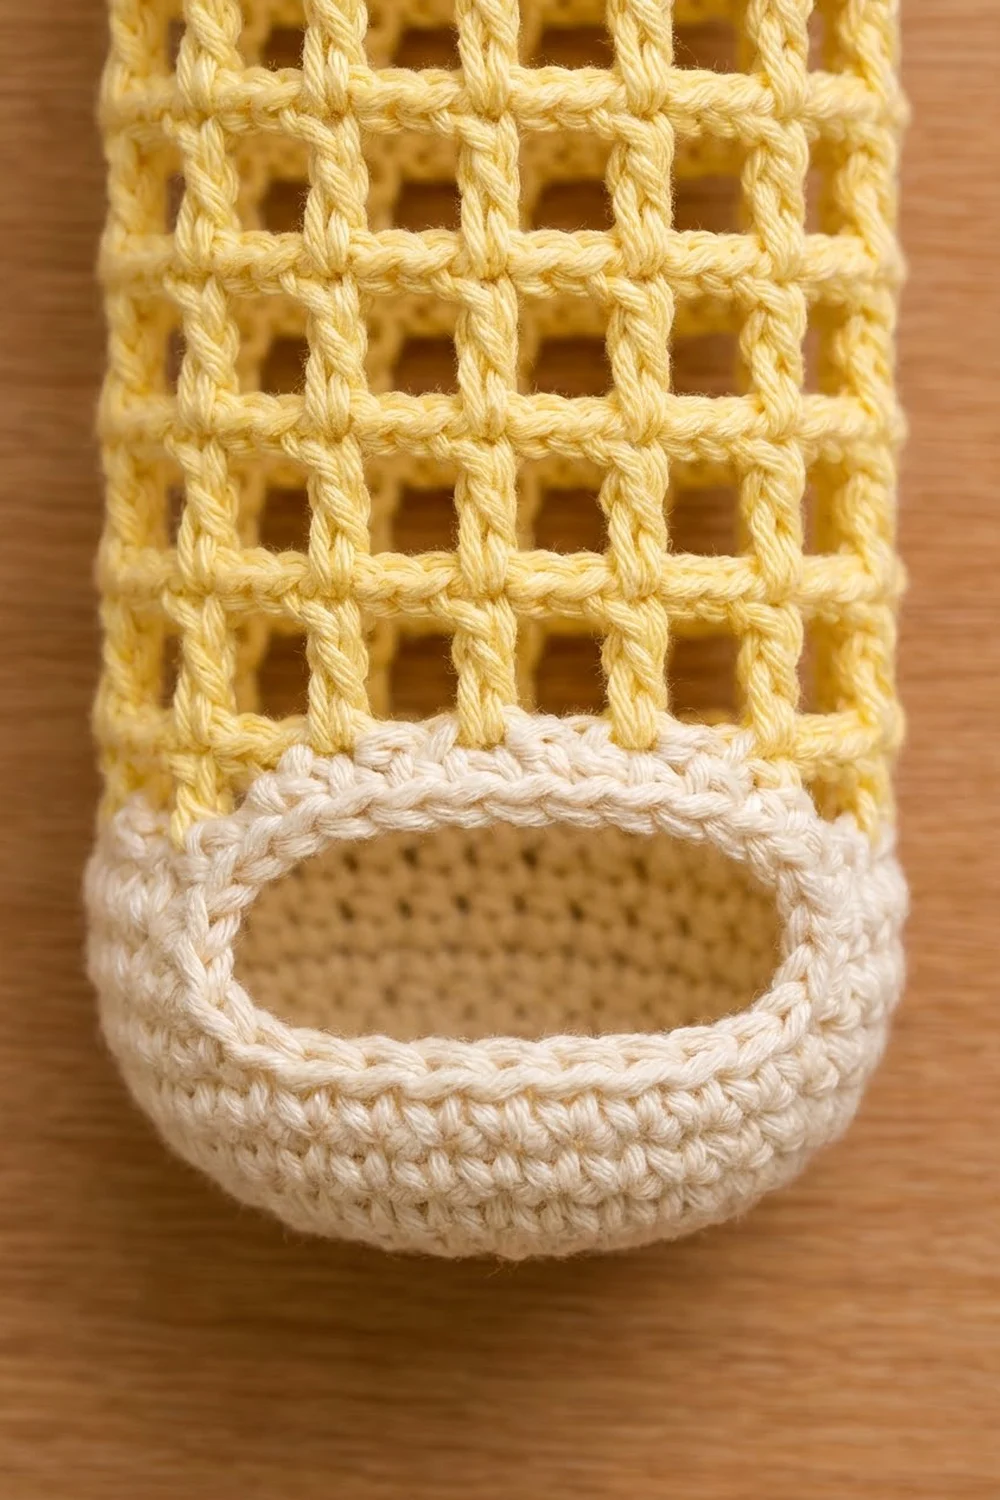
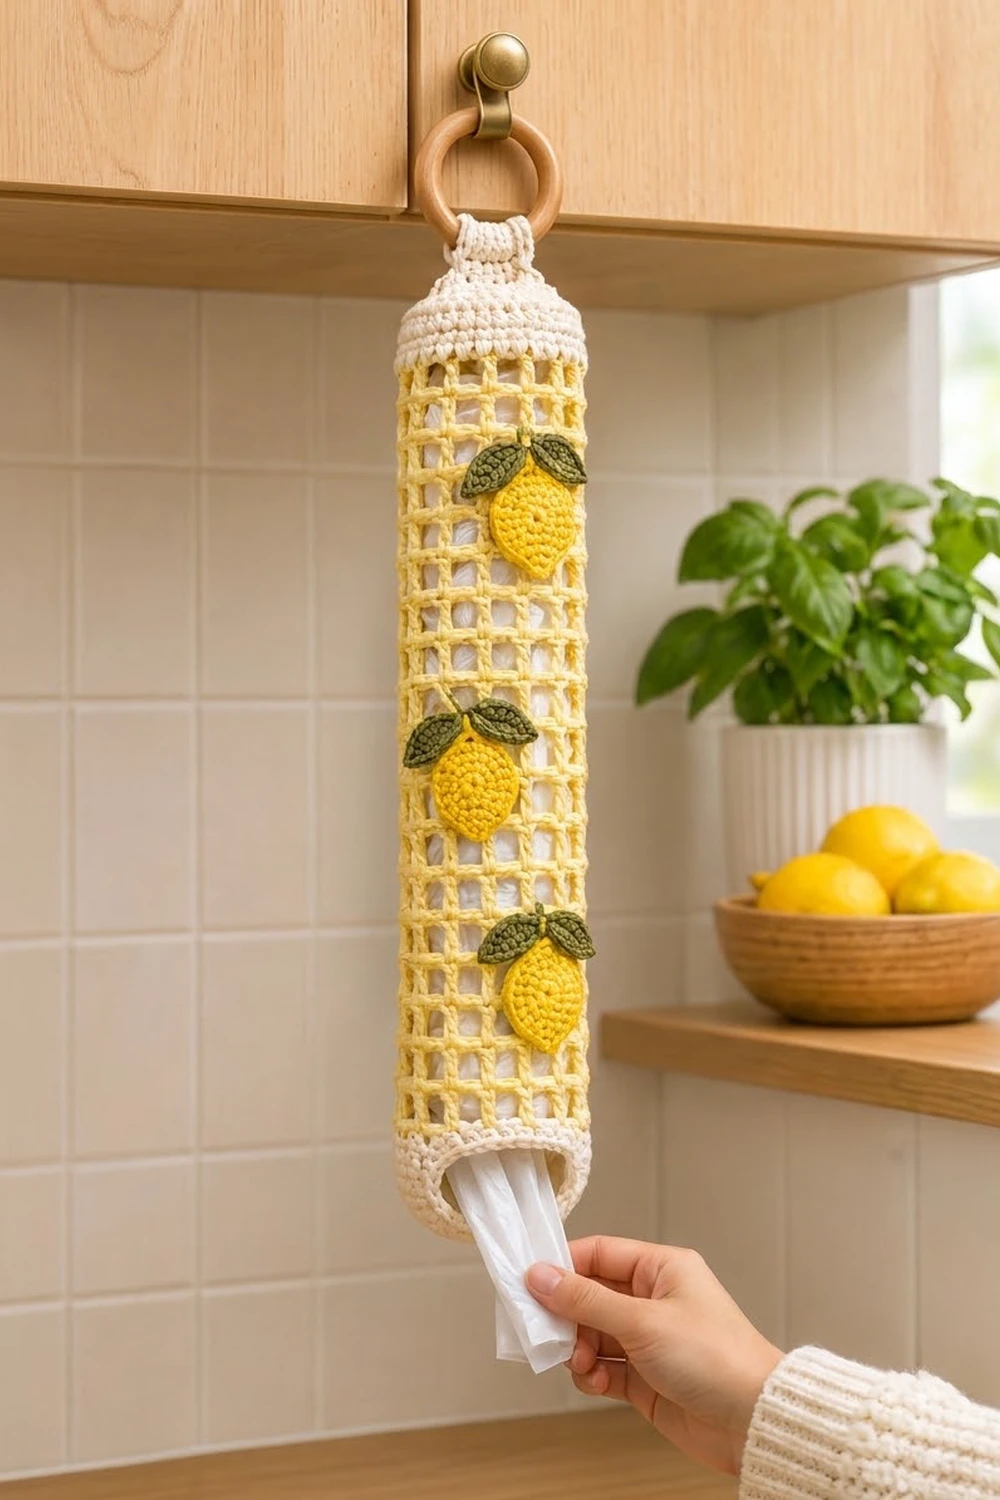
This bag holder brings a little sunshine to the kitchen. A pale-yellow open-mesh tube shows off the bags inside. A sturdy cream base with a wide oval opening lets you pull out one bag at a time. Three bright lemons with olive-green leaves climb the front in a soft zigzag.
The palette is cream, pale yellow, bright lemon yellow, and olive green. The style is fresh farmhouse: simple filet mesh, solid single-crochet bands, and a natural wooden ring for hanging. This pattern uses US crochet terms throughout.
The finished holder is 6 in (15.2 cm) wide when flat (12 in / 30.5 cm around) and 21.5 in (54.6 cm) long, not counting the tab and ring.
Construction is bottom-up in one piece. You start with a flat circular base, work cream walls with a built-in opening, switch to yellow mesh, and finish with a cream band and a gathered neck. Then you add a tab around the wooden ring and sew on three lemons.
Finished Size and Construction
- Finished size: 6 in x 21.5 in (15.2 cm x 54.6 cm) flat
- Circumference: 12 in (30.5 cm)
- Skill level: Easy (advanced beginner)
- Terminology: US
- Yarn weight: Worsted (#4) cotton
- Hooks: 4.5 mm (US 7) for the body and tab; 3.5 mm (US E-4) for the appliqués
- Number of pieces: 1 body, 1 tab, 3 lemons, 6 leaves
- Layout: Three lemons stacked vertically on the front, offset right-left-right
- Section heights: cream base 2.75 in (7.0 cm), mesh 16 in (40.6 cm), top band 2 in (5.1 cm), neck 0.75 in (1.9 cm)
- Size before top band: 6 in x 18.75 in (15.2 cm x 47.6 cm)
- Opening edging depth: 1 round of sc plus 1 round of surface slip stitches, about 0.25 in (0.6 cm)
Materials
Use a smooth, mercerized or combed worsted-weight cotton. Cotton holds its shape when the tube is full of bags and won’t stretch out over time. Choose yarn with about 85 m per 50 g (roughly 1.7 m per gram).
- Pale yellow (mesh): 60 g, about 100 m
- Cream (base, band, neck, tab): 50 g, about 85 m
- Bright yellow (lemons): 15 g, about 25 m
- Olive green (leaves): 10 g, about 17 m
Tools:
– 4.5 mm (US 7) and 3.5 mm (US E-4) hooks
– Wooden ring, 2.5 in (6.4 cm) outer diameter
– Stitch markers (4)
– Tapestry needle
– Scissors
– Rust-proof pins for blocking
All quantities include a margin of about 15%.
Abbreviations (US Terms)
- ch – chain
- sl st – slip stitch
- sc – single crochet
- hdc – half double crochet
- dc – double crochet
- sc2tog – single crochet 2 together
- BLO – back loop only
- MR – magic ring
- st(s) – stitch(es)
- sk – skip
- sp – space
Special stitch – mesh (filet square): dc in the next dc, ch 2. In the set-up round, each mesh covers 3 sts (1 dc + 2 skipped sts).
Picot tip: ch 3, sl st in the 3rd ch from the hook.
Gauge and Checkpoints
Gauge with the 4.5 mm hook:
- Single crochet: 15 sc and 16 rounds = 4 in (10.2 cm)
- Mesh: 5 meshes and 6 rounds = 4 in (10.2 cm). Each mesh is 0.8 in (2.0 cm) wide and about 0.67 in (1.7 cm) tall.
Work the base first and treat it as your test piece. It’s small and tells you everything you need to know.
Checkpoints:
1. After Rnd 5, the base disk measures 3.8 in (9.7 cm) across.
2. After Rnd 16, the cream section measures 2.75 in (7.0 cm) tall, measured up the side.
3. After 6 mesh rounds, the mesh adds 4 in (10.2 cm).
4. After Rnd 40, the tube measures 18.75 in (47.6 cm).
5. After Rnd 48, it measures 20.75 in (52.7 cm).
If the base is too big, go down a hook size. If it’s too small, go up a size. If only the mesh height is off, adjust your height by adding or removing mesh rounds in multiples of 1. Each round changes the length by 0.67 in (1.7 cm).
Body
With the 4.5 mm hook and cream:
Base disk
- Rnd 1: MR, 9 sc in ring, join with sl st to the first sc. (9)
- Rnd 2: Ch 1, 2 sc in each st, join. (18)
- Rnd 3: Ch 1, sc 1, 2 sc in next 9 times, join. (27)
- Rnd 4: Ch 1, sc 2, 2 sc in next 9 times, join. (36)
- Rnd 5: Ch 1, sc 3, 2 sc in next 9 times, join. (45)
Cream walls
- Rnd 6: Ch 1, sc in BLO of each st, join. (45) This turns the wall upward and gives a rounded base edge.
- Rnd 7: Ch 1, sc in each st, join. (45)
Opening rows: These rows are worked back and forth, leaving 15 sts unworked.
- Row 8: Ch 1, sc in the first 30 sts, turn. (30) Leave the last 15 sts of Rnd 7 unworked; they form the bottom edge of the opening. Mark the first and last of these 15 sts.
- Rows 9–14: Ch 1, sc 30, turn. (30) You finish Row 14 at the 30th st.
- Closing chain: Ch 15, then sl st to the first sc of Row 14. This bridges the opening.
- Rnd 15: Ch 1, sc in the same st and the next 29 sts, then sc in each of the 15 ch. Join. (45) That’s 30 sc + 15 sc in the chain.
- Rnd 16: Ch 1, sc in each st, join. (45)
The opening is now 15 sts wide, 4 in (10.2 cm), and 7 rows tall, 1.75 in (4.4 cm). Its center at st 38 marks the front of the holder. Change to pale yellow.
Mesh
- Rnd 17 (set-up): Ch 5 (counts as dc + ch 2). Sk 2, dc in next, ch 2 14 times, sk 2, join with sl st to the 3rd ch of the ch-5. (15 meshes = 15 dc + 30 ch = 45 sts)
- Rnds 18–40: Ch 5 (counts as dc + ch 2). Dc in next dc, ch 2 14 times, join to the 3rd ch. (15 meshes)
That’s 24 mesh rounds, which add 16 in (40.6 cm). Every dc stacks directly on the dc below, so you get the straight square grid. Change to cream.
Top band
- Rnd 41 (conversion): Ch 1, sc in each dc and 2 sc in each ch-2 sp, join. (15 + 30 = 45)
- Rnds 42–48: Ch 1, sc in each st, join. (45)
That’s 8 band rounds, 2 in (5.1 cm).
Neck
- Rnd 49: Ch 1, sc 1, sc2tog 15 times, join. (30)
- Rnd 50: Ch 1, sc2tog 15 times, join. (15)
- Rnd 51: Ch 1, sc 1, sc2tog 5 times, join. (10)
Fasten off, leaving a 12 in (30.5 cm) tail. The neck adds 0.75 in (1.9 cm), for a body length of 21.5 in (54.6 cm).
Tab
With the 4.5 mm hook and cream, ch 6.
- Row 1: Sc in the 2nd ch from the hook and in each ch across, turn. (5)
- Rows 2–14: Ch 1, sc 5, turn. (5)
Fasten off, leaving a 10 in (25.4 cm) tail. The tab measures 1.3 in x 3.5 in (3.3 cm x 8.9 cm).
Lemons (make 3)
With the 3.5 mm hook and bright yellow, ch 5.
- Rnd 1: Sc in the 2nd ch from the hook, sc in the next 2 ch, and 3 sc in the last ch. Rotate to work along the opposite side of the chain: sc in the next 2 ch, 2 sc in the last ch. Join. (10)
- Rnd 2: Ch 1, 2 sc in the first st, sc 2, 2 sc in each of the next 3 sts, sc 2, 2 sc in each of the last 2 sts. Join. (16) Each narrow end now has 3 increases.
- Rnd 3: Ch 1. Sc in each st up to the center st of the far narrow end. Work (sc, picot tip, sc) in that st. Sc to the center st of the near narrow end and work (sc, picot tip, sc) again. Sc to the end and join. (18 sc + 2 picots)
Fasten off with a long tail. Each lemon measures about 2.25 in x 1.5 in (5.7 cm x 3.8 cm).
Leaves (make 6)
With the 3.5 mm hook and olive green, ch 7.
- Sl st in the 2nd ch from the hook, then work sc, hdc, dc, hdc, sc in the next 5 ch. (6)
- Ch 2 for the tip.
- Working along the other side of the chain, work sc, hdc, dc, hdc, sc, sl st. (6) Join. (12 sts + ch-2 tip)
Fasten off with a long tail. Each leaf measures about 1.25 in (3.2 cm) long.
Make All Pieces
Quantities:
– Cream: 1 body base, band and neck; 1 tab
– Pale yellow: the mesh section of the body
– Bright yellow: 3 lemons
– Olive green: 6 leaves (2 per lemon)
Placement grid: This is the front view. Columns are meshes 12–14, with mesh 13 centered above the opening. Mesh rounds are numbered 1–24 from the bottom of the mesh.
Band (cream)
Mesh rnds 20–22:  [ ][ ][L]   Lemon A, centered on mesh 14
Mesh rnds 12–14:  [L][ ][ ]   Lemon B, centered on mesh 12
Mesh rnds 4–6:    [ ][ ][L]   Lemon C, centered on mesh 14
Base (cream) with opening centered on mesh 13
Joining
Leaves to lemons: Lay two leaves over the top picot tip of a lemon, angled outward in a V with their wide ends overlapping the tip. Whipstitch each leaf along its center chain to the lemon, catching 1 lemon st per leaf st. Then sew the leaves’ upper edges to each other where they cross.
Lemons to body: Pin each lemon in place following the grid, with the leaves pointing up. Whipstitch around the lemon’s Rnd 3 edge. Catch one lemon sc per stitch and anchor to the nearest dc post or ch-2 bar of the mesh. Keep the tension relaxed so the mesh doesn’t pucker. The lemon should lie flat, and the mesh behind it should still measure 0.8 in (2.0 cm) per square.
Tab: Pass the tab through the wooden ring and fold it in half, so both short ends are 5 sts wide. Flatten the neck so it has 5 sts per side. Insert both tab ends into the neck opening, then sew through the neck sts and the tab layers, 1 neck st to 1 tab st on each side.
Size checkpoint: The tab loop extends about 1.5 in (3.8 cm) above the neck, and the body still lies flat at 6 in (15.2 cm) wide.
Border: Opening Edging
Border gauge: 15 sc = 4 in (10.2 cm) with the 4.5 mm hook. One sc per row end matches row height closely, since there are 16 rows per 4 in.
Join cream at a marked corner of the opening.
- Rnd 1: Ch 1. Work sc around the opening:
- Bottom edge: 15 sc, one in each unworked st of Rnd 7
- Each side: 7 sc, one in each row end of Rows 8–14
- Top edge: 15 sc, one in the underside of each ch
- Join. (15 + 7 + 15 + 7 = 44)
- Rnd 2: Work 44 surface sl sts, one in each sc, and join. Fasten off.
Why the math works: Each edge gets exactly 1 sc per existing stitch or row end, so no corner stitch is counted twice and the edge neither ruffles nor pulls in. The sc round narrows the opening by about 0.25 in (0.6 cm) on each side. That leaves a smooth oval about 3.5 in x 1.25 in (8.9 cm x 3.2 cm). The slip stitch round adds firmness without shrinking it further.
Final Blocking
- Weave in all ends along solid cream rounds or inside the lemon backs.
- Roll a towel tightly to about 3.8 in (9.7 cm) across and slide it into the tube.
- Mist the whole piece with water until it is damp.
- Square up the mesh by pulling gently along the length until the rounds stack straight.
- Pin the lemons and leaves flat and open the leaf tips.
- Shape the opening into an even oval with your fingers.
- Let it dry completely, then remove the towel.
Final Quality-Control Checklist
- [ ] Base is 3.8 in (9.7 cm) across with a defined BLO edge.
- [ ] Opening is centered on the front, about 3.5 in x 1.25 in (8.9 cm x 3.2 cm).
- [ ] There are 15 meshes per round, with every dc stacked in a straight column.
- [ ] Mesh height is 16 in (40.6 cm).
- [ ] The top band is 2 in (5.1 cm) with an even 45 sts.
- [ ] Body is 6 in x 21.5 in (15.2 cm x 54.6 cm) flat.
- [ ] Tab is sewn securely and the ring hangs centered.
- [ ] Lemons follow the right-left-right layout with the leaves up.
Troubleshooting
- Mesh columns spiral: You’re probably working the dc into a ch-2 space instead of into the dc. Always work into the top of the dc below.
- Mesh is too short: Add 1 or 2 mesh rounds. Each one adds 0.67 in (1.7 cm).
- Band flares above the mesh: Work 1 sc in each ch-2 space instead of 2 on Rnd 41, then add sts back evenly on Rnd 42 to return to 45.
- Opening gapes or sags: Work the edging’s Rnd 2 slip stitches more firmly.
- Lemon curls: Your Rnd 2 increases are too tight. Block the lemon flat, or redo the round with a looser tension.
- Holder leans when hung: The tab isn’t centered. Re-sew it so the neck has 5 sts on each side.
Care
Hand wash in cool water, press out the water in a towel, and reshape the holder over a rolled towel to dry flat. Don’t put it in the dryer, because the cotton mesh can lose its shape.
Final Notes
Your measurements build on each other:
- A 3.8 in (9.7 cm) base sets the 45-stitch circumference, which is 12 in (30.5 cm) around.
- The cream walls rise 2.75 in (7.0 cm) and frame a 4 in (10.2 cm) opening.
- 24 mesh rounds add 16 in (40.6 cm).
- The top band adds 2 in (5.1 cm) and the neck adds 0.75 in (1.9 cm).
- Together they give a 6 in x 21.5 in (15.2 cm x 54.6 cm) holder, finished with a wooden ring and three cheerful lemons.
Check your gauge at the base and the rest falls into place. Happy crocheting!