

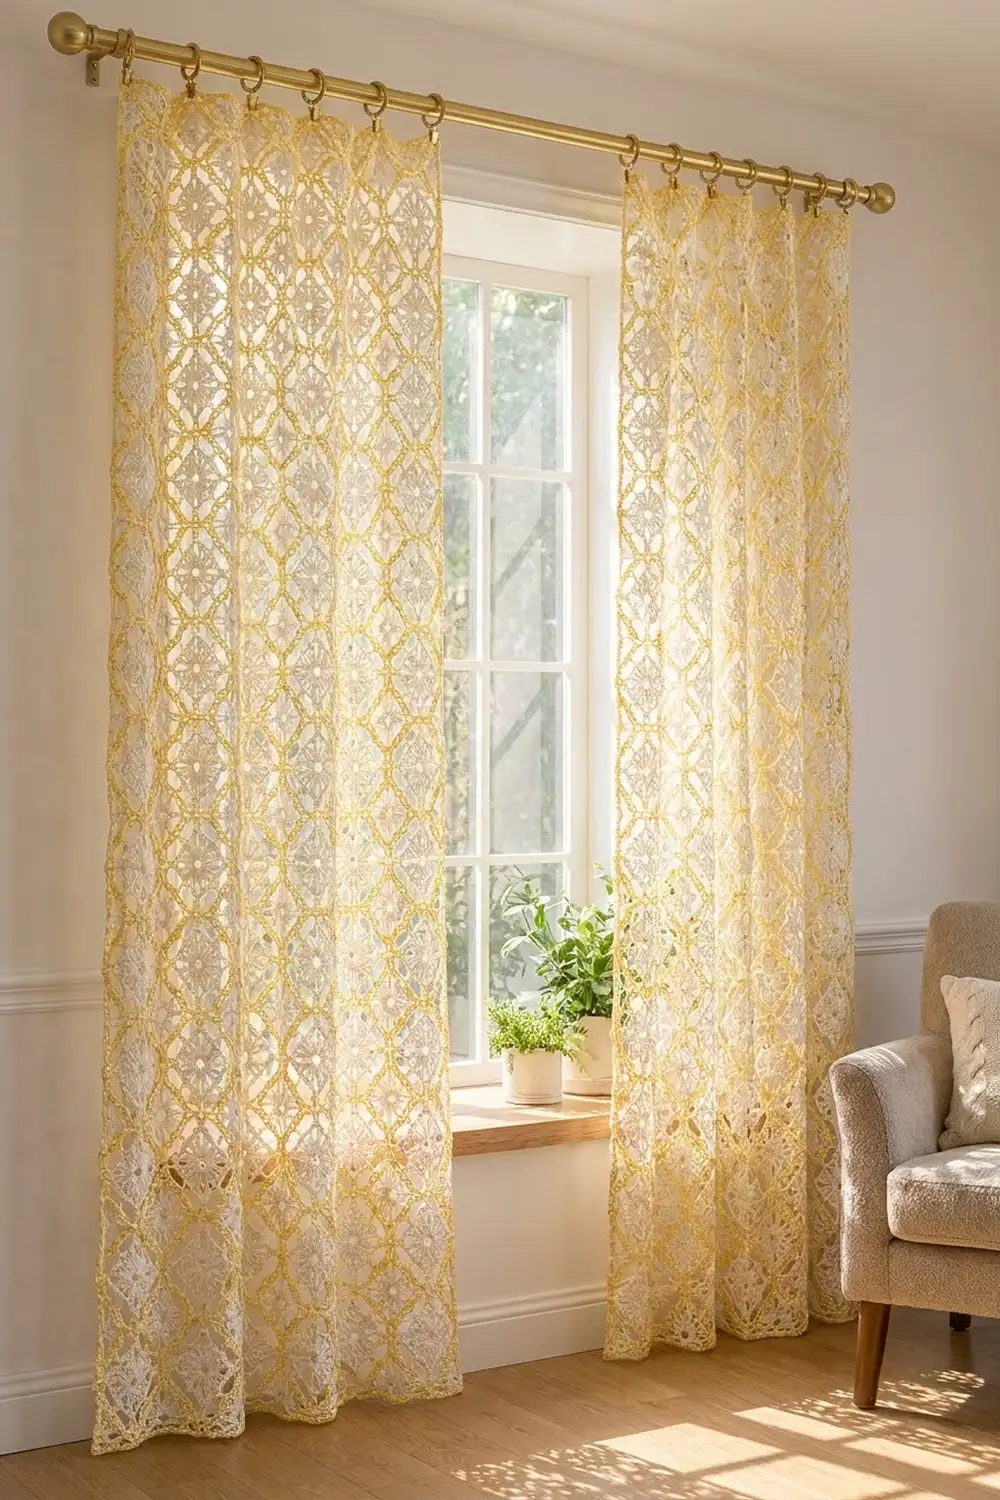
The Lemon Lattice Curtain is a light, airy lace panel made of small cream flower motifs set on point inside a soft yellow chain lattice. When the panels hang against a window, the cream diamonds glow and the yellow lines frame them like a sunny trellis.
The palette is just two colors: buttery yellow and warm cream. The style is vintage lace with a clean, modern grid, so it suits a kitchen, a cottage bedroom or a bright living room.
This pattern uses US crochet terms. Each finished panel measures 51.5 in (130.8 cm) wide by 81.5 in (207.0 cm) long. The photo shows a pair of panels, so the pattern is written for one panel and you make two.
The construction is easy to follow. Each motif has two cream rounds and one yellow frame round. You join the motifs tip to tip as you go. A yellow filler border then fills the notches along the edges and straightens all four sides. The panels hang from clip rings.
Finished Size and Construction
- Finished size (per panel): 51.5 in (130.8 cm) wide x 81.5 in (207.0 cm) long
- Skill level: Intermediate
- Terminology: US crochet terms
- Yarn weight: DK / light worsted (#3) cotton
- Hook: 4.0 mm (US G-6)
- Number of pieces: 160 motifs per panel, 320 motifs for the pair
- Layout: 10 motifs across x 16 motifs down per panel, set on point and joined tip to tip
- Motif size: 5 in (12.7 cm) tip to tip; each side about 3.5 in (8.9 cm)
- Size before border: 50 in (127.0 cm) x 80 in (203.2 cm)
- Border depth: about 0.75 in (1.9 cm) beyond the motif tips
Materials
Choose a smooth mercerized or combed cotton in DK weight, about 115 m per 50 g ball. Cotton shows lace stitches clearly, blocks well and holds up in sunlight.
- Cream (motif centers): 700 g, about 1,610 m (14 balls)
- Yellow (frames and border): 550 g, about 1,265 m (11 balls)
- 4.0 mm (US G-6) crochet hook
- Tapestry needle
- Scissors
- Stitch markers
- Tape measure
- Blocking mats and rustproof pins
- Spray bottle
- 22 curtain clip rings (11 per panel)
These quantities are for the pair. They include a margin of about 15 to 20 percent for gauge swatches, tails and small differences in tension.
Abbreviations (US Terms)
- ch – chain
- sl st – slip stitch
- sc – single crochet
- dc – double crochet
- tr – treble crochet (yarn over twice)
- dtr – double treble crochet (yarn over 3 times)
- trtr – triple treble crochet (yarn over 4 times, then work the loops off 2 at a time 5 times)
- sp(s) – space(s)
- st(s) – stitch(es)
- rep – repeat
Special stitch – joining corner (JC): sc in corner sp, ch 2, sl st into the ch-5 corner loop of the neighboring motif, ch 2, sc in the same corner sp of the current motif.
Gauge and Checkpoints
Make one complete motif first and block it lightly before you start the panel. Every measurement in this pattern grows from this one motif.
- After Round 1: circle about 2 in (5.1 cm) across
- After Round 2: square about 2.75 in (7.0 cm) per side
- After Round 3: square about 3.5 in (8.9 cm) per side, and 5 in (12.7 cm) from tip to tip
Border gauge: 22 sc = 5 in (12.7 cm); 4 rounds of sc = 1 in (2.5 cm).
If your motif is larger than 5 in (12.7 cm) tip to tip, go down a hook size. If it is smaller, go up a hook size. A difference of only 0.25 in (0.6 cm) per motif adds up to 2.5 in (6.4 cm) across the width and 4 in (10.2 cm) down the length, so check carefully.
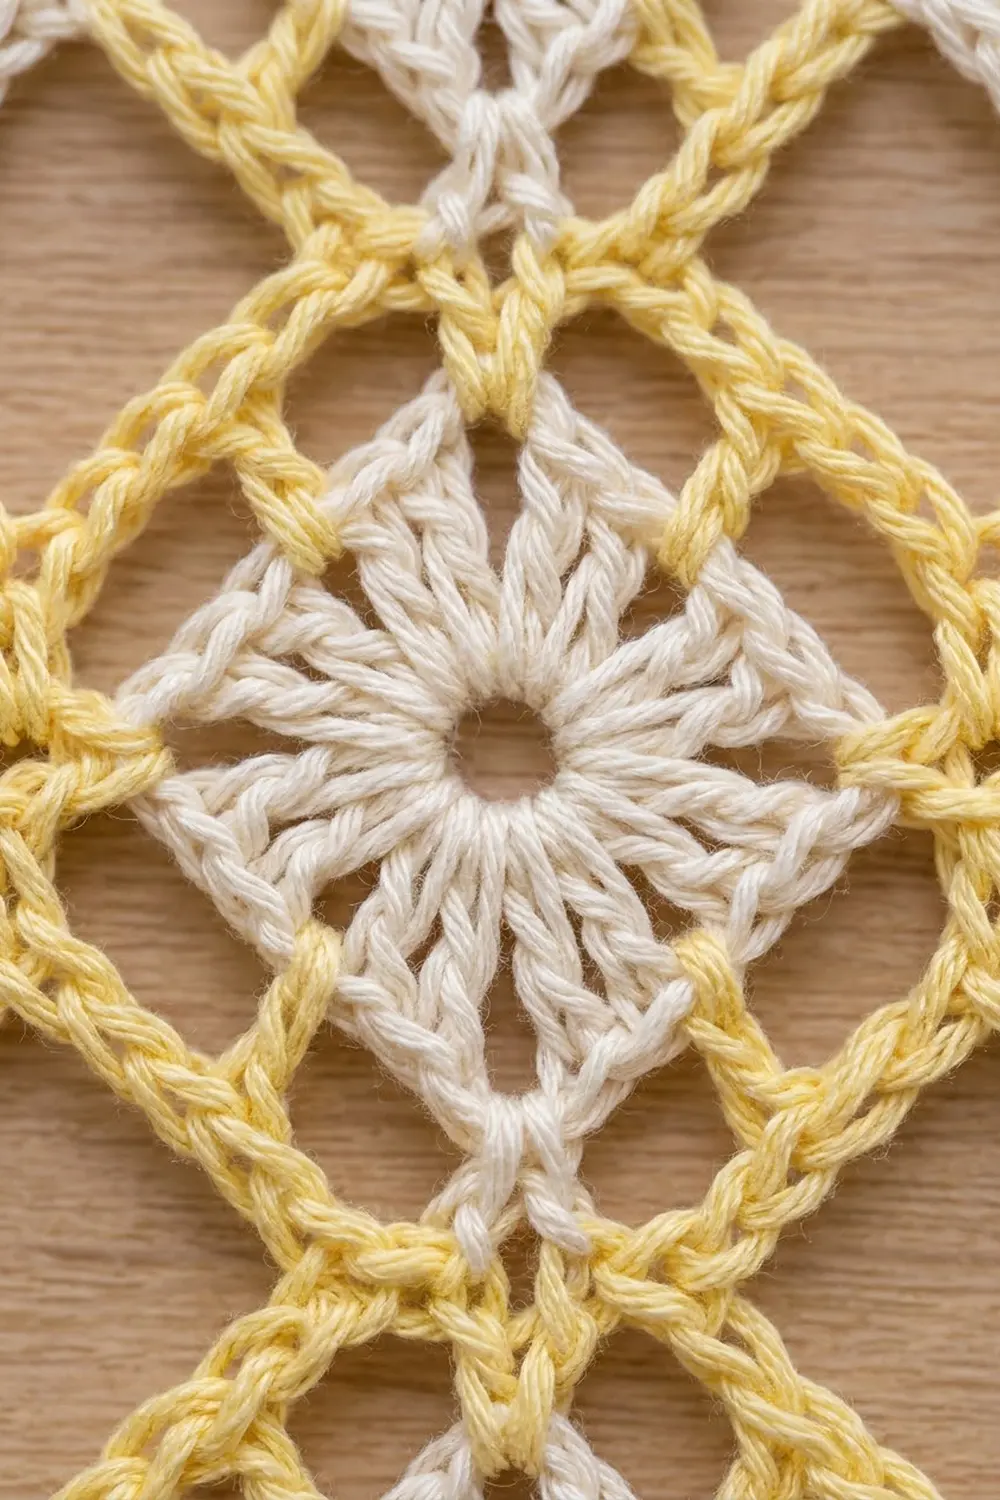
Motif
Work each motif in the round with the right side facing. Do not turn.
Round 1 (cream): Make a magic ring. Ch 4 (counts as dc and ch 1), [dc in ring, ch 1] 15 times, sl st to 3rd ch of beginning ch-4. Pull the ring closed. (16 dc, 16 ch-1 sps)
The ch-1 spaces separate the dc into spokes, which gives the open wheel center.
Round 2 (cream): Sl st into the next ch-1 sp and the next dc. Ch 3 (counts as dc), (ch 3, dc) in same st. Dc in each of the next 3 dc, working into the stitches and skipping the ch-1 sps. (Dc, ch 3, dc) in next dc, dc in each of the next 3 dc; rep from * 2 more times, sl st to top of beginning ch-3. Fasten off. (20 dc, 4 ch-3 corner sps)*
Each side now has 5 dc between corner spaces. Pulling the 16 spokes out to four corners turns the circle into a square. You will set it on point so it reads as a diamond.
Round 3 (yellow frame): Join yellow with a sl st in any ch-3 corner sp. Ch 1, (sc, ch 5, sc) in same sp. Ch 4, skip 2 dc, sc in next dc (the center dc of the side), ch 4, skip 2 dc, (sc, ch 5, sc) in next corner sp; rep from * 2 more times. Ch 4, skip 2 dc, sc in center dc, ch 4, sl st to first sc. Fasten off. (12 sc, 4 ch-5 corner loops, 8 ch-4 side loops)*
The ch-5 loops are the four tips of the diamond. The ch-4 loops form the open yellow lines of the lattice.
Make All Pieces
Make 160 motifs for each panel. Work Rounds 1 and 2 in cream for all motifs ahead of time. Work Round 3 in yellow as you join.
- Cream: 160 centers per panel, 320 for the pair
- Yellow: 160 frames per panel, 320 for the pair
Layout for one panel (each ◇ is one motif set on point, joined at the tips):
Row 1:   ◇ ◇ ◇ ◇ ◇ ◇ ◇ ◇ ◇ ◇   (10 motifs)
Row 2:   ◇ ◇ ◇ ◇ ◇ ◇ ◇ ◇ ◇ ◇
Row 3:   ◇ ◇ ◇ ◇ ◇ ◇ ◇ ◇ ◇ ◇
 ...      (continue the same)
Row 16:  ◇ ◇ ◇ ◇ ◇ ◇ ◇ ◇ ◇ ◇
16 rows x 10 motifs = 160 motifs per panel.
Joining
Join the motifs during Round 3 using the join-as-you-go method. Only the tips are joined, so each joining point connects exactly two motifs.
- Work Round 3 of the first motif in full.
- For the next motif in Row 1, work Round 3 as written, but replace the left-tip corner with a JC into the right-tip loop of the previous motif.
- For Row 2 and every row after it, replace the top-tip corner with a JC into the bottom-tip loop of the motif directly above. Also join the left tip to the motif on its left, as in Row 1.
- Leave all outer tips as full ch-5 loops. These are the top tips of Row 1, the bottom tips of Row 16, the left tips of column 1 and the right tips of column 10.
Because the diamonds touch only at their points, the space between four motifs becomes an open diamond the same size as a motif. This creates the checkerboard of cream diamonds and open yellow lattice.
Tension advice: keep the ch-2 on each side of the joining sl st snug but not tight. Joins that are too tight pucker the lattice. Joins that are too loose let the motifs droop when the panel hangs.
Size checkpoint: after Row 2 is joined, measure across Row 1. It should be 50 in (127.0 cm) from the left tip of the first motif to the right tip of the last. The completed panel should measure 50 in (127.0 cm) x 80 in (203.2 cm) from tip to tip.
Border
Work the border in yellow with the right side facing. Rounds A and B fill the V-shaped notches between the edge tips and the triangle at each corner. Rounds C, D and E add straight sc edges.
Along each edge, a notch sits between two free tips. Each side of the notch has 2 ch-4 loops with one sc between them; call this the mid sc. The bottom of the notch is the joining point between two motifs.
Round A: Join yellow with a sl st in the first free tip loop after a corner. Ch 1, sc in same loop. For each notch: ch 4, tr in mid sc, ch 5, trtr around the joining point (insert hook under both ch-2s and the sl st), ch 5, tr in next mid sc, ch 4, sc in next tip loop. Rep across the edge. At each panel corner: ch 4, (trtr, ch 5, trtr) in the mid sc of the corner motif’s outer side, ch 4, sc in the next tip loop. Continue around, sl st to first sc.
Round B: Ch 1. Over each notch: sc in sc, ch 4, dc in tr, ch 5, trtr in trtr, ch 5, dc in tr, ch 4. At each corner: sc in sc, ch 4, dc in trtr, ch 4, (dtr, ch 3, dtr) in ch-5 sp, ch 4, dc in next trtr, ch 4. Sl st to first sc.
The tallest stitches sit at the deepest point of each notch. After Round B, the edge is straight and level with the tips.
Round C: Ch 1. Work 1 sc in each sc, dc, tr, trtr and dtr. Work 4 sc in each ch-4 sp and 5 sc in each ch-5 sp. In each corner ch-3 sp, work 3 sc; the middle sc is the corner stitch. Sl st to first sc.
Counts for Round C:
- Each notch: 4 + 1 + 5 + 1 + 5 + 1 + 4 = 21 sc
- Each tip: 1 sc
- Each half-corner (from tip to corner stitch, not counting the corner stitch): 4 + 1 + 4 + 1 + 1 = 11 sc
- Top and bottom (10 tips, 9 notches): 2 corner sts + 11 + 10 tips + (9 x 21) + 11 = 223 sc per side
- Left and right (16 tips, 15 notches): 2 corner sts + 11 + 16 tips + (15 x 21) + 11 = 355 sc per side
- Total: (2 x 223) + (2 x 355) − 4 shared corners = 1,152 sc
Round D: Ch 1, sc in each st, working 3 sc in each corner st. Sl st to first sc. (225 sc top and bottom, 357 sc each side, 1,160 sc total)
Round E: Rep Round D. Fasten off. (227 sc top and bottom, 359 sc each side, 1,168 sc total)
Why the math works: each motif adds 5 in (12.7 cm) of edge and carries 22 sc: 21 in its notch or half-corners, plus 1 in its tip. At a border gauge of 22 sc = 5 in (12.7 cm), the sc edge matches the motif width, so the border lies flat without ruffling or cupping. Rounds D and E only add the 2 corner increases per side that a flat corner needs.
Final Blocking
- Weave in all ends, running each tail through the solid dc or sc of its own color.
- Lay the panel flat on blocking mats, right side up. Work in sections if your space is small.
- Spray it evenly with water until it is damp but not dripping.
- Pin the four corners first, to 51.5 in (130.8 cm) x 81.5 in (207.0 cm).
- Pin along each edge every 5 in (12.7 cm), at each tip position.
- Pin open a few interior diamonds so the lattice lines run straight.
- Let the panel dry completely before you remove the pins. Repeat for the second panel.
Once the panels are dry, clip 11 rings to the top edge of each one. Put one ring at each corner and space the rest about 5 in (12.7 cm) apart, then slide the rings onto your rod.
Final Quality-Control Checklist
- Each panel has 160 motifs in 10 columns and 16 rows.
- Every motif has a wheel center of 16 dc spokes and 4 sharp corners.
- Every join connects exactly two tips, with no skipped or doubled joins.
- Round C counts are 223 sc on the short sides and 355 sc on the long sides.
- Round E counts are 227 sc on the short sides and 359 sc on the long sides.
- The edges are straight, with no waves at the notches.
- Each panel blocks to 51.5 in (130.8 cm) x 81.5 in (207.0 cm).
- Both panels match in length to within 0.5 in (1.3 cm).
Troubleshooting
- Motif cups like a bowl: Round 2 is too tight. Loosen the ch-3 corners or go up a hook size.
- Motif ruffles: the ch-1 spaces in Round 1 are too loose. Keep them snug.
- Panel is too wide: your motifs are too big. Recheck the 5 in (12.7 cm) tip-to-tip gauge and change hooks.
- Border dips at the notches: the trtr is too short. Pull up a slightly taller loop, or add 1 ch to each ch-5 in Round B.
- Border bulges at the notches: the trtr is too tall. Work it more firmly.
- Corners round off: check that you worked 3 sc in each corner st in Rounds C to E.
- Panels hang crooked: re-block, and space the clip rings evenly.
Care
Hand wash in cool water with mild soap, press out the water in a towel and dry flat. Re-block if needed.
Final Notes
The whole curtain grows from one chain of measurements. One motif is 5 in (12.7 cm) tip to tip. Ten motifs across make 50 in (127.0 cm), and sixteen motifs down make 80 in (203.2 cm). The filler rounds straighten the edges at 22 sc per motif, and the sc rounds add 0.75 in (1.9 cm) on each side. That gives a finished panel of 51.5 in (130.8 cm) x 81.5 in (207.0 cm). Check your first motif carefully, and every later step will fall into place.
Happy crocheting!