

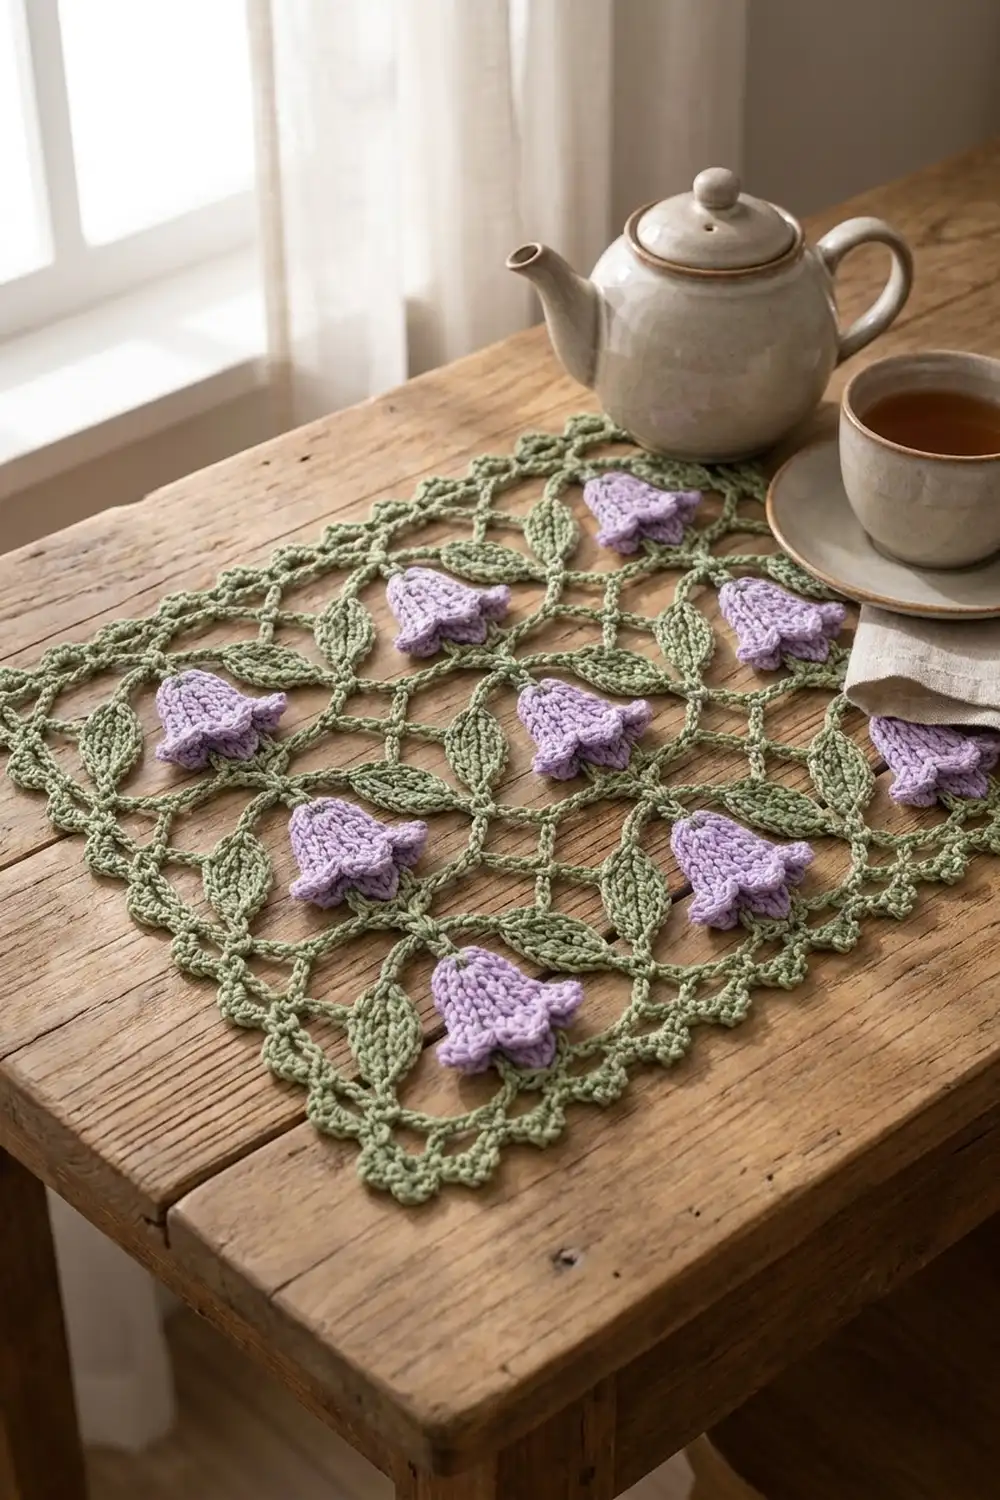
This doily is a sage green diamond trellis with nine lilac bellflowers hanging from it. Each bell is flanked by a pair of small leaves, and a neat picot edge frames the whole piece. It reads like a garden fence in early summer: airy and calm, with a soft cottage feel.
The palette uses just two colors, sage green and lilac. The green carries the mesh, the leaves, the stems and the border. The lilac is used only for the bells, so they stand out clearly against the open background.
The finished doily measures about 13.2 x 11 in (33.5 x 27.9 cm). It works well as a table mat, a dresser runner end or a framed wall piece. The pattern uses US crochet terms throughout.
Construction is simple to follow. You work one mesh panel flat in rows, close it with a solid row, and add a two-round picot border. The bells and leaves are made separately and sewn onto the mesh, so the whole doily is one piece with appliqués.
Finished Size and Construction
- Finished size: 13.2 x 11 in (33.5 x 27.9 cm)
- Skill level: Intermediate
- Terminology: US crochet terms
- Yarn weight: Sport weight (2) mercerized cotton
- Hook: 3.0 mm (C/2–D/3)
- Number of pieces: 1 mesh panel, plus 9 bells and 18 leaves sewn on
- Layout: 3 columns x 3 rows of bells, with 2 leaves per bell
- Panel size before border: 12.2 x 10 in (31.0 x 25.4 cm)
- Border depth: 0.5 in (1.3 cm) per side
Materials
Choose a smooth, mercerized sport-weight cotton. It shows stitch definition crisply and holds blocked lace shapes well. The quantities below assume about 155 m per 50 g.
- Sage green: 75 g (about 233 m), for the mesh, leaves, stems and border
- Lilac: 20 g (about 62 m), for the bells
Tools:
– 3.0 mm crochet hook
– Tapestry needle
– Stitch markers (at least 4)
– Rust-proof pins and a blocking board or foam mat
– Spray bottle
– Scissors and a tape measure
All quantities include a margin of roughly 15% for your gauge swatch and tails.
Abbreviations (US Terms)
- ch: chain
- sl st: slip stitch
- sc: single crochet
- hdc: half double crochet
- dc: double crochet
- sk: skip
- st(s): stitch(es)
- sp: space
- RS: right side
Special stitches
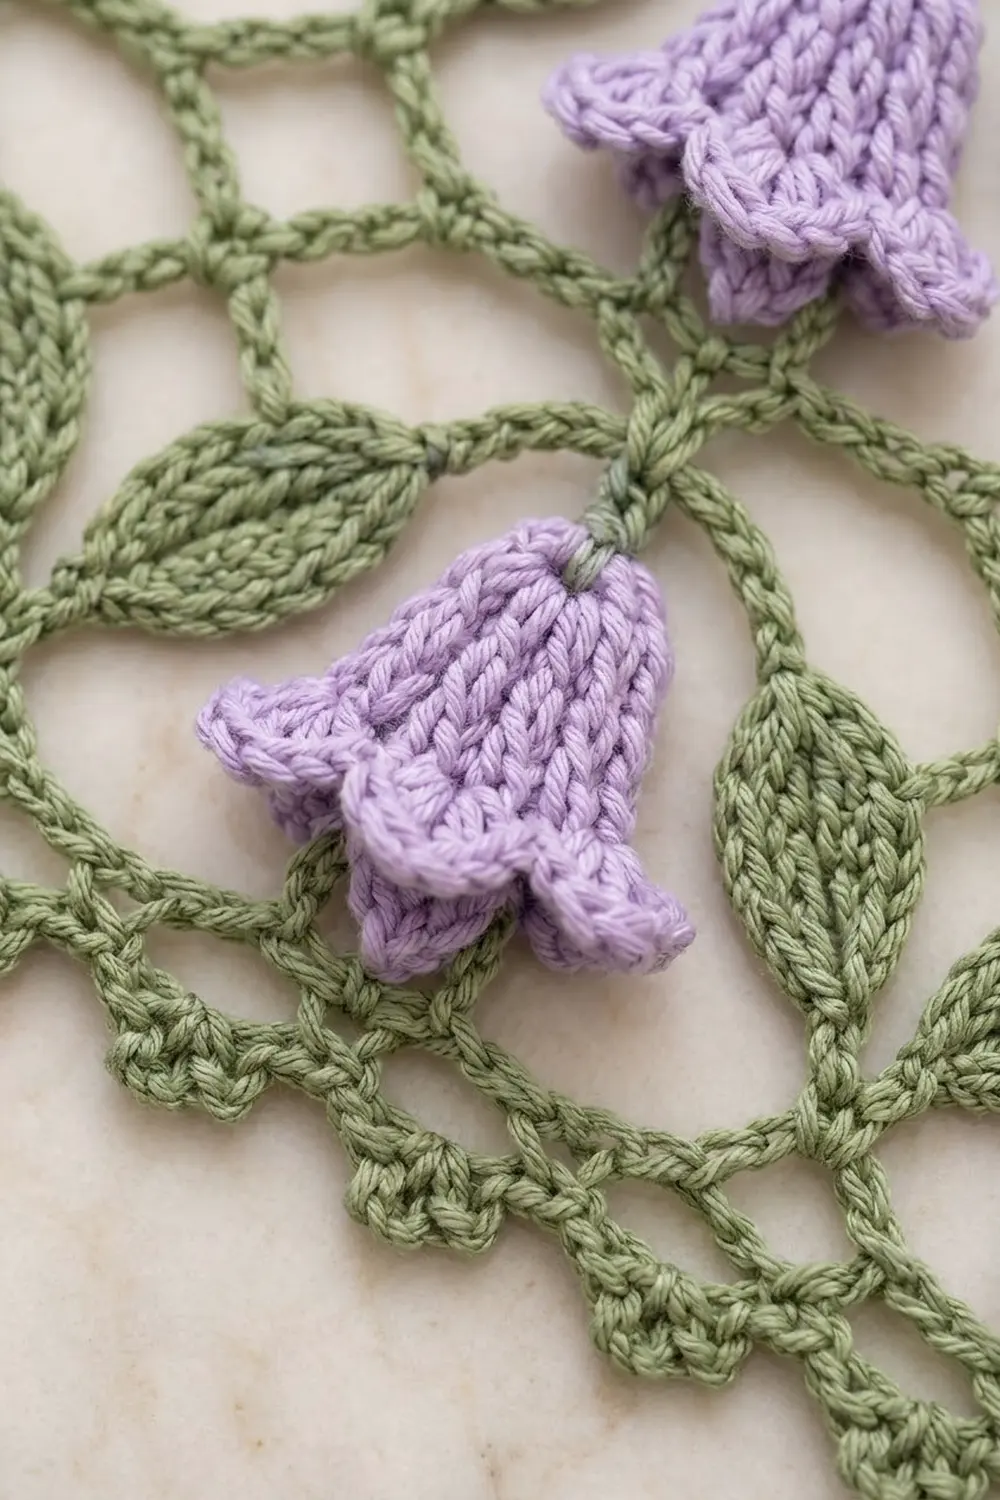
- Waistcoat stitch (ws): Insert your hook through the center of the “V” of the next sc below, between its two vertical legs (not under the top loops). Yarn over and pull up a loop, then yarn over and pull through both loops. This gives the bells their knit-look vertical ribs.
- Picot: Ch 3, then sl st in the 3rd ch from the hook.
Gauge and Checkpoints
Gauge:
– 20 sc = 4 in (10.2 cm)
– 5 mesh loops = 4 in (10.2 cm) wide
– 8 mesh rows = 4 in (10.2 cm) tall
Test piece first. Before starting the doily, make a small swatch, one bell and one leaf.
- Swatch: Ch 22. Work Row 1 as given below to get 21 sc, which should measure 4.2 in (10.7 cm). Then work 8 mesh rows: Row 2, then Rows 3 and 4 three more times, then Row 3 once more. The swatch should measure 4.25 in (10.8 cm) tall.
- Bell: About 1.5 in (3.8 cm) tall and 1.3 in (3.3 cm) across the rim.
- Leaf: About 1.25 in (3.2 cm) long.
Checkpoints:
– After Row 1: 61 sc, 12.2 in (31.0 cm) wide.
– After Row 9: 4.25 in (10.8 cm) tall.
– After Row 21: 12.2 x 10 in (31.0 x 25.4 cm).
– After the border: 13.2 x 11 in (33.5 x 27.9 cm).
If your swatch is too big, go down 0.25 mm in hook size. If it is too small, go up 0.25 mm. Mesh loops stretch a lot when blocked, so match the sc gauge first and judge the loops after a light steam.
Mesh Panel
Work the panel with sage green. Turn at the end of every row. The ch-5 at the start of odd rows counts as 1 dc plus a ch-2 space.
Row 1: Ch 62. Sc in the 2nd ch from the hook and in each ch across. Turn. (61 sc)
Row 2: Ch 1, sc in the first sc. Ch 5, sk 3 sc, sc in the next sc. Repeat from * 15 times. Turn. (15 ch-5 loops, 16 sc)
Row 3: Ch 5 (counts as dc + ch 2), sc in the first ch-5 loop. Ch 5, sc in the next ch-5 loop. Repeat from * 14 times. Ch 2, dc in the last sc. Turn. (14 full loops, 2 half loops, 15 sc)
Row 4: Ch 1, sc in the dc. Ch 5, sc in the next full ch-5 loop. Repeat from * 14 times. Ch 5, sc in the 3rd ch of the turning ch. Turn. (15 ch-5 loops, 16 sc)
Rows 5–20: Repeat Rows 3 and 4 eight more times. Row 20 is a full-loop row. (15 ch-5 loops, 16 sc)
Row 21 (closing row): Ch 1, sc in the first sc. 3 sc in the next ch-5 loop, sc in the next sc. Repeat from * 15 times. Do not fasten off. (16 sc worked one per existing sc + 45 sc added in the loops = 61 sc)
Row 21 has the same stitch count as Row 1, so the top and bottom edges match exactly.
Checkpoint: The panel should measure 12.2 x 10 in (31.0 x 25.4 cm). Row 1 and Row 21 together add about 0.5 in (1.3 cm), and the 19 mesh rows add 9.5 in (24.1 cm).
Bellflowers (make 9)
Work with lilac in continuous spiral rounds and use a marker to track the first stitch of each round. Leave a 10 in (25.4 cm) starting tail for sewing.
Rnd 1: Magic ring, 6 sc in the ring. Pull the ring closed. (6)
Rnd 2: Ws in the next st, 2 ws in the next st. Repeat from * 3 times. (9)
Rnd 3: Ws in the next 2 sts, 2 ws in the next st. Repeat from * 3 times. (12)
Rnds 4–6: Ws in each st around. (12)
Rnd 7: Ws in the next 3 sts, 2 ws in the next st. Repeat from * 3 times. (15)
Rnd 8: Ws in each st around. (15)
Rnd 9: Ws in the next 4 sts, 2 ws in the next st. Repeat from * 3 times. (18)
Rnd 10 (scalloped rim): Sc in the next st, (hdc, dc, hdc) in the next st, sc in the next st. Repeat from * 6 times, then sl st to the first sc. Fasten off. (18 sts worked into + 12 added = 30 sts, 6 scallops)
The bell should measure about 0.6 in (1.5 cm) across the top, 1.3 in (3.3 cm) across the rim and 1.5 in (3.8 cm) tall. Weave in the ending tail, but keep the starting tail.
Leaves (make 18)
Work with sage green. Leave an 8 in (20.3 cm) tail.
Leaf: Ch 9. Working into the chains from the 2nd ch from the hook:
- Sl st in the next ch, sc in the next ch, hdc in the next ch, dc in each of the next 2 ch, hdc in the next ch, sc in the next ch.
- Work (sc, ch 2, sc) in the last ch to form the tip.
- Rotate and work along the opposite side of the foundation chain: sc in the next ch, hdc in the next ch, dc in each of the next 2 ch, hdc in the next ch, sc in the next ch, sl st in the last ch.
- Fasten off.
(14 sts along the two sides + 2 tip sc + 1 ch-2 tip)
The leaf should measure about 1.25 in (3.2 cm) long and 0.5 in (1.3 cm) wide. The ridge where the two sides meet forms a natural center vein.
Attaching Bells and Leaves
Lay the panel RS up with Row 21 at the top.
Bell positions: The bells hang from the junction sc of Rows 7, 13 and 19. In each of those rows, use the 3rd, 8th and 13th sc. Because each odd row has 15 sc, these positions are symmetric whichever way you count. The bell columns sit 4 in (10.2 cm) apart, with the middle column centered. Mark all nine junctions before sewing.
Placement grid (top to bottom):
ROW 19:  LEAF BELL LEAF   LEAF BELL LEAF   LEAF BELL LEAF
ROW 13:  LEAF BELL LEAF   LEAF BELL LEAF   LEAF BELL LEAF
ROW 7:   LEAF BELL LEAF   LEAF BELL LEAF   LEAF BELL LEAF
Stems:
1. Join green with a sl st around a marked junction sc.
2. Ch 3, then sl st into the center of a bell’s magic ring. Fasten off.
3. Use the bell’s lilac tail to tack the top of the bell to the stem so it hangs mouth-down and doesn’t twist.
Leaves: Place one leaf on each side of the bell. Set the base 0.5 in (1.3 cm) from the junction and angle the leaf up and outward along a mesh diagonal. Whipstitch the outer edge of the leaf to the mesh strand beneath it with the green tail. Keep the stitches small so they disappear into the edge.
Border
Border gauge: Rnd 1 adds about 0.2 in (0.5 cm), and Rnd 2 with its picots adds about 0.3 in (0.8 cm), for 0.5 in (1.3 cm) per side.
Rnd 1: Continue from Row 21 with the RS facing. Each corner group is 3 sc, and its middle sc is the corner center. Work all of Rnd 1 as follows, then join with a sl st to the first sc. (206 sc)
- First corner: Ch 1, 3 sc in the first sc of Row 21.
- Top edge: Sc in the next 59 sc, then 3 sc in the last sc.
- First side: Work 2 sc into the end of each mesh row (Rows 20 down to 2). (38 sc)
- Bottom edge: Work 3 sc in the first foundation ch (the base of Row 1’s end sc). Sc in the free loops of the next 59 ch, then 3 sc in the last ch.
- Second side: Work 2 sc into the end of each mesh row (Rows 2 to 20). (38 sc)
| Count | Top and bottom | Sides |
|---|---|---|
| Sc between corner groups | 59 | 38 |
| Sts between corner centers (outer corner legs included) | 61 | 40 |
Total: 4 corner centers + (2 x 61) + (2 x 40) = 206. ✓
Rnd 2 (picot): Sl st into the next corner center sc. Work around as follows, then join with a sl st to the first sc and fasten off.
- At each corner center: Work (sc, picot, sc) in the corner center sc.
- Top and bottom edges: Sc in the next st. Picot, sc in the next 3 sts. Repeat from * 20 times. (1 + 60 = 61 sts, 20 picots)
- Sides: Sc in the next st. Picot, sc in the next 3 sts. Repeat from * 13 times. (1 + 39 = 40 sts, 13 picots)
(210 sc, 70 picots)
Why the math works: The 61 sc in Rows 1 and 21 set the top and bottom edges. In Rnd 1, each 3-sc corner group adds one leg to each neighboring side, which turns 59 into 61 and 38 into 40. Both 61 and 40 follow the pattern 1 + (3 x n), with n = 20 and n = 13. That means every side starts and ends with a sc next to the corner and needs no fudged stitches. Check the totals: 8 corner sc + (2 x 61) + (2 x 40) = 210 sc, and 4 + 40 + 26 = 70 picots.
Final Blocking
- Weave in all remaining ends along the solid edges or the backs of the leaves, never across open mesh.
- Soak the doily in cool water for 10 minutes, then gently press out the water in a towel. Don’t wring it.
- Pin the four corners to a 13.2 x 11 in (33.5 x 27.9 cm) rectangle, measuring from picot tip to picot tip.
- Pin the middle of each side, then add pins every 1 in (2.5 cm) through the picots.
- Ease the mesh into even diamonds. Each loop should open to about 0.8 in (2.0 cm) wide.
- Shape each bell rim with your fingers so the six scallops flare evenly, and flatten the leaves.
- Let it dry completely before unpinning.
Final Quality-Control Checklist
- Rows 1 and 21 each have 61 sc.
- Every mesh row has 15 loops: full loops on even rows, 14 full plus 2 half loops on odd rows.
- The panel measured 12.2 x 10 in (31.0 x 25.4 cm) before the border.
- There are 9 bells, each with 30 sts in the rim and 6 scallops.
- There are 18 leaves, two per bell, angled symmetrically.
- The bells hang from the 3rd, 8th and 13th sc of Rows 7, 13 and 19.
- Border Rnd 1 has 206 sc. Rnd 2 has 210 sc and 70 picots.
- The finished doily measures 13.2 x 11 in (33.5 x 27.9 cm).
Troubleshooting
- The edges of the mesh lean or wave: Check that every odd row starts with ch 5 and ends with ch 2, dc. If a half loop is missing, the edge pulls in.
- Bells flare too little: Work Rnd 10 a little looser, or try the bells with a 3.25 mm hook.
- Bells twist sideways: Add a second tacking stitch at the top of the stem.
- The border ruffles: You have too many sc along the sides. Recount for exactly 38 between corner groups.
- The border cups: Make sure each corner center has 3 sc in Rnd 1 and (sc, picot, sc) in Rnd 2.
- Leaves curl: Steam them lightly and pin them flat while damp.
Care
Hand wash in cool water with mild soap and dry flat, pinned to shape. Don’t tumble dry, because the bells and picots can lose their form.
Final Notes
The measurement chain is short and reliable:
- 61 sc sets the width at 12.2 in (31.0 cm).
- Nineteen mesh rows between two solid rows give a height of 10 in (25.4 cm).
- The border adds 0.5 in (1.3 cm) on every side, for a finished size of 13.2 x 11 in (33.5 x 27.9 cm).
Check your gauge on the test piece, count at each checkpoint, and the bells and leaves will sit exactly where the grid places them.
Happy crocheting!