

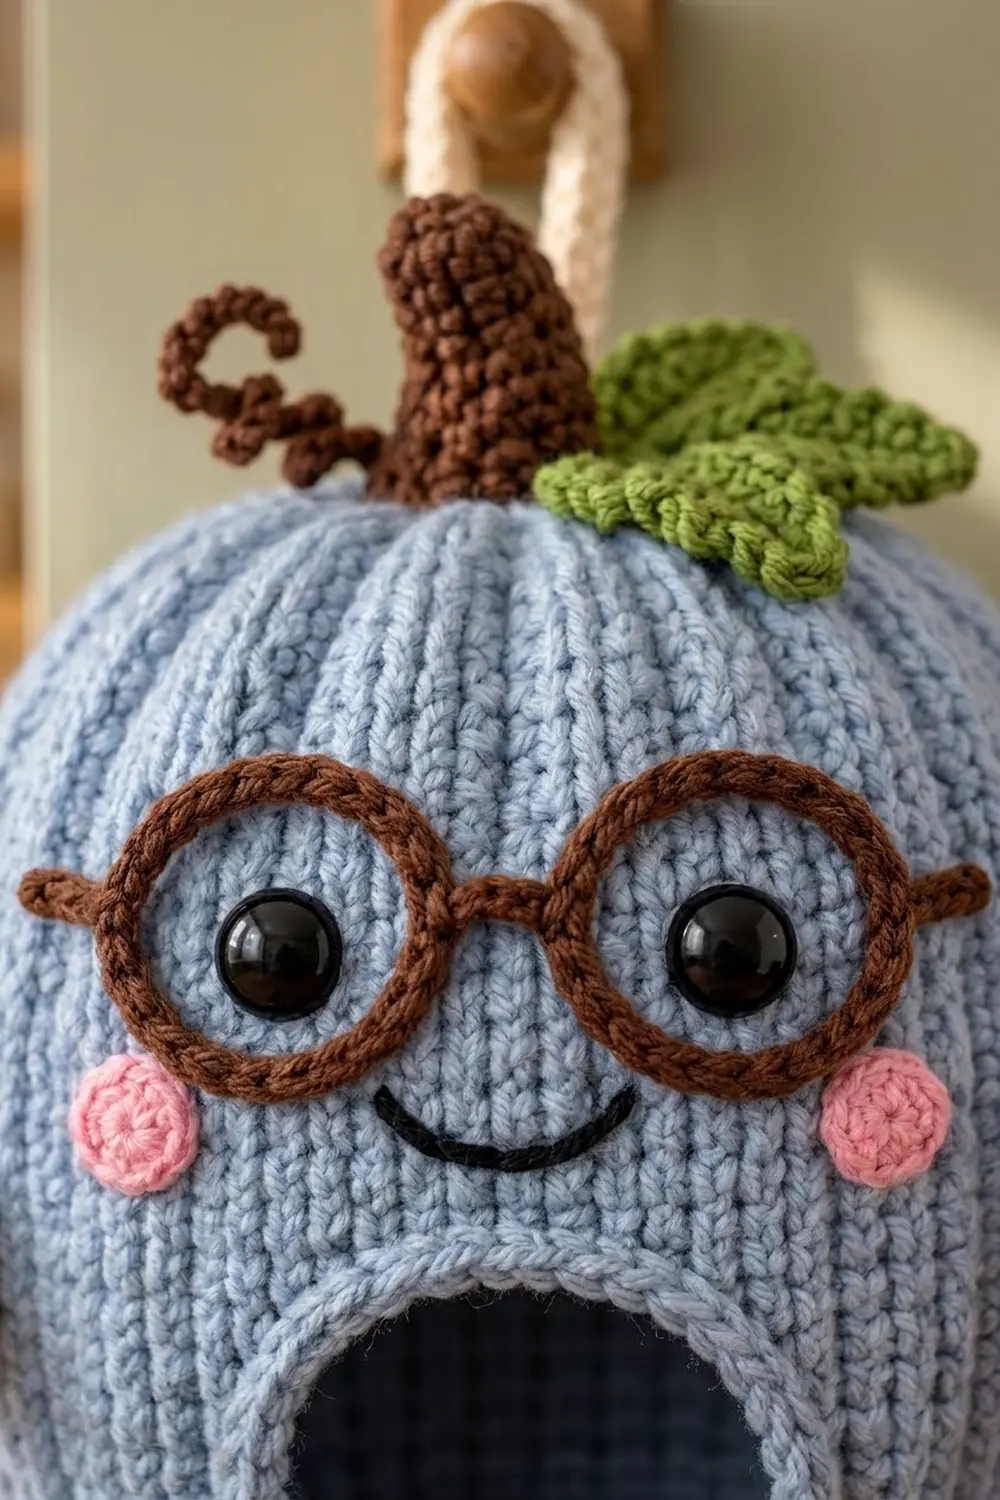
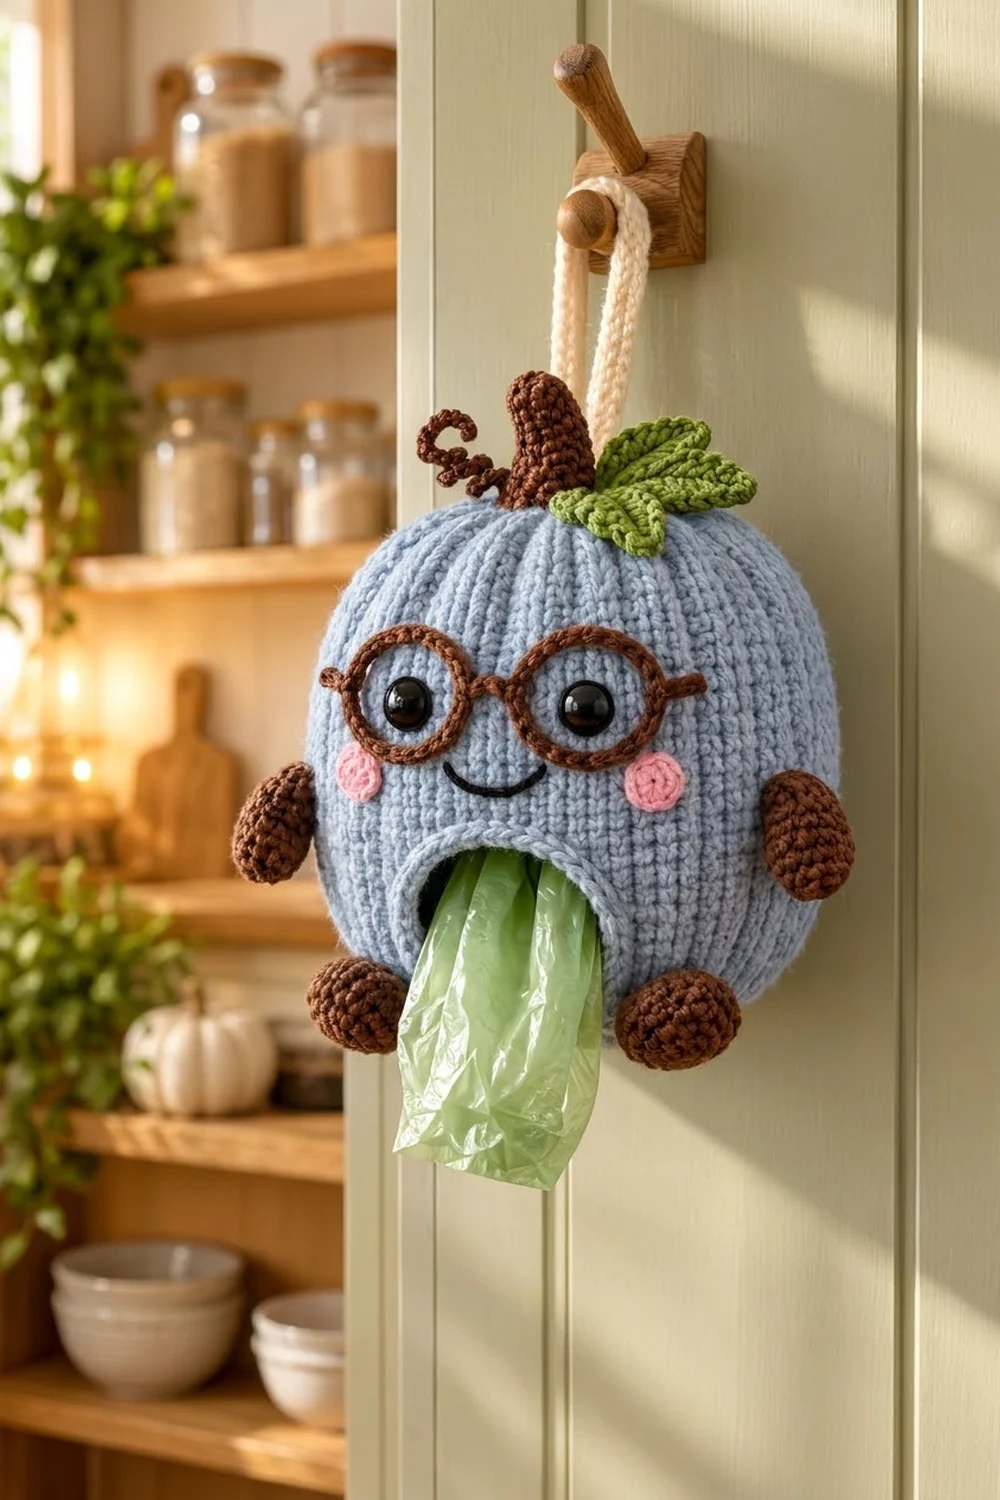
Professor Pumpkin is a cheerful bag holder that hangs on a hook and keeps plastic grocery bags out of sight. You push bags in through the top and pull them out one at a time through the opening in the front. He has a dusty-blue ribbed body, brown round glasses, pink cheeks, a curly brown stem and two green leaves.
The palette is soft and cozy: light blue for the body, chocolate brown for the stem, tendril, glasses, arms and feet, leaf green for the leaves, and pink for the cheeks. A cream cord closes the top and also forms the hanging loop.
This pattern uses US crochet terms throughout. Before the top is cinched, the flat body panel measures 7.5 in × 16 in (19.1 cm × 40.6 cm). Once seamed, gathered and bordered, the pumpkin is about 6 in (15.2 cm) tall and 5.5 in (14.0 cm) wide. With the stem and feet it stands about 8 in (20.3 cm) tall, and it is about 7 in (17.8 cm) wide across the arms.
Construction is simple. You work one rectangle in back-loop single crochet, leaving an opening in it with split rows. You seam it into a tube and gather the bottom closed. Then you add an edge around the opening and an eyelet rim at the top for a drawstring. Finally, you sew on the small pieces.
Finished Size and Construction
- Finished size: about 6 in (15.2 cm) tall × 5.5 in (14.0 cm) wide; 8 in (20.3 cm) tall including stem and feet
- Skill level: Easy–Intermediate
- Terminology: US crochet terms
- Yarn weight: Worsted (#4)
- Hooks: 5.0 mm (H-8) for the body; 4.0 mm (G-6) for the small pieces
- Number of pieces: 1 body plus 9 small pieces (stem, tendril, 2 leaves, glasses, 2 cheeks, 2 arms, 2 feet)
- Layout: one flat panel seamed into a tube, with the opening centered on the front
- Flat panel size: 30 sts × 56 rows = 7.5 in × 16 in (19.1 cm × 40.6 cm)
- Size before border: 7.5 in (19.1 cm) tall tube, 16 in (40.6 cm) around
- Border depth: top rim 0.75 in (1.9 cm); opening edge 0.25 in (0.6 cm)
Materials
Use a smooth worsted acrylic or a cotton blend. Smooth yarn shows the ribs clearly and lets bags slide out easily. The amounts below assume about 180 m per 100 g.
- Light blue (body): 55 g / 100 m
- Brown (stem, tendril, glasses, arms, feet): 20 g / 36 m
- Green (leaves): 6 g / 11 m
- Pink (cheeks): 3 g / 5 m
- Cream 3 mm cotton cord: 30 in (76.2 cm)
- Black embroidery floss or yarn (smile): 20 in (50.8 cm)
Tools:
– 5.0 mm (H-8) and 4.0 mm (G-6) hooks
– Two 12 mm black safety eyes
– A small handful of fiberfill
– 4 stitch markers
– Yarn needle
– Pins
– Scissors
– Spray bottle or steamer
All quantities include roughly a 15% margin.
Abbreviations (US Terms)
- ch – chain
- sl st – slip stitch
- sc – single crochet
- hdc – half double crochet
- dc – double crochet
- BLO – back loop only
- MR – magic ring
- inc – 2 sc in the same stitch
- sc2tog – single crochet 2 together
- st(s) – stitch(es)
- rnd – round
Special stitch – sc BLO: Insert the hook under the back loop only, then complete a single crochet as usual. Worked in turned rows, it makes a raised ridge on both sides. Those ridges become the pumpkin’s ribs.
Gauge and Checkpoints
Gauge (5.0 mm hook): 16 sc BLO × 14 rows = 4 in × 4 in (10.2 cm × 10.2 cm).
Make a test piece first. Chain 17, work 16 sc, and continue in sc BLO for 14 rows. Measure it unstretched and flat.
Checkpoints:
– After Row 1: 30 sts = 7.5 in (19.1 cm) tall
– After Row 21: 6 in (15.2 cm) wide
– After Row 35: 10 in (25.4 cm) wide; opening 4 in × 3 in (10.2 cm × 7.6 cm)
– After Row 56: 16 in (40.6 cm) wide
If your piece is too big, use a hook 0.5 mm smaller. If it is too small, use a hook 0.5 mm larger. Change hooks rather than stitch counts, because every border count depends on 30 sts and 56 rows.
Body Panel
The rows run from the top edge to the bottom edge of the pumpkin, and the panel grows sideways. Odd rows end at the bottom edge, and even rows end at the top edge. Ch 1 at the start of each row does not count as a stitch.
Use light blue and the 5.0 mm hook.
Foundation: Ch 31. The slip-knot end is the bottom edge.
Row 1: Sc in the 2nd ch from the hook and in each ch across. (30 sc)
Rows 2–21: Ch 1, turn, sc BLO in each st across. (30 sts per row)
Row 21 ends at the bottom edge. Counting from the top edge, its sts 1–13 are the top section, sts 14–25 will become the opening, and sts 26–30 are the base section.
Opening (Split Rows)
Base strip, Row 22: Ch 1, turn, sc BLO in the next 5 sts. Leave the rest unworked. (5 sts)
Base strip, Rows 23–35: Ch 1, turn, sc BLO in each st. (5 sts per row)
Row 35 ends at the bottom edge. Don’t fasten off. Pull up a long loop and put a marker in it.
Top strip, Row 22: Count to st 13 from the top edge of Row 21. Join a new strand of light blue with a standing sc in the BLO of that st. Then sc BLO in the next 12 sts toward the top edge. (13 sts)
Top strip, Rows 23–35: Ch 1, turn, sc BLO in each st. (13 sts per row)
Row 35 ends at the opening edge. Fasten off.
Row 36 (joining row): Put the marked loop back on the hook. Ch 1, turn, sc BLO in the 5 base sts, ch 12, then sc BLO in the 13 top-strip sts. (5 + 12 + 13 = 30 sts)
Row 37: Ch 1, turn, sc BLO in the 13 top sts, sc in the back loop of each of the 12 ch, then sc BLO in the 5 base sts. (30 sts)
Rows 38–56: Ch 1, turn, sc BLO in each st. (30 sts per row)
Check the count: rows 1–21, 22–35 and 36–56 give 21 + 14 + 21 = 56 rows. The opening sits across rows 22–35, so its center is between rows 28 and 29. That is exactly halfway across the panel, so the seam ends up at the center back.
The opening is 12 sts tall and 14 rows wide, which is 3 in × 4 in (7.6 cm × 10.2 cm). Above it there are 13 sts, or 3.25 in (8.3 cm), for the face. Below it there are 5 sts, or 1.25 in (3.2 cm), for the base.
Don’t fasten off. Leave the working loop on the hook.
Seam and Bottom Gather
Seam: Fold the panel so Row 56 lies against the foundation chain, with the right sides facing out. Sl st through each st of Row 56 and the matching free loop of the foundation chain: 30 sl sts.
Keep these sl sts loose enough to match the stretch of the ribbing. Fasten off.
Bottom gather: Thread a 20 in (50.8 cm) strand of light blue onto the needle. Weave it in and out through the 56 row-ends along the bottom edge. Pull it tight, so the base closes into a small flat dimple, and knot it securely. Weave the tails inside.
Small Pieces
Use the 4.0 mm hook. Work in continuous rounds and move a marker up at the start of each round. Leave a long tail on each piece for sewing.
Stem (brown)
- Rnd 1: 6 sc in MR. (6)
- Rnd 2: Sc 1, inc 3 times. (9)
- Rnds 3–6: Sc in each st. (9)
- Rnd 7: Sc 2, inc 3 times. (12)
- Rnd 8: Sc in each st. (12)
Sl st and fasten off. Stuff lightly. Bend the narrow tip slightly to one side and add a stitch to hold the curve. The stem is about 1.75 in (4.4 cm) tall.
Tendril (brown)
Ch 20. Work 2 sc in the 2nd ch from the hook and in each ch across. (38 sc)
The extra stitches make it twist into a corkscrew.
Leaves (green, make 2)
Ch 9.
- First side: Starting in the 2nd ch from the hook, work sl st, sc, hdc, dc, dc, hdc, sc. Then work 3 sc in the last ch.
- Second side: Working along the other side of the chain, work sc, hdc, dc, dc, hdc, sc, sl st. (7 + 3 + 7 = 17 sts)
Each leaf is about 2 in (5.1 cm) long. Pinch the center lengthwise to give it the crinkled look.
Glasses (brown)
Ring 1: Ch 16 and sl st to the first ch to form a ring. Ch 1, work 24 sc into the ring (over the chain), and sl st to the first sc. Fasten off.
Ring 2: Work the same as Ring 1, but don’t fasten off. Ch 4, then sl st into any sc of Ring 1 to make the bridge. Fasten off.
Temples: Join brown to the outer side of each ring, ch 6, and fasten off.
Each ring is about 1.25 in (3.2 cm) across.
Cheeks (pink, make 2)
- Rnd 1: 6 sc in MR. (6)
- Rnd 2: Inc in each st. (12)
Sl st to join. Each cheek is about 0.9 in (2.3 cm) across.
Arms (brown, make 2)
- Rnd 1: 6 sc in MR. (6)
- Rnd 2: Inc in each st. (12)
- Rnds 3–5: Sc in each st. (12)
Stuff lightly. Flatten the opening and sew it closed with 6 sts on each side. Each arm is about 1.5 in (3.8 cm) long.
Feet (brown, make 2)
- Rnd 1: 6 sc in MR. (6)
- Rnd 2: Inc in each st. (12)
- Rnd 3: Sc 1, inc 6 times. (18)
- Rnds 4–5: Sc in each st. (18)
- Rnd 6: Sc 1, sc2tog 6 times. (12)
- Rnd 7: Stuff. Then work sc2tog 6 times. (6)
Close the hole. Each foot is about 1.5 in (3.8 cm) across.
Border
Border gauge: Work 1 sc per stitch or per row-end, using the same 5.0 mm hook and light blue. You have 14 rows per 4 in (10.2 cm) and 16 sc per 4 in (10.2 cm). That means 1 sc per row-end is very slightly loose, which helps the top rim gather smoothly.
Opening Edge
Rnd 1: Join yarn at the top-right corner of the opening and sc around it:
- Top edge (row-ends of the top strip): 14 sc
- Left side (free loops of the 12 ch): 12 sc
- Bottom edge (row-ends of the base strip): 14 sc
- Right side (unused sts 14–25 of Row 21): 12 sc
That is 14 + 12 + 14 + 12 = 52 sc. Sl st to the first sc. There are no extra corner stitches, because each corner stitch is already counted in its side. That keeps the corners soft and rounded, like an arch.
Rnd 2: Sl st loosely in each sc around. (52 sl sts)
Fasten off. This edge is about 0.25 in (0.6 cm) deep and stops the opening from stretching out of shape.
Top Rim
Rnd 1: Join yarn at the back seam. Sc in each of the 56 row-ends around the top edge. Sl st to the first sc. (56 sc)
Rnd 2 (eyelets): Ch 1. Sc in the next 3 sts, ch 1, skip 1 st 14 times. Sl st to the first sc. (42 sc + 14 ch = 56 sts, 14 eyelets)
Rnd 3: Ch 1. Sc in each sc and in each ch-1 space. Sl st to the first sc. (56 sc)
Fasten off. The rim is about 0.75 in (1.9 cm) deep.
Why the math works: The panel has 56 rows, so the rim starts with exactly 56 sts. Because 56 ÷ 4 = 14, the 4-stitch eyelet repeat fits evenly with no leftover stitches. On the opening, each side matches its own stitch or row count exactly: 14 rows across, 12 sts up.
Drawstring: Starting at the center front, weave the cream cord in and out through the 14 eyelets. Pull it until the top is about 1.5 in (3.8 cm) across, which is still wide enough to push bags in. Knot the two ends together to make a 4 in (10.2 cm) hanging loop.
Final Blocking
- Fill the body firmly with plastic bags or a ball of scrap fabric so it takes on a round pumpkin shape.
- Spray it lightly with water, or hover steam over it without touching the yarn. Run your fingers down each rib to make the ribs stand out.
- Let it dry completely, about 6–8 hours.
- Reach in through the top and fit the safety eyes. Place them about 1.5 in (3.8 cm) above the top edge of the opening, between rows 25 and 32, centered on the front. Push the washers on firmly.
- Pin the glasses over the eyes and sew down the rings, bridge and temples.
- Sew the cheeks just below and outside the rings.
- Embroider a smile about 1 in (2.5 cm) wide with backstitch, centered between the cheeks.
- Sew on the arms at the sides, level with the top of the opening. Sew the feet at the bottom front, one on each side of the opening.
- Sew the stem to the back half of the gathered rim, so the drawstring can still open. Add the leaves to its right and the tendril to its left.
Final Quality-Control Checklist
- The panel measured 7.5 in × 16 in (19.1 cm × 40.6 cm) before seaming.
- The opening is centered on the front, and the seam is at the center back.
- The opening edge has 52 sts and lies flat without ruffling.
- The top rim has 56 sts and 14 eyelets.
- The bottom is closed with no gap.
- The safety-eye washers are fully seated.
- The glasses sit level and even on both sides.
- The drawstring holds the bag holder’s weight when it is full.
Troubleshooting
- The ribs look flat: Check that you work every row in BLO. Steaming over a firm filling brings the ribs back up.
- The opening is crooked: Recount both strips. The top strip needs 13 sts and the base strip needs 5 sts, for all 14 rows.
- The opening edge ruffles: Use the smaller hook for Rnd 1, or work the sl st round more tightly.
- The rim flares out: Make sure you work 1 sc per row-end, not 2.
- The tendril won’t curl: Work the 2-sc increases more tightly, or use a smaller hook.
- The pumpkin looks lopsided: Re-block it over the filling, and turn the seam to the exact back.
Care
Spot clean with mild soap and let it air dry in shape. Take the safety eyes into account before you wash it in a machine.
Final Notes
Here is the full measurement chain. Gauge is 16 sts and 14 rows = 4 in (10.2 cm). The panel is 30 sts × 56 rows, or 7.5 in × 16 in (19.1 cm × 40.6 cm). The opening is 12 sts × 14 rows, or 3 in × 4 in (7.6 cm × 10.2 cm), and gets a 52-st edge. The top rim has 56 sts with 14 eyelets. The finished pumpkin is 6 in (15.2 cm) tall and 5.5 in (14.0 cm) wide, or 8 in (20.3 cm) tall with the stem and feet.
If the swatch is right, every count after it works out.
Happy crocheting!