
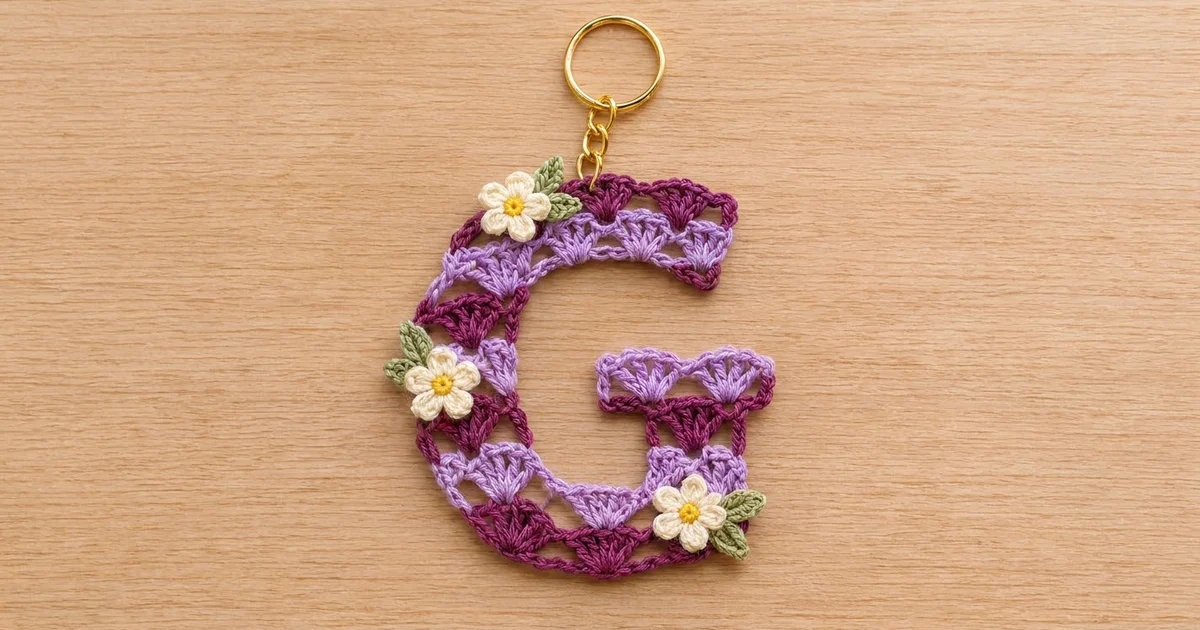
This little letter G is a lacy keychain made from stacked shell stitches. Plum and lavender stripes alternate up the letter, each one a row of open fans sitting on a row of small chain arcs. A single plum outline gives it a clean finish, and three tiny cream daisies with yellow centers and green leaves make it feel like spring.
The look is soft and vintage, but the piece is sturdy enough to hang from a tote bag, backpack, or set of keys. It also makes a good personalized gift, because the same shell grid can be rearranged into other letters.
The pattern uses US crochet terms. The finished size is about 3.8 in (9.7 cm) wide and 4.7 in (11.9 cm) tall, including the border.
The letter is worked flat in rows from the bottom up, in three connected sections: the bowl base, then the spine continuing into the top arm, and finally the stem and crossbar. A one-round plum border outlines everything. The daisies and leaves are made separately and sewn on.
Finished Size and Construction
- Finished size: 3.8 in × 4.7 in (9.7 cm × 11.9 cm)
- Skill level: Intermediate (shaping by sections)
- Terminology: US crochet terms
- Yarn weight: Size 3 mercerized cotton crochet thread (Super Fine #1)
- Hook: 2.0 mm
- Number of pieces: 1 letter, plus 3 flowers and 6 leaves (appliqué)
- Layout: single letter G on a grid 6 shells wide and 9 stripes tall
- Piece size before border: 3.6 in × 4.5 in (9.1 cm × 11.4 cm)
- Border depth: about 0.1 in (0.3 cm) on each side
Materials
Use smooth, mercerized cotton thread. It gives crisp shells, holds up to handling, and won’t fuzz on a keychain. Choose a deep plum and a light lavender with strong contrast.
- Plum: 8 g (about 25 m)
- Lavender: 6 g (about 18 m)
- Cream: 2 g (about 6 m) for petals
- Yellow: 1 g (about 2 m) for flower centers
- Sage green: 1 g (about 3 m) for leaves
These quantities include a safety margin.
Tools:
– 2.0 mm crochet hook
– Tapestry needle
– Scissors
– Gold split ring, 1 in (2.5 cm)
– Gold chain about 1 in (2.5 cm) long, plus 2 small jump rings
– Flat-nose pliers
– Rustproof pins and a spray bottle
– Optional: fabric stiffener
Abbreviations (US Terms)
- ch – chain
- sc – single crochet
- hdc – half double crochet
- dc – double crochet
- sl st – slip stitch
- st(s) – stitch(es)
- sp – space
- MR – magic ring
- RS – right side
Shell: 5 dc in the same stitch.
Shell row: ch 1, sc in first st, skip 2 sts, shell in next st, skip 2 sts, sc in next st. Each repeat is 6 sts, so a row of n shells has 6n + 1 sts.
Arc row: ch 1, sc in first sc, ch 2, sc in center (3rd) dc of shell, ch 2, sc in next sc. Each repeat is also 6 sts (sc, 2 ch, sc, 2 ch), so the count stays at 6n + 1.
The turning ch 1 does not count as a stitch. One stripe is one shell row plus one arc row in the same color.
Gauge and Checkpoints
Make a test swatch first. Ch 26. Row 1: sc in 2nd ch from hook, skip 2 ch, shell in next ch, skip 2 ch, sc in next ch 4 times (25 sts). Then work an arc row, change color, and continue until you have 4 stripes (8 rows).
Gauge: 1 shell repeat (6 sts) = 0.6 in (1.5 cm) wide; 1 stripe (2 rows) = 0.5 in (1.3 cm) tall. The swatch should measure 2.4 in × 2.0 in (6.1 cm × 5.1 cm).
- Swatch too big: go down to a 1.75 mm hook.
- Swatch too small: go up to a 2.25 mm hook.
Checkpoints:
– After Row 4: 3.6 in × 1.0 in (9.1 cm × 2.5 cm)
– After Row 14: the spine is 1.2 in (3.0 cm) wide, and the piece is 3.5 in (8.9 cm) tall
– After Row 18: 3.6 in × 4.5 in (9.1 cm × 11.4 cm)
– Bar: 1.8 in (4.6 cm) long, with its top edge 2.0 in (5.1 cm) above the bottom edge
Color Sequence
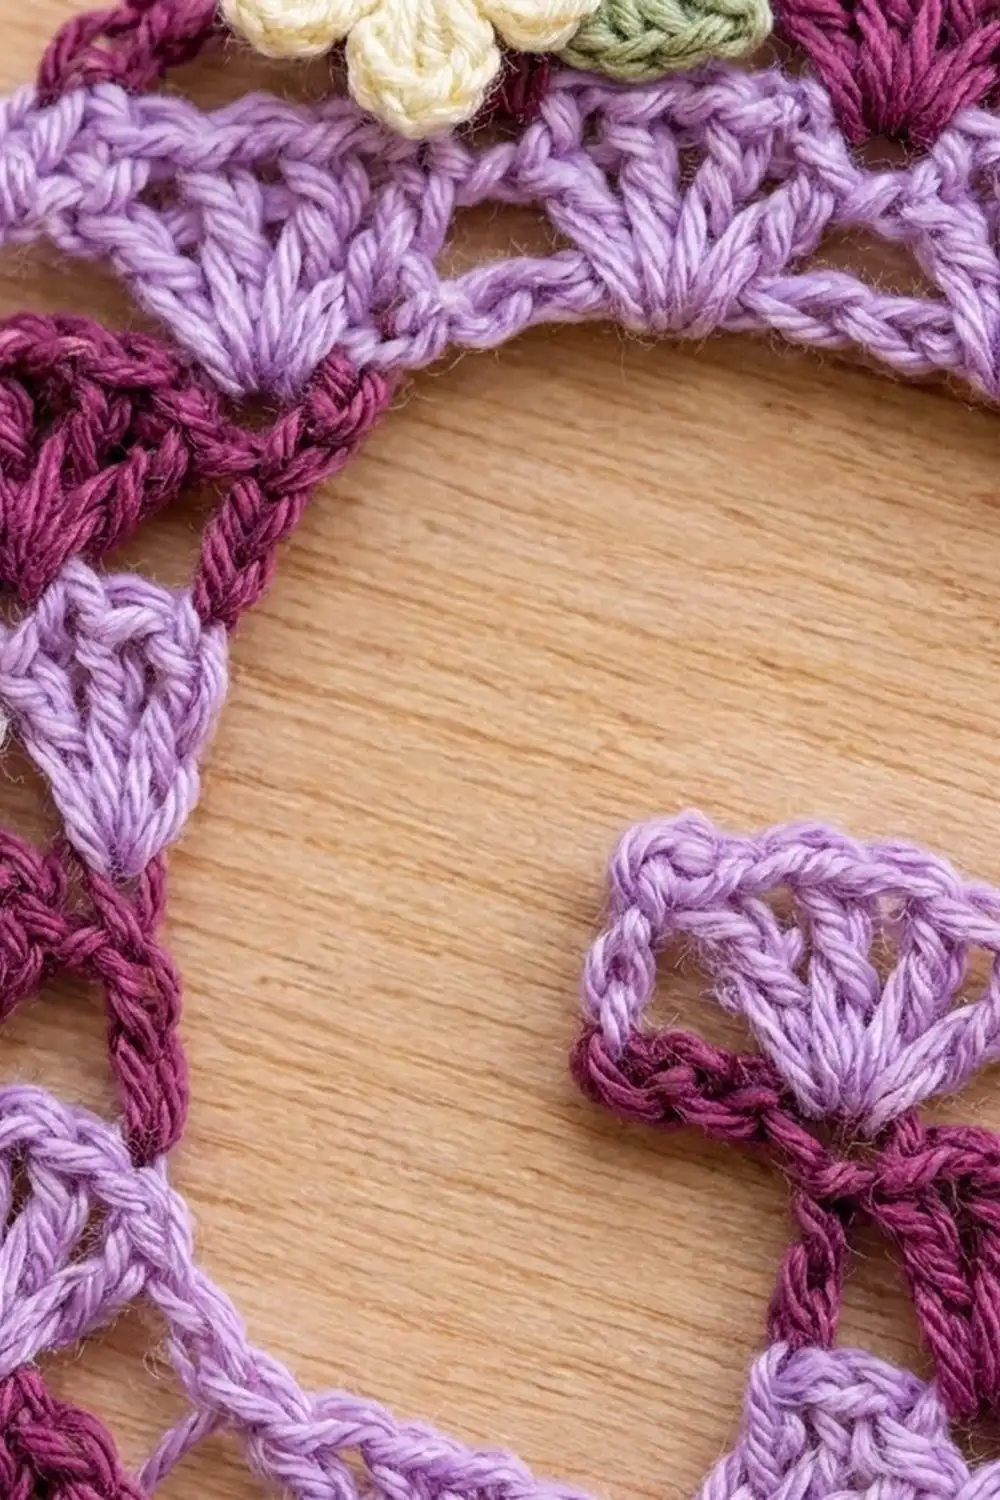
Odd stripes (1, 3, 5, 7, 9) are plum, and even stripes (2, 4, 6, 8) are lavender. Change color in the final yarn-over of the last sc of each arc row.
Within each section, all color changes happen at the same edge. Carry the unused color loosely up that edge; the border will hide it.
Part 1: Bowl Base (Stripes 1–2)
With plum, ch 38.
Row 1 (shell row, RS): sc in 2nd ch from hook, skip 2 ch, shell in next ch, skip 2 ch, sc in next ch 6 times. Turn. (37 sts: 6 shells, 7 sc)
Row 2 (arc row): work an arc row across. Change to lavender. Turn. (37 sts: 13 sc, 24 ch)
Row 3: with lavender, work a shell row across. Turn. (37 sts, 6 shells)
Row 4: work an arc row across. Fasten off both colors. (37 sts)
Number the 7 sc of Row 4 as sc 0 to sc 6, from left to right with RS facing. Each sc sits on a column boundary of the letter grid.
Part 2: Spine (Stripes 3–7)
The spine covers the two leftmost shell columns, between sc 0 and sc 2.
Row 5: with RS facing, join plum with a standing sc in sc 2. Then skip 2 ch, shell in next sc, skip 2 ch, sc in next sc 2 times, ending in sc 0. Turn. (13 sts, 2 shells)
Row 6: work an arc row. Change to lavender. Turn. (13 sts)
Rows 7–14: continue in shell rows and arc rows, alternating colors every stripe:
– Rows 7–8: lavender
– Rows 9–10: plum
– Rows 11–12: lavender
– Rows 13–14: plum
Each row has 13 sts. At the end of Row 14, change to lavender, but do not fasten off.
The spine is now 1.2 in (3.0 cm) wide. The right edge of the spine forms the inside of the letter.
Part 3: Top Arm (Stripes 8–9)
Row 15 (extension shell row): with lavender, ch 25, turn. Sc in 2nd ch from hook. Skip 2 ch, shell in next ch, skip 2 ch, sc in next ch 3 times. Skip 2 ch, shell in next ch, skip 2 ch, sc in the last sc of Row 14. Then skip 2 ch, shell in next sc, skip 2 ch, sc in next sc 2 times. Turn. (37 sts, 6 shells)
The chain math: 1 turning ch, plus 1 ch for the first sc, plus 23 ch for the four new shell repeats (whose last sc lands in the existing spine sc), equals 25 ch.
Row 16: arc row. Before you change color, cut the carried plum strand at the spine edge, leaving a 4 in (10.2 cm) tail. Join plum in the last sc of this row. Turn. (37 sts)
Row 17: plum shell row. (37 sts)
Row 18: arc row. Fasten off. (37 sts)
Part 4: Stem and Crossbar (Stripes 3–4)
Return to the top of Row 4.
Stem Row 1: with RS facing, join plum with a standing sc in sc 6. Then skip 2 ch, shell in next sc, skip 2 ch, sc in next sc 2 times, ending in sc 4. (13 sts, 2 shells)
Stem Row 2 (arc row with bar extension): ch 7, turn. Sc in 2nd ch from hook, ch 2, skip 2 ch, sc in next ch, ch 2, skip 2 ch, sc in the sc at sc 4. Then ch 2, sc in center dc, ch 2, sc in next sc 2 times. Change to lavender. Turn. (19 sts: 7 over the extension plus 12 over the stem)
Stem Row 3: lavender shell row. Turn. (19 sts, 3 shells)
Stem Row 4: arc row. Fasten off. (19 sts)
The crossbar spans 3 shells, 1.8 in (4.6 cm), and points inward. Between the bar and the spine there is a gap one shell (0.6 in / 1.5 cm) wide. The open mouth of the G sits between the bar and the top arm and is 1.5 in (3.8 cm) tall.
Weave in all ends along the edges before you start the border.
Border
Border gauge:
– Horizontal edges: 4 sc per shell repeat (0.6 in / 1.5 cm)
– Row-end edges: 3 sc per stripe (0.5 in / 1.3 cm). That is 2 sc around each shell-row end and 1 sc in each arc-row end.
How to work horizontal edges:
– Top edges: sc in each sc and 1 sc in each ch-2 sp.
– Chain undersides: sc at the base of each sc, at the base of each shell, and once in each pair of skipped chains.
Either way, an edge of n repeats has 4n + 1 sts. Its two end sts are the corners, so 4n − 1 sc are worked between them.
Corners:
– Outer corners: 3 sc in the corner st.
– Inner corners: 1 sc in the corner st, with no increase.
Round 1: with RS facing, join plum at the bottom-left corner. Work counterclockwise:
- Bottom-left corner: 3 sc
- Bottom edge (6 repeats): 23 sc
- Bottom-right corner: 3 sc
- Right edge (stripes 1–4): 12 sc
- Bar top-right corner: 3 sc
- Top of bar (3 repeats): 11 sc
- Bar top-left corner: 3 sc
- Bar left end (Stem Row 3 end, Stem Row 4 end, and the extension end): 4 sc
- Bar underside corner: 3 sc
- Underside of extension chain (1 repeat): 3 sc
- Inner corner at the stem: 1 sc
- Stem inner edge (Stem Row 1 end): 2 sc
- Inner corner at sc 4: 1 sc
- Exposed top of Row 4, from sc 4 to sc 2 (2 repeats): 7 sc
- Inner corner at sc 2: 1 sc
- Spine inner edge (stripes 3–7): 15 sc
- Inner corner under the top arm: 1 sc
- Underside of top-arm chain (4 repeats): 15 sc
- Top-arm lower-right corner: 3 sc
- Top-arm right end (stripes 8–9): 6 sc
- Top-right corner: 3 sc
- Top edge (6 repeats): 23 sc
- Top-left corner: 3 sc
- Left edge (stripes 1–9): 27 sc
Sl st to the first sc. Total: 176 sc.
Why the math works:
– Horizontal edges: 23 + 11 + 3 + 7 + 15 + 23 = 82
– Row-end edges: 12 + 4 + 2 + 15 + 6 + 27 = 66
– 8 outer corners × 3 = 24
– 4 inner corners × 1 = 4
– 82 + 66 + 24 + 4 = 176
There are four more outer corners than inner corners, as any closed outline with only right-angle turns must have. The rounded look of the photo comes from blocking, not from extra stitches.
The border adds about 0.1 in (0.3 cm) per side, bringing the letter to 3.8 in × 4.7 in (9.7 cm × 11.9 cm).
Flowers and Leaves
Flower (make 3):
– Round 1: with yellow, make 5 sc in a MR, pull it closed, and sl st to the first sc. Fasten off. (5 sc)
– Round 2: join cream in any sc. [Sl st, ch 2, 3 dc, ch 2, sl st] in the same sc, then move to the next sc 5 times. (5 petals)
Fasten off, leaving a 6 in (15.2 cm) tail. Each flower is about 0.8 in (2.0 cm) across.
Leaf (make 6): with green, ch 6.
– First side: sc in 2nd ch from hook, then hdc, dc, hdc, sc in the remaining ch (5 sts).
– Tip: ch 1, then rotate to work along the other side of the foundation chain.
– Second side: sc, hdc, dc, hdc, sc (5 sts). Sl st to the tip.
Fasten off. Each leaf is about 0.5 in (1.3 cm) long.
Placement: sew 2 leaves behind each flower, angled outward. Then sew the flowers in place:
– Flower 1: on the top arm at the upper left, near where the ring attaches.
– Flower 2: on the left spine, at stripes 4–5, overlapping the outer edge slightly.
– Flower 3: on the bowl at the lower right, over stripes 1–2.
Hardware
Find the 8th border sc to the right of the top-left corner group. Open a jump ring, pass it through that sc and the end link of the chain, and close it. Use the second jump ring to join the other end of the chain to the split ring.
Final Blocking
- Mist the letter evenly until it is damp, not soaked.
- Lay it RS up on a blocking mat.
- Pin the outer corners to 3.8 in × 4.7 in (9.7 cm × 11.9 cm).
- Open each fan with a pin tip so the 5 dc spread evenly.
- Ease the bottom-left and top-left corners into gentle curves.
- Check that the bar is 1.8 in (4.6 cm) long and straight.
- Optional: brush a thin coat of fabric stiffener on the back.
- Let it dry fully before you attach the flowers and hardware.
Final Quality-Control Checklist
- All shell and arc rows have the stated counts: 37, 13, or 19
- Stripes alternate plum and lavender with no skipped color
- The border has exactly 176 sc and lies flat
- The gap between the bar and the spine is clearly open
- The finished size is 3.8 in × 4.7 in (9.7 cm × 11.9 cm)
- All ends are woven in securely
- Flowers and leaves are stitched firmly
- The jump rings are fully closed
Troubleshooting
- Fans lean or overlap: you may have skipped the wrong number of sts. Check that each shell sits in a sc that is centered between two ch-2 spaces.
- The row grows or shrinks: recount to 6n + 1 and confirm that the turning ch 1 was not worked into.
- The top arm chain twists: keep the chain flat as you work back along it, and work into the same loop each time.
- The border ruffles: use 2 sc per shell-row end, not 3.
- The border pulls in: loosen your tension or go up a hook size for the border only.
- Carried strands show: keep them loose, and fully enclose them in the border sc.
Care
Hand wash in cool water and lay flat to dry. If you used stiffener, reshape and re-stiffen after washing.

Final Notes
The measurement chain runs like this:
– A 6-st shell repeat of 0.6 in (1.5 cm) and a 0.5 in (1.3 cm) stripe give a 3.6 in × 4.5 in (9.1 cm × 11.4 cm) letter.
– A 176-sc border adds 0.1 in (0.3 cm) per side, finishing at 3.8 in × 4.7 in (9.7 cm × 11.9 cm).
Check your gauge, count each row, and the G will come out true.
Happy crocheting!