

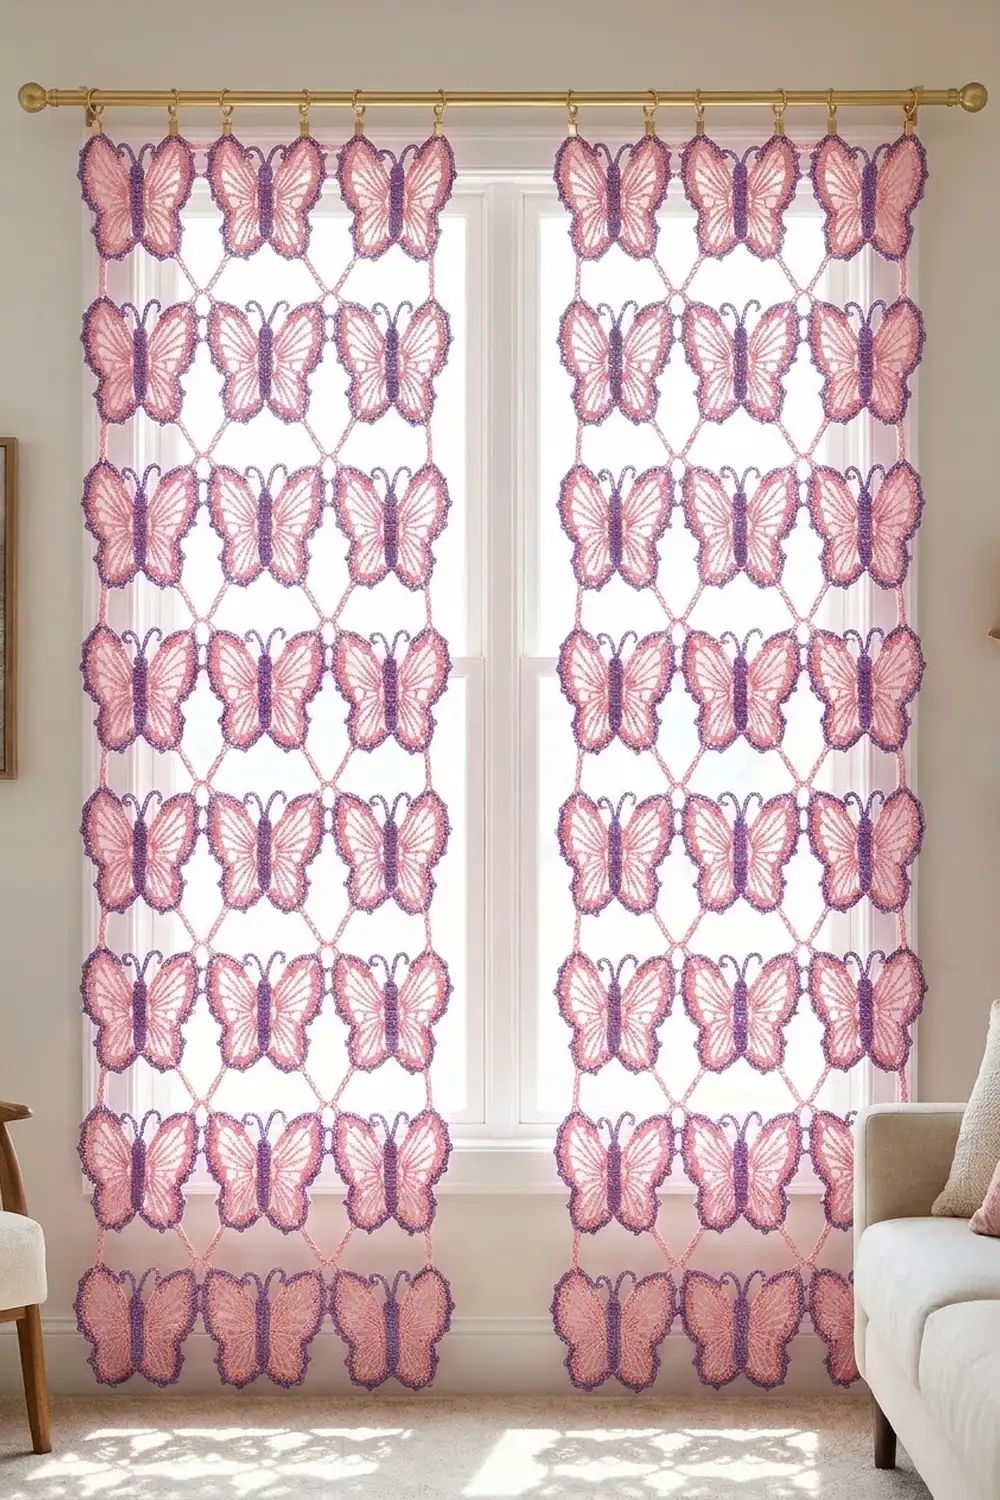
This lace curtain is made from rows of pink and purple butterflies held together by a light pink chain mesh. With light behind it, the butterflies seem to float on the window, and the open mesh casts diamond-shaped shadows into the room.
Each butterfly has fan-shaped pink wings with a purple picot edge, a ribbed purple body and two curled antennae. The colors are soft and romantic, but the structure is a simple grid. The pattern uses US crochet terms throughout.
One finished panel is 45.25 in x 82.75 in (114.9 cm x 210.2 cm), border included. The room photo shows a pair of panels, so make two if you want to cover a wide window.
Each butterfly is crocheted separately: first the body and antennae, then four wings, then a purple picot edge. A pink chain-loop frame turns each butterfly into a square unit. From the second unit on, you join each frame to its neighbors as you work it, so there is no sewing. A three-round border straightens the outer edges.
Finished Size and Construction
- Finished panel: 45.25 in x 82.75 in (114.9 cm x 210.2 cm)
- Skill level: Intermediate
- Terminology: US
- Yarn weight: DK (#3) cotton
- Hook: 3.5 mm (E-4)
- Number of pieces: 91 butterfly units per panel
- Layout: 7 units across x 13 units down
- Unit size (blocked): 6.25 in x 6.25 in (15.9 cm x 15.9 cm)
- Size before border: 43.75 in x 81.25 in (111.1 cm x 206.4 cm)
- Border depth: about 0.75 in (1.9 cm) on each side
Materials
Use a smooth mercerized cotton or cotton blend in DK weight, about 110 m (120 yd) per 50 g. Cotton gives crisp picots, blocks into a sharp mesh and does not fuzz in sunlight.
- Pink (wings, frame, border Round 1): 750 g, about 1650 m (1800 yd)
- Purple (bodies, antennae, wing edges, border Rounds 2–3): 350 g, about 770 m (840 yd)
Each unit uses about 7 g (15 m) of pink and 3 g (6.5 m) of purple. These quantities include a margin of about 10–15% for your gauge swatch and small differences in tension.
Tools:
– 3.5 mm (E-4) crochet hook
– Tapestry needle
– Locking stitch markers
– Blocking mats and rustproof pins
– Spray bottle
– 8 curtain clip rings for hanging
Abbreviations (US Terms)
- ch – chain
- sl st – slip stitch
- sc – single crochet
- hdc – half double crochet
- dc – double crochet
- tr – treble crochet
- dtr – double treble crochet
- blo – back loop only
- sp – space
- RS – right side
Picot: ch 3, sl st into the 3rd ch from the hook.
Gauge and Checkpoints
Gauge: 18 sc and 20 rows = 4 in (10.2 cm). The border uses this same sc gauge.
Make one complete unit and block it before you start the rest. Every measurement in this pattern depends on that first unit. Check it at these points:
- Body: 2.75 in (7.0 cm) long and 0.5 in (1.3 cm) wide.
- Upper wing: reaches 2.5 in (6.4 cm) out from the body.
- Lower wing: reaches 1.75 in (4.4 cm) out from the body.
- Finished butterfly: 5.5 in x 4.5 in (14.0 cm x 11.4 cm).
- Blocked unit with frame: 6.25 in x 6.25 in (15.9 cm x 15.9 cm).
If your unit is too big, go down 0.25 mm in hook size. If it is too small, go up 0.25 mm. If only the frame is off, keep the hook and adjust only your chain tension. Loose chains make the mesh sag, and tight chains pull the wings out of shape.
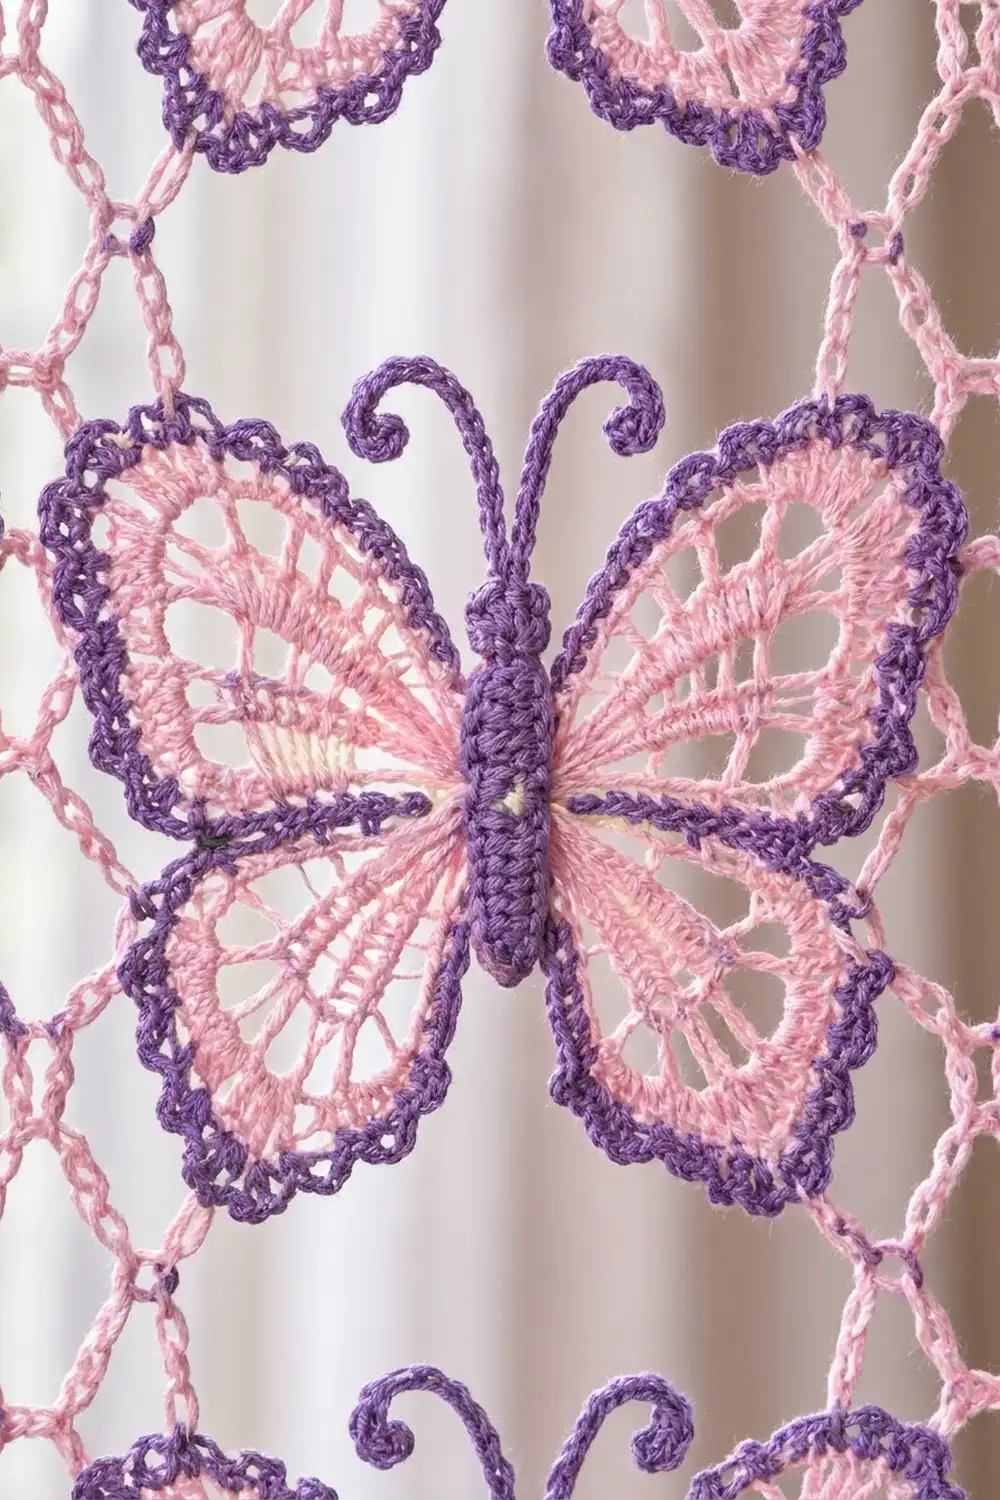
Butterfly Body (Purple)
Ch 14.
Row 1: Hdc in 3rd ch from hook and in each ch across, turn. (12 hdc; the skipped ch does not count as a stitch.)
Row 2: Ch 1, sc blo in each st across, turn. (12 sc)
Row 3: Ch 1, sc blo in each st across. (12 sc) Do not fasten off.
The back-loop rows make the ribbed ridges you see on the body. One short end is the head and the other is the tail. If your hook is at the tail end, sl st along the row ends to reach the head.
Antennae: At the head, ch 11. Working back along the chain: 3 sc in 2nd ch from hook, 2 sc in each of next 3 ch, sl st in each of last 6 ch. The increases make the tip curl. Sl st across the row ends to the opposite corner of the head and make a second antenna the same way. Fasten off.
The center of the head edge (the Row 2 end) is anchor T. The center of the tail edge is anchor B.
Upper Wings (Pink, Make 2)
Each long edge of the body has 12 stitch positions. On one side these are the Row 3 stitches. On the other side they are the free loops of the foundation chain. The upper wing uses the 6 positions nearest the head.
Row 1: With RS facing, join pink in the 6th st from the head. Ch 3 (counts as dc), dc in same st, 2 dc in each of next 5 sts, turn. (12 dc)
Row 2: Ch 4 (counts as dc + ch 1), dc in next dc, ch 1; rep from * to last dc, dc in last dc, turn. (12 dc, 11 ch-1 sps)*
Row 3: Ch 4 (counts as tr), ch 3, tr in next dc; rep from * across, turn. (12 tr, 11 ch-3 sps)*
Row 4: Ch 5 (counts as dtr), ch 4, dtr in next tr; rep from * across, turn. (12 dtr, 11 ch-4 sps)*
Because the chain spaces get longer in each row, the stitches fan out into the spoke pattern.
Row 5 (rim): Ch 1, sc in first dtr, 5 sc in next ch-4 sp, sc in next dtr; rep from * 10 more times. (1 + (11 x 6) = 67 sc)* Fasten off.
Row 6 (purple edge): With RS facing, join purple in the end sc nearest the antennae. Ch 1, sc in same sc, picot, sc in next 3 sc; rep from * 21 more times. (67 sc, 22 picots)* Fasten off.
Number these picots P1–P22, starting at the end nearest the antennae. Make the second upper wing the same way on the other long edge of the body.
Lower Wings (Pink, Make 2)
The lower wing uses the remaining 6 positions on each long edge, nearest the tail.
Rows 1–3: Work as for the upper wing. (After Row 3: 12 tr, 11 ch-3 sps)
Row 4 (rim): Ch 1, sc in first tr, 4 sc in next ch-3 sp, sc in next tr; rep from * 10 more times. (1 + (11 x 5) = 56 sc)* Fasten off.
Row 5 (purple edge): Join purple in the end sc nearest the upper wing. Ch 1, sc in same sc, picot, sc in next 5 sc; rep from * 10 more times. (56 sc, 11 picots)* Fasten off.
Number these picots P1–P11, starting at the end nearest the upper wing.
Checkpoint: The butterfly should measure 5.5 in x 4.5 in (14.0 cm x 11.4 cm). Weave in all ends now.
Frame Round (Pink)
The frame makes a square of 16 chain loops, 4 on each side. The corners sit on the upper wing tips (P12) and the lower wing tips (P9). Along every side, the two loops next to the corners are ch 7 and the two middle loops are ch 9. A corner is worked as (sc, ch 3, sc) in one picot.
Frame Round: With RS facing, join pink in left upper P12 and work (sc, ch 3, sc) there. Then work:
- Top side: ch 7, sc in left upper P6; ch 9, sc in T; ch 9, sc in right upper P6; ch 7, (sc, ch 3, sc) in right upper P12.
- Right side: ch 7, sc in right upper P18; ch 9, sc in right upper P22; ch 9, sc in right lower P4; ch 7, (sc, ch 3, sc) in right lower P9.
- Bottom side: ch 7, sc in right lower P11; ch 9, sc in B; ch 9, sc in left lower P11; ch 7, (sc, ch 3, sc) in left lower P9.
- Left side: ch 7, sc in left lower P4; ch 9, sc in left upper P22; ch 9, sc in left upper P18; ch 7, sl st to first sc.
(16 loops: 8 ch-7 and 8 ch-9; 4 ch-3 corner sps; 20 sc) Fasten off. Block the unit and confirm it measures 6.25 in (15.9 cm) square.
Make All Pieces
For one panel, make 91 butterflies through the purple edges, which uses about 637 g of pink and 273 g of purple. Work the first unit’s frame on its own. Work every later frame with join-as-you-go, as described in the Joining section below.
The panel layout is 7 units across and 13 rows down:
B B B B B B B   <- Row 1 (top)
B B B B B B B
B B B B B B B
B B B B B B B
B B B B B B B
B B B B B B B
B B B B B B B
B B B B B B B
B B B B B B B
B B B B B B B
B B B B B B B
B B B B B B B
B B B B B B B   <- Row 13 (bottom)
All butterflies face the same way, with the antennae pointing up.
Joining (Join-As-You-Go)
Work each new frame as written. On any side that touches a finished unit, replace the middle of each loop with a sl st into the neighbor’s matching loop:
- ch-7 loop: ch 3, sl st into the neighbor’s ch-7 loop, ch 3. (3 + 1 + 3 = 7)
- ch-9 loop: ch 4, sl st into the neighbor’s ch-9 loop, ch 4. (4 + 1 + 4 = 9)
- ch-3 corner: ch 1, sl st into the neighbor’s ch-3 corner sp, ch 1. (1 + 1 + 1 = 3)
Each sl st replaces exactly one chain, so every loop keeps its length and no stitches are added. Join loops in order: the 1st with the 1st, the 2nd with the 2nd, and so on. This keeps the diamond openings even.
Up to four corners can meet at one point. For the third and fourth units at that point, sl st into the same place where the earlier corners joined.
Keep your tension the same for joining chains and ordinary chains. Tight joins will pucker the mesh.
Checkpoint: After the first row, lay it flat. Two joined units should measure 12.5 in (31.8 cm) across and three should measure 18.75 in (47.6 cm). The full panel before the border is 43.75 in x 81.25 in (111.1 cm x 206.4 cm).
Border
Border gauge: 18 sc = 4 in (10.2 cm), the same as the body.
Count per unit side: 1 sc in the corner sp + 6 sc in the ch-7 loop + 7 sc in each ch-9 loop + 6 sc in the ch-7 loop + 1 sc in the next corner sp. That gives 1 + 6 + 7 + 7 + 6 + 1 = 28 sc, and this count already includes that side’s 2 corner stitches.
Round 1 (pink): With RS facing, join pink at the top right corner and sc around, working the per-unit count along every side.
- Where two units meet along an edge, each unit’s own corner sp gets its own 1 sc. These are part of the 28, so nothing extra is added at seams.
- At the 4 panel corners, one corner sp belongs to two sides. Work (sc, ch 2, sc) there: the first sc completes one side and the second sc starts the next. The ch-2 is not counted.
Counts: top and bottom 7 x 28 = 196 sc each; left and right 13 x 28 = 364 sc each. (Total 1120 sc + 4 ch-2 corner sps) Sl st to first sc and fasten off.
Round 2 (purple): Join purple. Sc in each sc around, and work (sc, ch 2, sc) in each corner sp.
Counts: top and bottom 196 + 2 = 198 sc each; sides 364 + 2 = 366 sc each. (Total 1128 sc)
Round 3 (purple picot): (Sc in next 2 sc, picot) across each side; in each corner sp work (sc, picot, sc).
Counts: top and bottom have 198 sc + 99 picots; sides have 366 sc + 183 picots. Both 198 and 366 are even, so the 2-sc repeat comes out exactly on every side. Sl st to first sc, fasten off.
Why the math works: At 4.5 sc per inch, 28 sc measure 6.2 in (15.7 cm). That is essentially the 6.25 in (15.9 cm) width of one unit, so the border neither pulls in nor ruffles. Rounds 2 and 3 add stitches only at the corners, which keeps the corners square.
Final Blocking
- Lay the panel on mats in sections, starting at the top edge.
- Pin the top border straight, then pin down both sides to 82.75 in (210.2 cm).
- Pin each butterfly at its 4 frame corners to keep the grid square.
- Pin the top of each wing open so the spokes fan evenly.
- Mist lightly until damp, but not soaked.
- Let each section dry completely before moving to the next.
- Check that the width is 45.25 in (114.9 cm) at the top, middle and bottom.
Final Quality-Control Checklist
- All 91 butterflies face up, with the antennae curled.
- Every wing has a full purple picot edge: 22 picots on each upper wing and 11 on each lower wing.
- All frame loops on adjoining sides are joined, and every opening is an even diamond.
- Each corner meeting point is a single join point.
- Border counts are 196/364 in Round 1 and 198/366 in Round 2.
- Edges are straight, with no rippling or cupping.
- All ends are woven in securely and the cut tails are not visible.
Troubleshooting
Wings cup instead of lying flat: The ch-3 or ch-4 spaces are too tight. Go up a hook size for Rows 3–4 only.
Wings ruffle: The chain spaces are too loose. Chain more firmly, or work Row 5 with 4 sc per space instead of 5. If you do, recount: the rim becomes 56 sc, so the purple edge needs (picot, sc in next 5) x 11, and the corner and anchor picots move.
Mesh sags: The frame chains are loose. Re-check the frame size on one blocked unit before you continue.
Border waves: You have extra sc in the loops. Count 28 per unit side.
Antennae won’t curl: Work the tip increases more tightly, then pin them into a curl while blocking.
Care
Hand wash in cool water with mild soap, roll the panel in towels to remove water, and dry it flat. Re-pin the corners if the grid shifts.
Final Notes
The measurement chain runs like this. The body is 2.75 in (7.0 cm) long. The wings bring the butterfly to 5.5 in x 4.5 in (14.0 cm x 11.4 cm). The frame makes a 6.25 in (15.9 cm) unit. Seven units by thirteen gives 43.75 in x 81.25 in (111.1 cm x 206.4 cm). The border adds 0.75 in (1.9 cm) on each side, for a finished panel of 45.25 in x 82.75 in (114.9 cm x 210.2 cm). If your first unit measures correctly, the whole panel will too. Clip the rings at the 8 top corner points and hang.
Happy crocheting!