
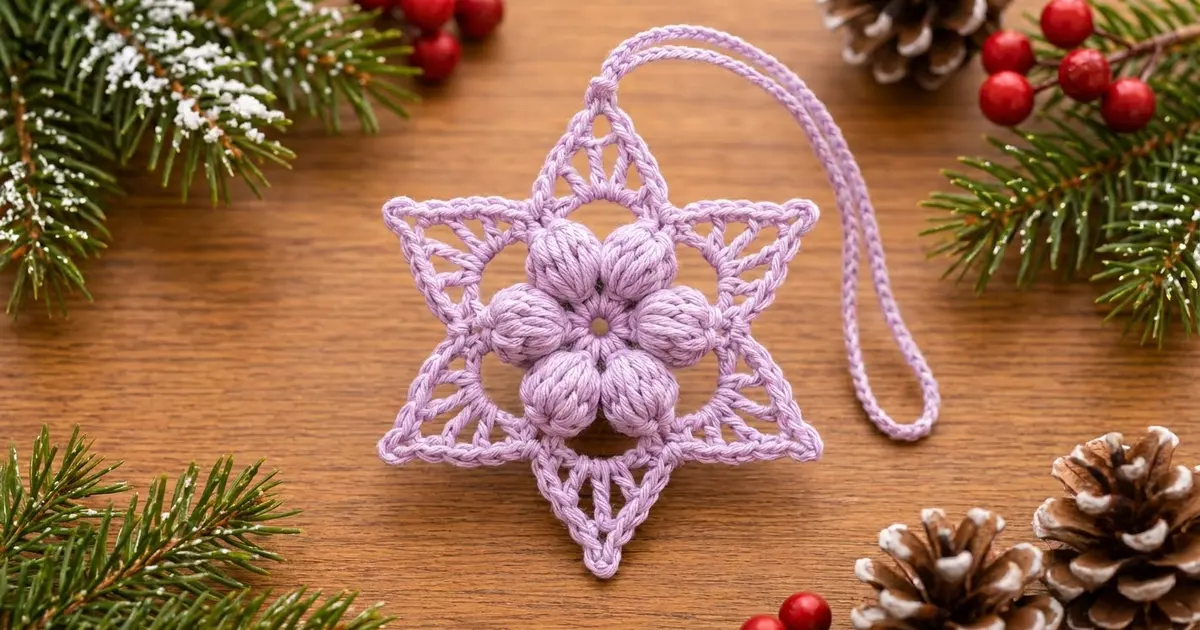
The Lilac Frost Star is a delicate six-pointed ornament with a soft puff-flower heart. Six rounded puff stitches cluster around a tiny center ring. Lacy triangular points fan out from there, each one finished with a crisp edge and a small picot at the tip.
It is worked in a single pastel lilac, which gives it a frosty, wintry look that is a little different from traditional red and green. It looks equally good hanging on a tree, tied to a gift or pinned to a window. This pattern uses US crochet terms throughout.
The finished star measures 5 in (12.7 cm) from tip to tip after blocking, plus a 2 in (5.1 cm) hanging loop. You work it in the round as one piece: a magic ring, a puff-stitch flower, a round of chain arches, graded fans that shape the points, a chain outline and a single-crochet border. There is no sewing and no joining.
You only need a few grams of yarn, so one ball will make a whole set.
Finished Size and Construction
- Finished size: 5 in (12.7 cm) tip to tip; about 3 in (7.6 cm) across between opposite valleys
- Skill level: Easy-intermediate (puff stitches and treble crochet)
- Terminology: US crochet terms
- Yarn weight: Sport (#2), cotton or cotton blend
- Hook: 3.0 mm (US C/2 or D/3)
- Number of pieces: 1
- Layout: Single motif worked in continuous joined rounds
- Piece size before border (after Round 5): 4.75 in (12.1 cm) tip to tip
- Border depth: about 0.125 in (0.3 cm)
- Hanging loop: 2 in (5.1 cm) when folded
Materials
Yarn: Choose a smooth, tightly plied sport-weight cotton or cotton blend. Cotton shows the puff stitches clearly and holds the points crisp after blocking. Avoid fuzzy or very soft acrylic, because it blurs the lace and the points will droop.
- Light lilac: 8 g (about 25 m / 27 yd) per star
The quantity includes a margin for your gauge swatch, yarn tails and the hanging loop. One 50 g ball makes about six stars.
Tools:
- 3.0 mm crochet hook
- Tapestry needle
- Scissors
- Stitch marker
- Blocking mat or folded towel, and rust-proof pins
- Spray bottle with water, or liquid starch for a stiffer ornament
- Ruler or tape measure
Abbreviations (US Terms)
- ch: chain
- sl st: slip stitch
- sc: single crochet
- hdc: half double crochet
- dc: double crochet
- tr: treble crochet
- sp: space
- sk: skip
- st(s): stitch(es)
- beg: beginning
- rep: repeat
Special stitch: Puff stitch (puff). (Yo, insert hook in stitch, yo, pull up a loop to about 0.375 in / 1.0 cm tall) 5 times, leaving 11 loops on the hook. Yo and pull through all 11 loops, then ch 1 to lock. The locking ch 1 is part of the puff and is not counted separately.
Special group: Fan. (Hdc, ch 1, dc, ch 1, tr, ch 3, tr, ch 1, dc, ch 1, hdc), all worked into the same space.
Gauge and Checkpoints
Gauge for this ornament is measured by checkpoints instead of a square swatch. Make one complete star first and measure it before you make a set.
- After Round 2: The puff flower measures 1.5 in (3.8 cm) across.
- After Round 3: The arch ring measures 2.25 in (5.7 cm) across.
- After Round 4: The star measures 3.5 in (8.9 cm) from fan tip to fan tip.
- After Round 5: The star measures 4.75 in (12.1 cm) tip to tip.
- After Round 6 and blocking: The star measures 5 in (12.7 cm) tip to tip.
If your flower is too big (over 1.75 in / 4.4 cm), go down to a 2.75 mm hook. Also check that your puff loops are not pulled taller than 0.375 in (1.0 cm).
If your flower is too small (under 1.25 in / 3.2 cm), go up to a 3.25 mm hook.
If the flower cups instead of lying flat, your ch-3 spaces in Round 2 are too tight. Keep those chains relaxed.

Pattern
Round 1: Center Ring
Make a magic ring. Ch 1, then work 12 sc into the ring. Pull the tail until a small hole about 0.25 in (0.6 cm) wide remains. Join with a sl st to the first sc.
Count: 12 sc.
Round 2: Puff Flower
Ch 1. Work a puff in the first sc, then ch 3 and sk the next sc. *Work a puff in the next sc, ch 3, sk the next sc; rep from * 4 more times. Join with a sl st to the top of the first puff.
Count: 6 puffs and 6 ch-3 spaces (24 sts: 6 puffs + 18 ch).
Push each puff forward so it sits round and plump on the right side. The ch-3 spaces tuck behind the puffs, so the flower looks solid from the front.
Round 3: Arch Ring
Sl st into the first ch-3 sp. Ch 1, then work a sc in the same sp and ch 7. *Sc in the next ch-3 sp, ch 7; rep from * 4 more times. Join with a sl st to the first sc.
Count: 6 sc and 6 ch-7 loops (48 sts: 6 sc + 42 ch).
Each ch-7 loop arches over the top of one puff. The gap between the puff and the arch makes the round openings at the base of each point.
Round 4: Point Fans
Sl st into the first ch-7 loop. Ch 2 (counts as hdc), then work (ch 1, dc, ch 1, tr, ch 3, tr, ch 1, dc, ch 1, hdc) in the same loop. Sc in the next sc. *Work a Fan in the next ch-7 loop, then sc in the next sc; rep from * 4 more times. The last sc goes into the sc where Round 3 was joined. Join with a sl st to the top of the beg ch-2.
Count per point: 6 sts (hdc, dc, tr, tr, dc, hdc) + 4 ch-1 + 3 ch at the tip + 1 valley sc = 14.
Total: 84 (36 fan sts, 6 valley sc and 42 ch).
Because the stitches grow from hdc to tr and back down, each fan rises to a peak at the ch-3 space. The hdc, dc and tr form the lacy spokes inside each point.
Round 5: Point Outline
Sl st into the next ch-1 sp. Ch 1 and work a sc in the same sp, then ch 2. Sc in the next ch-1 sp, ch 2. Work (sc, ch 3, sc) in the tip ch-3 sp, then ch 2. [Sc in the next ch-1 sp, ch 2] twice. Sc in the valley sc, ch 2.
*[Sc in the next ch-1 sp, ch 2] twice. Work (sc, ch 3, sc) in the tip ch-3 sp, ch 2. [Sc in the next ch-1 sp, ch 2] twice. Sc in the valley sc, ch 2. Rep from * 4 more times. Join with a sl st to the first sc.
Count per point: 7 sc + 6 ch-2 spaces (12 ch) + 1 tip ch-3 = 22 sts.
Total: 132 sts (42 sc + 90 ch).
Each side of a point, from the valley to the tip, is now ch 2, sc, ch 2, sc, ch 2, sc, which is 9 stitches. The tip ch-3 sits between the two sides.
Checkpoint: 4.75 in (12.1 cm) tip to tip.
Border
Border Gauge
The border is worked about 8 sc per 1 in (2.5 cm). Each side of a point holds 11 sc over about 1.4 in (3.6 cm).
Round 6: Single-Crochet Edge with Tip Picots
Ch 1 and sc in the same st as the join. 2 sc in the next ch-2 sp, sc in the next sc, 2 sc in the next ch-2 sp, sc in the next sc. Work (2 sc, ch 3, 2 sc) in the tip ch-3 sp. Sc in the next sc, [2 sc in the next ch-2 sp, sc in the next sc] twice, 2 sc in the next ch-2 sp, then sl st in the valley sc.
*2 sc in the next ch-2 sp, [sc in the next sc, 2 sc in the next ch-2 sp] twice, sc in the next sc. Work (2 sc, ch 3, 2 sc) in the tip ch-3 sp. Sc in the next sc, [2 sc in the next ch-2 sp, sc in the next sc] twice, 2 sc in the next ch-2 sp, sl st in the valley sc. Rep from * 4 more times.
2 sc in the last ch-2 sp, then join with a sl st to the first sc. Point 1’s first side is now complete.
Count per side: 9 sc worked one per existing st (3 sc + 6 ch) + 2 extra sc at the tip = 11 sc.
Count per point: 18 sc worked one per st along the sides + 1 sl st in the valley + 4 sc at the tip (worked into the 3 tip chains) + a ch-3 picot = 22 sc, 1 sl st and 1 picot.
Total: 132 sc, 6 sl st and 6 ch-3 picots.
Why the math works: Round 5 gives each side exactly 9 stitches. One sc per stitch keeps the side edges flat without ruffling. The tip is the only place the edge turns sharply, so that is the only place extra stitches are added: 2 sc on each side of the picot.
The valley gets a sl st instead of a sc. That pulls the inner corner in and keeps the star sharp. The total checks out: 6 points × 2 sides × 11 sc = 132 sc.
Hanging Loop
Do not fasten off. Sl st into the next 2 sc to reach the side of point 1, then sl st into its tip ch-3 picot. Ch 30 and sl st back into the same picot. Fasten off and leave a 6 in (15.2 cm) tail.
Folded, the loop measures about 2 in (5.1 cm). Weave the tail back along the loop chain to reinforce it, then weave in all ends along the edge.
Final Blocking
- Soak the star in cool water for 5 minutes, or mist it heavily. For a stiffer ornament, dip it in diluted liquid starch.
- Press out the excess water in a towel. Do not wring it.
- Lay the star right side up on a blocking mat.
- Pin each of the six tip picots so the star measures 5 in (12.7 cm) from tip to tip. Opposite tips should line up through the center.
- Pin each valley so the distance across opposite valleys is 3 in (7.6 cm).
- Gently pull each Round 3 opening into a round shape with a fingertip.
- Leave the puffs unpinned so they stay raised. Pinch each one lightly to round it.
- Let the star dry completely, at least 6 hours, before unpinning.
Final Quality-Control Checklist
- Six puffs, evenly spaced and of similar size
- A small, closed-looking center ring with no visible tail
- Six round openings, one between each puff and the base of its point
- Six points, each with hdc, dc, tr, tr, dc and hdc spokes
- 11 sc on every side, 132 sc in total
- A neat ch-3 picot at every tip
- Valleys pulled in sharply by the sl st
- Tip-to-tip measurement of 5 in (12.7 cm), within 0.25 in (0.6 cm)
- A secure hanging loop with the ends woven in
Troubleshooting
The puffs look flat or uneven. Pull every loop up to the same height before closing, and always lock each puff with ch 1.
The center hole is too big. Pull the magic ring tail firmly before weaving it in, and anchor it with a backstitch.
The points are rounded instead of sharp. Check that each Fan has its trebles and a ch-3 at the peak. Pin the tips firmly when blocking, and use starch if needed.
The edge ruffles. You have probably added extra sc. Count again: there should be 11 per side. Tension that is too tight in Round 5 also crowds the border.
The edge cups. Your Round 5 ch-2 spaces may be too tight. Loosen them, or go up a hook size for Rounds 5 and 6 only.
The star leans. One fan may be missing a ch-1 space. Count to 14 stitches per point in Round 4.
Care
Hand wash in cool water, press dry in a towel, and reblock flat. Store the ornament flat or hang it on its loop so the points keep their shape.

Final Notes
The measurement chain for this star is:
- 12 sc ring
- 6 puffs measuring 1.5 in (3.8 cm)
- 6 arches measuring 2.25 in (5.7 cm)
- 84-stitch fans measuring 3.5 in (8.9 cm)
- 132-stitch outline measuring 4.75 in (12.1 cm)
- 132 sc border, blocked to 5 in (12.7 cm)
If each checkpoint matches, the next round will too. Make one star, check the counts and measurements, and then make as many as you like for your tree or gift wrapping.
Happy crocheting!