

The Lilac Iris Bag Holder is a tall crochet tube that hangs on a peg and keeps plastic grocery bags tidy. You push bags in through the wide top and pull them out one at a time through the smaller opening at the bottom.
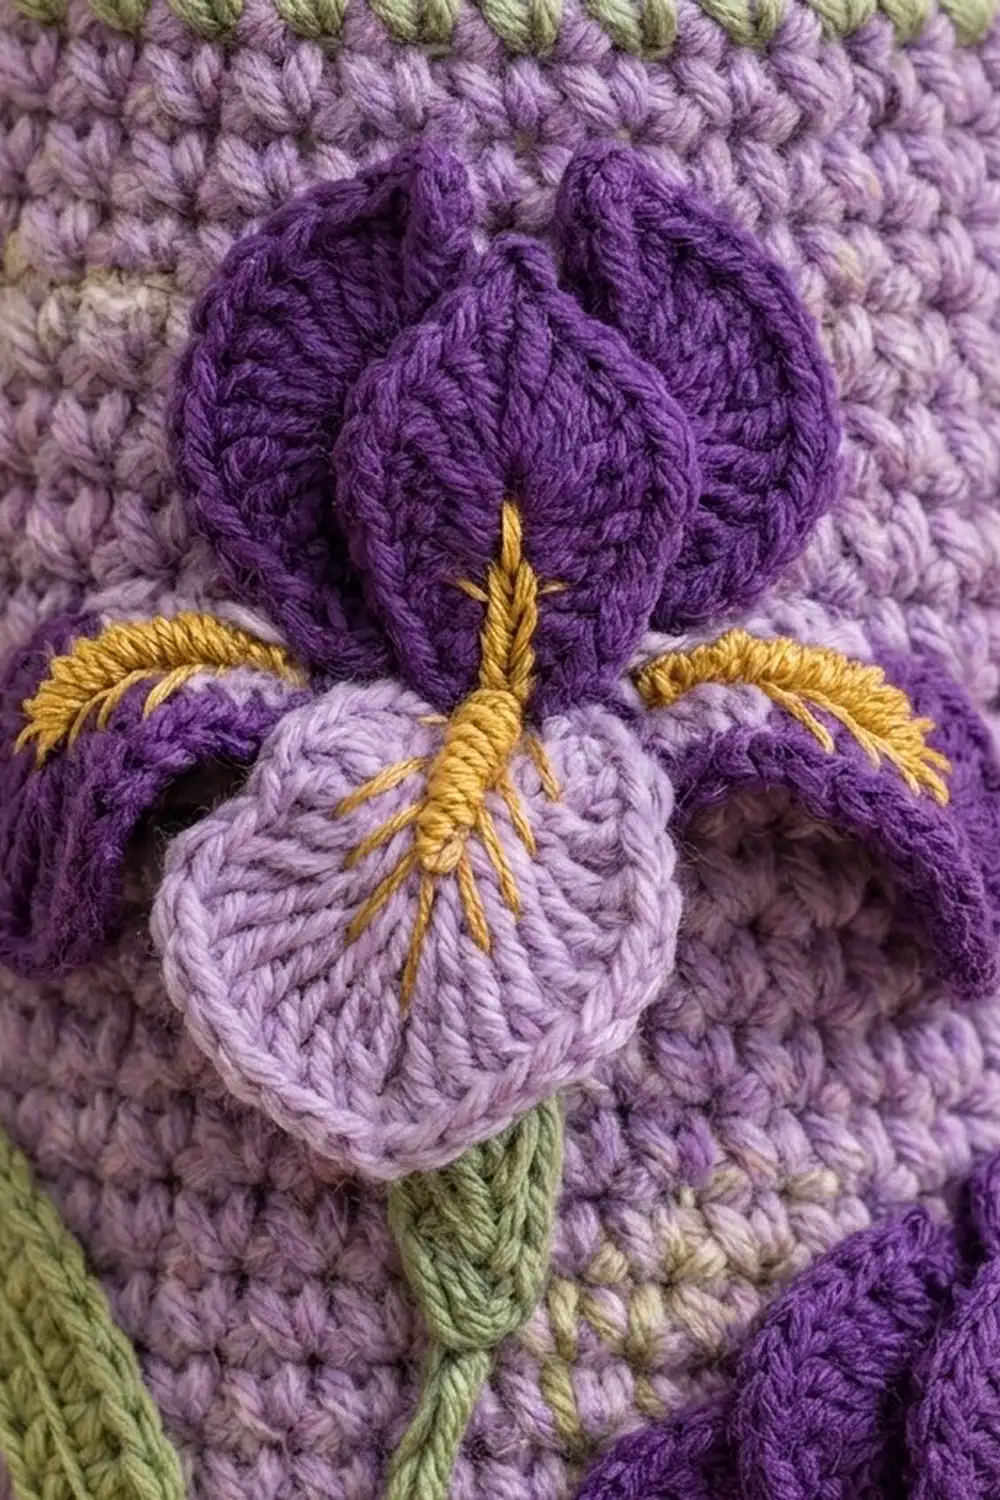
The body is heathered lilac with sage-green rims at the top and bottom. Two irises bloom on the front. Each one has deep-purple standards and light-lavender falls with gold beards, and sage-green sword leaves grow up from the base. The look is soft cottage-garden style, and the dense fabric holds up to daily use.
This pattern uses US crochet terms. The finished holder is 5.1 in (13.0 cm) in diameter, 16 in (40.6 cm) around, and 14.9 in (37.8 cm) tall, plus a strap loop that rises about 4 in (10.2 cm).
Construction is simple. You start at the bottom with a flat ring, turn up the wall, and work joined rounds up to the green top border. You add a strap, then crochet and sew on the appliqués.
Finished Size and Construction
- Finished size: 5.1 in (13.0 cm) diameter × 14.9 in (37.8 cm) tall
- Skill level: Intermediate
- Terminology: US
- Yarn weight: Worsted (#4)
- Hook: 5.0 mm (US H-8)
- Number of pieces: 1 finished holder. It is made from the body, 1 strap, 2 irises (each with 3 standards and 1 falls piece), and 5 leaves.
- Layout: A single vertical tube with appliqués on the front half
- Piece size (body): 64 sts around, 16 in (40.6 cm) circumference
- Size before border: 14.0 in (35.6 cm) tall through Rnd 67
- Border depth: 0.9 in (2.3 cm), 4 rounds
Materials
Pick a smooth worsted-weight acrylic or cotton blend. A heathered lilac gives the body a soft, tweedy look. Cotton makes a firmer tube, and acrylic is lighter and stretches a little more.
- Heathered lilac (A): 210 g / about 400 m (body, base ring, strap)
- Sage green (B): 40 g / about 75 m (rims, leaves, stems)
- Deep purple (C): 20 g / about 35 m (standards)
- Light lavender (D): 10 g / about 18 m (falls)
- Gold (E): 5 g / about 9 m (beard embroidery)
All quantities include a margin of about 15% for your gauge swatch and tension differences.
Tools: 5.0 mm (US H-8) hook, tapestry needle, stitch markers, scissors, measuring tape, pins, a spray bottle, and a rolled towel or a 5 in (12.7 cm) cylinder (such as an oatmeal canister) for blocking.
Abbreviations (US Terms)
- ch: chain
- sl st: slip stitch
- sc: single crochet
- hdc: half double crochet
- dc: double crochet
- tr: treble crochet
- inc: 2 sc in the same stitch
- sc2tog: single crochet 2 together
- BLO: back loop only
- st(s): stitch(es)
- sp: space
- rnd: round
Special stitch: crab stitch (reverse sc). Working from left to right, insert the hook into the next stitch to the right, yarn over, pull up a loop, then yarn over and pull through both loops. This makes a twisted, corded edge.
Gauge and Checkpoints
Gauge: 16 sc and 18 rnds = 4 in (10.2 cm) in sc worked in joined rounds. That is 4 sts and 4.5 rnds per inch.
Make the base ring first and measure it, because this small piece tells you a lot. Check these measurements as you go:
- After Rnd 4 (base ring): outer diameter 5.1 in (13.0 cm), center opening 3.2 in (8.1 cm). The ring should lie flat or wave only slightly.
- After Rnd 20: the wall is 3.6 in (9.1 cm) tall (16 wall rounds). Laid flat, the tube measures 8 in (20.3 cm) wide.
- After Rnd 67: the wall is 14.0 in (35.6 cm) tall.
- After the border: the wall is 14.9 in (37.8 cm) tall.
If your piece is too big (more than 8 in / 20.3 cm flat width), go down half a hook size and start over. If it is too small, go up half a size. If only the height is off, add or remove lilac rounds between Rnds 7 and 67, and keep 64 sts.
Body
Join every round with a sl st into the first sc and start each round with ch 1, which does not count as a stitch. Keep the joins at the back center. To change color, work the last yarn over of the final stitch of the previous round in the new color.
Base Ring
With A, ch 40. Join with a sl st into the first ch, taking care not to twist the chain.
Rnd 1: Sc in each ch around. (40 sts)
Rnd 2: (Sc in next 4 sts, inc) 8 times. (48 sts)
Rnd 3: (Sc in next 5 sts, inc) 8 times. (56 sts)
Rnd 4: (Sc in next 6 sts, inc) 8 times. (64 sts)
Checkpoint: outer diameter 5.1 in (13.0 cm), opening 3.2 in (8.1 cm). Change to B.
Wall
Rnd 5 (turning round): With B, sc in BLO of each st around. (64 sts) The unused front loops form a crisp fold line where the ledge turns into the wall.
Rnd 6: With B, sc in each st around. (64 sts) Change to A.
Rnds 7–67: With A, sc in each st around. (64 sts each round)
That is 61 lilac rounds. After Rnd 67, the wall (Rnds 5–67, 63 rounds) measures 14.0 in (35.6 cm). Change to B.
Border
The border uses the same gauge of 4.5 rnds per inch, so its 4 rounds add 0.9 in (2.3 cm). The body is round, so there are no corners. To check your count, split the 64 sts into 4 quarters of 16 sts. Because the joins sit at the back center, st 1 is at the back, st 33 is front center, and the side points are st 17 and st 49. Mark all three now.
Top Border
Rnd 68: With B, sc in each st around. (64 sts; 16 per quarter)
Rnd 69: Sc in each st around. (64 sts; 16 per quarter)
Rnd 70: Sc in each st around. (64 sts; 16 per quarter)
Rnd 71: Ch 1, crab stitch in each st around. (64 sts; 16 per quarter) Join and fasten off.
Why the math works: Each round has the same 64 sts as the wall, so the rim stays exactly 16 in (40.6 cm) around and does not flare or pull in. Crab stitch is worked one per stitch, so it keeps the count and rolls the edge into a firm cord.
Bottom Opening Trim
Turn the holder upside down. Join B in any free loop of the foundation chain at the back.
Trim Rnd 1: Sc in each foundation loop around. (40 sts)
Trim Rnd 2: Sl st in BLO of each st around. (40 sts) Fasten off.
The opening stays 3.2 in (8.1 cm) across because there is still one stitch per foundation chain. That is snug enough to hold bags but loose enough to pull one out.
Strap
With A, ch 41.
Row 1: Sc in 2nd ch from hook and in each ch across. Turn. (40 sts)
Rows 2–3: Ch 1, sc in each st across. Turn. (40 sts)
Fasten off and leave a long tail. The strap is 10 in (25.4 cm) long and 0.7 in (1.8 cm) wide.
Overlap each strap end 0.75 in (1.9 cm) inside the rim at one of the side points (st 17 and st 49, which are 32 sts apart), so it covers Rnds 68–71. Whipstitch both edges securely. The loop should rise about 4 in (10.2 cm).
Iris Appliqués (make 2)
Standards (make 3 per iris, 6 total)
With C, ch 9.
Rnd 1: Working in the chain, sl st in 2nd ch from hook, then sc, hdc, 3 dc, hdc in the next 6 chs. Work 3 sc in the last ch. Then, working along the other side of the chain: hdc, 3 dc, hdc, sc in the next 6 chs, and sl st in the same ch as the first sl st. (17 sts)
Rnd 2 (trim): Working in BLO, work 1 sc in each st, except: (sc, ch 2, sc) in the tip sl st and 2 sc in each of the 6 dc. That is 17 sts worked once each plus 7 added, for 24 sc + 1 ch-2 sp. Fasten off.
The BLO round leaves a raised ridge around each petal, and the extra stitches over the dc ruffle the edge. Each standard is about 2 in (5.1 cm) long.
Falls (make 1 per iris)
With D, make a magic ring.
Rnd 1: 6 sc in ring. (6 sts)
Rnd 2: Inc in each st. (12 sts)
Rnd 3 (falls): Sl st in next st, (hdc, 2 dc) in next st, (2 tr, ch 2, 2 tr) in next st, (2 dc, hdc) in next st; repeat from * 2 more times. Join to the first sl st. (33 sts + 3 ch-2 sps; 11 sts per fall)* Fasten off.
The falls piece is about 2.5 in (6.4 cm) across.
Beard and Assembly
With E, embroider each fall with 3 straight stitches about 0.5 in (1.3 cm) long, running from the center ring toward the ch-2 tip. Add 2 short angled stitches on each side.
Pin the 3 standards behind the falls. Set the center one upright and angle the other two out about 30°. Tuck their bases 0.5 in (1.3 cm) behind the center ring. Turn the falls so that one points down and two point to the lower left and lower right. Sew the layers together through the center. Each finished iris is about 2.5 in (6.4 cm) wide and 3 in (7.6 cm) tall.
Leaves (make 5)
The chain becomes the center vein because you work along both sides of it.
Long leaf (make 3): With B, ch 26. Sl st in 2nd ch from hook, then sc in next 3 chs, hdc in next 6, dc in next 10, hdc in next 4, and 3 sc in the last ch. Working along the other side of the chain, hdc in next 4, dc in next 10, hdc in next 6, sc in next 3, and sl st in the tip ch. (51 sts) Each long leaf is about 6 in (15.2 cm) long and 1 in (2.5 cm) wide at the widest point.
Short leaf (make 2): With B, ch 18. Sl st in 2nd ch from hook, then sc in next 2 chs, hdc in next 4, dc in next 7, hdc in next 2, and 3 sc in the last ch. Working along the other side of the chain, hdc in next 2, dc in next 7, hdc in next 4, sc in next 2, and sl st in the tip ch. (35 sts) Each short leaf is about 4 in (10.2 cm) long.
The pointed sl st end is the tip, and the 3-sc end is the base.
Placing the Appliqués
Slide the holder over a rolled towel so the surface is firm to work on.
- Upper iris: center it slightly left of the front-center marker (st 33), 10.5 in (26.7 cm) above the bottom fold.
- Lower iris: place it right of center, 6.5 in (16.5 cm) above the bottom fold.
- Stems: with B, surface sl st a straight line from Rnd 7, which is 1.3 in (3.3 cm) up, to the base of each flower. The upper stem covers about 35 rnds, or 7.8 in (19.8 cm). The lower stem covers about 18 rnds, or 4 in (10.2 cm).
- Leaves: pin the bases in a fan along Rnd 7, just above the green band. Put the 3 long leaves in the middle and the 2 short leaves on the outside, angled slightly outward. Let them cross the stems naturally.
Whipstitch the leaves along both edges. Leave the top 0.25 in (0.6 cm) of each tip free. Sew the irises around the edge of the falls center and tack each petal tip down lightly, so the petals stand out in 3D but don’t snag.
Final Blocking
- Lightly mist the whole holder with water.
- Slide it over the cylinder or rolled towel so the 16 in (40.6 cm) circumference sits evenly.
- Smooth the wall so the stitch columns run straight and the joins line up at the back.
- Press the base ring and bottom trim flat with your fingers.
- Shape the iris petals with your fingertips and pin the falls so they curve outward.
- Let it dry completely, then check that the height is 14.9 in (37.8 cm).
Acrylic can be steamed lightly instead. Hold the iron above the fabric and never press on the appliqués.
Final Quality-Control Checklist
- The body has 64 sts in every round from Rnd 4 to Rnd 71.
- The flattened width is 8 in (20.3 cm), and the diameter is 5.1 in (13.0 cm).
- The wall is 14.0 in (35.6 cm) before the border and 14.9 in (37.8 cm) after.
- The bottom opening is 3.2 in (8.1 cm) with 40 trim sts.
- The strap ends sit exactly opposite each other and are sewn through all 4 border rounds.
- Each standard has 24 sc + 1 ch-2 sp, and each falls piece has 33 sts + 3 ch-2 sps.
- The long leaves have 51 sts and the short leaves have 35 sts.
- All tails are woven in on the inside.
Troubleshooting
- Base ring ruffles a lot: your tension is loose. Block it flat, or redo it a half hook size smaller.
- Base ring cups upward: you skipped an increase. Recount to 48, 56, and 64.
- Join seam slants: you may be counting the ch 1 as a stitch. Start every round in the first real st.
- Top rim flares: your crab stitch is too loose. Rework Rnd 71 with tighter loops.
- Bags slide out too easily: add a third trim round, (sc in next 8 sts, sc2tog) 4 times, to bring the opening to 36 sts.
- Leaves curl: pin them flat while blocking before you sew.
- Strap stretches: sew a matching strip of cotton ribbon behind it.
Care
Hand wash in cool water and lay flat over a cylinder to dry. Don’t wring it, so the 3D petals keep their shape.

Final Notes
The measurement chain is short and easy to check. Gauge is 16 sc and 18 rnds = 4 in (10.2 cm). The base ring grows from 40 to 64 sts, for a 5.1 in (13.0 cm) diameter. The wall stays at 64 sts for 14.0 in (35.6 cm), and the 4-round border adds 0.9 in (2.3 cm) for a finished 14.9 in (37.8 cm). If each checkpoint matches, the strap, leaves, and irises will sit exactly where they should.
Happy crocheting!