

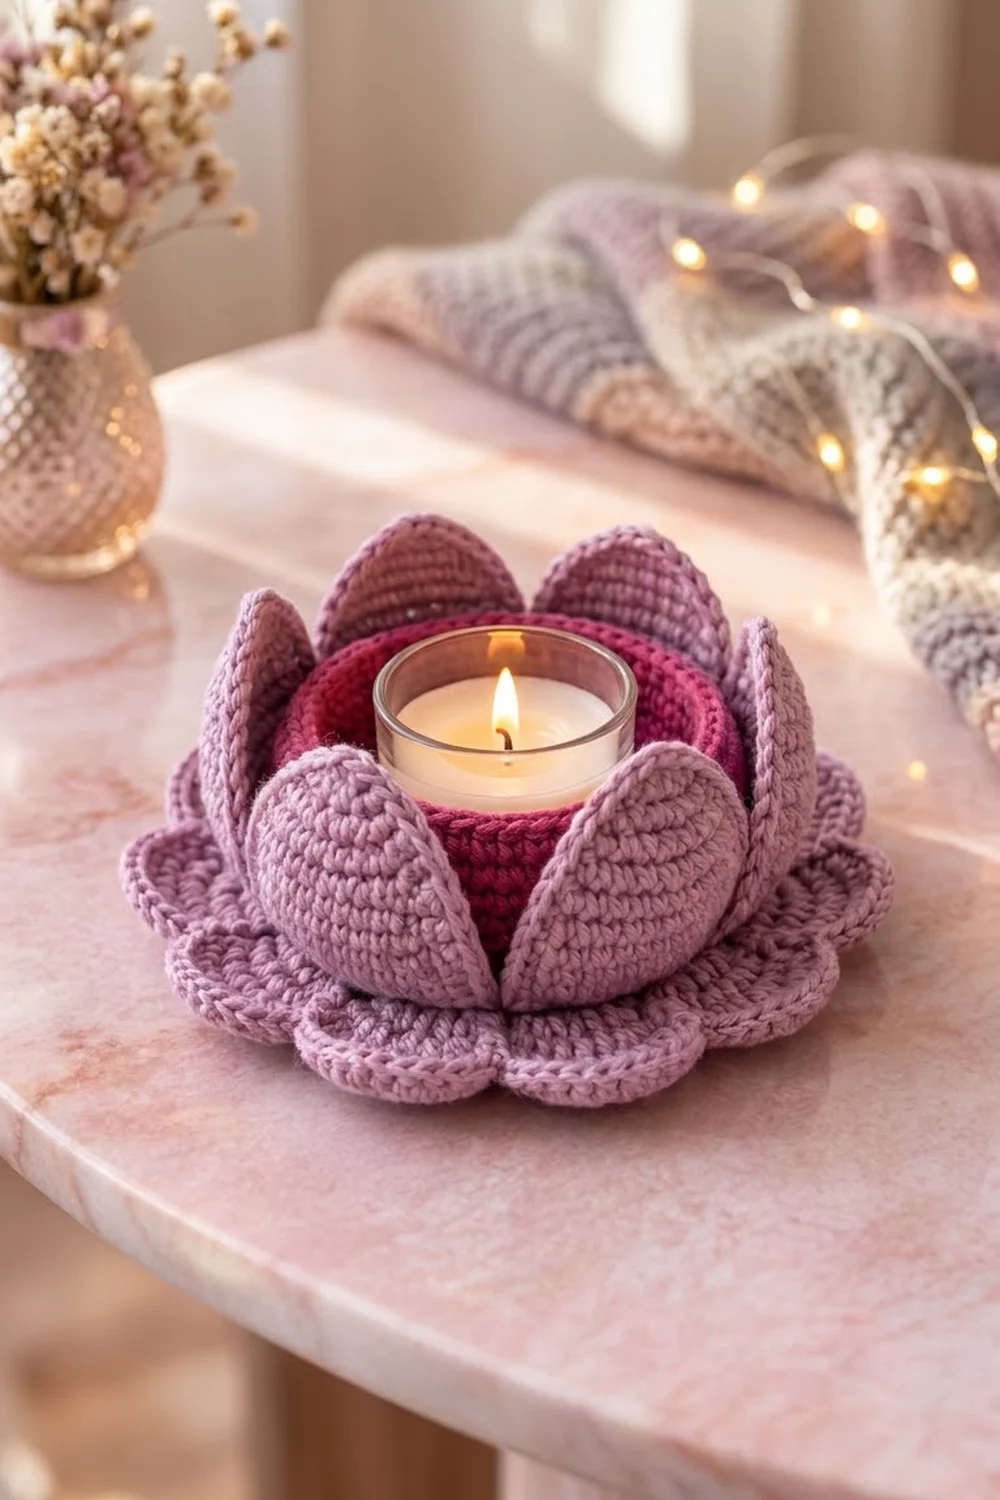
This lotus tealight holder opens around a candle like a flower on still water. Eight pointed lilac petals rise from a flat scalloped base and lean gently outward. A deep raspberry cup sits in the center and holds a tealight in a glass cup.
The palette is soft and warm. Dusty lilac is used for the base and petals, and a rich berry shade for the inner cup, so the center looks shaded and deep when the candle is lit. Every piece is worked in tight single crochet with cotton yarn, so the flower keeps its shape without starch or wire.
This pattern uses US crochet terms. The finished holder is about 5.8 in (14.7 cm) across the base and about 2.8 in (7.1 cm) tall. The inner cup is about 2.5 in (6.4 cm) across, so it fits a standard tealight in a glass cup up to about 2.25 in (5.7 cm) wide.
The construction is simple. You crochet one flat circle for the base with a scalloped edge, one small cup, and eight petals worked in rows. Then you sew the cup to the center of the base and sew the petals in a ring around it.
Safety note: Only use this holder with a tealight inside a glass or metal cup, or with an LED tealight. Never leave a lit candle unattended.
Finished Size and Construction
- Finished size: about 5.8 in (14.7 cm) diameter x 2.8 in (7.1 cm) tall
- Skill level: Easy to intermediate
- Terminology: US crochet terms
- Yarn weight: Worsted weight (#4) cotton
- Hook: 4.0 mm (G-6), or the size that gives gauge
- Number of pieces: 10 (1 base, 1 inner cup, 8 petals)
- Layout: cup centered on the base, 8 petals in one overlapping ring around the cup
- Petal size: about 2.25 in (5.7 cm) wide x 2.8 in (7.1 cm) tall
- Base size before border: 4.8 in (12.2 cm) diameter
- Border depth: about 0.5 in (1.3 cm), for 5.8 in (14.7 cm) total
- Inner cup: about 2.5 in (6.4 cm) diameter x 1.6 in (4.1 cm) tall
Materials
Choose a smooth combed or mercerized cotton in worsted weight. Cotton shows the stitches clearly and makes stiff petals. Avoid acrylic near a flame. It melts more easily and tends to make floppy petals.
Yarn:
- Color A, Lilac (base and petals): 50 g, about 85 m
- Color B, Raspberry (inner cup): 15 g, about 25 m
These quantities include a margin of roughly 20 percent for a test petal and sewing tails.
Tools:
- 4.0 mm (G-6) crochet hook
- Tapestry needle
- Stitch markers
- Scissors
- Locking pins or sewing clips
- Spray bottle and blocking mat
- A small round object for shaping, such as an egg or a tennis ball
- Tealight in a glass cup, or an LED tealight
Abbreviations (US Terms)
- ch – chain
- sl st – slip stitch
- sc – single crochet
- hdc – half double crochet
- dc – double crochet
- inc – 2 sc in the same stitch
- sc2tog – single crochet 2 together
- sc3tog – single crochet 3 together
- BLO – back loop only
- MR – magic ring
- st(s) – stitch(es)
- rnd(s) – round(s)
Special stitch – sc3tog: Insert hook in next st, yarn over and pull up a loop. Repeat in each of the next 2 sts (4 loops on hook). Yarn over and pull through all 4 loops. This makes the petal tip.
Gauge and Checkpoints
Gauge: 18 sc and 20 rows = 4 in (10.2 cm) in single crochet. That is 4.5 sts and 5 rows per inch (2.5 cm).
Make one petal first. It is small and quick, and it tells you everything you need to know about your tension.
Checkpoints:
- Petal after Row 9: 2 in (5.1 cm) wide
- Finished petal: about 2.25 in (5.7 cm) wide x 2.8 in (7.1 cm) tall
- Base after Rnd 6: 2.4 in (6.1 cm) diameter
- Base after Rnd 12: 4.8 in (12.2 cm) diameter
- Base after border: 5.8 in (14.7 cm) diameter
- Inner cup: 2.5 in (6.4 cm) diameter x 1.6 in (4.1 cm) tall
If your pieces are too big: go down to a 3.75 mm or 3.5 mm hook. Loose stitches also make the petals floppy.
If your pieces are too small: go up to a 4.5 mm hook. Whatever hook you use, check that the cup still fits your tealight with a little room to spare.

Petals (Make 8)
Each petal is worked in rows from the narrow rounded bottom up to the pointed tip. Then one round of edging outlines the whole shape.
With Color A, ch 4.
Row 1: Sc in 2nd ch from hook and in each ch across, turn. (3 sts)
Row 2: Ch 1, inc in first st, sc in next st, inc in last st, turn. (5 sts)
Row 3: Ch 1, sc in each st across, turn. (5 sts)
Row 4: Ch 1, inc in first st, sc in next 3 sts, inc in last st, turn. (7 sts)
Row 5: Ch 1, sc in each st across, turn. (7 sts)
Row 6: Ch 1, inc in first st, sc in next 5 sts, inc in last st, turn. (9 sts)
Rows 7–9: Ch 1, sc in each st across, turn. (9 sts)
Checkpoint: the petal is 2 in (5.1 cm) wide across Row 9.
Row 10: Ch 1, sc2tog, sc in next 5 sts, sc2tog, turn. (7 sts)
Row 11: Ch 1, sc2tog, sc in next 3 sts, sc2tog, turn. (5 sts)
Row 12: Ch 1, sc2tog, sc in next st, sc2tog, turn. (3 sts)
Row 13: Ch 1, sc3tog. (1 st)
Do not fasten off. You now have 13 rows, about 2.6 in (6.6 cm) tall.
Edging Rnd: Ch 1. Work 12 sc down the side edge, 1 sc in the end of each of Rows 12 through 1. Work 1 sc in each of the 3 foundation ch loops across the bottom. Work 12 sc up the other side, 1 sc in the end of each of Rows 1 through 12. Work 3 sc in the sc3tog at the tip. Join with sl st to the first sc. (30 sts: 12 + 3 + 12 + 3)
Fasten off, leaving a 12 in (30.5 cm) tail for sewing. The edging makes the raised outline around each petal, and the 3 sc at the tip keep the point sharp.
Inner Cup (Make 1)
Work in continuous rounds. Place a marker in the first st of each round and move it up as you go.
With Color B:
Rnd 1: 6 sc in MR. (6 sts)
Rnd 2: Inc in each st around. (12 sts)
Rnd 3: Sc in next st, inc in next st 6 times. (18 sts)
Rnd 4: Sc in next 2 sts, inc in next st 6 times. (24 sts)
Rnd 5: Sc in next 3 sts, inc in next st 6 times. (30 sts)
Rnd 6: Sc in next 4 sts, inc in next st 6 times. (36 sts)
Checkpoint: the flat bottom is 2.4 in (6.1 cm) across.
Rnd 7: Sc in BLO of each st around. (36 sts)
This round turns the work upward. It leaves a ring of 36 unused front loops on the outside, which you will use to sew the cup to the base.
Rnds 8–14: Sc in each st around. (36 sts)
Sl st in the next st and fasten off, leaving a 16 in (40.6 cm) tail.
Checkpoint: the walls are 8 rounds, about 1.6 in (4.1 cm) tall. The circumference is 36 ÷ 4.5 = 8 in (20.3 cm), which gives a diameter of about 2.5 in (6.4 cm).
Base (Make 1)
The base is a flat circle worked in continuous rounds with Color A. The increases are staggered on odd rounds from Rnd 7 on, so the circle stays round instead of turning into a hexagon.
Rnds 1–6: Work as Inner Cup Rnds 1–6. (36 sts)
Rnd 7: Sc in next 2 sts, inc in next st, sc in next 5 sts, inc in next st 5 times, sc in next 3 sts. (42 sts)
Rnd 8: Sc in next 6 sts, inc in next st 6 times. (48 sts)
Rnd 9: Sc in next 3 sts, inc in next st, sc in next 7 sts, inc in next st 5 times, sc in next 4 sts. (54 sts)
Rnd 10: Sc in next 8 sts, inc in next st 6 times. (60 sts)
Rnd 11: Sc in next 4 sts, inc in next st, sc in next 9 sts, inc in next st 5 times, sc in next 5 sts. (66 sts)
Rnd 12: Sc in next 10 sts, inc in next st 6 times. (72 sts)
Checkpoint: the base lies flat and is 4.8 in (12.2 cm) across.
Do not fasten off if you want to work the border now while the base is still flat (see Border).
Make All Pieces
Before you start sewing, check that you have all 10 pieces:
- Color A, Lilac: 8 petals and 1 base
- Color B, Raspberry: 1 inner cup
Top-down layout (P = petal, C = cup):
          P1    P2
      P8            P3
            [ C ]
      P7            P4
          P6    P5
The cup sits on base Rnd 6. The petals stand on base Rnd 8, evenly spaced, and each one overlaps its neighbors along the sides.
Joining
Step 1 – Attach the cup. Center the cup on the base. Line up the 36 front loops left from cup Rnd 7 with the 36 sts of base Rnd 6. Using the Color B tail, whipstitch one front loop to one base st all the way around. Because you are matching 36 sts to 36 sts, the cup cannot twist or pucker.
Step 2 – Mark the petal positions. Base Rnd 8 has 48 sts. Divided between 8 petals, that is 6 sts per petal. Place a marker in every 6th st of Rnd 8.
Step 3 – Sew the petals. Each petal has 5 bottom edging sts to sew: the 3 sc across the foundation, plus the first row-end sc on each side. Stand the petal upright with the right side facing out. Whipstitch those 5 sts into the first 5 sts of its 6-st section. The 6th st stays open as a small gap, and the next petal’s side covers it. Work around in order from P1 to P8.
Step 4 – Tack the overlaps. The petals widen from about 1.1 in (2.8 cm) at the bottom to 2 in (5.1 cm) at Row 9. That is much wider than their 6-st share of the ring, so they overlap and flare outward. With a Color A tail, make one small tacking stitch where each petal overlaps its neighbor at about Row 6.
Tension: Sew snugly but don’t pull hard. Over-tight stitches pinch the petal bottoms and make the petals lean in against the cup.
Size checkpoint: the petal ring is about 5 in (12.7 cm) across at the tips. The cup opening stays 2.5 in (6.4 cm) wide and clear of petal edges.
Border
The scalloped border is worked into the 72 sts of base Rnd 12. It’s easiest to work it before joining, while the base is flat. If you work it after joining, start directly below the center of a petal.
Border gauge: Each scallop uses 9 base sts and covers about 2 in (5.1 cm) of the outer edge. Its depth is about 0.5 in (1.3 cm).
Border Rnd 1 (scallops): Sc in next st, skip next st, hdc in next st, 2 dc in next st, 3 dc in next st, 2 dc in next st, hdc in next st, skip next st, sl st in next st 8 times. Join with sl st to first sc.
Count per scallop: each scallop uses 9 base sts, working into 7 of them and skipping 2. Those 7 worked sts become 7 sts + 4 extra sts (from the 2 dc, 3 dc, 2 dc groups) = 11 sts.
Round total: 8 scallops x 11 sts = 88 sts.
Border Rnd 2 (outline): Ch 1, sl st loosely in each st around. (88 sts) Join and fasten off.
This round gives the scallops a firm, rope-like edge. Keep it loose, or the scallops will curl upward.
Why the math works: Rnd 12 has 72 sts, and 72 = 8 x 9. Each scallop uses exactly 9 sts, so the round ends cleanly with no partial repeat. The 8 scallops also match the 8 petals. Rnd 8 is 8 x 6 sts and Rnd 12 is 8 x 9 sts, so each scallop sits under one petal.
Final Blocking
- Lightly mist the whole holder until it is damp, not soaked.
- Lay the base flat and ease each scallop into an even curve.
- Pin the base edge out to 5.8 in (14.7 cm) across.
- Push the center of each petal out from the inside so it curves like a shallow spoon. For a deeper curve, hold the damp petal over an egg or a tennis ball for a minute.
- Pinch each tip to a sharp point.
- Set the tealight in its glass cup inside the inner cup to hold the cup round.
- Let it dry fully, 12 to 24 hours.
Final Quality-Control Checklist
- The base lies flat and is 5.8 in (14.7 cm) across
- All 8 scallops are the same size and evenly spaced
- Each petal has 30 edging sts and a sharp tip
- All petals are about 2.8 in (7.1 cm) tall
- The cup is centered and sewn down on all 36 sts
- The petals overlap evenly and lean outward at the same angle
- The glass tealight cup sits level and rises above the yarn
- All tails are woven in securely
Troubleshooting
Base ruffles: Your increases are too frequent for your tension. Go down a hook size for the base.
Base cups like a bowl: Your tension is too tight. Go up a hook size for the base only.
Floppy petals: Use a smaller hook and 100 percent cotton, then block the petals over a round object.
Rounded petal tip: Check that Row 13 is a true sc3tog with 3 sc worked into it in the edging.
Tealight doesn’t fit: Make the cup again with a hook one size larger.
Uneven scallops: Place a marker every 9 sts before you begin Border Rnd 1.
Care
Hand wash in cool water with mild soap, roll it in a towel to press out the water, and reshape it to dry. To remove wax drips, freeze the holder briefly and gently flake the wax away.
Final Notes
Here is the measurement chain from start to finish. A gauge of 18 sc and 20 rows per 4 in (10.2 cm) gives a 9-st petal that is 2 in (5.1 cm) wide, or 2.25 x 2.8 in (5.7 x 7.1 cm) with edging. The 36-st cup is 2.5 in (6.4 cm) across and sews to the 36 sts of base Rnd 6. The petals share the 48 sts of Rnd 8, 6 sts each. Rnd 12 reaches 72 sts and 4.8 in (12.2 cm), and 8 scallops of 9 sts each add 0.5 in (1.3 cm) all around, for a finished 5.8 in (14.7 cm) lotus.
Check your first petal, keep your tension steady, and your lotus will open evenly around its glow.
Happy crocheting!