

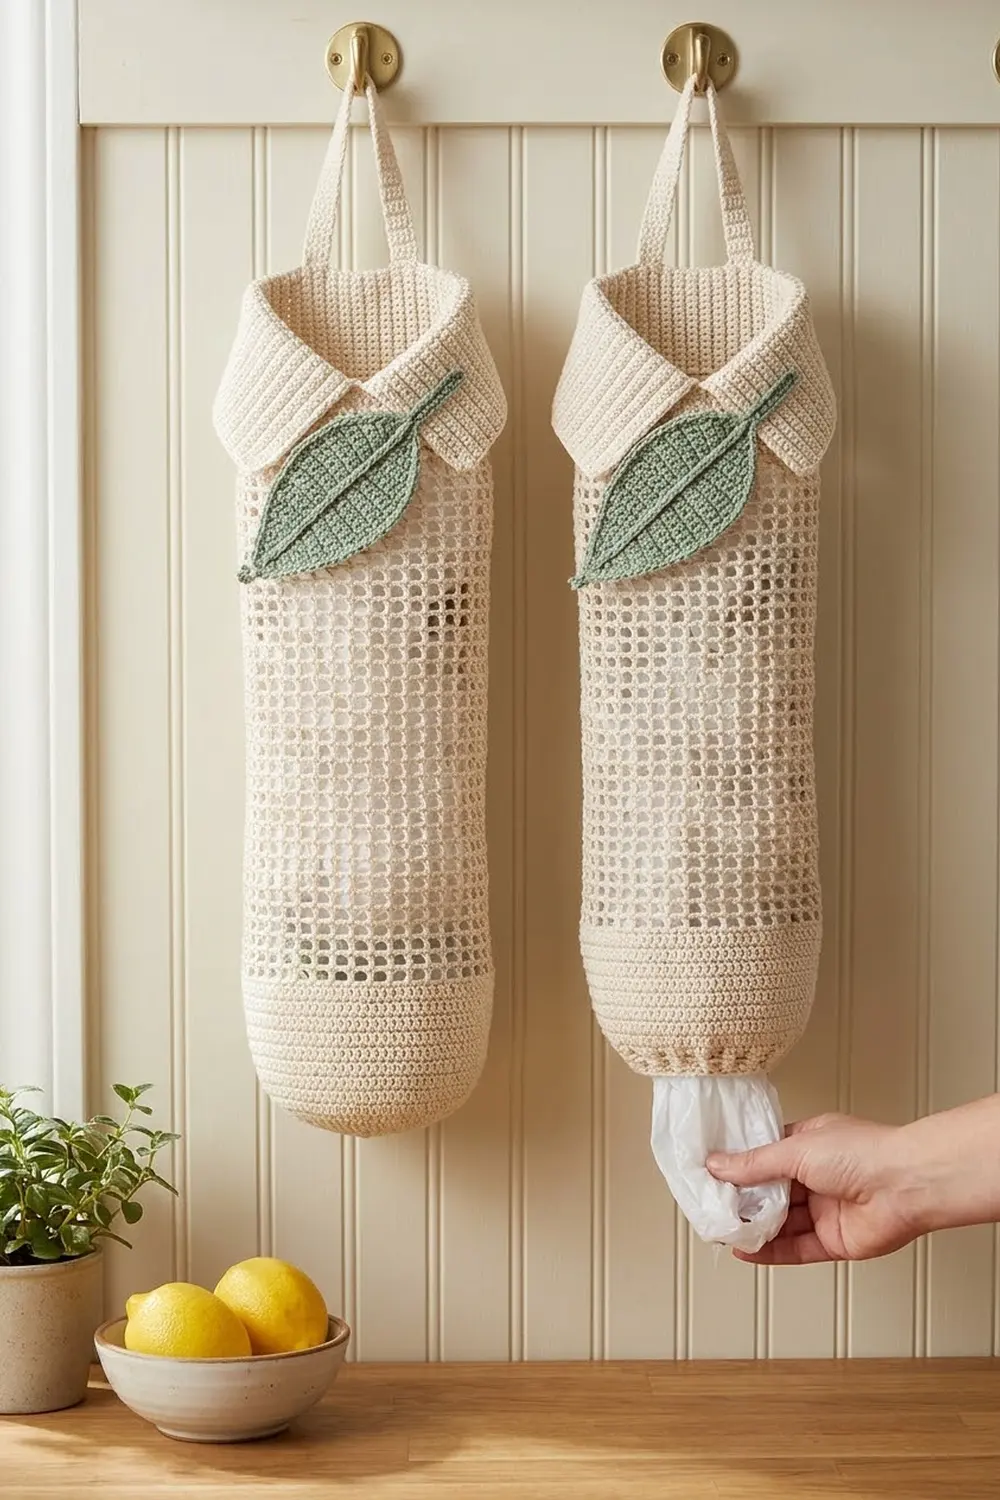
This bag holder gives your plastic bags a tidy home on the wall. The body is an open filet-mesh tube, so you can see how many bags are left. The bottom narrows to a small, firm opening, so you can pull out one bag at a time.
It’s all cream cotton except for one sage-green leaf. A solid, ridged collar folds over the top, and its ends cross at the front to make a soft lapel point. The leaf is sewn across that point, so the holder looks good enough to hang where people can see it.
The pattern uses US crochet terms. The finished holder is 6 in (15.2 cm) wide when flat and 16.5 in (41.9 cm) long, not counting the loop. With the loop it is 19.5 in (49.5 cm) long.
You work the holder from the bottom up in one piece. You start at the bag opening, increase to full width, and work 26 rounds of mesh. Then you change the top round to solid stitches, work a collar in rows, and fold it outward. Last, you add a hanging loop and sew on the leaf.
Finished Size and Construction
- Finished size: 6 in (15.2 cm) wide flat × 16.5 in (41.9 cm) long; 19.5 in (49.5 cm) with the loop
- Skill level: Easy / advanced beginner
- Terminology: US
- Yarn weight: Worsted (#4) cotton
- Hook: 5.0 mm (US H-8)
- Number of pieces: 1 holder body (with collar and loop) + 1 leaf appliqué
- Layout: One tube, worked in the round; the collar is worked in rows
- Body circumference: 12 in (30.5 cm), which is 48 stitches
- Size before edging: The bottom opening is 6 in (15.2 cm) around, so 3 in (7.6 cm) flat
- Edging depth: 2 rounds at the bottom opening, about 0.25 in (0.6 cm), and 1 round around the collar
The photo shows two holders side by side. They are identical, so for a pair, just follow this pattern twice.
Materials
Use a smooth worsted-weight cotton, either mercerized or plain. Cotton holds its shape and won’t stretch out under the weight of the bags. Acrylic will work, but the mesh sags more over time.
- Cream (main color): 120 g / 200 m
- Sage green (leaf): 8 g / 14 m
These amounts include an extra 15 percent or so for swatching and weaving in ends.
Tools:
– 5.0 mm (US H-8) crochet hook
– 4 stitch markers (1 in a contrast color)
– Tapestry needle
– Scissors
– Measuring tape
– Rust-proof pins
– Spray bottle and a rolled towel for blocking
Abbreviations (US Terms)
- ch – chain
- sl st – slip stitch
- sc – single crochet
- hdc – half double crochet
- dc – double crochet
- tr – treble crochet
- sp – space
- BLO – back loop only
- st(s) – stitch(es)
- rnd(s) – round(s)
- RS / WS – right side / wrong side
Special stitch – Mesh square: (dc, ch 1). Each dc goes into the dc below it, so every square is 2 stitches wide: 1 dc and 1 chain space.
Gauge and Checkpoints
- Single crochet: 16 sc × 16 rnds = 4 in (10.2 cm)
- Mesh: 8 squares × 8 rnds = 4 in (10.2 cm), so each square is 0.5 in (1.3 cm)
- Half double crochet in BLO: 16 hdc × 12 rows = 4 in (10.2 cm)
Make the leaf first as a test piece. It should measure 2.75 in (7.0 cm) long. If it does, your tension is about right. The mesh matters most, though, so check it early on the holder itself.
Checkpoints:
1. After Rnd 5: 48 sts. The tube is 6 in (15.2 cm) wide laid flat, and the band is 1.25 in (3.2 cm) tall.
2. After Rnd 11 (6 mesh rnds): The mesh is 3 in (7.6 cm) tall, and the width is still 6 in (15.2 cm).
3. After Rnd 31: The body is 14.25 in (36.2 cm) from the bottom edge.
4. After Rnd 32: The body is 14.5 in (36.8 cm) long.
5. After the collar: The collar is 4 in (10.2 cm) tall before folding.
If your holder is too big, go down one hook size (4.5 mm). If it’s too small, go up one size (5.5 mm). Don’t change the stitch count, because the mesh only works with exactly 48 stitches.

Pattern: Bottom Band
Join each round. Every round starts at the same spot, the center front. Put the contrast marker there and move it up each round.
Foundation: With cream, ch 24. Without twisting the chain, sl st into the first ch to form a ring.
Rnd 1: Ch 1, sc in each ch around, join with sl st to first sc. (24 sc)
Rnd 2: Ch 1, sc in next 3 sts, 2 sc in next st 6 times, join. (30 sc)
Rnd 3: Ch 1, sc in next 4 sts, 2 sc in next st 6 times, join. (36 sc)
Rnd 4: Ch 1, sc in next 5 sts, 2 sc in next st 6 times, join. (42 sc)
Rnd 5: Ch 1, sc in next 6 sts, 2 sc in next st 6 times, join. (48 sc)
These increases make the gentle taper at the bottom of the holder. The band is now 1.25 in (3.2 cm) tall and 6 in (15.2 cm) wide flat.
Pattern: Mesh Body
Rnd 6: Ch 4 (counts as dc + ch 1), skip next st, dc in next st, ch 1, skip next st 23 times, join with sl st to the 3rd ch of the beginning ch-4. (24 dc, 24 ch-1 sps = 24 mesh squares; 48 sts)
Here’s the count: the ch-4 and the skipped stitch use 2 stitches, and the 23 repeats use 46, for 48 in all.
Rnds 7–31: Ch 4 (counts as dc + ch 1), dc in next dc, ch 1 23 times, join to the 3rd ch of the beginning ch-4. (24 mesh squares)
That’s 26 mesh rounds in total, 13 in (33.0 cm) tall. Keep each dc right on top of the one below it. If your squares start leaning into diamonds, your chain-1s are too loose.
Rnd 32 (conversion round): Ch 1, sc in the same st as the join, sc in the next ch-1 sp, sc in next dc, sc in next ch-1 sp 23 times, join. (24 sc worked 1-per-dc + 24 sc worked 1-per-sp = 48 sc)
The body is now 14.5 in (36.8 cm) long.
Pattern: Crossover Collar
You work the collar in rows so its two ends can overlap at center front.
Row 1 (RS): After joining Rnd 32, ch 6. Hdc in the 2nd ch from hook and in the next 4 ch. That makes a free tab of 5 sts. Then hdc in the first sc of Rnd 32 (the same st as the join) and in each sc around. Do not join. Turn. (5 tab hdc + 48 hdc = 53 hdc)
Rows 2–12: Ch 1 (does not count as a st), hdc BLO in each st across, turn. (53 hdc)
Working in the back loop makes the fine horizontal ridges on the collar. After Row 12, the collar is 4 in (10.2 cm) tall. The tab end overlaps the other end by 1.25 in (3.2 cm). Don’t fasten off yet.
Border: Collar Edging and Bottom Opening
Edging gauge: The hdc rows are 3 rows per inch, and sc edging is 4 sts per inch. So along the row ends, work 4 sc for every 3 rows.
Collar Edging Rnd: Ch 1, then work around the collar in this order:
- Short end A (the end at center front, 12 rows): 16 sc
- Long top edge (Row 12): 3 sc in the first st, sc in the next 51 sts, 3 sc in the last st. (53 sts worked + 2 extra at each of 2 corners = 57 sc)
- Short end B (tab end, 12 rows): 16 sc
- Tab underside (the 5 foundation ch): 3 sc in the first ch, sc in the next 4 ch. (5 ch worked + 2 extra at the corner = 7 sc)
Sl st into the body at the base of the tab, then fasten off. Total: 16 + 57 + 16 + 7 = 96 sc.
Why the math works: 12 rows ÷ 3 × 4 = 16 sc on each end, which keeps the ends flat and stops ruffling. Each corner stitch is already counted once in the long edge or the tab, and only the 2 extra sc per corner are added. That way no corner gets counted twice.
Bottom Opening Edging: With the opening facing you, join cream at center front in a foundation ch loop.
- Rnd 1: Ch 1, sc in each of the 24 foundation ch loops, join. (24 sc)
- Rnd 2: Sl st loosely in each sc around. (24 sl st) Fasten off.
Working exactly one sc per chain keeps the opening at 6 in (15.2 cm) around. That’s snug enough to hold the bags in but easy to pull one out. The slip-stitch round makes a firm, slightly rolled edge.
Fold the collar: Fold the collar down over the outside of the body so 2 in (5.1 cm) hangs over. Fold the top corner of the tab end diagonally outward to make the lapel point. Tack it down with a few cream stitches.
Hanging Loop: Find the center back, 24 sts from the center-front marker. Join cream with a sl st through both layers of the fold. Ch 24 (about 6 in / 15.2 cm), then sl st in the same place to make a loop. Ch 1, work 32 sc over the chain loop, and sl st at the base. Fasten off and weave the tail through both layers twice for strength. The loop stands 3 in (7.6 cm) tall.
Leaf Appliqué
With sage green, ch 12.
Side 1: Starting in the 2nd ch from hook, work: sc, hdc, dc, dc, tr, tr, tr, dc, dc, hdc. That’s 10 sts. Work 3 sc in the last ch to go around the base. (13 sts)
Side 2: Working along the other side of the same 10 chains: hdc, dc, dc, tr, tr, tr, dc, dc, hdc, sc. (10 sts; 23 sts total)
Tip picot: Ch 2, sl st in the 2nd ch from hook, then sl st into the tip. Fasten off, leaving a 10 in (25.4 cm) tail.
Vein: With the tail, surface sl st down the center of the leaf. Stop 0.25 in (0.6 cm) before the base. The finished leaf is 2.75 in (7.0 cm) long and 1.25 in (3.2 cm) wide.
Attach: Place the leaf at an angle across the lapel fold, with the tip pointing up and out. Pin it, then whipstitch around the edge, going through the outer collar layer only.
Final Blocking
- Weave in all ends through the solid stitches, not the mesh.
- Spray the holder until it’s damp, not soaked.
- Stuff the tube with a rolled towel so it holds its round shape.
- Straighten the mesh squares. Check that the flat width is 6 in (15.2 cm) and the body is 14.5 in (36.8 cm) long.
- Press the collar fold and lapel point lightly with your fingers, and pin the leaf flat.
- Let it dry completely, then take out the towel.
Final Quality-Control Checklist
- Rnd 5 has 48 sc, and each mesh round has 24 squares.
- In all 26 mesh rounds, the dc line up in straight vertical columns.
- Rnd 32 has 48 sc, and each collar row has 53 hdc.
- The collar edging has 96 sc, and the bottom opening has 24 sc.
- The tab overlaps by 1.25 in (3.2 cm) at center front.
- The loop is centered at the back and goes through both layers.
- The holder is 16.5 in (41.9 cm) long and 6 in (15.2 cm) wide.
Troubleshooting
- The mesh spirals or leans: Join every round into the 3rd ch of the ch-4, not the 4th.
- The squares are taller than they are wide: Your dc are too loose. Go down a hook size or snug up your yarn-overs.
- The bottom opening is too tight: Redo edging Rnd 2 more loosely, or leave it out.
- The collar ruffles at the ends: You worked too many sc along the row ends. Stick to 16 per end.
- The collar won’t stay folded: Tack the fold to the body at each side with cream yarn as well.
- The holder sags when it’s full: Switch to cotton, or go down one hook size.
Care
Hand wash, or machine wash cold in a mesh bag. Reshape while damp and lay flat to dry.
Final Notes
Each measurement builds on the last. The 24-st foundation ring makes a 6 in (15.2 cm) opening. Five sc rounds increase to 48 sts, which is 12 in (30.5 cm) around and 6 in (15.2 cm) flat. Then 26 mesh rounds add 13 in (33.0 cm), and the conversion round brings the body to 14.5 in (36.8 cm). The 4 in (10.2 cm) collar folds down 2 in (5.1 cm), so the holder ends up 16.5 in (41.9 cm) long. The 3 in (7.6 cm) loop brings it to 19.5 in (49.5 cm). If every checkpoint matches, the leaf, lapel, and loop will all land where they should.
Happy crocheting!