

This lacy panel has six butterflies in two columns of three, each one sitting in its own square frame of green chain mesh. Each butterfly has two lilac upper wings with a small open slit in the middle, two round green lower wings, a slim green body, and two curled antennae.
Two colors are used throughout. Lilac is for the upper wings, and a soft spring green is for everything else: lower wings, bodies, frames, joins, and border. The look is light, airy, and a little vintage. It works as a doily, a table mat, or a wall piece.
The pattern uses US crochet terms. The finished panel measures 11 in x 16 in (27.9 cm x 40.6 cm) after blocking.
Each block is built from the center out. First you crochet and sew the butterfly (two upper wings, two lower wings, one body). Then you work three rounds of green mesh around it to square it off. Six blocks are joined in a 2 x 3 layout with a flat slip-stitch join, and a three-round picot border finishes the edge.
Finished Size and Construction
- Finished size: 11 in x 16 in (27.9 cm x 40.6 cm)
- Skill level: Intermediate
- Terminology: US crochet terms
- Yarn weight: Sport (#2), mercerized cotton
- Hook: 3.0 mm (US C/2 or D/3)
- Number of pieces: 6 identical butterfly blocks
- Layout: 2 blocks wide x 3 blocks tall
- Block size: 5 in x 5 in (12.7 cm x 12.7 cm), 27 sts per side
- Size before border: 10 in x 15 in (25.4 cm x 38.1 cm)
- Border depth: 0.5 in (1.3 cm) on every side
Materials
Use a smooth, mercerized sport-weight cotton of about 150 m per 50 g (164 yd per 1.75 oz). Mercerized cotton gives crisp stitches and takes blocking well, which suits open mesh. Pick a lilac and a green with clear contrast so the wings stand out against the frames.
- Color A, Lilac (upper wings): 20 g, about 60 m (66 yd)
- Color B, Spring Green (lower wings, bodies, frames, joining, border): 75 g, about 225 m (246 yd)
The quantities include a margin of roughly 15 percent for your gauge swatch and tension differences.
Tools:
- 3.0 mm crochet hook
- Tapestry needle
- Locking stitch markers (at least 12, to mark the frame anchor points)
- Rust-proof pins and a blocking mat
- Spray bottle
- Small scissors
Abbreviations (US Terms)
- ch – chain
- sl st – slip stitch
- sc – single crochet
- hdc – half double crochet
- dc – double crochet
- st(s) – stitch(es)
- sp – space
- sk – skip
- RS – right side
- beg – beginning
Special stitch – picot: Ch 3, then sl st in the 3rd ch from the hook.
Gauge and Checkpoints
Stitch gauge: 27 sc = 5 in (12.7 cm), which is about 5.4 sc per inch.
Make one complete block before you start the others. Then use these checkpoints:
- Upper wing: about 1.75 in x 1.25 in (4.4 cm x 3.2 cm)
- Lower wing: about 1.25 in (3.2 cm) across
- Body: about 2 in (5.1 cm) long
- Assembled butterfly: about 3.5 in (8.9 cm) wide x 3.25 in (8.3 cm) tall
- After frame Round 1: about 4 in (10.2 cm) across
- After frame Round 2: about 4.6 in (11.7 cm) across
- After frame Round 3: 5 in x 5 in (12.7 cm x 12.7 cm) once pinned
If your block comes out larger than 5.1 in (13.0 cm), go down 0.25 mm in hook size. If it comes out smaller than 4.9 in (12.4 cm), go up 0.25 mm. Don’t change the stitch counts. Every number below depends on 27 sts per side.
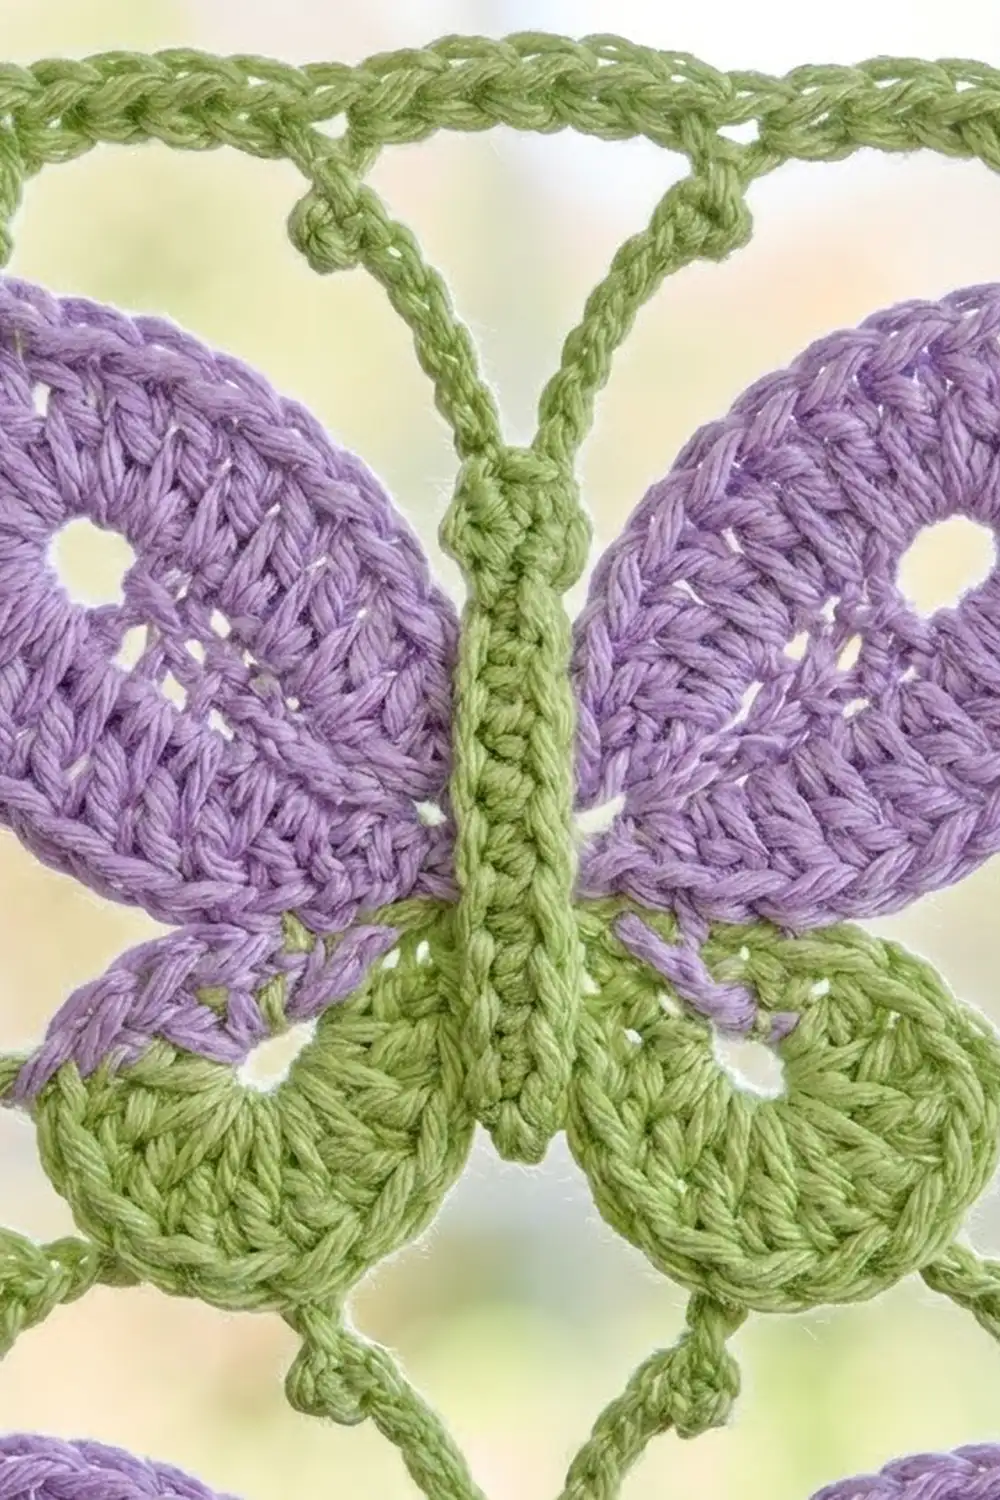
Butterfly Block
Upper Wing (make 2 per block, Color A)
Ch 10 and sl st in the first ch to make a long ring. Lay the ring flat so it looks like a narrow slit. This slit becomes the eyelet in the middle of the wing.
Round 1: Ch 1, work 24 sc into the ring, sl st to the first sc. (24 sc)
As you work, keep the ring pressed flat so that about 12 sc sit along each side of the slit.
Round 2: Ch 1, sc in each of the first 2 sts, hdc in each of the next 2 sts, dc in each of the next 6 sts, 2 dc in each of the next 4 sts, dc in each of the next 6 sts, hdc in each of the next 2 sts, sc in each of the last 2 sts, sl st to the first sc. (28 sts: 4 sc, 4 hdc, 20 dc)
The sc end is the narrow point of the wing, which goes next to the body. The 8 dc from the increases make the rounded outer tip. For reference later, the outer tip is st 15 of this round, and the top edge is st 8. Fasten off and leave a 10 in (25.4 cm) tail for sewing.
Lower Wing (make 2 per block, Color B)
Make a magic ring.
Round 1: Ch 3 (counts as dc), 11 dc in the ring, sl st to the top of the beg ch-3. (12 dc)
Round 2: Ch 1, (sc in next st, 2 sc in next st) 6 times, sl st to the first sc. (18 sc)
Fasten off and leave a 10 in (25.4 cm) tail.
Body and Antennae (make 1 per block, Color B)
Ch 12.
Body: Sc in the 2nd ch from the hook and in each of the next 9 ch, 3 sc in the last ch (this is the head end), then work along the other side of the foundation and sc in each of the next 10 ch. Sl st to the first sc. (23 sc)
The skipped ch at the start makes a small point, which is the tail.
Antennae: Sl st in the center sc of the 3-sc head group. Ch 7, sl st in the 3rd ch from the hook to make a tiny knob, sl st in each of the next 4 ch, then sl st back into the head st. Repeat once more for the second antenna. Fasten off.
Assembly
Lay the body vertically with the head at the top. Tuck the narrow (sc) end of each upper wing under the body, angled up and out so the eyelet slits point toward the top corners. Tuck each lower wing under the body just below the upper wing, so it overlaps the bottom of the upper wing by about 0.25 in (0.6 cm). Use the tails to whipstitch everything to the back of the body. Weave in the ends.
Frame (Color B)
Before you start, mark these 12 anchor points clockwise, starting at the left antenna:
- Left antenna knob
- Center sc of the head
- Right antenna knob
- Right upper wing, top edge (st 8)
- Right upper wing, outer tip (st 15)
- Right lower wing, outer side
- Right lower wing, bottom
- Tail point of the body
- Left lower wing, bottom
- Left lower wing, outer side
- Left upper wing, outer tip (st 15)
- Left upper wing, top edge (st 8)
Round 1: Join with sc at anchor 1. Then work: ch 5, sc at anchor 2; ch 5, sc at anchor 3; ch 7, sc at anchor 4; ch 5, sc at anchor 5; ch 5, sc at anchor 6; ch 7, sc at anchor 7; ch 5, sc at anchor 8; ch 5, sc at anchor 9; ch 7, sc at anchor 10; ch 5, sc at anchor 11; ch 5, sc at anchor 12; ch 7, sl st to the first sc. (12 sc, 8 ch-5 side loops, 4 ch-7 corner loops)
Label the loops L1 to L12 in order. L1 runs from anchor 1 to anchor 2. The ch-7 loops (L3, L6, L9, L12) are the corners.
Round 2: Sl st into L1. Ch 1, sc in L1, ch 7, sc in L2, ch 4, (3 dc, ch 3, 3 dc) in L3, ch 4. Sc in next loop, ch 7, sc in next loop, ch 4, (3 dc, ch 3, 3 dc) in next corner loop, ch 4. Repeat from * to * 2 more times, then sl st to the first sc. (24 dc, 8 sc, 4 ch-7 sps, 8 ch-4 sps, 4 ch-3 corner sps)
Round 3: Ch 1. Sc in sc, 7 sc in ch-7 sp, sc in sc, 4 sc in ch-4 sp, sc in each of the next 3 dc, 3 sc in corner ch-3 sp, sc in each of the next 3 dc, 4 sc in ch-4 sp. Repeat from * to * 3 more times, then sl st to the first sc. (104 sc)
Count check: Each repeat makes 1 + 7 + 1 + 4 + 3 + 3 + 3 + 4 = 26 sc, and 4 repeats make 104. On each side, the center sc of the corner 3-sc group is the corner st. One side, counting both corner sts, is 1 + 25 + 1 = 27 sts. Four sides x 27 = 108, minus the 4 corner sts that are shared = 104. ✓
Fasten off, weave in the ends, and pin the block out to 5 in x 5 in (12.7 cm x 12.7 cm).
Make All Pieces
Make 6 complete blocks. In total, you’ll need:
- Color A: 12 upper wings
- Color B: 12 lower wings, 6 bodies with antennae, 6 frames
Layout (antennae point up in every block):
[ B1 ][ B2 ]
[ B3 ][ B4 ]
[ B5 ][ B6 ]
Lightly steam or spray-block every block to 5 in (12.7 cm) square before joining. Blocks that are all the same size join much more evenly.
Joining
Method: Flat slip-stitch join in Color B, worked from the RS through the inner loops.
Lay two blocks side by side with the RS facing up and the edges touching. Starting at a corner st, insert the hook through the inner loop of the matching st on each block, then sl st. Join stitch to stitch: 27 sts on one block to 27 sts on the other, corner st to corner st. Don’t skip any sts, and don’t add any.
- Join B1 to B2, B3 to B4, and B5 to B6 to make three rows. Each seam is 27 sl sts.
- Join the rows together along their long edges. Each of these seams is 54 sl sts (27 + 27). Work straight through the four-way corner intersections.
Tension: Keep your sl sts as loose as the sc in Round 3. If the seam ripples, your sl sts are too tight. A size larger hook just for joining helps.
Size checkpoint: The joined panel should measure 10 in x 15 in (25.4 cm x 38.1 cm). The short edges have 2 x 27 = 54 sts and the long edges have 3 x 27 = 81 sts. The 27 count already includes each block’s corner sts, so no seam sts are added.
Border (Color B)
Border gauge: The border keeps the block gauge of 5.4 sc per inch. Round 1 should lie flat at 10.4 in x 15.4 in (26.4 cm x 39.1 cm).
Round 1 (trim): Join with sc in the st just after any panel corner st. Sc in each st around, and work 3 sc in each of the 4 panel corner sts. Sl st to the first sc.
- Short side: 54 (worked 1 per existing st) + 2 (extras from the corner groups) = 56 sts, counting both corner sts
- Long side: 81 (worked 1 per existing st) + 2 (extras) = 83 sts, counting both corner sts
- Total: the original 266 edge sts (2 x 54 + 2 x 81 − 4 shared corners) + 8 corner extras = 274 sc. ✓
Round 2 (mesh): Sl st in each st up to the center sc of the next corner group. (Sc, ch 3, sc) in the corner st, ch 3, sk 1, sc in next st, then (ch 3, sk 2, sc in next st) across until 2 sts remain before the next corner st, ch 3, sk 1. Repeat from * to * around. Sl st to the first sc.
- Short side: 17 repeats of (ch 3, sk 2, sc) = 19 ch-3 loops between the corners
- Long side: 26 repeats = 28 ch-3 loops between the corners
- Total: 2 x 19 + 2 x 28 + 4 corner loops = 98 ch-3 loops, and 98 sc
Round 3 (picot): Sl st into the next loop. In each side loop, work (2 sc, picot, sc). In each corner loop, work (2 sc, picot, 2 sc). Sl st to the first sc and fasten off. (298 sc, 98 picots)
Why the math works: Round 2 uses the corner st, sk 1, sc, then repeats of 3 sts, then sk 1 before the next corner. That means a side count minus 5 has to divide evenly by 3. Short side: 56 − 5 = 51 = 17 x 3. Long side: 83 − 5 = 78 = 26 x 3. Both come out even, so every side ends exactly on its corner. Round 3 puts 3 sc in each 3-ch loop, so it lies flat without ruffling.
Final Blocking
- Weave in all remaining ends along the green mesh, never through the lilac wings.
- Soak the panel in cool water for 10 minutes, then press out the water gently in a towel. Don’t wring it.
- Pin the panel to 11 in x 16 in (27.9 cm x 40.6 cm), starting at the four outer corners.
- Pin along each seam line to keep the blocks square at 5 in (12.7 cm).
- Open each picot and the corner loops with a pin.
- Shape each upper wing so its eyelet slit lies open and the rounded tip is smooth.
- Let it dry completely, about 24 hours, before unpinning.
Final Quality-Control Checklist
- Every block shows 27 sts per side in Round 3.
- All butterflies face the same direction, with antennae up.
- The upper wing eyelets are open and centered.
- The lower wings overlap the upper wings evenly on both sides.
- The seams are flat, and there’s no puckering at the four-way intersections.
- Border Round 1 has 56 / 83 / 56 / 83 sts.
- Border Round 2 has 19 / 28 / 19 / 28 loops plus 4 corner loops.
- The finished panel measures 11 in x 16 in (27.9 cm x 40.6 cm).
- No ends are visible on the RS.
Troubleshooting
- Wing eyelet closes up: You pulled Round 1 too tight around the ring. Keep the ring flat and spread the sc evenly, 12 per side.
- Wing cups instead of lying flat: The 2-dc increases are bunched together. Make sure they’re spread over 4 sts at the rounded end.
- Frame loops sag: Your chains are loose. Go down 0.25 mm for Round 1 only.
- Block corners are rounded: Pin the ch-3 corner sp sharply when blocking. Check that Round 3 has exactly 3 sc in each corner.
- Panel is wavy after joining: Your sl sts are too tight. Remove the seam and rejoin with a larger hook.
- Border ruffles: Check that you skipped 2 sts between the sc in Round 2.
Care
Hand wash in cool water with mild soap and dry flat, pinning it back into shape if needed. Mercerized cotton can be pressed lightly under a cloth on a warm setting.

Final Notes
Every measurement in this panel builds on the one before it. The butterfly is 3.5 in (8.9 cm) wide, and three frame rounds bring each block to 5 in (12.7 cm) with 27 sts per side. Six blocks in a 2 x 3 layout make 10 in x 15 in (25.4 cm x 38.1 cm), with 54 and 81 edge sts. The three-round border adds 0.5 in (1.3 cm) on each side, for a finished 11 in x 16 in (27.9 cm x 40.6 cm). If your first block measures true, the rest will follow.
Happy crocheting!